In most city apartments, heating pipes have not been changed for decades. The heating network is very worn out. That is why in many private houses and apartments, even with the heating turned on at full strength, it is quite cool. The fault is the deterioration of the pipes. Many people change them even in new high-rise buildings. Changes are also made in houses.
Instructions for replacing heating pipes
Why do you need to change pipes?
Traditional heating systems made of steel pipes and cast iron radiators are becoming obsolete not only morally.
The main disadvantages of such systems are:
- the tendency of steel and cast iron to corrosion - after many years of operation, a leak may occur from the pipeline;
- “overgrowth” with calcium salts and significantly low efficiency, littering of radiators with rust;
- inability to bleed air from the radiators in the apartment.
Old wiring is often not done according to the design or the design was not well thought out - as a result, the room is cold. The presence of air in the coolant also creates inconvenience in the form of cold radiators and noisy risers.
When is the best time to replace pipes?
A good time to replace your heating is summer. There is no coolant in the system and neighbors in an apartment building will not complain. There is time to purchase materials, think through everything, and complete the work carefully and without haste.
But if a leak occurs and repairing the heating pipes in the apartment is impossible or ineffective (it is impossible to close many rusty places with clamps), then there is nowhere to go - we replace them at any time of the year.
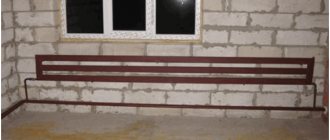
It is better to replace heating pipes in the summer
First steps in the event of an emergency
How to wrap a heating pipe? If you have a couple of clamps with rubber seals in stock at home, you can prevent some emergency situations. In the event of an accident, the most important thing to do is to shut off the coolant supply to the area where the heating pipe is leaking.
Covering the heating riser of a multi-storey building
You will need to stop the heating boiler, turn off the pump and turn off the necessary taps and valves. The clamp will solve the problem temporarily, so repairs will still be inevitable. Before you begin the repair, you will need to prepare the necessary materials and tools, turn off the heating, turn off all taps and drain the water from the system. Depending on the material from which the pipes are made, repairs can be carried out in various ways.
Material selection criteria
When choosing heating pipes, you need to pay attention to the following issues:
- The internal diameter of the pipes, which determines the passage of water.
- The power of the heating boiler and the type of energy used, the size of the heated room.
- Type of heating (closed or open). The characteristics also depend on this.
- Method of laying contours. That is, a conventional system is installed or hidden in the walls or floor. And this applies not only to the underfloor heating system. Many owners do hidden wiring when using conventional convectors and radiators.
- Methods of movement used in the heating system: forced or natural. This is reflected in the cross-sectional dimensions of the highways.
- The maximum heating temperature of the coolant, the pressure created in the heating system.
- Pipe installation methods.
After all the questions regarding the selection conditions have been answered, you need to decide on the optimal pipe material.
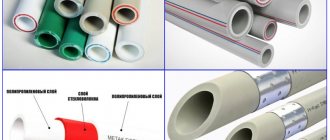
In specialized stores, manufacturers present pipes made from the following materials:
- metal is steel, stainless steel or copper;
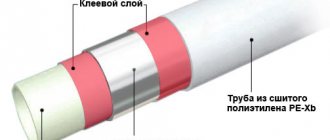
- polymers – PP (polypropylene), PEX and PERT (cross-linked polyethylene);
- metal-plastic - aluminum and plastic are used for production.
In order not to make a mistake when choosing pipes for a heating system, you need to understand their main characteristics. Then it is easier to draw conclusions about their suitability for the planned operating conditions.
Replacing heating pipes in an apartment has its price
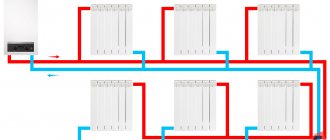
Connecting radiators
The modern building materials market is distinguished by a wide selection of radiators: aluminum, bimetallic, copper, traditional cast iron, etc., of all shapes, colors and sizes that can harmoniously fit into any interior.
Most often, batteries are installed under a window opening, at an equal distance from the floor and window sill, and at a distance of 5-10 cm from the wall. This allows you to evenly distribute thermal energy throughout the room, as well as eliminate the unpleasant effect of “crying” windows, shifting the dew point.
Radiators are suspended on special brackets, after which they are checked for level. Correctly set horizontal line will have a positive effect on flow and reduce air accumulation. To increase heat transfer, the wall behind the radiator can be additionally shielded.
Next, pipes made of the selected material are connected to the batteries, the necessary shut-off elements, plugs, Mayevsky taps, etc. are connected.
Upon completion of the required installation stages, air is bled from the finished heating system and a leak test is carried out. To do this, coolant is supplied to the system, and this should be done extremely carefully, avoiding the possibility of water hammer. The joints are carefully examined for leaks. If they are identified, the problematic connection will have to be redone.
Installation and replacement stages
Required tools and materials
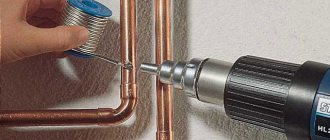
In addition to a large piece of pipe, it is desirable to have a welding machine and the appropriate skills in your hands.
Skills in welding sealed seams together with the mirror are required. Gas welding makes it easier to work in difficult conditions.
If there is welding, you need welds - short and long threads, shut-off valves and radiators will fit them.
In addition, you need:
- 3 locknuts, one per radiator;
- 3 drives - one each for the jumper and liner;
- 3 valves DN20.
The valves will, in various positions, block the flow of water through the jumper or direct all the water to the heating device. Or limit the passage of the battery when the jumper is open.
The valves are exclusively ball valves. It’s better to forget about screw valves.
As an option, you can install a thermal head or throttle on one of the connections. Very reliable, hassle-free and convenient design. When assembling by hand, you will have to purchase a die with a lock and turbine and a steel cutting circle. All straight sections with threads will be completed on site. You will need all the listed parts: 2 tees (brass or cast iron) and 2 couplings. The threads must be cut in a vice.
Replacement of pipes requires certain tools
Reset risers
In houses with bottom filling, the risers are connected in pairs. You will have to find out exactly how the riser of interest is connected. An easy way to find out is to go to a top floor apartment and look at the lintels. Top pouring means that you will have to turn off one valve in the attic and in the basement.
How to find valves: follow the entrances - in the basement the stairs are always visible. If the required entrance is found, finding out the position of the valve is a simple matter. All valves are closed, then the vents are opened or the plugs are unscrewed.
Wait for the water to drain to ensure that the fittings are fully functional. If there are relief valves instead of plugs, starting and resetting will be easier.
Turning off the riser during the heating season is only possible if there is a passage to the upper apartment.
If no one lives in it, then you will not be able to start the heating by bleeding the air.
A simple way to disassemble heating devices is to cut off their connections with a turbine. Then the locknuts and a piece of liner are unscrewed from the radiator cap. Two factors depend on cutting the riser: relations with neighbors below and above. It makes sense to replace risers through the ceilings. Corrosion most quickly destroys the pipe inside the ceiling. You need to cut the pipe in the place where you can weld the finished one or trim the thread on it. Preferably not close to the wall or floor. A grinder is convenient for chamfering and cutting off the riser before trimming the threads.
The first step is to reset the risers
Thread cutting
But cutting threads for the first time can be quite difficult.
What to take into account:
- The chamfer is removed from the pipe using a turbine or file and an entrance is made for the die.
- The holder with the die is installed on the pipe with the long side. This is necessary so that the die is strictly perpendicular to its axis.
- Short threads are cut on the riser - no more than 5 threads.
- When the die finds the pipe, you need to squeeze the holder with the maximum available force.
- The riser itself must be held with a key after the first cut thread. The force is directed in such a direction as to compensate for the rotation of the die at the moment. The situation of tearing off threads from the radiator lower or higher up the riser is quite possible.
- Threads are cut clockwise. The force directed towards the key goes in the opposite direction.
The exception is a convector installed for welding. You will not tear off a pipe welded to the convector. There is no need to hold the riser when cutting threads.
Long threads are cut off on the connections to the radiator (you will have to fit locknuts and radiator plugs onto them) and on the outlet in the jumper. When cutting, the pipe is clamped in a vice so as not to crush or damage the already cut threads.
The next stage is threading the heating pipes
Assembling risers and connecting radiators
Cut pipes with threads cut on both sides are passed through the ceilings and connected with couplings to the threads on the riser.
Winding - linen with silicone sealant or red thread. Good results from polymer thread too. The price of winding is much higher, but for one-time work you can buy it.
Linen ensures tightness. Silicone protects against fading and rotting. Then tees are screwed onto the threads. The gap between the threads directed towards the heating device is exactly half a meter along their axes.
The next valves to be screwed into the tees are the valves with female-female threads with small pipes or male-female threads. Long pipes are screwed into the radiator shut-off valves - pipes with a long thread at one end and a short length at the other. You immediately need to push the stop of the radiator cap and locknut onto them.
The jumper is mounted in the same way as any drive.
Then the radiator is connected. It is hung on brackets so that the axes of the threads coincide with the axes of the eyeliners. Next, pre-wound plugs are driven into it. Same with locknuts.
If welding is available, you can get by with a small number of threads.
After cutting the threads, you should connect the pipes to the radiator
Pressure testing and first launch
There is only a little work left: we need to start the riser and test the structure under pressure, resuming movement in it.
We start with tests. At this stage, it is desirable to have an assistant who, if there is a leak, will inform you about it in the simplest way - by tapping on the riser or by calling the phone.
Open the valve on the jumper and close all the valves leading to the radiator. This way we limit the number of threads that are under pressure during the first start-up. We close the vents at the bottom or tighten the plugs. Open the valve on the new riser a little.
As soon as the water in the open valve subsides, the bottling pressure in the risers can be considered equal. The valves on the risers (in the case of top filling - in the attic) open at full strength. Then - a visual inspection: upon arriving at the apartment, we open the valves on the supply lines (slowly, allowing the radiator to fill with water without consequences) and carefully inspect all the threads for leaks.
If there are screw valves on the risers, open the valve where the arrow from the filling to the apartments is installed. By opening another standing valve, you can tear the valve away from the stem.
Now all that remains is to bleed the air and begin moving.
How to do it:
- In houses with bottom filling, in an apartment on the top floor, open the Mayevsky tap on the jumper between the risers. When water flows from the tap, do not leave: air bubbles may remain in the radiators and be delayed near the vent. Only a heated riser indicates that the movement has definitely begun.
- Top filling does not require active action: the air lock will go into the expansion tank in the attic. If its volume is small, it is better not to be lazy and open the air vent on the top of the tank.
Pressure testing of the heating system
Prices for crimping machine
crimper
Using glue
Holes of small and medium sizes, cracks can be sealed. This option is temporary and is only suitable so as not to drain water from the riser or deprive the room of a heat source. After the heating season, the aluminum radiator must be removed in order to carry out high-quality repairs.
You can seal the hole using:
- Epoxy glue.
- Cement.
- A solution called “cold welding”.
Repairing holes with epoxy glue
To use epoxy resin glue, you need to prepare fiberglass or thick fabric. Since any of these materials must be wrapped around the radiator, the use of such adhesive is limited. After all, not every place can be wrapped easily and tightly. For some versions of aluminum radiators, this method is not suitable at all.
To seal holes or cracks:
- Cut the fabric into long narrow strips.
- Clean the area from which water is flowing. That is, remove all paint that has peeled off and all particles that are easily removed. This is done with a spatula. Next, take a brush with metal bristles and clean the surface. There should be pure metal left. It happens that a crack appears in a place where it is impossible to reach with a brush. An iron cable can help in this situation. It is pushed through the desired part of the radiator and pulled by the ends one by one, cleaning the desired area. This area is then dried.
- Apply glue to the treated area and wrap it with cloth.
- Apply glue to the fabric and wind another turn. This should be done until there are 4-5 turns. No glue is applied to the top layer of fabric.
- Secure the fiberglass using clamps or wire.
- Wait for the glue to dry. It dries from 2 hours to 3 days. If the room temperature is 20-25 °C, then it will dry in 2-3 hours.
To enhance the properties of the glue, you can add aluminum or bronze powder to it. Such powder is obtained by grinding off an unnecessary aluminum or bronze part with a rasp. Before use, the glue and powder must be mixed well.
Cracks are repaired in the same way using cement. However, medical bandages should be used instead of cloth. They need to be soaked in the solution and wound around the radiator.
We use “cold welding”
It is very convenient for sealing cracks and holes. This is a putty that looks like plasticine. There are two types:
- Single color.
- Two-color.
The first type is easier to work with, since you need to cut off the desired piece and knead it with your hands. You should wear gloves on your hands, because the putty is chemically active and can harm the skin.
Two-color cold welding must be mixed until a homogeneous solution appears. It becomes sticky while mixing.
The fight against holes using “cold welding” is carried out as follows:
- Clean the damaged area from dirt and paint.
- Knead the cut piece of “cold welding”.
- Apply the solution to the hole and rub it in (this is done with a metal spatula). To prevent the putty from remaining on the spatula, it must be moistened with water.
- If after grouting the cork begins to come out (a bubble forms, which then bursts), it must be rubbed again with a spatula. This may have to be done before the “cold weld” has completely dried. It dries in 5 minutes.
- Secure the plug with a clamp or rubber.
You can also seal the hole with heat-resistant sealant. However, you need to use the right sealant because there are acidic sealants that can corrode aluminum. Practitioners advise using neutral solutions.
Possible errors and problems
The most common mistakes when replacing heating:
- using heating pipes that are not intended for this purpose;
- the diameter of the heating pipes does not match that described in the project;
- heating structure made of pipes made of different materials;
- heating wiring is done incorrectly;
- installation of a room thermostat, which controls the operation of the boiler, in the wrong place;
- lack of required headroom when installing heated floors;
- did not check the underfloor heating system for leaks before covering it with the finishing floor covering;
- they made a screed on a system of plastic pipes, but did not fill it with water;
- dilatation gaps are not made or made incorrectly;
- We turned on the heated floors for heating when the screed had not yet dried. Study the long-burning solid fuel boiler at the link.
Extraneous noise
Sometimes noise may occur in the heating pipes - it can be either a knocking in the heating pipes, or various clicks, and a hum. Why are heating pipes noisy? There are several reasons:
- During operation, the diameter decreases.
- Pipes are leaking.
- A smaller pipe diameter was installed.
You may need to think about how to fix a leaking heating pipe. When you eliminate the leak, you will also eliminate the problem of noisy heating pipes.
Why are the heating pipes still humming? This may be a reduction in pipe diameter. You can hear the heating pipes knocking right on the spot. You need to walk along the pipes and find the reason why the heating pipes are clicking. Usually the source from which the heating pipes click is located in the basement - because there is more pressure here
It is very important to find in time the reason why the heating pipes are shooting, humming or making noise - because this could be a prerequisite for a serious problem
Cost of replacing heating system pipes
Prices for replacing heating pipes in an apartment:
| 1 | Installation, battery wiring | from 3,500 rub. | |
| 2 | Installation, battery piping (apartment) | from 4,000 rub. | |
| 3 | Installation of heating risers up to Ø 40 mm | from 150 rub. | |
| 4 | Installation of a heating system heating system up to Ø 40 mm with insulation, 2 pipes (without excavation work) | from 700 rub. | |
| 5 | Installing a heating pump | from 3,000 rub. | |
| 6 | Installation of RB heating | from 3,000 rub. | |
| 7 | Installation of taps, gate valves, balancing valves | from 600 rub. | |
| 8 | Pressure testing of the heating system of a private house | from 3,000 rub. | |
| 9 | Diagnostics of the heating system, on-site (up to 50 km) | from from 2,000 rub. | |
| 10 | Repair and modernization of the heating system | price according to agreement | |
Replacing heating pipes is a difficult but important process
What sets our company apart from others
There are several reasons that make people turn to us:
- extensive experience of our craftsmen - we can perform all plumbing work without exception;
- commitment - having taken on a job, we bring it to the end;
- responsibility – we are responsible for the quality of our work;
- reasonable prices - we do not inflate prices so that our services are accessible to everyone;
- efficiency – we do our work not only efficiently, but also quickly;
- politeness – our dispatchers respect their clients, they will politely and thoroughly answer all your questions asked by phone;
- preliminary agreement – you can agree with us in advance about any plumbing work in your home, our specialists will carry it out at a time convenient for you.
By choosing our company, you can be sure that all work will be completed with high quality and on time.
No approval or project development is provided for the dismantling or replacement of NPA radiators
According to clause 1.7.1 of Rules No. 170, the conversion of residential and non-residential premises in residential buildings, the production of which is permitted after obtaining the appropriate permits in the prescribed manner, includes:
- installation of household electric stoves instead of gas stoves or kitchen fires;
- transfer of heating plumbing and gas appliances;
- installation and refurbishment of existing toilets and bathrooms;
- replacement of existing inlet and outlet pipelines, electrical networks and devices for installing shower cabins, Jacuzzis, high-power washing machines and other new generation plumbing and household appliances.
This also follows from the content of the application form for consent to refurbishment or redevelopment of residential premises, approved by Decree of the Government of the Russian Federation of April 28, 2005 No. 266, according to which the refurbishment of premises requires the development of a project and its coordination with certain services.
The legislation does not provide for obtaining any consent for the dismantling and replacement of elements of engineering systems, with the exception of the consent of the management organization or heat energy suppliers, which is required during the heating period to connect to the network. It is not required to dismantle and replace radiators and develop any project.
It follows that the dismantling of heating system elements does not relate to re-equipment or redevelopment, since, according to the above regulations, re-equipment and re-development do not include the dismantling and replacement of heating radiators.
Collection of debt for heating in the absence of radiators
Modernization of heating equipment in an apartment
Making a decision on the need to replace heating radiators, and, if necessary, pipelines, is within the competence of the owner. Mostly, such an operation is confined to general repair work, but can also be performed separately from them. To carry it out, it is necessary to carry out a number of preparatory measures and purchase new radiators.
Features of choosing heating batteries
The range of heating devices on the market is large and varied both in terms of materials used and cost characteristics. They have different design and efficiency. When choosing the required devices, parameters such as specific heat transfer and geometric dimensions should be taken into account. The first parameter, if selected correctly, will allow you to accurately maintain the temperature and humidity conditions, and the second will fit organically into the window sill niches.
When choosing heating batteries, you should take into account parameters such as specific heat transfer and geometric dimensions.
The following types of radiators are currently available for sale:
- stamped, steel panel type;
- cast iron;
- steel tubular;
- aluminum;
- bimetallic.
The last batteries on the list are the most expensive, but their efficiency is at the highest level. With rare exceptions, all modern equipment has a durable polymer or paint coating and requires annual painting. The choice of a specific type of equipment is determined by many factors, not least the financial capabilities of the client.
Preparatory activities
When replacing heating batteries with gas welding, it is necessary to perform a number of preliminary operations.
First of all, you need to dismantle the old heating devices. To do this you will need an angle grinder and cutting wheels. When cutting pipes, you need to install screens on the sides of the wall and floor, which will avoid damage to these surfaces by scale.
After separating the battery from the pipelines, it is removed from the brackets and carefully turned upside down with flanges and taken out of the room. The hanging fasteners are also dismantled, and the wall behind the radiator is cleaned and finished.
Important! In order to increase the efficiency of heaters, experts recommend installing reflective screens behind them. This will allow you to direct the infrared flux inside the room, and not to heat the wall
This will allow you to direct the infrared flow inside the room, and not to heat the wall.
Installation of new radiators
The operation of replacing heating batteries during welding should be carried out by well-trained specialists. Their qualifications must be high enough to make a sealed seam on the back side of the pipeline.
To install the battery in a niche under the window, you must first install new brackets. These items are usually supplied with the equipment or purchased separately. Markings are made in advance to ensure a strictly horizontal position of the device. It is necessary to maintain the distance from the floor recommended by the manufacturer.
A piece of pipe with a pre-cut thread is welded to the pipeline; their location must coincide with the position of the radiator flanges. The same adapters are pre-screwed into them. Next, you can perform the steps to replace heating batteries yourself. The connection is made using a coupling and a lock nut. All joints are sealed most carefully.
It is better to entrust the replacement of heating batteries with gas welding to professionals.
For this, one of two materials is used: fluoroplastic tape (FUM) or jute tow. In the second case, plumbing specialists also add a little oil paint or primer. After drying, it forms a very reliable and tight connection; in addition, this measure protects the threaded connection from corrosion. After drying, a test run of water is carried out to check the absence of leaks in all welds and joints.
Timely replacement of heating batteries will reduce the cost of heating residential and public premises directly or indirectly. In the first case, if it is possible to regulate, it is possible to reduce the supply of coolant to them or its temperature. In the second option, there will be no need to use additional devices to increase the temperature in the room.
Multi-level floor
To zone the space, craftsmen install floors at different levels. They advise installing a podium to separate the kitchen and dining room. This option is considered one of the most practical because, among other things, the owners have additional free space where they can hide something.
It is convenient to use boxes or crates for this. Wicker baskets will look good. But such space can remain free.
For podiums, reliable materials are selected that can withstand heavy loads. Usually builders make wooden or metal podiums.
However, such a design should not be made if there are small children in the family, since the podium can become an obstacle for him. In addition, various floor coverings can be used.
They will zone the space between the living room and the kitchen and protect the podium from damage. For example, tiles are laid in the kitchen area, and laminate flooring in the dining room. The main thing is to choose colors and textures and combine the finishes correctly.
Reconstruction of the engineering system of apartment buildings without permits is considered unauthorized
According to Art. 25 of the Housing Code of the Russian Federation, installation, replacement or transfer of utility networks that require changes to the technical passport of the house/premises fall under the concept of “reconstruction”. Redevelopment is carried out after agreement with the local administration, which must issue a permit on the basis of Part 6 of Art. 26 Housing Code of the Russian Federation.
In the absence of permits, the reconstruction is considered unauthorized. For such actions administrative liability is provided under Art. 7.21 Code of Administrative Offenses of the Russian Federation. For individuals, the fine is up to 2,500 rubles. In addition, in certain cases, according to Part 6 of Art. 29 of the Housing Code of the Russian Federation, the court may oblige the owner to restore the apartment to its previous condition or make a decision to sell such premises at auction.
At the same time, not every change in engineering systems falls under the concept of reconstruction, because elements of the in-house engineering systems of an apartment building can be located both outside the apartment and inside it. If we are talking about interference in the operation of common building systems, then, in addition to coordination with the administration, the consent of the other owners is also required. Otherwise, the culprit will be punished, and the court will oblige him to bring the VDIS to its original state.
The Supreme Court of the Russian Federation on the redevelopment and reconstruction of premises in an apartment building
Methods for eliminating leaks
Once you have become familiar with the causes of leaks, it is worth moving on to considering ways to eliminate them. To date, several methods have been invented for sealing damaged pipes.
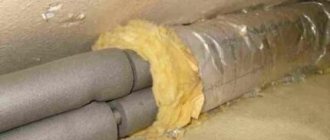
If the leak has formed on an even section of the pipeline, then you can use a fairly well-known method: rewind the damaged area with a piece of soft rubber and tighten tightly with a piece of wire or a clamp (for more details: “Types of repair clamps for pipes and rules for their use”). Just make sure that the piece of rubber is several centimeters wider than the damaged piece.
It is worth noting that to obtain a reliable screed, it is better to use a plumbing pipe clamp, which can be found in any plumbing store.
How to fix a leak in a heating pipe
This approach will make it possible to get rid of the leak, so that the system can be properly modified until the end of the heating period, after which it will be possible to safely carry out all the work to replace damaged pipes.
Alternatively, you can purchase a ready-made bandage with rubber sealing and clamps in the store. The process of neutralizing the leak in this case will be the same as in the previous version.
Sometimes a situation arises when a heating pipe drips at the joint (on a fitting or on a thread) - what to do in this case, you ask? In this case, it will be a little more difficult to solve the problem.
For example, you can use the same factory bandage, but you just need to replace the rubber seal with a longer piece of rubber. They wrap it around the end of the pipes together with the fitting in such a way as to equalize the difference in size, and carefully clamp it using clamps. And even though the bandage will come out a little skewed, the damaged section of pipe will become quite airtight.
If a leak appears at the junction of the sections, and its size is small, then to temporarily eliminate the problem you need to take a fabric soaked in some kind of heat- and moisture-repellent glue and carefully rewind the problem area with it. After the glue hardens, the fabric will seal the leak.
Among the ways to eliminate a leak in a heating or hot water supply pipe, one can also name the use of special compounds for sealing, “cold welding,” as well as other synthetic materials.
It is worth noting that if you find that a heating pipe or water supply is leaking, fixing the leak using one of the above methods is only a temporary solution. At the end of the heating season, all faulty areas need to be partially or completely replaced in order for the system to function fully and without failures.
Finishing
If the kitchen combined with the living room has the same floor covering, then there are no special rules for carrying out the work. When combining different materials, take into account in advance where they will be joined.
For example, laminate flooring creates unsightly joints with tiles. The main thing is that the floor is flat without curved joints, as they will be noticeable.
Kitchen cabinets that are mounted on the walls should reach the ceilings. In some cases, craftsmen “lower” the ceiling with plasterboard.