Installation of moldings on the ceiling and floor is the shortest and seemingly simplest stage of repair. But probably many of you had to spend at least an hour trying to cut these 45 degrees. The only exceptions are the lucky ones with a technical mindset and those who were friends with geometry at school.
Today we will tell you how to cut the corner of a ceiling plinth and a floor plinth without resorting to complex calculations. You will see that this is not a difficult job at all and can be completed in a short time.
Cutting a corner using a miter box
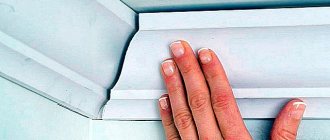
We take a polyurethane ceiling plinth intended for the left or right side of the corner.
We lean it against the future installation location so that the end of the segment opposite from the corner is against the edge of the already glued molding. In the place where the bottom edge of the ceiling plinth touches the top of the wall corner, make a dot with a pencil or stick a piece of insulating tape. We repeat these steps with the second segment.
How to cut an external corner of a ceiling plinth:
- We place the left blank in the miter box from left to right, pressing it to the edge closest to us. The corner vertex mark should coincide with the leftmost slot in the same edge
- We place the right blank from right to left, pressing it to the near edge. The mark for the top of the corner is to the far right slot.
How to saw down a ceiling plinth at an internal corner? Everything is very simple, the actions will be exactly the same, only the location of the corner vertex mark changes.
Here it’s the other way around: for the left segment – the far right slot, and for the right – the far left. The finished ceiling fillets must be aligned, and then the joints should be held up to the light - there should be no gaps. If they are very small, then editing is not necessary; you can get by with sealing with putty material after installation.
How to make a corner of a ceiling plinth: positioning the workpiece in a miter box
Important: sometimes the angles deviate too much from the standard 45 degrees, and a simple miter box for the ceiling plinth becomes useless - you can cut off the excess. The solution would be to purchase a rotary tool, but it is not cheap and this “one-time” purchase will be irrational. In this case, you can use the intersecting point method.
How to cut the corners of a ceiling plinth without a miter box
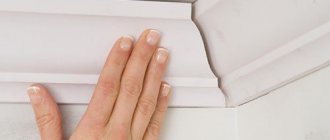
If you are wondering how to properly cut down a ceiling plinth without a miter box, then the following information will be useful to you. We take the right section of the ceiling plinth made of foam plastic, apply it to the installation site and draw a line on the ceiling along its upper edge.
It should extend beyond the vertices of the corners by about 5 cm. We do the same with the left segment and put points at the intersections of the lines. We put the ceiling plinths in place one by one and transfer the resulting marks to them.
We've dealt with the upper part of the ceiling moldings, now let's move on to the lower part. Everything is simple here, the marks we need are the vertices of the corners. We mark their location with dots on the lower edges of the left and right ceiling plinth.
Next, you need to connect the dots on the moldings - this will be the cutting line. This method will help you cope with even the crooked corners. Adjustment will most likely not be needed, and if it is, it will be minimal.
How to cut a ceiling plinth without a special tool: the photo shows marks for the intersecting point method
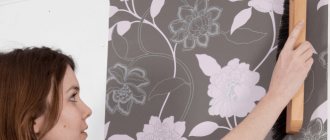
Important: the work described here requires marking the surfaces. Therefore, first you need to start cutting and fitting the ceiling plinth, and only then think about how to glue the wallpaper. Or, if you want to attach skirting boards on top of wallpaper, we do marking and trimming before finishing, and gluing after it.
Advantages
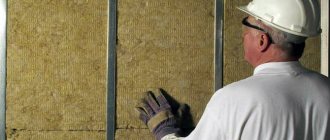
MDF plinth has a number of advantages over analogues:
- The design is convenient to install. Installation work does not take much time. Even a novice master can cope with such work.
- The product is ideally attached to the wall surface. It is tightly fixed without leaving cracks.
- The plinth looks neat, the interior becomes original.
- MDF skirting boards can be installed in houses where there is a high level of humidity. It has good moisture resistance. But experts advise not to let water come into direct contact with the product, and if this happens, immediately remove the water and dry the baseboard with a dry cloth.
- This version of the plinth is quite flexible, it can be installed even on an uneven surface with curves.
Cutting wood floor molding using a miter box
It is necessary to measure the distance from the edge of the baseboard already glued to the wall to the top of the corner of the wall. Now we take a new piece of molding and set aside a length equal to this distance on its lower edge. We put a dot with a pencil or stick a piece of electrical tape.
We perform this procedure for both external and internal corners. In the miter box we place the plinth pieces from left to right for the left side of the corner and from right to left for the right. In this case, they should be pressed as in the figure - to the side of the miter box closest to you.
How to cut a corner of a ceiling plinth - placing the workpiece in a miter box:
- For the outer left one, we match the mark on the plinth with the leftmost slot. For the outer right - from the far right.
- For the inner left one, we match the mark on the plinth with the rightmost slot. For the inner right - from the extreme left.
Clarification: the slot refers to the one that is on the side that is closer to you.
Cutting the plinth at an angle: the red line marks the place of the cut
Product characteristics and options
Installing an MDF skirting board is quite a painstaking job. You can choose the option you like, taking into account the characteristics of the material.
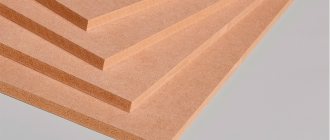
It is believed that MDF is an improved version of fiberboard. It is known that the coating is a medium-density slab. To obtain this material, manufacturers grind wood fibers to very fine particles. The abbreviated name was taken from the English abbreviation MDF.
Small particles of wood are heated and then pressed. As a result, a natural sticky composition appears, it is called lignin. He glues the resulting mass together.
Manufacturers write that MDF is an environmentally friendly material. Some suppliers still add chemical resins that are harmful to human health. Therefore, it is worth taking products only from well-known manufacturers who have proven themselves in the building materials market.
MDF plinth is available in the form of a smooth board. The part is decorated with ornament or relief. You can order a plinth with an insert strip along the entire length. It will help hide fasteners or wires that run along the edge of the wall. There are laminated baseboard options, as well as those decorated with natural veneer. Some choose painted options. The plinth covered with veneer is visually practically no different from the version made of natural wood.
Floor plinth: internal and external corner “by hand”
Floor moldings, as a rule, are quite wide and thick, and therefore finding only two points here, as for ceiling moldings, is not enough. To trim an internal corner, first place a point at its top at a height equal to the width of the plinth - in the figure this is a green point. From it to the left and right we set aside a distance equal to the thickness of the plinth - points 1 and 2.
We apply the left segment to the wall, and from point 1 we draw a line along it, perpendicular to the wall and put a point on the edge. We repeat the action with the right segment, only draw from point 2.
In the figure, the point is marked with the number three. We draw a line from it across the plinth to its opposite edge - we get point 4. Now we connect the green dot with points 3 and 4 - we get a line and an angle along which the molding can be cut.
How to cut a plinth: make the necessary marks in the corners
Important: trimming external corners is easier than trimming internal ones. We set points on the left and right segments: A – mark of the top of the corner of the wall; C – the point of intersection of the lines, which is obtained by alternately drawing the left and right sections of the plinth along the floor; B – from point C across the molding a line is drawn to its opposite edge.
By connecting these points with one line, we get a line along which the cut will be made.
Selecting a tool for forming an angle
The most economical option is to buy a simple plastic miter box.
It is a plastic block with eight working slots. This device is designed for only two operations: trimming at 45, 90 and 22.5 degrees. An angle of 90 degrees is useful, for example, if you need to embed a socket box into the middle of the molding.
Some devices come with eccentric locks included. They are preferable because it is easier to work with - the plinth is clamped in the desired position and does not move during the cutting process. Accordingly, if any errors occur, they will be minimal and adjusting the angle will not be difficult.
How to cut a plastic baseboard: a simple plastic miter box
If you have to make repairs in your own home, then perhaps it makes sense to purchase a more serious tool - a rotary single-plane miter box. It is designed for cutting at angles of 15, 22.5, 30, 36, 45 and 90 degrees.
The design of this miter box includes 2 clamps - for clamping in horizontal and vertical planes, as well as a limiter that will allow you to cut workpieces to the same length. The hacksaw will be built-in here. If it is not clear how to cut a ceiling plinth, the video review below will help you.
This will be useful to you at work
As you noticed, the text mentioned marking using electrical tape.
This is the most convenient way to mark blanks, since the pencil is not always visible on the floor plinth, and it is sometimes difficult to trace its lines from the ceiling. The bright pieces of electrical tape are very clearly visible, and when they are no longer needed, they are removed literally with one movement of the hand. There are no traces of glue left after removing such marks.
Sometimes you have to trim moldings with a very large pattern. How to connect corners to make them beautiful:
- From one long fillet we cut pieces according to the number of corners, each of which should contain an element of the pattern. On both sides of the pattern there should be 5 cm of the length of the plinth.
- We measure the resulting blanks and find their middle, cut along the center line.
- We make corner trims as usual, but taking into account the fact that the centers of the patterns on the workpieces should fall on the tops of the corners.
How to join the corners of a ceiling plinth if there is a large pattern on its surface
Installation methods
There are three methods for installing products. When resorting to one of them, it is worth considering the possibility of dismantling . In the event of an emergency (for example, a pipe leak), the covering will have to be removed, and the faster and more successfully this happens, the greater the chance of keeping the floor safe and sound.
On glue
If the back surface is fairly flat, you can mount the structure using liquid nails or polymer glue. However, in this case, dismantling will be extremely difficult, which may damage the planks.
Next, take the second plank, previously adjusted to the first, and join it in any chosen way. If the use of joining parts is not provided, after treating with glue, the plinth is placed tightly against the first plank so that there are no gaps left.
If you plan to use connecting posts , the first post is placed in the corner of the room, and a strip is glued to it on both sides. If corner elements are used, installation is carried out in the same way, but the strips are not pressed, but inserted into the grooves.
For clips
The simplest and most convenient installation of floor plinths. Metal or plastic clips are pre-fixed, corresponding to the fastening channel on the back side of the element. As a rule, they already come complete with the baseboard. By attaching it in this way, you can remove the structure at any time and then reinstall it.
For self-tapping screws
The structure is screwed to the wall surface. The dismantling process will take more time, but such fixation of the planks is durable and reliable. In some cases, self-tapping screws are combined with liquid nails.
Next, the strips are attached and secured with screws. Cables are being pulled. Joints can also be installed in several ways, as with liquid nails. Skirting boards are put on. The fastening system may vary, but if necessary, even an untrained person can handle it.
Perfectly joined ceiling plinth
Since the installation of ceiling plinths is always made from standard strips 2 m long, during the work it will simply be impossible to do without joining them. In this case, it does not matter fundamentally what material the fillets are made of - gypsum, wood, foam or other polymer material (see Ceiling plinth for plastic panels: installation technology).
High-quality joining of skirting boards is possible, even if the corners in the room are uneven (with deviations of 90 degrees), the main thing is that you have the necessary tools for marking and cutting.
So, let's look at how to make the joints of ceiling plinths on flat areas and in corners as invisible as possible.
Purpose
Many people do not give due importance to baseboards. This detail means a lot for the room. It is generally accepted that the flooring should be framed with skirting boards. Previously, they were chosen to match the floors, but now this trend is outdated. It is important to understand that the plinth performs not only the function of separating the wall and the floor. The following functions can be distinguished:
- In the past, the installation of MDF skirting boards was carried out for the purpose of insulating the floor. Builders always leave a small gap between the wood covering and the wall. It is needed when the wooden covering expands under the influence of heat. Through this gap, cold air begins to enter the room. To stop the cooling process of the room, they began to use baseboards.
- Do-it-yourself installation of MDF skirting boards is required to protect the floor covering from various types of dust.
- The plinth is needed to skillfully hide the wires. For example, you can successfully disguise a cable for a TV or an Internet cable.
- The beautiful appearance of the product allows you to use skirting boards as a decorative element. Installing a white MDF baseboard will add light colors to the room.
Trimming ceiling plinth using a miter box
Tool for cutting ceiling plinths for joining in corners
It should be noted right away that in the modern realities of our country, a miter box is not always a life-saving tool for precise angular trimming of plinths. The fact is that the angles in our houses are often not equal to 90 degrees, but are arranged with an error of up to 5 degrees.
The miter box is intended specifically for cutting the plinth at even angles (see Final lesson on the ceiling ABC: installing ceiling plinths). For this reason, when performing high-end repairs, you will first need to correctly measure the angles using a protractor and, depending on the result, use or not use a miter box.
Let's assume that the corners are still even, and you can use a miter box to trim the baseboard.
In this case, the preparation of skirting boards will have the following features:
- The corner joint of the ceiling plinth can be formed by two types of corners - external and internal corners between adjacent walls. There are internal angles in any room, and their value is always less than 180 degrees (usually 90). External corners are somewhat less common. Their value is always greater than 180 degrees (usually 270).
- In addition, each corner joint consists of two plinth strips - left and right. Depending on which corner of the ceiling cornice (external or internal) will be installed, the left and right plinth strips will need to be trimmed in a certain way.
Scheme for cutting ceiling plinths in a miter box for arranging external and internal corners
- To join the plinth at the inner corner, the left and right strips in the miter box are cut as follows:
- The left bar is positioned in the miter box against the wall farthest from you with the slope expected for the final installation under the ceiling. The hacksaw is inserted into the left near and right far grooves of the miter box, after which an incision is made.
- The right bar is also installed at the far side of the miter box with a similar slope and a cut is made using the right near groove and the far left one to insert the hacksaw blade.
- To join at the outer corner, the left strip is cut similarly to the right one for the inner corner, and the right one is cut similarly to the left one for the inner corner.
Advice! Before joining the ceiling plinth and gluing it completely, you need to try on the strips in the corner and make sure that they form a clear joint without gaps.
How to calculate the required amount of material for self-installation?
Before purchasing what you need for the job, you need to calculate how many planks you will need. It is important to know what length of skirting board is required. You should immediately buy additional parts and connecting elements. If the room has a non-standard shape, then the number of elements will increase.
To understand how long the baseboard is needed, you need:
- Measure the length of the walls in the room, taking into account the protrusions. You will need information about the thickness of the walls and doorway.
- If you have a plan of the room, this will simplify the task. If it is not there, then it is better to draw it. It is convenient to indicate the measurement results on the drawing.
- You need to calculate the total length of the walls and subtract the width of the doorway from the resulting value. The result will be the total length of the baseboard. It's better to take extra. Usually they add 10-15% of the total amount.
- When the length is known, it is divided by 2500 to obtain the quantity. It is believed that the value of 2500 millimeters is the standard length of the bar.
- Taking into account all the calculations, you can calculate the number of joints.
- It is important to calculate all internal and external angles from the drawing, as well as how many connecting elements will be needed.
Manual trimming of skirting boards for joining
Cutting ceiling plinths manually for corner joints is done with a stationery knife at an angle of 45 degrees
In order to understand more clearly the question of how to properly join the ceiling plinth, it is necessary to understand the features of manual trimming of the ceiling plinth without a miter box. This cutting method is used if the angle is not right or if the miter box is inaccessible for some reason during installation.
The procedure is carried out as follows:
- Using an inclinometer, the size of the angle being equipped with the plinth is measured, and the result obtained is divided in half.
- Alternately, markings are applied to the left and right strips of the plinth in accordance with the final value (usually the value for conditionally right angles is close to 45 degrees). When applying a cutting line to the plinth, it should be inclined in the same way as at the site of further installation.
- Cut along the marking line using a stationery knife and try on the strips in the corner. If everything is done correctly, there will be no gap between the planks, and the angle will be even and clear.
Product preparation
The division of the plinth is carried out with the listed devices. As a rule, when cutting, splinters (from a hacksaw), roughness (from a jigsaw) or unevenness (from a knife) are formed on the edges of decorative strips. This needs to be addressed. Immediately before installation, the edges of the plinth are sanded using fine sandpaper. This will make the joining perfectly smooth, without gaps or distortions.
To form the internal/external corner, two fragments of the plinth are cut: one from left to right diagonally, and the other vice versa. When strengthening, it is necessary to ensure that the fragments of the pattern fit each other exactly. All of the tips listed will help you easily connect the baseboard in the corner.
How to make and join the corners of a floor plinth
When installing floor plinths, the most difficult task is finishing the corner areas. The plinth strips will have to be cut into separate elements according to the perimeter of the room. Experts recommend first drawing a visual installation diagram on paper, writing down all the dimensions, and also schematically depicting how to make the corners of the floor plinth. With such a hint at hand, finishing work will move much faster.