Parquet is a durable floor covering, but over time even it needs to be repaired or completely re-laid. The reasons for this may be different: wear of the coating, infection with fungus, insects, or damage to the panels due to flooding.
Reasons for replacing parquet flooring
Replacing parquet flooring is not an easy process and takes a lot of time. But you can do all the work yourself without involving specialists. Let's look at how to remove old parquet and lay new ones in more detail.
Any construction process consists of several stages that must be performed in strict sequence.
Removing old parquet
The technology for removing old parquet depends on its type and installation method. Let's consider each of the technologies in detail.
Preparation
Whatever dismantling method is used, the first step is to prepare the necessary tools and the room itself.
- The room is cleaned of furniture and carpeting.
- If there is wiring on the floor, it is de-energized.
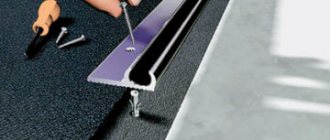
- Skirting boards and thresholds (if any) are dismantled. For this, a tool such as a crowbar is used.
Dismantling the baseboard
How to remove parquet glued to glue
The most difficult thing to do is dismantle parquet with your own hands if it is installed with glue. In general, it will not be possible to remove it in one piece; during operation, it falls apart into pieces or splinters. The dismantling technology involves the use of a chisel and a hammer and is performed in the following sequence:
- By tapping the surface of the parquet with a hammer, they find the place where the dies come off, from which dismantling will begin.
- If there is none, then the dismantling process begins from the side of the floor opposite the window.
- Having driven in a chisel, at the junction of the panels it pries and knocks them out.
- And according to this principle, the entire coating is removed.
Removing parquet using glue
Removing the subfloor
In most cases, parquet is laid on a rough wooden base or OSB boards. After removing the parquet, it is also recommended to change it. Do-it-yourself dismantling of this coating is done using the same technology. By driving a chisel into the interpanel seams, they are knocked out.
Removing the rough coating
Panel deck dismantling technology
The technology for dismantling the panel covering is similar to the previous one.
How to disassemble parquet? Main stages:
- Removal of panel parquet begins from the side where its installation ended, namely on the opposite side from the window.
- Using a chisel, driving it into the gap between the shields, lift one of them. To do this, you need to make an effort, since it is not so easy to tear the shield off the glue.
- In this way, board by board, the entire parquet covering is removed.
Removing the panel covering
Partial dismantling of parquet
If the parquet is in excellent condition, but some part of it has failed, you can dismantle only this section and reinstall only it, or eliminate the defect that has appeared.
To do this you need:
- Protect the rest of the parquet flooring with cardboard and film, attaching them to the surface with construction tape. This requirement is necessary to prevent damage to the parquet, which may occur during dismantling of a given area.
- Dismantle the dies using a chisel with special care so as not to catch the edges of undamaged parquet.
- Clean the area, after which you can proceed to repairing the parquet yourself.
Partial dismantling
Cleaning the premises
Having removed the flooring, main and rough, it is necessary to clean the room, collecting all construction waste in specially prepared containers (propylene bags are mainly used).
Cleaning the premises
Types of dismantling parquet dies
Depending on what work needs to be done, you may need:
- remove the parquet completely, preserving the tiles;
- disassemble the parquet only in a certain area to replace several tiles;
- completely remove the parquet without saving the elements.
Dismantling block parquet with your own hands is usually much more difficult, since the covering elements are small in size and can be attached to nails. Sometimes additional fastening of dies with glue is used.
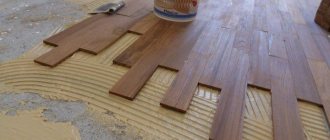
Methods for laying parquet
There are two main ways to lay parquet boards:
- The “floating” method involves installing parquet panels without attaching them to the base. The creation of a single canvas occurs due to the interlocking of the locking system of the laminate panels. This method is used provided the base is perfectly level. Different materials can be used as a substrate. The disadvantage of this method is the occurrence of squeaks shortly after installation of the flooring.
- Laying parquet with glue . This method is more reliable than the previous one. Parquet boards, connected by a locking mechanism and located on an adhesive base, are practically not subject to deformation and squeaking.
Methods for laying parquet
Important! To glue parquet to the subfloor, do not use water-based glue. It does not provide the necessary grip, which will lead to deformation of the board in the future.
Dismantling parquet boards
Parquet boards are usually fastened together using special locks, but there are types of joints that require fastening with glue. Dismantling a parquet floor, in the case of a lock joint without the use of glue, allows you to preserve the coating and use it in the future. With glue connections, it is much more difficult to preserve parquet boards.
The boards can be connected to each other with glue or fasteners, which also needs to be taken into account if the boards are planned to be used in the future
Preparatory work is carried out to the same extent as for panel parquet. You also need to find the board that was laid last and carefully separate it from the rest. If you want to preserve the old parquet, you should number each element you remove.
If you need to re-lay parquet boards, using numbered parts will greatly simplify the work. In some cases, parquet boards are attached to a plywood base or screed using glue. In this case, it is very difficult to preserve the coating for further use.
Replacing the coating
Laying parquet panels after dismantling the old covering is carried out in the following sequence:
Preparing the base
The first stage of replacing parquet is preparing the base for its installation. The better the preparation, the longer the coating will last.
To properly prepare the base, you need to decide on the method used for this.
There are two main technologies.
Concrete screed
Stages of foundation preparation:
- We need to decide on the zero level.
- The level of height difference is determined, which affects the choice of surface leveling method.
- Having chosen a method using a concrete screed, determine its height in certain areas to reduce height differences.
- For the screed itself, mixtures are used, when working with which the difference in floor differences is minimized, for example bentonite.
Concrete screed
- After the screed is ready and completely dried, the underlay is laid.
This stage requires special attention, since it is very important and the life of the parquet depends on the correct installation of the base.
Important! The substrate can be plywood, chipboard or fiberboard, which can be laid using glue or nails.
Dismantling without saving dies
In this case, there is no need to worry about the safety of the elements, so you can dismantle them with any convenient tool, such as a chisel, chisel, hammer, crowbar, nail puller, or hand-held circular saw. The only thing you should take care of is the safety of the substrate.
Whenever dismantling parquet, you must follow safety precautions and wear safety glasses and gloves.
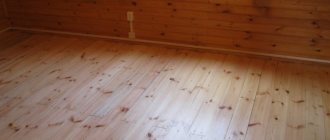
Fragment of the dismantled floor
What types of floors are there, and why change them?
We all want our apartments to be warm and comfortable. To do this, we make expensive repairs and spend a lot of time. But we will not achieve the desired result if we replace windows, doors, level the walls, and leave the floors as they are. That's why we set out to replace the flooring ourselves.
Floors need to be replaced if you are not satisfied with the quality of the coating, its evenness, thermal characteristics, or if it is completely worn out. You should also think about repairing the coating if you have had it since the very installation of the building, and you decided to lay linoleum, laminate or parquet boards in a high-quality manner (then it would be best to lay the finishing coating on plywood).
To give you an idea of what they are, we will describe the most common types that are used in apartments. Floors are divided into rough and finished.
Subfloor
A surface manufactured and laid over floor slabs or wood to provide a base level layer for the finished floor. Subfloors are divided into:
- plank on joists - an old wooden floor that is processed with a special jointing machine. Either a new structure is made from logs, boards are laid on it and processed again with a jointer,
- plywood on joists - the old joist structure is restored, or a new one is laid, and sheets of plywood are laid on top of it,
- chipboard, chipboard on joists - the same as in the case of plywood,
- OSB boards on joists - the same as in the case of plywood,
- concrete screed - the old concrete coating is knocked down, and a new, perfectly smooth cement screed is poured onto the prepared surface with or without the help of an insulating pad,
- self-leveling floor - a special solution is poured onto the old cement screed, which is sold dry and must be made strictly according to the instructions. Suitable for leveling surfaces from 5 mm to 20 mm, no more than
- dry screed - the old concrete screed is knocked down, beacons are laid on the prepared surface and quartz or other sand is poured out, leveled over the beacons, and a rough floor covering is laid on top of it,
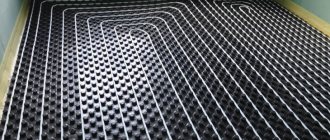
- heated floor - pouring a concrete base or dry screed, laying water or electric heating elements, again a regular or dry screed. Expensive to make and maintain, but very comfortable.
Finish floor
This is the finishing material on which we will move - most often, a thin coating that is quickly applied. Typically the following coatings are found on the market:
- linoleum is a rolled, porous-rubberized coating that has a base with a variety of properties. It is used for laying on a variety of surfaces and has a low price,
- laminate is visually a wooden covering, but at its base it has fiberboard - a wood-fiber board, glued with glassine on the bottom for waterproofing, and treated on top with a special armor layer resembling wood. Afraid of water, short-lived, relatively inexpensive,
- parquet is an extremely expensive material made from valuable wood. Most often, it has a multi-layer structure, at the base there is cheaper wood, the last layer, the rear one, is made only of precious species, resistant to mechanical wear and having a very beautiful appearance,
- edged polished board - boards of a certain durable species, require piece fitting, after installation they are processed and covered with a special coating, the final result is not cheap,
- Fiberboard is the most inexpensive material, it is laid with the expectation of further painting, it cannot be used without paint treatment,
- floor tiles are an almost eternal coating with excellent water-repellent properties and an aesthetically beautiful appearance, excellent in all respects, except for one huge disadvantage - it is very cold.
You can do the work yourself very simply. Perhaps some of the coatings require specialized tools, but on modern markets and Internet resources you can find any equipment and tools you are interested in, and rent them at very affordable prices.
Laying laminate flooring
Laminate flooring on a base in the form of a parquet board can be laid in several ways.
Installation stages
A properly prepared surface allows you to quickly install the lamellas in accordance with the following instructions:
- Place any damping underlay on the parquet surface. When using a rolled backing, an overlap of twenty centimeters must be observed.
- Install special wooden spacer wedges around the perimeter of the walls, which will serve as a kind of temperature compensator. This gap should be about fifteen millimeters.
- The location of the joining lines of laminated panels should be carried out in a direction perpendicular to the window openings, which will make the joints almost invisible.
- Laying should begin with a more visible wall, which will be less crowded with furniture than others. This allows the trimmed panels to be used in a less visible part of the room.
- The second row of lamellas is mounted offset relative to the first by thirty-five percent in length.
To knock the elements together, use a rubber hammer. The slats with the locking system are joined in the horizontal direction. Click panels are fixed by snapping. The use of adhesive laminate involves the use of an adhesive composition.
The use of a substrate can significantly improve the thermal insulation of the floor, as well as make the laminate flooring more silent during operation.
Indications for dismantling
Dismantling parquet in an apartment or private house is a difficult, labor-intensive and dirty operation. Therefore, you should resort to it only in extreme situations in which no other repair methods help.
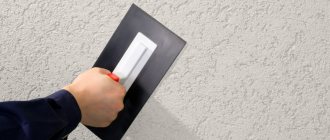
Small cracks formed as a result of drying of the lamellas can be filled with acrylic-based putty, matching it to the tone of the wood. The putty surface is sanded and varnished.
If the gap is too wide, but the lamellas are still firmly attached to the base, there is also no need to rush to disassemble. In this case, the gap is widened with a sharp awl or a narrow chisel. A narrow die is cut out of spare parquet boards along the width of the widened gap. The gap is thoroughly vacuumed and degreased. The die is smeared with a small amount of parquet (or simple wood glue) and carefully inserted into the slot. Excess glue must be thoroughly wiped off with a rag. The repaired area is sanded and varnished.
There are also damages in which repair without dismantling becomes impossible. These include:
- Cracking, swelling and deformation of lamellas. This usually happens after the parquet has been filled with a large amount of water and then dried. Wood absorbs liquid perfectly, but if it dries unevenly, it becomes deformed, cracks, swells, or becomes screwy. In this case, you will have to replace the entire parquet or the damaged area.
- Loosening the wood of the lamellas. This means that the tree is affected by fungal or mold cultures. This coating must be replaced. Long-term stay of people in rooms affected by fungus leads to the development of allergies, respiratory diseases and other serious consequences.
- Blackening of parquet. This is also a sign of fungal infection. After complete dismantling to concrete and removal of all affected wooden structures, the room, including walls, ceiling and furniture, must be treated with antifungal drugs.
- Lowering the level of part of the coating. This means that the joists or other foundation elements have rotted or collapsed. To replace it, you will have to disassemble the parquet completely or partially.
Blackening of the parquet is an indication for dismantling
In order for parquet to last for a long time, it is necessary to monitor the temperature and humidity in the room and ventilate it regularly. It is also necessary to periodically renew the protective coating on the parquet - varnish or oil.
Preparatory stage
Preparation for installation involves leveling the base. Incomplete adherence of the finish to the base is unacceptable; this will damage the expensive floor covering. So you have these options:
- We leave the lags. In this case, they need to be secured - the edges to the walls and each board to each other using self-tapping screws with metal corners. If there are few boards or you want to replace damaged ones, add transverse ones to make a grid of longitudinal and cross members. Then lay a layer of plywood or OSB board on top, 10-15 mm thick. Some people put a double layer of 10.
- We remove the supports. If you replace it, then make a new frame and all of the above. If you don’t want to leave it at all, clean the base from construction waste (sand, cement, tow, glass wool) and make a concrete screed at the required level. Be prepared that the floor will drop at least ten centimeters; you will have to fill it all with mortar or lower the level.
- We leave the glued inlaid parquet and lay laminate panels or boards on top of the base. The height will still rise a little, this is taken into account for doorways, that is, they may have to be raised.
Important point. It is more convenient and practical to disassemble the floor in parts and strengthen the plank frame and stuff plywood during the repair process. This way you won’t spread dust and debris and you won’t need to take out all the furniture. Work your way through each room piece by piece, replacing floorboards and rearranging items. If you fasten the frame joists-boards step by step, they will not displace all your work at the last stage.
When and how to do selective parquet repairs
When a parquet floor is used for a long time, some planks dry out and pop out of the coating.
In such a situation, there is no need to dismantle the coating and then replace it; it is enough to repair the old parquet. To this end, certain specific actions must be taken:
- Completely remove the layer of old varnish to reveal all loose, unsecured elements.
- Dried planks, with gaps of more than 5 mm formed between them, must be removed and replaced with new ones. If the bar resists and cannot be pulled out, you can use a chisel to split it into small pieces and then pull it out.
- To insert a new plank into the vacant space, its protrusion - a tenon - is cut off. A layer of glue is applied to the base, then a new plank must be inserted at an angle so that its groove fits onto the tenon of the adjacent plank.
- Places of local repair are pressed down with a heavy load and left overnight.
- After selective repairs, the parquet surface is sanded and coated with a layer of varnish.
How much does it cost to restore parquet in Moscow?
The Fresh Parket company carries out repair and restoration work on parquet flooring at a very attractive cost - from 230 rubles/m2. Our master technologist will arrive at the site at any time convenient for you to draw up a package of work. Consultation is free.
Sanding, sanding, and varnishing parquet are the most important and labor-intensive stages of flooring restoration. The final appearance of the floor depends on the quality of the repair work. Therefore, it is better to entrust the restoration of parquet to experienced specialists with solid work experience.
The high professionalism of our employees and the use of modern equipment enable us to restore the appearance and physical condition of parquet with high quality and in a short time. For a free consultation, as well as to call a technologist, call
How to avoid mistakes
Many experts do not recommend using a backing when laying lamellas on a base in the form of a parquet board. Of course, you can do without a substrate, but its use can significantly improve the thermal insulation of the floor, as well as make the laminated coating more silent during operation.
It is very important to remember that before installing laminated panels on an old parquet base, it is necessary to correctly carry out a preliminary calculation of the materials. It is important to correctly calculate the total working surface area, as well as the required number of slats.
In addition, the amount of finishing material purchased for flooring is influenced by the installation method. If installation is carried out directly, then about seven percent of the material should be added to the volume. When using diagonal laying, at least fifteen percent is added.
When diagnosing old parquet flooring, areas of wood affected by rot or fungus require special attention. Such changes progress over time and cannot simply be sanded down. Problem areas must be dismantled, and the resulting depressions must be filled with putty to the floor level.
You may also be interested in the article: “Laminate with and without chamfer: selection rules and installation features.”