The bathroom is not a residential area. But this is where special coziness and comfort are needed. After all, the mood of the apartment owners and, as a result, their performance and health depend on how convenient it is to use the bathroom.
Traditionally, laying tiles in the bathroom solves the problem. It has a long service life, beautiful appearance, and easy maintenance. However, the desired result can be achieved only with proper installation of tiles - the slightest violation of technology leads to chips and cracks that cannot be restored.
Below we will tell you how to prepare the surface of the floor and walls for laying ceramics, how to choose tile adhesive, and how to properly finish.
Methods for laying tiles
Ceramic tiles are used in the bathroom for wall cladding and flooring. This type of finishing material does not absorb moisture, is easy to clean, does not burn, and does not conduct electricity. Produced by thousands of companies whose tiles have different sizes and a huge selection of colors and patterns. This allows you to get an abundance of design solutions that do not repeat each other.
Various methods of laying ceramics, which visually transform the room, can also contribute to the design of the bathroom interior. You can lay tiles in different ways both on the floor and on the walls.
Today, tiles can be laid in the following ways:
- basic - ceramics are laid in even rows. This is the simplest and most popular method, and at the same time the most economical - you need less material and the least labor-intensive, because few trims (always laid at an angle of 90° with respect to the wall);
- “staggered” (brickwork) - imitates classic brickwork. Here, each next row is shifted by ½ the length of the tile. For example, if the first row began to be laid with a whole tile, then all odd rows should start with a whole tile, but the second and all even rows should start with half a tile;
Staggered laying.
- diagonally - the tiles are laid in a diamond shape in relation to the wall (on the floor) or the floor (on the wall). The method is complex and requires a lot of trimming. If you plan to use several colors, it is advisable to first draw up a laying scheme, as it is easy to get confused;
Diagonal method.
- “herringbone” is a combination of two methods: “staggered” and diagonal. An even more complex method;
"Christmas tree."
- checkerboard - used for two tile colors. It is based on a basic laying method, where colors alternate both horizontally and vertically;
Chess method.
- artistic (also called the “koleidoscope” method) - a complex geometric pattern is laid from tiles based on the basic or diagonal method. A laying diagram is also needed here. A variety of artistic method can be an ornament and a carpet;
- modular - an interesting geometric pattern is created using three or more sizes of tiles of the same model. A chaotic layout is also possible - it looks fresh and original. Used for finishing walls and floors;
- with shift - applied only to the floor. The method involves the use of tiles of different sizes, where the difference in size can reach 4, 6, 8, 10, 12, 16 and 24 times.
Kaleidoscope.
Ornament.
Modular way.
Installation of tiles with a shift.
You can see in the photo how to lay large and small tiles according to this pattern.
Not all of the considered options for laying tiles in the bathroom can be done by a beginner. In case of difficult installation, it is better to entrust the work to professionals.
Tile masonry - reliability and practicality in a modern interior
Page navigation
An excellent option for facing coating, which has a lot of advantages, are clay layers, fired and covered with glaze. Of course, we are talking about tiles. In rooms where it is appropriate to lay the floor or wall with ceramic tiles, this type of finishing will look advantageous and will last a long time and be reliable. All thanks to the high quality and durability of this material. This cladding is not afraid of temperature changes; it can be used to decorate not only home interiors, but also outdoor elements.
Preparatory work
Laying tiles on a bathroom floor, like on a wall, requires a lot of preparatory work. There is a whole range of technological operations performed regardless of whether it is a Khrushchev or a wooden house:
- the bathroom is freed from old plumbing (in a new building without finishing this type of work is not possible);
- the walls are leveled (a detailed story about the technology for leveling walls can be read in the materials “How to level walls in a bathroom” and “How and with what to plaster a bathroom”);
Important: you should once again pay attention to the fact that the gypsum board under the tile is attached only to the sheathing. Moisture-resistant sheets of plasterboard and gypsum board glued to the wall will not withstand the weight of the ceramics and will fall off.
- The base of the floor is being prepared. Technological operations such as pouring a new screed and waterproofing work are carried out. A step-by-step algorithm of work is described in the articles “Preparing the floor for pouring screed” and “Waterproofing the floor in the bathroom”;
- the surface of the walls and floors are treated with a primer.
The last operation is mandatory. It helps to increase the adhesion of ceramics to the base of the floor and walls. The primer must be rubbed into the base until white foam appears - a sign that the primed surface is saturated with moisture.
It is better to apply the first layer in the evening so that the walls are completely dry by morning (you can find out how long the primer takes to dry from the instructions on the package).
The second layer of primer does not need to dry completely - it is better to lay the tiles on a slightly damp surface.
Corner technology
Internal corners are formed at the joints of the walls. It is necessary to try to lay out the trim as accurately as possible. Many novice craftsmen leave gaps of 1-2 cm in the hope of sealing them later with tiled grout. This is not true, because first of all, it violates the aesthetics, and secondly, the grout is not intended for such tasks, and after a short period of time it will weather and begin to deteriorate.
External corners, as a rule, are formed to hide the installation of niches and projections for communications. You can form a corner joint with uncut, factory edges of the tiles, making an undercut near the wall. The easiest way is to lay it “overlapping” on the corner, leaving a gap of 3-4 mm between the tiles for grouting. The verticality of the corner is checked after laying 1-2 rows using a plumb line.
When forming an end-to-end corner, after drying, you can glue a special rubber corner. It will hide possible defects in the joint and make the protruding corner itself softer, which will subsequently protect the owners from possible household injuries.
Corners can be sealed with a corner
Calculation of the required amount of materials
Laying tiles in the bathroom with your own hands requires an accurate calculation of the required material: tiles, glue, grout.
Tile calculation
The method for calculating the required amount of tiles for walls and floors has minor differences. Therefore, using a conditional example, we will analyze how the number of tiles for walls and floors is determined.
Walls. We will do the calculations for a basic layout with a monochromatic surface of the material. Step by step calculations are performed in the following sequence:
- A regular tape measure measures the perimeter of the walls. The results are recorded in a notepad or on a piece of paper;
Measuring wall parameters.
- the height of the room is determined. In both cases, measurement results are rounded to the nearest centimeter;
- multiplying the perimeter by the height to determine the total area of the walls;
For example, two walls are 1.7 m long, and two are 3.1 m long. As a result, the perimeter is 9.6 m (1.7 x 2 + 3.1 x 2). The ceiling height is 2.8 m. Then the total area of the walls will be 26.88 m2 (9.6 m x 2.8 m);
- the area of the doors and windows, if any, is determined;
- the dimensions of the bathtub are taken to determine how much wall area it will cover;
- The doors, windows and the area where the bathtub adjoins the wall are subtracted from the total area of the walls.
For example, a doorway has an area of 1.8 m2 (2.0 m height, 0.9 m width). There is no window. The bathtub junction area is 1.44 m2 (the dimensions of the sanitary ware are 0.7 m wide, 1.7 m long, 0.6 m high). Adjacent to the wall at one end and side. There is no need to tile the wall behind the bathroom. The area of such areas is 0.42 m2 at the end (0.7 m x 0.6 m) and 1.02 m2 at the side (0.6 m x 1.7 m);
- by subtracting from the total wall area the space where tiles will not be laid, the size of the surface for laying tiles is found (26.88 m2 - 1.8 m2 - 0.42 m2 - 1.02 m2 = 23.64 m2).
But this is a pure, net figure. But the tiles will be trimmed, and the tiles may be damaged during work. Therefore, the figure of 23.64 m2 must be increased by 10% for the basic layout (for a non-professional by 15%) and by 15-20% for the diagonal method (practice shows that this should be enough).
Please note: all final figures are rounded up.
Since tiles in large retail outlets, as a rule, are not sold individually, calculating the number of tile packages is not difficult: the area of the required material is divided by the area of the tiles in the package.
Important: most Russian retailers of building materials accept back unused ceramic tiles, which allows you to buy a little more ceramics than required without affecting the family budget. This point must be clarified when purchasing the material.
FYI: Like wallpaper, ceramic tiles can have different tones in different batches. Therefore, you need to control the batch number or tone number - manufacturers indicate this data on the packaging. For Gres tiles, you also need to pay attention to the caliber - it is also on the packaging.
Floor. Here, the calculation of the required material can be made based on the area of the room and the number of rows. In the first case, the computational process is carried out in stages.
Stage I. The total floor area is determined.
Stage II. The floor area under the bathroom, where tiling is not planned, is calculated.
Stage III. The net (net) amount of material for the flooring is calculated.
Stage IV. The result obtained increases by 10% for straight laying and by 15-20% for diagonal laying.
When calculating the number of tiles in rows, the length and width of the room are measured. After this, the length of the floor is divided by the length of the floor element, as a result of which the amount of ceramics in the row is determined (rounded up). Then the width of the bathroom is divided by the width of the tiles - we get the number of rows (again rounded up). By multiplying the number of tiles in a row by the number of rows, we obtain the total amount of material required. With this calculation method, the final figures are more accurate. Therefore, it is enough to buy 1-2 floor tiles (not packages) in reserve.
Calculation of the number of tiles per row.
Glue calculation
All manufacturers of tile adhesive indicate on the packaging the material consumption per 1 m2. But these are purely theoretical calculations, since in practice there are no perfectly smooth walls.
Therefore, dividing the area of the walls and floor by the material consumption, we end up with a basic figure that needs to be adjusted for the uneven surface of the walls and floor. For example, when leveling a wall with tile adhesive by 5 mm, the basic adhesive requirement increases by 20%.
Grout calculation
Fugue (grout) is purchased depending on the length, width and height of the seam between the tiles. The consumption is indicated on the packaging. Therefore, determining the number of packages of grout is not difficult. You should not be upset if there is not enough fugue or if it remains.
After all, you cannot predict how the seam is filled with glue. If it practically protrudes to the surface, consumption will be minimal. If the space between the tiles is empty, you will have to buy additional grout.
Adhesive compositions, classification, preparation
Depending on the conditions of use, tile adhesive materials are divided into 5 main categories:
- Adhesive for internal use, contains a minimum amount of special ingredients. For this reason, it is the cheapest representative of such materials.
- Universal adhesive compositions used for finishing objects with ceramic tiles both indoors and outdoors.
- Compositions intended for laying floor tiles. Due to the use of a significant amount of plasticizing additives, it has increased fluidity, which makes it unsuitable for use on vertical planes.
- Mixtures with increased adhesive properties are used for working with large-sized tiles, including for finishing non-standard surfaces.
- Adhesives with increased moisture resistance. The presence of hydrophobic plasticizers in the composition makes it indispensable for finishing fountains or swimming pools.
When purchasing tile adhesive mixtures, you should carefully read the package directions, including the list of ingredients, to make the right choice.
To prepare glue from ready-made mixtures, it is enough to thoroughly mix it with water in a strictly specified proportion. Having achieved a uniform composition, you need to let it sit for 10 - 15 minutes so that the chemical reactions of specific additives start. It should be borne in mind that the finished composition has a limited period of use, after which it begins to harden. It is impossible to “revive” such a mixture by adding water. Therefore, glue must be prepared in a limited volume per 1.0 - 1.5 square meters.
Stirring the adhesive composition with water is usually done in a plastic container using a special attachment on a drill.
Ceramic or porcelain stoneware products with increased load-bearing capacity and a rough surface are used for laying flooring. The walls are decorated with ceramic tiles.
Tile adhesive calculator by area
How to choose the right glue
You can make adhesive for bathroom tiles yourself, or you can buy it. It all depends on the type of base, the amount of work and the skill of the finisher.
So, if you need to level out significant differences in height on the surface of the walls with glue, it is cheaper to do it at home. You will need: Portland cement, river sand (quarry sand must be sifted to remove small pebbles), PVA glue (can be replaced with dishwashing detergent, liquid soap or washing powder) and water.
The quality of such glue depends entirely on compliance with the proportions of the ingredients in the composition: 4 parts of sand are added to Portland cement grade 300, 400 - 5, 500 - 6 and 5-10% PVA glue diluted with water (1 part water, 2 parts glue) for every 10 kg mixtures.
For information: to improve the frost, heat and moisture resistance of homemade glue, resistance to chemicals, plasticity and adhesion, special additives are added to the solution: MasterTherm, superplasticizer - C3, liquid glass, dibutyl phthalate, resin additive DEG1, superplasticizer D5, etc. .
The method of use of each additive is described in the instructions for its use.
Ready-made types of tile adhesive come in the form of:
- dry mixtures - the composition contains all the necessary components. All that remains is to stir according to the instructions;
Dry tile adhesive.
- mastic - ready-to-use paste;
Mastic.
- adhesive solution (another name is “liquid nails”) - used only for repairing (replacing) tiles.
How to choose adhesive for bathroom tiles if you have to buy it?
Here the choice of glue is determined by the base on which the ceramics will be glued. Thus, universal cement and two-component epoxy adhesives adhere best to gypsum and cement plaster. For a plasterboard wall, you need a dispersion adhesive that has good adhesion, but does not penetrate deeply into the base.
The best brands to buy: Litokol, Knauf, Vetonit Ultra fix, Ceresit and Unis Plus.
How to prepare the wall surface
Preliminary work consists of cleaning the surface of old tiles or paint, leveling it and priming it.
Removing old tiles
The old tiles are removed with a spatula, picking up the edge with a spatula. With the same tool you need to clean off traces of glue on the wall. Remains of the old fastener are unacceptable; they must be cleaned off until large scratches form, and if this does not work, they must be cleaned with coarse emery cloth. It is best to use it in a waterproof version, since old plaster quickly clogs the pores, and it is best to remove dirt with a jet of water.
After removing the tiles, the walls need to be sanded and large potholes and cracks filled with putty. If there are large protrusions, they are removed with a spatula or chisel and then sealed. The putty should be given time for final hardening during the day, and smoothed with sandpaper.
Cleaning old paint from walls
It is rarely possible to effectively remove paint from walls mechanically with your own hands. For this it is better to use a special liquid. It is applied to the walls with a brush and left for a day. During this time, the paint peels off the walls and is easily removed with a spatula. If difficulties arise, you can additionally use a hair dryer; the temperature of the air flow up to 600 degrees helps to separate the old paint from the walls.
Alignment of walls
Checking the horizontal straightness of the walls can be done with a stretched cord and measuring the distance between it and the wall. To clarify the amount of vertical curvature, a plumb line is used.
The amount of curvature up to 12 - 15 mm can be corrected with plaster , but this work can only be trusted by an experienced craftsman.
The second, radical way to correct curvature is to install a sheet of drywall on the wall.
Before starting work on finishing the walls with tiles, they need to be treated with a primer. The composition is selected depending on the material of the wall surface, in accordance with the recommendations on the packaging of the product.
Calculator for the required number of tiles
Step-by-step installation instructions
The instructions on how to lay tiles on the floor in the bathroom, as well as on the walls, have several sections:
- where to start laying ceramics;
- how to make markings;
- how to lay tiles on a wall in a bathroom;
- how to lay tiles on the floor;
- how to sand seams.
Where to start
For professional builders, the order of work is not fundamental. Some people first tile the floor, then the walls, and only then install the bathtub, others start with the walls, and others with the bathtub.
For those who carry out the entire cycle of work themselves, it is best to start with laying tiles on the walls - during the work, mortar, tools, and even tiles may fly down. If the glue can be rubbed off, then the tools and tiles leave chips, which the author has observed more than once, even among professionals. In addition, with this order of work, the bottom row of wall tiles rests on the floor tiles, solving another problem: a so-called “lock” is formed for water, which tends to seep through the joint.
In this regard, on the Internet you can find many recommendations in what sequence to tidy up the bathroom. Of these, in our opinion, only one deserves attention, where professional builders advise first tiling the walls, then installing a bathtub and completing the tiling by laying the floor.
Thus, beginners will avoid several problems at once:
- If you first install a bathtub, then the first row of tiles along the wall should go along the side of the sanitary ware, which, by the way, is good. But a huge problem for non-professionals is laying the two lower rows, namely, fixing the tiles in the penultimate row on the wall;
- Recently it has become fashionable to place the bathtub not on the tiles, but on the screed, which is easy to do with the above technology;
- there is no risk of installing a bathtub with a counter-slope (installed strictly horizontally), since you can always add mortar under the legs.
Another start when installing a shower cabin:
- all communications are installed;
- an inclined rough screed is poured;
- walls are lined;
- the floor in the booth is being finished - it should have a slope towards the drain hole;
- The tiles are laid on the rest of the floor in the room.
Marking
One of the conditions for correctly laid tiles with a pattern or pattern is to apply markings to the wall or floor. To avoid mistakes and apply the correct pattern to the wall, the tiles are laid out on the floor in another room. The tiles are numbered in pencil on the reverse side. The resulting diagram is transferred to the wall.
Marking is also required for the metal profile for the first row of cladding on the wall. The work is carried out using a pencil (marker), tape measure and level, preferably a laser one. First, the lowest corner in the room is located (how to do this correctly, you can see in the work “How to check the floor level in an apartment yourself”).
Then, starting from the floor, the location of the seam between the first and second rows is determined, after which a horizontal line is drawn along the wall along the entire perimeter of the room, which will allow the ceiling profile to be attached to the walls perfectly evenly.
Marking using a laser level.
Wall covering
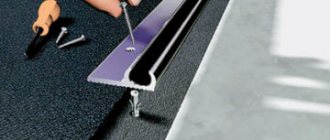
The peculiarity of wall cladding is that with a slight curvature of the floor, the ceramics begin to move to the sides, forming so-called steps. To avoid problems with vertical seams, you need to either allow the first row to dry completely, which takes a long time, or artificially create a perfectly flat stand for the first row.
The second option has become very popular among professionals. To do this, they screw a ceiling profile to the wall using self-tapping dowels (used when covering gypsum board walls). The tiles are placed on it. After the lower rows have dried, the profile is removed, and the wall, after laying the tiles on the floor, is tiled.
Profile on the wall for the first row.
In practice, several methods of laying ceramics are used, in which glue is applied:
- only on the back side of the tile - this method is possible with smooth walls;
- on tiles and walls - used when there is significant curvature of the wall, since a thick layer of glue levels out differences in height of the wall surface;
- only on the wall - used by craftsmen with extensive experience.
Before starting work, the tiles and walls are sprayed with water so that they do not draw out the water necessary for the adhesive solution - due to a lack of moisture, the hydration process of the cement solution may be disrupted (wetting of the walls is not carried out under epoxy adhesive).
After gluing several tiles, they are brought into one plane using a level and a mallet. Innovative tile leveling systems (TIS) will help simplify the process. The principle of their operation is shown in the photo below.
Leveling the tile plane using SVP.
Leveling tiles with the Rubi Tile Level system.
The installation technique is simple:
- glue is applied to the wall or tile with the smooth side of the spatula;
- using the teeth of a spatula, ridges are created (without them it is impossible to adjust the plane of the tiles - the glue will constantly protrude between the seams);
- apply the facing element to the wall and immediately place plastic crosses or SVP elements;
Laying the first row.
- using a mallet, level and devices (crosses or SVP) bring the tiles into the same plane with the already laid cladding;
- in the corners of adjacent walls, the tiles should overlap each other and not touch with their edges, which is clearly visible in the figure.
Options for tile joints in corners.
Holes are also drilled into the tiles using special crowns or drills for existing holes in the wall for various pipes and cables. These operations are carried out before laying the tiles.
Installation of ceramic floor
Floor covering work begins with applying silicone sealant to the joints of the floor and walls (an additional degree of protection against moisture penetration down to the neighbors). The first tile is laid in the far left corner, the last one is at the threshold. Otherwise, the installation technique is identical to working on the wall.
After the glue has dried, a sheathing of wooden slats or a metal profile for the screen is mounted on the floor, on the outside of the bathtub. Moisture-resistant drywall is attached to the sheathing with self-tapping screws. Along the edges, near the walls, hatches are installed to provide access to communications. They are attached to the sheathing using magnets (removable with suction cups). The tiles are glued to the gypsum board.
Hatch for servicing communications.
You can watch a video on how to lay tiles in a bathroom.
Final work
Among the final works are two operations:
- sealing the joint between the bathtub and the wall;
- grouting joints.
The joints between the tiles and the side of the bathtub are sealed with silicone sealant. But the tiles cut in narrow strips, laid along the entire perimeter at an angle of 45°, look more beautiful. It effectively hides the seam while preventing water from seeping down the wall under the bathtub.
Grouting of joints with a fugue is started after the glue has completely dried - at least after two days. The consistency of the grout should resemble rich sour cream with a spoon in it. If the solution is thin, it will float off the seams. Thick materials cannot be rubbed evenly into the seams.
Grouting joints.
Rubbing the fugue between the tiles is done with a rubber spatula. After filling the seam with the solution, the surface is grouted at an angle of 25-30°. In one pass, about 3 m2 of area is processed - it depends on the skill of the finisher and the size of the tiles.
Traces of paste on the tiles are immediately removed with a dry cloth (a wet cloth will leave stains that will take a long time to wash away). After 3-4 hours, the seams can be corrected with your fingers - rub the solution in places where there were gaps or the fugue failed. After this, the seams are sanded with a foam sponge.
Where will corners be needed?
Trimming tiles is inevitable when decorating walls with this facing material for a number of reasons:
- the most aesthetic option for laying out tiles is “from the middle”, the tiles are cut in both corners;
On the boxes, all tiles are cut to obtain a beautiful layout without narrow and asymmetrical pieces. - the edge of the cut is very rarely perfectly smooth, the glaze may chip;
- If the finisher is not sufficiently qualified, the tiles may turn out shorter than the required size.
Therefore, you have to seal the joint with grout or initially use a special profile that allows you to hide minor defects. A corner seam occurs at the junctions of the following surfaces:
- wall/wall – internal vertical;
- wall/ceiling – internal horizontal;
- wall/floor – horizontal internal;
- wall/bath – internal horizontal;
- wall/wall – vertical external;
- wall/slope – external vertical and horizontal.
Important: In a separate bathroom with brick walls, the last two options are rare, since communications, metering devices, shut-off valves are often located near the toilet, that is, the boxes are built inside the toilets.
The joint between the bathtub and the wall needs not only finishing, but also sealing against leaks.
Possible problems and ways to solve them
Careful study of instructions, manuals and tutorials on how to properly lay tiles in a bathroom does not guarantee high-quality work. When laying tiles yourself, mistakes almost always occur. Some have more, some have less. In this situation, you need not to get hung up on the problems that have arisen, but to quickly eliminate them before the glue has completely set.
The tiles lie in steps
The origins of such a defect were laid during the preparatory work - the problems of the wall plane were not completely eliminated. More precisely, the line where the wall meets the floor has a slope or curvature. As a result, the vertical joints will slowly move to the side, creating steps of tiles. In such cases, you initially need to either trim the tiles or place various underlays under them to maintain a perfectly even top line.
If the problem is discovered later, after laying several rows of tiles, you need to find the row where it all started and wedge the seams. The lower seam is corrected using matches and wedges, the upper seams are corrected with plastic crosses of different thicknesses.
Steps.
The tiles look crooked in a row
This situation occurs when there is no cross in the seam - it fell out or the craftsman forgot to insert it. The defect can be easily eliminated: the tiles are leveled, new crosses are placed in the seams, and the displaced tiles are secured on all sides to adjacent tiles with masking tape.
The tile looks crooked.
The tile falls inside
When the tiles are embedded in the adhesive and this is clearly visible visually, the fault lies entirely with the finisher - he applied the adhesive mixture incorrectly: either unevenly or only in dots. By the way, the most common mistake of novice finishers is to apply glue pointwise in order to save it. In this case, the tile either sinks in or cracks, becoming covered with cobwebs.
Defects in work are eliminated by re-gluing the entire row of tiles, which is easier and faster than re-gluing only sunken tiles. This recommendation seems illogical, but it is a fact.
Restoring sunken tiles.
The sealed seams have failed
Such defects occur as a result of poorly cleaned seams or too liquid grout. The defect can be eliminated by repeating the jointing operation after the old grout has been removed and the seams have been cleaned.
Different tile sizes
Even the world's leading brands producing ceramic tiles may have different lengths and widths of tiles. The difference may be minimal, but on the wall it is noticeable. Therefore, experienced finishers lay one row of tiles from one package, which increases the likelihood of hiding sizing errors.
If a tile of a different size has already been laid, then it is replaced with another one, more suitable in geometry to the adjacent tiles, or the size of the seams is adjusted to hide the defect as much as possible.
How to tile a backsplash in the kitchen
When finishing a kitchen apron with ceramic tiles, the technology is practically no different from that described above. There is simply no need to calculate the number of vertical rows. The “start” location is determined by the height of the tabletop: it should start 5-10 cm above the edge of the tile. Attach the bar at the required level, align it exactly with the horizon, and you are ready to begin.
An example of a tiled apron on a working wall in the kitchen
An apron in the kitchen is usually made on the work wall. If it is not one wall, but two or three, you can start from one of the corners.
How to tile a backsplash in the kitchen
If the apron is made of small-sized tiles, the undercuts may not be very noticeable. If you want to do everything symmetrically, repeat the layout and start from the center, as described above.
The nuances of laying tiles in the bathroom
Every business has its own little secrets. Tilers also have them:
- The surface of the tile should not have chips, blurred patterns or stains. Tiles with such defects are set aside. Its subsequent use is possible in places closed from view. For example, behind a bathtub, washing machine or sink counter. Tiles with chips are most often used for trimming, getting rid of damaged areas using a tile cutter;
- high-quality tiles should have a flat surface and right angles. You can check these parameters quite simply. It is enough to stack two tiles with their front sides facing each other - the presence or absence of gaps gives an assessment of the quality of the product;
- Laying tiles on drywall in the bathroom will be done quickly and efficiently if you allow the 1st row to dry completely. This will prevent the tiles of the upper rows from sliding and steps will not form. In general, this advice from experienced specialists is universal - suitable for walls made of any material;
- you only need to press the tiles into the glue with a rubber hammer (mallet) to avoid damaging the tiles;
- Mentally, the design of a pattern on a wall is difficult to evaluate. Therefore, it is best to lay the tiles on the floor in the next room and see what happens. It’s too late to change anything on the wall;
- When gluing the tiles, you do not need to press them hard into the adhesive - the mortar will begin to protrude through the seams. If the adhesive does appear, it must be removed immediately;
- if the desired grout color is not available, a white fugue is purchased and then tinted. Here you need to be very careful and count drops of dye per volume of solution in order to subsequently obtain the same color;
- to make the room wider, light tiles are laid on the walls in a horizontal position, higher - in a vertical position;
- For hexagonal tiles, a contrasting color grout is used - it looks very beautiful and interesting.
Grouting seams
Only when the glue has completely dried should you start grouting. It happens:
- cement;
- silicone;
- epoxy.
The work must be done as follows:
- remove the remaining crosses;
- Clean the tile surface and tile joints with a vacuum cleaner;
- in order not to stain the tile finish with the grout, it is necessary to cover its edges with masking tape;
- Apply a little grout inside the seam;
- run a rubber spatula along the seam, removing excess product;
- let the composition dry;
- remove the tape;
- wash the tiles.
The technology of laying tiles can hardly be called easy, especially for beginners. But a truly high-quality result will definitely please its owners. A rich color palette and a wide selection of layout schemes will create comfort and a unique atmosphere.
Summarizing
Tile is the most common floor and wall covering for the bathroom. It is highly durable and resistant to high humidity. In addition, this material has a low price. You can install it in the bathroom yourself. This will not require special knowledge and professional skills; you will not need a large number of tools and expensive materials. However, when installing, you need to remember a number of important rules that will ensure the strength of the coating and its long service life.
Tile cutting technology
Before gluing the tiles to the wall, you need to cut out the missing elements using a tile cutter. This is often required at corners, or when creating holes for drain pipes.
- To cut ceramic tiles, the product is scratched with a tool. To get an even result, use a ruler.
- Then it is placed on the edge of the table so that it coincides with the outlined line. Glazed surface at the top.
- By pressing on the tile from both sides, you break it along the cut.
If you need to cut tiles of irregular shape, you first need to mark them with a felt-tip pen. Excess pieces are broken off with tongs. Next, the edge is processed with a whetstone. This is done in any case, regardless of the thickness of the tiles on the wall.
Round cutouts for pipes are made with a drill. To do this, apply masking tape to mark the drilling location. During the process, gradually increase the size of the drill bits to the desired end result.
To obtain a round cutout, markings are carried out as follows:
- lean the required size of ceramic tiles for the walls (consider thickness and other parameters in advance) on one side of the pipe, then under or above it;
- transfer the markings to the part corresponding to the level of the sides, top and bottom of the pipes;
- then draw lines at right angles to the edges of the tile;
- In the middle of the resulting rectangle, mark a circle with a size equal to the diameter of the pipe.
Another method for creating a round cutout is to cut the tile in half. The cut should be in the center of the circle so that the pipe will subsequently hide the resulting joint. This is done both vertically and horizontally. After cutting the part, make a semicircle of the required size on each half.
What materials and tools will be required?
Before gluing tiles in the bathroom, you need to prepare some tools:
- Two spatulas. Toothed (used to treat the surface with an adhesive composition), rubberized (with its help, grout is applied).
- Pencil, tape measure, building level.
- Cutting device.
- Drill for drilling technological holes in the material.
- Crosses (installed in the seams to ensure evenness of installation).
Important! Before gluing tiles to the wall, you also need to buy a composition for priming the rough surface, an adhesive mixture, a grout material, and a profile.
Cleaning
Before you begin tiling, the bathroom walls must be cleaned, leveled and primed. The smoother the surface, the less glue you will have to use, and the faster the work will go. And since “naturally” ideal walls are rare, many repairmen correct the curvature with the help of drywall. Moreover, it is advisable to use moisture-resistant gypsum plasterboard in the bathroom.
IMPORTANT: For the section of wall around the pipes, you will need to install a metal frame. A user with the nickname Master111 recommends first priming the joints in the box and then filling them with tile adhesive.
If you are lucky with the walls, but acrylic or oil paint has already been applied to them, it needs to be cleaned off.
max2741 Member FORUMHOUSE
Believe me, a good scraper, 3-4 hours of torment, and you will succeed. But you won’t have to worry when the tiles start to fall off along with the paint and putty that has left the moisture.
When leveling, it is important to know that gypsum plaster is absolutely not suitable for bathtubs. Here's what a member of the EsKor portal says about this.
EsKor
According to the rules, gypsum plasters are not used in wet rooms - gypsum is hygroscopic.
So, the leveled and cleaned surface is primed. After the soil has dried well, you can proceed to the next stage.
To work you will need the following tools:
- pencil;
- level or hydraulic level;
- square;
- plumb line;
- tile cutters;
- block with sandpaper;
- tile crosses and wedges;
- notched spatula;
- regular spatula 100 mm;
- rubber spatula (for jointing);
- glue container;
- tile cutter;
- tile drill (preferably bimetallic).