Owners of both freshly laid and well-used parquet floors are faced with the need to fill the seams between the tiles. A smooth surface without gaps or cracks prevents the accumulation of dust and the penetration of moisture into the wood, significantly increasing the service life and maintaining the attractiveness of the floor covering. The answer to the question of how to seal cracks in parquet depends on the age and condition of the flooring.
Gaps not only reduce the durability of the floor, but also affect the appearance and feel
When repairing a parquet floor with your own hands is impossible
Seeing in front of you a parquet that is clearly in need of repair, you need to clearly understand in what cases it is worth doing it yourself, and when it is better to involve specialists in the work. There are three particularly severe cases of parquet damage, when you cannot do it yourself :
Wavy cracks in the parquet boards, “hollows” and gouges, the coating has taken on a too dull appearance. In this case, a complete replacement of the floor covering will not be necessary, but let the professionals handle its restoration.- Excessive flooding of parquet and, as a result, swollen boards torn from the base. You can disassemble the floor covering yourself and dry the parquet boards, but not every one of them will return to its “original state”, and the processes of scraping and varnishing the coating will be more professionally performed by invited specialists.
- The parquet itself is dark, the wood is loose, the boards are falling in places, and there is mold and rot on the floor. In this case, a complete replacement of the parquet flooring will be required - repairs will not be enough. In addition, you will need to dry the floor and re-prepare the base for laying a new coating.
All other cases of parquet damage are repairable - this means that the work on restoring the parquet can be done on your own.
Please note: if parquet repair is intended as a continuation/component of the overall renovation of the premises, then it is carried out last.
Repaired defective areas
Here you immediately need to draw a line between the cracks (technological gaps) that were left on purpose and those that appeared during operation. Damper slots along the perimeter of the floor near the walls are not sealed, as they provide a reserve in case of increasing the area of the floor covering. They are covered with decorative skirting boards.
Chips on parquet Chips on parquet: effective ways to eliminate them
How to seal gaps in the floor between boards How to seal gaps in the floor between boards, when repairs are needed, and how to do them
Another thing is the gaps between the parquet planks, which arise due to two reasons:
- Improper parquet installation technology can subsequently cause similar defects. Here we should only blame the craftsmen who installed the slats incorrectly. If the installation was carried out using glue, the mixture may not have been distributed evenly, which is why the planks did not adhere securely in all places. With the “floating” installation method, the cause is poor locking connections or an uneven base. Often such gaps become visible after six months or a year of operation.
- The second reason is improper parquet care. With changing humidity and room temperature, parquet constantly changes its linear dimensions. With high humidity, the planks can push each other out due to insufficient technical clearance between them. And at low humidity they dry out. The normal indoor humidity level is 45-55%.
You can find out what the problem is in a simple way. Deformations due to poor installation appear only in some areas of the floor, because it is unlikely that the master was so bad that he laid the entire floor incorrectly. And in a bad microclimate, the floor covering is completely deformed, and all the planks change their dimensions.
No less important information on the topic: Chips on the parquet
Regardless of the reasons, the defects will have to be corrected in the same way, only the scale differs. Properly seal cracks and gaps as follows:
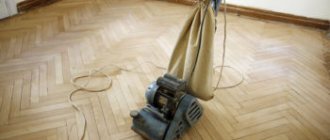
Sanding parquet boards
- scrape and sand the floor;
- seal cracks and gaps using one of the following methods;
- apply fine grinding;
- cover the surface with varnish.
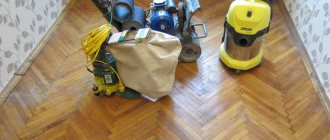
Performing sanding work on parquet floors is problematic because a special sanding machine is required. Therefore, it is advised to hire professionals who will perform a complete cosmetic repair of the parquet.
With a relatively new parquet flooring, there is no need to carry out rough scraping and sanding; it is enough to cover up the cracks, sand them and varnish them.
How to remove cracks and crevices in parquet flooring
Let's make a reservation right away - we will talk about eliminating with your own hands small cracks and crevices that can form due to long-term use of the parquet flooring or impact with a heavy object. Experts believe that self-repair can only be carried out if there are cracks/cracks no larger than one and a half millimeters in size.
First of all, you will need to purchase putty - it is sold in a large assortment, so you need to know what type of wood was used in the production of your parquet. The process of restoring parquet with cracks and crevices is carried out in stages :
- Thoroughly clean the surface to be repaired from dust and dirt. To clean the crack or crevice itself, you can use a vacuum cleaner with a narrow, plastic nozzle. Under no circumstances should you try to remove dirt from the recess with a stick, knitting needle, or knife - this usually leads to expansion of the damage.
- The putty is applied with a narrow spatula or a wide knife exactly into the crack/crevice. In this case, you need to try to fill the space with putty as much as possible - until excess material appears on the surface of the coating. These same excesses are removed with the same spatula or knife.
After the putty has completely dried (drying time can be found in the instructions for the material), you can begin sanding. To do this, use fine sandpaper and the cleaning process should last until an absolutely flat/smooth surface is created.
- 2-3 layers of varnish or mastic should be applied to the repair area - these materials play a protective role.
Please note: if the gap/crack is more than 1.5 mm wide, then you should not even try to use putty. The result will be a spillage of dried material, despite a competently carried out stage of preparing the surface for repair.
putty
Modern manufacturers of building materials offer a huge range of putty for parquet. It is best to choose a product from the same company as the parquet varnish used. This way the adhesion of materials will be much stronger and more invisible. Regardless of the depth of the hole in the floor, putty should be applied in a layer no thicker than 1 millimeter. If this is not enough to remove the defect, then apply another additional layer, but only after the previous one has dried.
How to remove wide holes in parquet
If the gap in the parquet is too wide and the situation cannot be corrected with putty, then experts recommend doing the opposite. This means that the hole needs to be expanded even further - we deepen it with a chisel or an awl, and smooth out the edges.
Then you need to take a pre-prepared wooden block, coat one side with wood glue, not forgetting to treat the sides of the insert, and “embed” it into the damaged floor covering. After this, the repair area is cleaned with fine sandpaper and covered with varnish or mastic.
Please note: wide cracks often appear on parquet flooring laid in a room with constant changes in air humidity levels. To prevent this situation, it is recommended to artificially humidify the air in winter.
Types of sealants
The most common colors for sealing parquet tiles
Grout for flooring materials helps improve the technical characteristics of floors. To treat the seams between slats, baseboards and parquet, “regular” sealants that do not have specific qualities and “special” ones can be used:
- Colored sealant. The color composition contains pigments, thanks to which you can choose a grout that matches the color of any type of wood - oak, ash, birch, beech, walnut, etc.;
- Antibacterial sealant. Ideal for working with ceramic tiles, where mold often appears in the seams due to the specific microclimate in the room (bathroom, kitchen, bathhouse).
Based on the number of components that the grout contains, the following types of sealing mixtures are distinguished:
- One-component. They harden very quickly, losing elasticity. Therefore, they are used mainly for working with tiles and other materials that practically do not experience thermal expansion;
- Two-component. They consist of two different components, one of which plays the role of a connecting element, and the second improves some of the physical and mechanical properties of the sealant: frost resistance, elasticity, adhesion, etc.
Often, one-component mixtures are used to work with ceramic tiles, but for wood processing it is more advisable to use a two-component acrylic composition. Its advantages include:
Types of varnishes for parquet and selection rules
- high adhesion to wooden surfaces;
- ability to withstand tension and compression;
- good hydro- and heat-insulating qualities.
How to sand parquet with your own hands?
We recommend reading: – Caring for parquet: basic rules and recommended products – Do-it-yourself parquet scraping: instructions and recommendations
Over the years, parquet inevitably loses its appearance - it becomes dull and covered with scratches. To restore the floor covering, you need to resort to the scraping process. It is carried out in three stages :
Using a scraping machine, the top layer of varnish is removed, touching the old wood. At this stage, the surface is leveled.- Opened cracks and cracks are puttied manually.
- The floor covering is sanded with fine sandpaper (this can be done by hand, but you can also use a special grinding machine), covered with a primer solution and varnished.
Please note: you can carry out sanding work on your own on the old flooring only if the parquet is not loose and the boards have not moved away from the base. The repaired parquet should be coated with varnish at least 3 times; the last layer of such decorative coating takes 3 days to dry. When carrying out filling work, it is advisable to mix the putty with sawdust - this will achieve maximum camouflage of the parquet restoration work.
Repaired defective areas
Here you immediately need to draw a line between the cracks (technological gaps) that were left on purpose and those that appeared during operation. Damper slots along the perimeter of the floor near the walls are not sealed, as they provide a reserve in case of increasing the area of the floor covering. They are covered with decorative skirting boards.
Another thing is the gaps between the parquet planks, which arise due to two reasons:
- Improper parquet installation technology can subsequently cause similar defects. Here we should only blame the craftsmen who installed the slats incorrectly. If the installation was carried out using glue, the mixture may not have been distributed evenly, which is why the planks did not adhere securely in all places. With the “floating” installation method, the cause is poor locking connections or an uneven base. Often such gaps become visible after six months or a year of operation.
- The second reason is improper parquet care. With changing humidity and room temperature, parquet constantly changes its linear dimensions. With high humidity, the planks can push each other out due to insufficient technical clearance between them. And at low humidity they dry out. The normal indoor humidity level is 45-55%.
You can find out what the problem is in a simple way. Deformations due to poor installation appear only in some areas of the floor, because it is unlikely that the master was so bad that he laid the entire floor incorrectly. And in a bad microclimate, the floor covering is completely deformed, and all the planks change their dimensions.
No less important information on the topic: Chips on the parquet
Regardless of the reasons, the defects will have to be corrected in the same way, only the scale differs. Properly seal cracks and gaps as follows:
- scrape and sand the floor;
- seal cracks and gaps using one of the following methods;
- apply fine grinding;
- cover the surface with varnish.
Performing sanding work on parquet floors is problematic because a special sanding machine is required. Therefore, it is advised to hire professionals who will perform a complete cosmetic repair of the parquet.
With a relatively new parquet flooring, there is no need to carry out rough scraping and sanding; it is enough to cover up the cracks, sand them and varnish them.
Partial replacement of parquet
If the parquet boards have moved away from the base or are severely damaged, then a partial replacement of the coating will have to be carried out.
First of all, you need to dismantle the hopelessly damaged areas of the parquet flooring. During dismantling, you need to be extremely careful not to damage the remaining parts of the parquet. After dismantling, you should clean the base from old glue, get rid of dust and dirt - this will ensure excellent adhesion of the adhesive composition and the base of the floor. All that remains is to apply wood glue to the prepared new parquet elements and insert them in place of the damaged ones. Sometimes it happens that new boards literally stick out on the general surface of the floor - in this case, you will need a plane, which simply removes extra millimeters of wood along the grain from the underside of the parquet board.
If it is necessary to replace several parquet boards at once, they must be knocked down/fastened before installation begins. This can be done with glue or small nails. By the way, you can also attach new parquet elements to existing ones on the floor not with wood glue, but with nails - in this case, the nails are driven in at an angle, fastening one element to another.
Please note: if replacing parquet boards is carried out using wood glue, then a weight must be placed in the location of the new boards for several days.
Blistering
The absence of temperature compensation gaps can cause a violation of the level of the entire parquet flooring. Externally, this manifests itself in the occurrence of the following defects: bulging of individual strips, the appearance of irregularities. One of the best ways to solve this problem is to dismantle the outer rows of dies.
If necessary, their end faces are ground down to the required size. As a result, a free space of up to 5 mm thick should form between the wall and the parquet flooring. It is filled with a flexible seal - foamed polyethylene or tubular rubber. Next, the dies are reinstalled.
This method will ensure the proper level of pressure on the parquet flooring elements. With the thermal expansion of wood, the linear expansion of the dimensions of the parquet will be compensated by the damper gasket.
How to restore parquet after flooding?
Everyone knows that wood absorbs water well and expands at the same time. And if the parquet floor is flooded with water, then before your eyes you can see two scenarios :
- a swollen parquet board torn from the base;
- deformed parquet elements that have not come off the base.
In the first case, you will have to replace damaged parquet elements - you can do this yourself, but only if small areas of the flooring are damaged. If the parquet boards are deformed, while maintaining the strength of the fastening on the base, restoration work can be carried out without replacement.
What can you do about swollen parquet flooring?:
Thoroughly warm the area with a hair dryer - this is a long process, it will take at least an hour and a half. The smell of mastic that appears will indicate that the heating is complete.- Now you need to quickly spread any textiles - burlap, knitwear, cotton - on the heated place.
- You need to place a weight on top of the heated section of the swollen parquet. It must be very heavy - at least 10 kg per square meter. m - these could be tube TVs (old granny’s apartments usually have such “goods”), stacks of thick books, weights, and so on.
- After a day, remove the load and see what happened to the damaged area. If the swelling has decreased, then the operation to restore the parquet must be repeated. Otherwise, the parquet is hopelessly damaged and you should prepare for a full replacement of the floor covering.
Please note: if the parquet was flooded with water not today/yesterday, but the swelling was a week ago, then it is not worth carrying out the described operation - fungal colonies have already awakened, multiplying and actively living in the thickness of the wood.
Step-by-step video instructions for repairing parquet with your own hands are presented in the video review:
How to fix squeaky parquet floors
At first, the creaking of parquet boards is perceived absolutely calmly - there is even a certain amount of romance and mystery in it. But over time, this fact begins to greatly irritate, interfere with sleep, and therefore something will have to be solved with this problem. Most likely, you will need to pull the parquet away from the edges.
Stages of work:
We remove the baseboard around the entire perimeter of the room and check the condition of the spacer wedges. Most likely, once a persistent creaking appears, they are no longer able to open anything, but simply lie in the crack.- If there are complete absence of wedges and the presence of polyurethane foam, you will need to completely clean the gap and insert the wedges.
- We install new wedges at a distance of 50-60 cm and tap them tightly.
If an individual floorboard creaks, you can fix the problem in a matter of minutes, without dismantling the baseboard. Watch detailed video instructions on how to eliminate squeaking parquet floors:
Now you need to knock out the wedges every day and control the strength/loudness of the squeak. If after 5-7 days the creaking has not disappeared anywhere, and the wedges “sit” tightly in the crack, then this means only one thing - it’s time to change the floor covering.
It is quite possible to carry out minor parquet repairs with your own hands - there is nothing complicated about it. It is only important to adhere to the described recommendations and then the luxurious, cozy, practical parquet will last for many years.
( 82 votes, average: 4.70 out of 5)
Heating cable for pipes: principles of do-it-yourself selection and installation
Do-it-yourself insulation of a wooden floor: step-by-step instructions
Related Posts
Elimination of minor defects
For minor damage, restoration of the surface will take a few minutes. Let's look at how you can remove small scratches on a parquet board.
For this you will need:
- soft wax;
- plastic spatula;
- retouching marker with a thin rod;
- lint-free polishing cloth;
- fixing varnish.
Step 1. The area of the floor with scratches should be thoroughly cleaned of dirt and dust and dried. If greasy substances come into contact with the parquet, the surface must be thoroughly degreased.
Step 2. Select soft wax by color, then scoop it up with a spatula and apply it to the scratch. The composition must be rubbed forcefully across the scratch to tightly fill the recess.
Waxing
Step 3. Place the spatula perpendicular to the surface and remove excess wax along the scratch with a sharp movement.
Removing excess wax
Step 4. Using the corner of a spatula, clean the pores of the material to restore the primary structure of the coating.
Step 5. Next, take a marker with a thin rod and carefully draw the texture on the restored area.
Texture restoration
Step 6. The final stage is applying varnish. The can must be shaken thoroughly and sprayed a little to the side to clear the nozzle. Next, bring the can to the surface to be treated and, holding it at a distance of 20-25 cm from it, spray the varnish onto the coating with a short, light pressure. You cannot spray for a long time, otherwise drips will form and a visible halo will remain. After 10 minutes, when the varnish has dried sufficiently, apply another layer. It takes 3-4 hours for the coating to dry completely at a temperature of at least 20 degrees.
Applying varnish to parquet
Result of scratch repair
You can also use a furniture touch to repair small scratches, carefully applying it with a brush to the problem areas.
Restoration stroke
Light abrasions can be simply painted over with a marker or rubbed with a wax pencil, and then polished with a thick cloth.
Retouching pencil
If you don’t have any purchased funds at hand, folk methods will do. The most popular option is to rub the scratch with the core of a young walnut. This makes the material darken and the damage becomes less noticeable. Treatment with iodine gives the same result. Of course, these products will only be effective on a dark surface, but they are completely unsuitable for light gray or beige boards. In addition, this result is temporary and the damage will still have to be eliminated with a touch or wax.
Prices for Sinteros parquet boards
parquet board Sinteros
Walnut pieces will help hide shallow scratches
If scratches have formed on furniture that is dark red or brownish in color, they can be masked with iodine