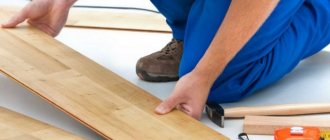
One of the main advantages of parquet boards is that they do not require additional processing after installation. The material is sanded, scraped, varnished and other operations are carried out in the factory, so all that remains for the consumer to do after purchase is to correctly lay the boards on the subfloor. Thanks to a convenient locking system, installation technology is noticeably simplified, but in order to create a high-quality and durable floor covering, you need to study all the intricacies of this process.
How to lay parquet boards
Features and types of parquet boards
Parquet boards differ from ordinary wooden boards in their three-layer structure:
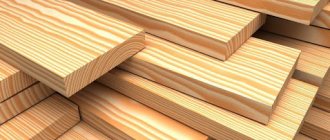
- the top layer is valuable wood with a pronounced texture. The thickness varies between 1-6 mm, but most often it is 3.5-4 mm. To increase the decorative properties, the material undergoes heat treatment, bleaching and other procedures, and to protect against negative effects - varnishing or impregnation with oil-wax compounds;
- the intermediate layer is pine or spruce slats laid perpendicular to the front layer. At the ends of the slats, tongue-and-groove or locking joints are cut, depending on the modification of the parquet board. The thickness of this layer is 8-9 mm;
- the bottom layer is solid coniferous wood veneer, up to 2 mm thick. The direction of the fibers is perpendicular to the previous layer.
Parquet board structure
Parquet structure
This arrangement of layers provides the material with high bending and compressive strength, and increases resistance to changes in humidity and temperature conditions. There are almost no chips on the parquet board, and the protective coating retains its attractive appearance for years. The standard board has the following parameters:
- width 120-200 mm;
- length 1100-2500 mm;
- thickness 10-22 mm.
Dimensions of parquet boards
There are several varieties of parquet boards, depending on the number of tiles in the top layer and the presence of chamfers on the sides.
Table. Types of parquet boards
| Board type | Characteristics |
Single lane | The top layer is a solid cut of natural wood. After installation, the material is visually indistinguishable from solid wood flooring, which gives the interior a more presentable look. In addition, the single-strip option is considered the most decorative, due to the integrity of the natural pattern. |
Two-way | The front layer consists of a double row of dies, which gives the coating an external resemblance to parquet. The length of the dies varies over a wide range: they can be solid or divided into 2-3 segments. The dies differ slightly from each other in tone and fiber structure |
Three-lane | The dies are arranged in three parallel rows offset along the length. There are also herringbone and wicker options - a classic parquet pattern. This coating is the most common today, as it is perfect for any type of premises. |
Multiband | The top layer consists of small, perfectly fitted dies, differing in shades and fiber structure. The coating pattern is bright and saturated, which is optimal for interiors that are not overloaded with details. |
With chamfer | The presence of a chamfer increases the decorative properties of the coating and makes it resemble a natural plank floor. In addition, these cutouts along the edges help minimize errors during installation. The chamfer width is 1-3 mm |
Prices for Tarkett parquet boards
Tarkett parquet board
Video description
The video features an interview with a technologist about adhesives for parquet flooring:
It is worth paying attention to the specialist’s recommendation about primers. Concrete must be treated 3 times with intermediate drying. Each layer is applied with a roller perpendicular to the previous one. Corners and perimeter are processed with a brush. The glue can subsequently be applied either with a notched trowel (wavy edge or in increments of up to 3*3 mm).
Gluing parquet material Source gorobzor.ru
Pros and cons of the material
Despite the abundance of inexpensive and reliable floor coverings, the demand for parquet boards remains consistently high. This popularity is explained by the presence of significant advantages of the material:
- the coating is durable and has a long service life, is resistant to wear and can be restored;
- there is no need for varnishing, sanding or painting after installation is completed;
- thanks to the locking system, the coating can be dismantled and re-installed if necessary, without compromising its performance properties;
- installation does not require special equipment and does not take much time;
- parquet flooring looks impressive and is suitable for different interior styles.
Parquet flooring in a bedroom interior
Parquet flooring is very strong and durable
Parquet does not need to be painted
Parquet can be dismantled, transported and reassembled
Installing parquet does not take much time
This coating also has disadvantages, although there are not many of them:
- lack of possibility of curly styling;
- relatively high price;
- the need for careful preparation of the rough foundation.
Parquet is not a budget flooring
Recommendations
Before laying hardwood flooring, you must carefully remove any debris from the subfloor. Parquet is not a thin laminate. Any pebble will not push through a thicker multi-layer solid wood plate and will not be visible as a protrusion at the finish. However, it will put pressure on the tree from below. Moreover, this pressure will be point pressure, which is strongly contraindicated.
Ideally, parquet boards should be laid without the slightest cracks - one millimeter, no more. This can be achieved only by strongly pressing the new plank into the one already placed with a hammer blow. However, hitting directly at the end with a tongue-and-groove lock is prohibited.
This way it will be damaged, which will lead to a decrease in the strength of the floor covering structure. The laid planks should only be tapped using a hammer in the form of a piece of wood or a block.
Floor laying technology
Methods for laying parquet boards
The coating can be laid in three ways - adhesive, floating and using fasteners (nails, self-tapping screws).
Glue method
Laying the coating with adhesive requires a perfectly flat and dry base. If there are recesses or bumps left on the subfloor, this will lead to uneven wear of the finishing layer, the appearance of cracks, and deformations. It is also more difficult to restore such a floor, since more material is removed during sanding in protruding areas than necessary, and in recesses it is not removed at all. And the presence of moisture under the floor contributes to partial peeling of the coating, the appearance of fungus, swelling and heaving. To eliminate such risks, the parquet board is glued not to the screed itself, but to a backing made of plywood or chipboard. There must be waterproofing under the substrate; additionally, you can lay soundproofing material - cork, polyethylene foam and others.
Laying parquet with glue
This method is used less and less often because it has more disadvantages than advantages. Firstly, costs increase: in addition to parquet boards and waterproofing, you need to buy backing material, fasteners and special parquet glue, the cost of which is quite high. Secondly, installation takes more time, because you need to cut and fit the plywood, secure it correctly, and apply glue. You cannot walk on the floor until the glue is completely dry. In addition, it will be more difficult to replace accidentally damaged areas, and the dismantled floor is unsuitable for reuse.
Laying parquet boards with glue
Floating method
Laying of the covering is carried out without fixing the parquet board to the rough base. The lamellas are attached to each other using a tongue-and-groove system or a special locking connection. A small gap must be left around the perimeter of the room to prevent the floor from deforming during thermal expansion. There is a layer of waterproofing between the coating and the base; noise-absorbing materials can also be laid.
This method is considered the most convenient and fastest, therefore it is used by most craftsmen, and is also ideal for those who do not yet have construction experience. If the installation technology is followed, the coating can withstand changes in humidity and temperature, which means that the risk of deformation is reduced to zero. If individual slats are damaged, replacing them will not be difficult; the main thing is to choose the right boards based on tone and pattern. Complete dismantling of the coating will also not require much effort; in addition, the material can be reused.
Laying parquet boards using the floating method
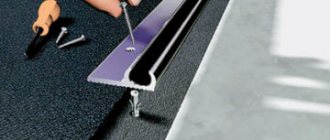
Laying with fasteners
Fixing the parquet board with nails or self-tapping screws can be used in the case of laying the covering on logs or a solid wooden base, and not on a screed. Slats with a thickness of at least 20 mm are suitable for this, since thin boards can be easily damaged. The logs are laid in increments of no more than 60 cm and strictly in the same plane, since even small differences in height cause squeaks when walking. The space under the flooring must be well ventilated to avoid the accumulation of condensation and dampness.
When laying, the lamellas are positioned so that their ends meet only at the joists. The nails are driven into the grooves at an angle, and the heads are deepened with a hammer so that the fasteners do not interfere with the tight fit of adjacent boards. Such fasteners provide the necessary strength of the connection, but make it difficult to subsequently replace elements during repairs. If complete dismantling becomes necessary, the coating cannot be reused due to damaged edges.
Fixing the board with nails
To fasten individual parquet strips, nails are used, the length of which is 40 mm and the thickness is 1.6 - 1.8 mm
Preparing the base
Depending on the type of rough foundation, the step-by-step instructions for installation, in particular, for preparation, will differ. This includes restoring the floor, correcting differences in levels, if any, and cleaning. All these works are an important part of the parquet installation technology, because this type of coating is laid exclusively on a perfectly flat rough base.
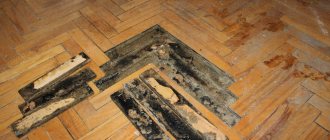
Nuances of preparing a wooden floor
If the base is relatively new and does not have serious defects (rotten boards, material sagging under weight, mold, mildew), you can skip the stage of replacing or partially restoring the coating. Otherwise, you need to replace the damaged areas.
When laying boards on a wooden floor, you also need to level it by adding additional floor joists and replacing sagging boards
Irregularities should be smoothed out: when the wood bends, the lag structure is strengthened; knots need to be cut off. Next, the degree of surface curvature is checked. The wooden base can be leveled using different methods: scraping; putty. It is important to check the condition of the joist structure, for which you need to remove the boards on one of the sections of the floor and look into the subfloor.
Features of preparing a concrete base
This process is less labor intensive. It is necessary to assess the condition of the surface: the floor is inspected for cracks, potholes, bumps and crumbling areas of concrete. If minor defects are detected (small cracks, small differences in levels), you can simply use a self-leveling screed, having previously primed the base. Otherwise, the correct course of action is to remove the old floor and re-grout it.
Regardless of the installation method, the boards require a smooth and high-quality base (without sagging, potholes, dried dirt).
Adhesive flooring technology
The use of adhesive mixtures for different types of coatings
Preparatory stage
They start by assessing the condition of the subfloor. Its surface should be smooth, dry, without any defects. In order not to miss minor damage, the base must first be cleaned of debris and dust. Be sure to check the screed with a level and, if necessary, level the floor with a leveling mixture. If a new screed is being poured, installation cannot begin until the base is completely dry.
During the installation process you will need:
- primer for concrete;
- moisture-resistant plywood;
- parquet board;
- tape measure and pencil;
- circular saw or jigsaw;
- drill;
- dowel-nails;
- one-component parquet adhesive;
- notched spatula;
- hammer.
Materials should be taken with a small margin, so calculate the required amount in advance by measuring the floor area. As a rule, trimming takes from 5 to 10% of the total amount of flooring, depending on the experience of the specialist and installation options.
Advice. The parquet board must be brought into the room where installation will take place in advance and left for at least a day. In this case, the temperature in the room should be within 18-25 degrees, and the humidity should not exceed 60%.
Laying the covering
Step 1. The dust-free screed is treated with a primer. If the composition is absorbed quickly, it is recommended to apply the primer in two layers, observing the time specified in the instructions for drying between layers.
The base of the floor needs to be primed
Step 2. The plywood is laid out on a dry floor and the cut locations are marked. The substrate sheets should be arranged in a checkerboard pattern, with gaps 3-5 mm wide left between them to compensate for temperature expansion. A gap of 10-15 mm wide is left around the perimeter of the room.
Cutting and laying plywood
Step 3. Using a circular saw, cut the plywood, clean the sections from shavings and dust. Dilute the glue and apply it to the concrete base where the first sheet will be located. The glue is quite thick, so it needs to be spread over the surface with a spatula. Lay the plywood, level it, and gently press it with your hands. All other sheets are glued in the same way.
Pouring glue
Leave gaps between sheets
Step 4. For more reliable fixation, the plywood must be fastened to the base with dowel nails. To do this, holes are drilled in each sheet in the corners and in the middle of the sides, 30-40 mm away from the edge. Dowels are inserted into the holes and the fasteners are driven in with a hammer.
Drilling holes for dowels
The dowel is driven in with a hammer
Self-tapping screws can be screwed in or hammered in
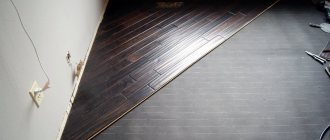
Step 5. After fixing the substrate, clean the surface from dust and begin marking the floor covering. Lay the first row from the wall, fastening the boards without glue using locking joints. On the last lamella in the row, mark a cutting line and cut off the excess. Having completely laid the first row, mark its border on the backing with a pencil and remove the boards.
We outline the cutting lines
Cutting parquet boards
Marking borders on the substrate
Step 6. Take a new portion of glue and apply it with a spatula to the designated area. Distribute in an even layer over the entire surface, without going beyond the boundaries of the marking. Lay the boards of the first row, carefully adjusting them at the ends and leaving a gap between the wall and the covering of at least 10 mm.
One-component silicone adhesive is used for installation
Step 7. The second row should be fastened with the end seams offset by half the length of the lamella. Having cut the material properly, carefully cover the substrate with glue and begin laying. To do this, take the board with both hands along the edges, place it at an angle to the board of the first row, inserting the ridge into the groove along the entire length, then lower it down and lightly knock it so that the lamella is in place. All the others are laid out the same way.
Laying parquet boards
Installation of parquet boards
Laying subsequent boards
The boards are knocked down through a hammer
Don't let the glue dry out
The joints of the ends of the rows should not coincide
Step 8. When laying the covering near the threshold, around the protrusions and in niches, cutouts of the appropriate shape are made in the boards, making sure to leave a technological gap around the perimeter. To ensure that the gap is the same along the entire length, it is recommended to insert wooden or plastic wedges 10 mm thick between the wall and the parquet board.
Laying parquet boards near the ledge
Maintain technological clearance
Laying parquet near the threshold
Advice. In the absence of experience in such work, it is necessary to control the time of fitting the boards so that the adhesive layer does not have time to dry. If the room is long, it is better to apply glue up to half the row for the first time.
Step 9. The last row often needs to be cut to width. Here, in the same way, the board is applied to the surface, the cut line is marked with a pencil, and the excess is removed. Having completed the work, leave the room for 8-10 hours so that the glue hardens and securely fixes the floor covering.
You can walk on the floor after 8-10 hours
Floor covering immediately after installation
After the specified time, remove the spacer wedges and close the gaps with plinths. It is not difficult to care for such a floor, the main thing is to avoid excessive moisture. When cleaning wetly, the rag must be wrung out well so that puddles do not accumulate on the floor. Accidentally spilled liquids should be wiped up immediately, preventing moisture from penetrating the seams between the boards.
Conclusion
Making your own parquet floor from factory-made boards with varnish is not difficult. You just need to carefully prepare the rough base, lay the first row correctly and evenly, and then slowly insert one plank after another, snapping the locking connection at the end.
This finish can be fixed using either glue or small nails. You just can’t hammer the latter into the front layer from above; this should be done carefully from the side.
Watch also the video on how to lay parquet boards:
Read about our other materials:
Cladding the basement of a private house
How to connect a toilet to a sewer pipe?
Floating installation technology
A floating floor also requires a high-quality base, so the screed is prepared in the manner described above. Next, prepare everything you need for work:
- parquet board;
- waterproofing film;
- scotch;
- soundproofing substrate;
- spacer wedges;
- tape measure and pencil;
- jigsaw;
- clamps for skirting boards;
- drill and dowels with self-tapping screws.
Step 1. The prepared base is lined with a film for waterproofing, covering the walls to a height of 10 cm. The film strips are laid overlapping to a width of 30 cm and the edge is taped.
Waterproofing film
Laying film with overlap on walls
Overlap of canvases up to 30 cm
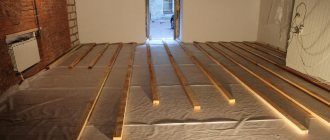
Step 2. The next layer is a thermal insulating substrate made of pressed cork or foamed polyethylene. The substrate is laid close to the walls, adjacent strips are laid end-to-end.
Thermal insulation substrate
Underlayment flooring
Step 3. Start installing the coating. Lay the first board in the corner along the wall, with a margin of 10-15 mm on the side and end. For convenience, wedges of appropriate thickness are inserted between the board and the walls.
Technological clearance diagram
Wedges are used to maintain the technological gap
The photo shows the process of laying parquet boards and installing wedges
Advice. The boards of the first row must be laid with the ridge to the wall, but since in this case the technological gap will be wider than required, the ridges are pre-cut.
Step 4. Place the second board next to it, level it, insert its end into the lock of the first one and fit it tightly. The last lamella in the row is first tried on, the required length is marked with a pencil and the excess is cut off with a saw, after which it is attached like all the others.
Laying the next board
Marking
Transferring the mark to the parquet board
The parquet board needs to be cut with a circular saw.
Connecting the ends of parquet boards
Step 5. In the second row, the boards are shifted at least a third of the length. Laying is done in the same way, only now each board needs to be joined both along the length and at the end.
Laying the second row of boards
Lock connection
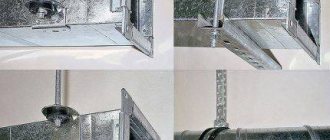
Step 6. Having reached the opening, mark the thickness of the coating on the door frame and carefully cut out a groove for the parquet board using a hacksaw. Use a vacuum cleaner to remove the resulting dust and shavings.
Sawing a groove
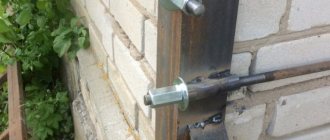
Step 7. Install the threshold. Place the aluminum strip on the floor and mark the fixation points through the mounting holes. Having drilled the holes, clean them of dust, insert dowels and screw the rail with self-tapping screws.
Marking drilling locations
Drilling holes
Dowel installation
The arrows show the places where the threshold is attached to the floor with self-tapping screws
Step 8. When laying the board furthest from the threshold, the connection is additionally strengthened with glue. To do this, use a sharp knife to carefully remove the top layer of wood along the ridge, remove the shavings and apply glue in a thin continuous strip. The board is pushed under the door frame, leveled from the end and along the side line, and the locks are snapped into place. For a tighter joint, hammer the lamellas on the other side with a hammer.
Marking
Cutting boards
Groove selection
Applying glue to the selected groove
Laying and tamping boards
Step 9. Cut out and lay the covering opposite the threshold, after which the top strip of the metal threshold is screwed on. The plank should tightly cover the ends of the boards and lie strictly horizontally.
Screwing the strip
Step 10. From the threshold, the rows are laid in the manner described above, with a mandatory gap around the perimeter of the room. If the last row does not fit in width, the boards are cut with a saw from the groove side.
Laying the last row of parquet boards
Step 11. Having laid the covering, on the walls, on top of the film, mark the places for attaching the clamps for the baseboards in increments of 40-50 cm. The distances from the corners should not be more than 20 cm. Drill holes in the wall through the film, insert dowels and screw the clamps with self-tapping screws.
Fastening clamps for plinths
Step 12. Install the baseboards, then take a sharp mounting knife and very carefully cut off the protruding edge of the film so as not to leave scratches on the baseboard and on the wall.
Installation of skirting boards
Trimming protruding waterproofing film
If the technology is followed, the coating is strong and durable, does not swell or squeak underfoot. If you need to replace individual fragments, it will be enough to pry them and lift them to disconnect the lock.
Why parquet?
Parquet is a coating that is not only beautiful, but also durable and environmentally friendly. It is made from natural wood, which is why its cost is quite high. However, the material allows you to retain heat in the house, is hypoallergenic, has a service life of 25 years or more, and provides excellent sound insulation.
Parquet laid in a herringbone pattern
On a note! The main disadvantage of the material is its high maintenance requirements. He does not like water, and therefore it is not recommended to wash him often. Also, periodically the coating has to be rubbed with special compounds so that it shines and looks like new.
Laying artistic parquet
Parquet can be of different types, and everyone can choose the most suitable option for themselves. The material can be piece, mosaic, panel, massive, palace. There is also a separate type of parquet, which is called parquet board. All types of material differ in size, methods of laying and working with them. Some are easier to install, some are more difficult, but in any case, the material does not lose its main advantages listed above.
What is good about parquet boards?
Prices for Tarkett parquet
Tarquette parquet
How to lay parquet correctly? Important aspects
Laying parquet has certain nuances - although the process is simple, it still requires a responsible and correct approach. If special requirements are not followed, the base will quickly collapse or lose its appearance.
- The air temperature in the room where the work is carried out should be within +18-23 degrees.
- Air humidity should be no more than 45-60%.
- Before starting work, the parquet must be kept in the room where it will be installed for 7-10 days. This will allow the material to “get used” to future operating conditions.
- There should be nothing unnecessary in the room during work.
- The base for laying parquet must be carefully prepared - leveled and cleared of debris.
- You should not install parquet on old, swollen and damaged flooring.
If all installation conditions are met, as well as proper care of the parquet, the coating can last 60-80 years without any complaints.
Parquet floor