When it comes to a shower stall, many people imagine cozy and beautiful cubicles that can be found in any hardware store, however, as practice has shown, they are not the best option for those who want to get a reliable and long-lasting solution. They are difficult to maintain and after 3 years most become leaky, requiring replacement parts and additional maintenance. If you need a reliable option that does not break and lasts forever, it is better to pay attention to a shower cabin in a construction version.
What is a shower cabin in a construction version?
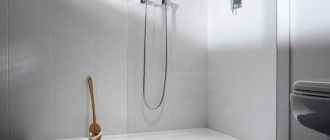
A corner made of tiles, with a tray made of tiles or in a finished design, with a drain in the floor and often a small border - this is a shower cabin in a construction design, which, by the way, can be made with your own hands.
Let's consider what such a solution consists of. The walls are made of moisture-resistant materials, the base and walls are equipped with reliable waterproofing, pipes for supplying hot and cold water are placed in the wall, and a drainage system is located in the floor. The walls are finished with tiles, and the pallet is a choice of ready-made or also tiles. A siphon for drainage is installed in the tray area, and the cabin is equipped with a shower with a mixer and is enclosed with doors or curtains if necessary.
There are many nuances in such a seemingly simple task, so if you thought that building such a booth was as easy as shelling pears, then this is not entirely true. At a minimum, you need to take into account a number of details for each stage, which we will now consider.
Curtains
You can buy various components for the future cabin, guided by necessity and your own taste. Combined cabins look very original and attractive, but they are much more expensive. The choice depends only on the taste of the designer and on his ability to create diverse compositions. A homemade base with tiled perimeter looks interesting, but you can also install regular shower curtains yourself.
Modern materials and the ease of their installation make it quite easy to create structures such as a shower cabin made of polycarbonate with your own hands, and instead of polycarbonate, glass, plastic or fiberglass parts are often used.
Cabin design
First, a decision is made on how to organize the booth, a location is selected, and the details are thought out. The main thing in the design is the drain. It is important that the water drains quickly enough, does not accumulate anywhere and does not flood the neighbors. Therefore, one of the most important issues is the organization of drainage.
Simply making a drain as one of the possible options and simply purchasing a shower device is not only wrong, but can also lead to unnecessary waste of several thousand euros or leaks and other troubles.
Take for example the fashionable “tropical” shower, which is characterized by high water consumption. If you use a standard siphon under it, designed for a different volume of water, the water simply will not have time to pass through, will accumulate and will not allow you to use the shower. You will have to disassemble the pan and change the drain, or abandon the expensive watering can and purchase a standard one.
At the design stage it is important to consider:
- Waterproofing walls and floors.
- Water consumption and drainage organization.
- Pallet type and choice of drain.
- Doors and walls.
There are several solutions for organizing waterproofing. All of them are effective, but it is advisable to make the choice at the design stage. Perhaps this will influence the decision regarding the size and type of booth or reconsider the chosen option. The main thing is to provide insulation to the area where water will potentially enter. There will be less cost for waterproofing if the pallet is ready, the cabin is small, and there are sides and walls. More, respectively, with a wide booth without walls and without a podium.
As for water consumption, a standard shower consumes an average of 9 liters per minute, and the premium tropical shower mentioned above - more than 60. Accordingly, a standard siphon, flowing about 30 liters per minute, can serve a traditional shower, but will not be suitable for new options . For new watering cans, there are corresponding drains that flow 75 liters per minute. They will be more expensive and their diameter will be wider.
When choosing a drain system, it is important to pay attention to the grate, choose its shape, on which the overall decision may also depend, as well as the height of the siphon. Some will demand elevation. Do not forget to select the siphon according to water flow.
For its part, the choice of pallet dictates the selection of the appropriate drain. When deciding to organize a shower without a podium and side, the choice of drain will be very limited and in most cases, the drain for the option without a podium will be more expensive than most budget options. Among the budget ones, those in the know usually choose siphons that require height, and therefore a podium, but the water leaves faster and does not stagnate, which should always be a priority when making decisions regarding the organization of a shower stall.
As for the walls, glass is an excellent and stylish solution that, among other things, will protect the bathroom from unnecessary moisture. However, there are a huge number of attractive projects without walls at all. It can be stylish and economical.
The main thing is to ensure reliable waterproofing and high-quality drainage. These are the fundamental priorities when building a shower stall, but it wouldn’t hurt for everyone to first draw up their priorities regarding the arrangement of a shower stall to make it easier to choose, since the price range is such that it’s impossible to ignore them. For some shower fittings, prices vary by 10 and even 100 times. Only after you have completely decided on the solution, components, calculated the cost of building materials, plumbing and agreed on the final cost, can you begin to work.
You can't go anywhere without them. Custom sizes
The non-standard shape of shower cabins can satisfy the most demanding consumer tastes. We present proportions that do not fit into the standard size range, but are present in the line of models of some manufacturers.
Here you can find the following sizes:
- 115*85
- 105*85
- 97*97
- 126*85
- 112*80
- 150*85
- 170*110
Waterproofing
Waterproofing is protection against water ingress in so-called “wet areas”. If you are making a booth with your own hands, take this stage especially seriously. The ingress of moisture, stagnant processes, the smell of dampness, rotting, fungus are such unpleasant phenomena that no positive components or expensive components will be a joy in the presence of everything that can happen with insufficiently effective insulation.
First we identify wet areas. This:
- The floor is outside the pallet. In the absence of a pallet and outside the pallet if there is one.
- Seams connecting the floor and wall.
- Fragments of the wall on which water will directly fall, the lower parts of the wall along the entire perimeter.
- Risers and pipes on which condensate collects.
- Pipe cuts.
The walls and floors in these areas must be insulated with additional protection.
Important in waterproofing without a tray is the correct installation of the water drainage device. The drain is installed on a concrete base in the selected location, the drainage system is connected to the sewer system, and this entire structure is filled with concrete, leaving only the outer part, which must be below floor level to allow water to drain. To drain in the center of the booth, make a slope of 3% on all sides, if in a corner, then 2%. The gaps between the floor and the exit of the drain are carefully sealed with an elastic profile and waterproof glue.
Pipes for supplying cold and hot water are laid in the walls and hidden under the plaster. To do this, make markings in the walls:
They make recesses and embed pipes.
These areas should be treated with insulation.
Coating or adhesive insulation can be used. The base is first leveled and a cement screed is produced, after which the surface is cleaned and primed.
For coating, bitumen-rubber or bitumen-polymer mastics, which are also called liquid rubber, are used. Apply mastic over the entire floor, and also treat the walls around the perimeter by 20 cm. The areas designated as “wet zones” are especially carefully treated. If these are walls, then all walls.
Pasted insulation involves the use of special roll insulating materials. They cover the surface with an overlap of 15 cm, treating the joints with special glue. Thus, the entire shower cabin must be insulated in those places where water can enter.
All seams and joints in the bathroom are also insulated, since there will be steam in this room. The bathroom should also have good ventilation.
Why is such a cabin with a shower the best option?
Homemade tile construction has a number of advantages:
- Tiles are an environmentally friendly and safe material that does not conduct electricity and is not susceptible to fire.
- The tiles are easy to care for using simple cleaning products.
- Compared to factory cabins, which have a limited color choice, the use of ceramic tiles allows you to turn any color fantasy into reality.
- A tiled shower will fit into a room of any size.
- Ceramics allows you to hide repair errors and level the surface of the walls.
- The price of plumbing fixtures made from tiles will be significantly cheaper than the factory version.
Such plumbing has one drawback - low sound insulation. This problem can be solved by additionally laying a soundproofing layer under the screed.
Gangway selection
Along with insulation, the most important thing in arranging a shower room is the choice of drainage drain. In addition to calculating water consumption and throughput, the height is also selected depending on the desired floor level, as well as design features and additional features. Some drains, for example, are equipped with a floor heating function.
When weighing all the pros and cons, it is important to take into account the dimensions of the grille and the diameter of the pipe: they must be compatible with the original parameters, so as not to later solve problems with adapters, because in the shower, the fewer parts, connections and joints, the better. Ease of cleaning and maintenance of the ladder is also important.
You can also choose a vertical or horizontal outlet to the pipe, a dry seal (for rare use) or a water seal (for frequent use).
For more information about choosing a ladder, watch the video:
The height of the pallet depends on the choice of ladder. In general, the requirements are as follows. The level of the pallet should be 10 cm lower than all floors in the apartment. If this is not possible, it is necessary to install a side of at least 10 cm. The podium is installed at a sufficient height to accommodate the drainage system.
Minimum sizes that can be offered to you
Given such diversity on the market, a logical question arises: “What dimensions of a small shower stall and tray can be considered the minimum?” The answer will be relevant for owners of small apartments who are trying their best to save internal space.
For shower stalls, the smallest size will be considered the following values:
- Width – 75 cm.
- Length – 80 cm.
- Height – 198 cm.
With such compact dimensions, the booth has full functionality and provides comfort when performing hygiene procedures.
Folding shower - an example of radical minimalism
And there are such things. Unfortunately, the author of this article did not come across a folding, compact copy in hardware stores.
Door finishing and organization
When the drain is installed, the screed is completed, the waterproofing is completed, all that remains is to do the facing work. Your shower stall will delight you if you manage to decorate it correctly, especially if you do it yourself. Let's take a look at what's important to remember about finishing your shower.
When laying tiles on walls and floors, it is important to ensure that the joints are securely filled with waterproof material. First they lay the floor one, the wall one should overlap it. Considering the required slope, it is better to choose small tiles, at least for the floor, because you will have to cut them to achieve the slope.
Doors and walls are best arranged from glass. Although you can arrange a stylish and comfortable shower without walls at all. For example, you can organize a round booth, protected on all sides by walls.
In addition to beauty, convenience is important, so do not use slippery tiles; also consider ease of cleaning and storage of bath accessories.
The semi-circular shape is the epitome of minimalist chic
Unfortunately, in this area there is some confusion in terminology and often a semicircular shower stall is called the “quarter circle” option, therefore in all dialogues (especially telephone) with sellers you should clarify the number of angles in the form of the proposed option.
However, in the case of dimensions, you can focus on the dimensions for the “quarter circle” shape given in the table above.
Filling the pan
Since in most cases the thickness of the pallet screed exceeds 10 centimeters, it is preferable to divide it into two layers. Make the first, rough layer as thick as possible, and the finishing layer as minimal as possible.
Although if the height of the bottom of the pan is less than 8 cm, it will be more convenient to fill it in one stage.
Through trial and error, I developed the following sequence for myself: first, a thick rough layer is poured, not reaching the design height of 4-5 cm, and then a finishing layer of screed is formed from the missing 4-5 centimeters.
Why exactly 4-5 cm? This thickness was chosen in case of poor adhesion between layers and to make it possible to safely use ordinary cement-sand mortar for finishing. Even if the top layer does not adhere well to the bottom one, it will have sufficient load-bearing capacity. Moreover, this approach will allow the use of a base layer of expanded clay concrete with a minimum amount of sand.
As you know, ordinary DSP is not recommended for screeds thinner than 3 cm. In fact, thinner layers can be formed with ordinary mortar, but a separate article is needed to cover this topic. Therefore, we will conventionally assume that cement-sand mortar without additives should not be laid in layers less than 3 centimeters.
It is recommended to reinforce both layers: the bottom one is usually very thick and by default requires reinforcement, and the top one has some chance of not sticking well to the top one and therefore must have load-bearing capacity. In fact, if everything is done correctly, the probability of the top screed peeling off is almost zero, but more on that below.
For the bottom layer, construction (masonry mesh) is used, and for the top layer, either the same mesh or fiber is used. When laying red brick as a base layer, naturally it will not be possible to use a mesh.
Since there is at least a sewer drain pipe in the pan (and quite possibly other communications), it will be difficult to lay the mesh in one piece. Therefore, the mesh can be cut into many small pieces, the main thing is that these scraps overlap each other by 5-10 cm.
Regarding the density of expanded clay concrete. I’m not sure of the absolute veracity of the information found, because unfortunately, 99% of the Internet is littered with nonsense. Expanded clay concrete has a density from 800 kg/m³ to 1800 kg/m³. Particularly lightweight can have a density of 600 kg/m³.
The weight is affected by both the fraction of expanded clay itself and the amount of sand. In practice, the less sand, the more difficult it is to lay the solution without voids. But we are not afraid of small local voids, because the load-bearing finishing layer will lie on top.
The photo above shows an example with expanded clay concrete with a density of approximately 1100 (calculation was carried out by the weight of the components used). I can say with confidence that the amount of sand in the batch can be reduced and the density can be reduced to at least 850-900 kg/m³. In other words, make the base layer twice as light as a regular solution.
I can’t give the exact proportions of the components, because expanded clay can be different, and you need to be guided by the sensations of the finished mixture (is it possible to lay it with a minimum amount of sand). However, I will give an approximate algorithm: cement is mixed in water, equal in weight to the weight of the introduced expanded clay, then expanded clay is mixed with water and cement, and then sand (and water, if necessary) is added in small portions. Sand is added until the mixture has a workable consistency.
As for the side, there seem to be two main options: lay it out of brick or lay it (fill it) together with a finishing layer.
For finishing screed, it is best to use the semi-dry method. I’ll explain why: the pallet will dry out faster, at least the upper part, and there’s almost zero chance of shrinkage cracks forming. This approach will allow you to quickly begin waterproofing.
As a last resort, if for some reason a semi-dry screed is not suitable, then the top layer should be poured with a minimum amount of water in the batch.
For beacons, you can use any available method. I prefer the PN profile on the screw heads. After forming the planes from the semi-dry solution, the profiles are removed, the support screws are recessed deeper and the strips are sealed. With the “wet” technology, the profiles are taken out after the screed has set and the locations of the beacons are covered.
For good adhesion to the previous layer, there is a simple technique. Forget about primer!
If the first layer has had time to dry fairly well (the filling was done more than a few days ago), then it needs to be well moistened. As an adhesive layer, you can use a thin layer of tile adhesive or a 1:1 liquid mixture of cement and sand.
The adhesive layer is spread over the surface with a trowel, and then the mixture for the finishing layer is laid on top. In hard-to-reach places, you can use a brush to apply liquid cement.
When using “slurry” made of cement, the main thing is not to overdo it and apply layers of no more than 2-5 mm, so that the bulk of the screed does not become more liquid. This method is quite simple, but it eliminates detachment. When using a primer, there are many cases where the top layer begins to sag after 2-4 weeks. The method is relevant for the semi-dry method and for the “wet” one.
After pouring, the next and subsequent 2-3 days it is useful to water the screed with water and cover it with plastic wrap.
Laying tiles
Whatever the shape of the shower, there will be a lot of trimming. How to make a high-quality cut of tiles or porcelain stoneware is described here.
One of the frequently asked questions: How to join the tiles to the drain
. I will not pretend to be true, but I will say what I think: the tiles should be 2-3 millimeters higher than the grating. The same applies to mosaics.
In fact, this question needs to be asked while pouring the pallet in order to lay the tiles without layers, on a fine comb.
I would also like to recommend choosing porcelain tiles or mosaics that are as less slippery as possible, although this is quite difficult.
Any cement-based grout for tiles is suitable, preferably hydrophobic. There is an opinion that epoxy grout is necessary in the shower. Of course, such grout is good, durable and can provide additional waterproofing. However, grouts on cement binders also perform well.
That's all. Later I plan to add higher quality photos, which are not yet available.
Source
Determining the height of the future pallet
The very first question that should be asked is the height of the horizontal outlet from the sewer riser. Since this height directly affects the height of the future pallet, you should estimate this very level at the ladder.
About pipe slopes: in the article on sewerage I mentioned SP 30.13330.2016, where for pipes with a diameter of 50 and 40 mm. a slope of 2-2.5 centimeters per meter of pipe is prescribed. In practice, this is a big bias and often cannot be implemented. Therefore, I completely allow this standard to be neglected, and I make a slope (when it is really necessary) of 1-1.5 cm per meter of pipe.
It may turn out that while observing all the slopes of the drain pipes, you will have to make the pan very high and this will be inconvenient for use. In short, in the process of assessing all the slopes of sewer pipes, the idea may clearly arise that it is necessary to interfere with the design of the riser and lower the horizontal outlet below the existing one.
As for the weight of a structure that is too thick, this issue can be completely resolved by using expanded clay concrete or other techniques. In my practice, there were showers that were 30 centimeters higher than the main floor.