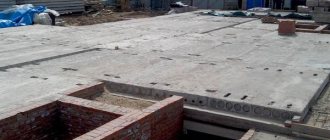
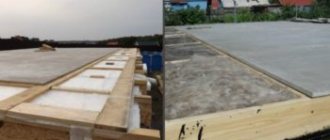
The technology for creating a semi-dry floor screed is practically no different from pouring conventional cement-sand mortar. It is also used to level bases and create rough coatings for further finishing. In industrial premises, such floors are simply sanded and then used.
The main difference between this method is the small amount of water that is used to dilute the dry composition. Thanks to this, dry-pressed floor screed does not require as much effort and time as conventional concrete pouring.
Wet, semi-dry and dry floor screed - what is it?
The screed is used between the floor covering and the ground, in which there are differences in height. Of course, this entire base must be made even, smooth, without distortions.
In the arrangement of a leveling base, there are 3 types of screed:
- wet;
- dry;
- semi-dry.
Wet screed involves the use of a cement-sand mixture in combination with water and liquid filling of the floor.
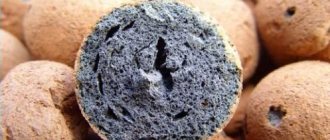
Dry floor screed, what is it:
- Light bulk material like expanded clay or permit.
- Metal profiles at the base.
- Sheets of chipboard or plasterboard laid on top and glued together.
Dry screed Source www.remontnik.ru
Let's take a closer look at the semi-dry version.
What is a semi-dry floor screed, pros and cons
Semi-dry floor screed is a technology according to which the leveling of the base is carried out using semi-dry sand-cement mortar and reinforcing elements.
This technology involves a semi-dry method of preparing the solution itself. It is made in the same weight proportions as the classic cement-sand composition. However, the presence of water in it is slightly lower than in the classic version.
The mixture itself is kneaded until it can be formed into balls. Considering the consistency, such component compositions are not poured onto the base, but covered.
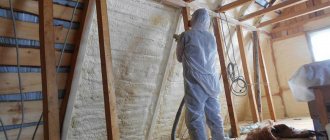
The strength of the main building mixture here is ensured through the use of high-quality materials in the form of washed coarse sand and M500 cement, as well as polypropylene fiber and metal mesh. To fill semi-dry screed, special equipment is used - a pneumatic compressor (mortar pump).
Mortar pump for semi-dry screed Source prestigehouse.ru
pros
The main advantage of this technology is the minimum volume of water that is required during the mixing process, making it possible to walk on a freshly laid screed the next day.
The second advantage follows from the first. Since the solution is not fluid, the likelihood of flooding the lower floors during work is practically reduced to zero. Liquid solutions quite often, when poured, end up in the ceilings of floors, causing unpleasant situations for neighbors below.
In addition, semi-dry screed dries much faster, which has a positive effect on the timing of the work. The resulting surface is almost flawless in quality.
The following finishing materials can be laid on it, without preliminary preparation:
- carpets;
- laminate;
- linoleum coverings;
- parquet flooring;
- floor tiles.
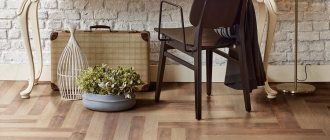
Laying flooring on a screed Source stroimpilim.ru
Using a trowel during operation eliminates the appearance of voids and cracks on the laid surface.
The volume of water in a semi-dry screed is only one third of the total volume. This amount is already quite enough for the cement hydration process, and the surface dries very quickly. After just four days, the laid screed is ready for the finishing floor covering to be laid on it.
Also, do not forget that with a relatively small thickness of the semi-dry layer, it has high performance characteristics. This coating has good resistance to mechanical loads and impacts.
These properties of the coating are ensured by the presence of reinforcing fibers in it. In a comparative analysis of semi-dry and conventional cement-sand screed, the latter exerts significantly greater loads on structures. This is due to the lack of light components for reinforcement.
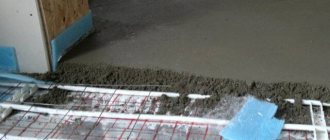
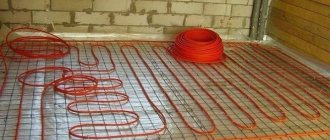
Semi-dry screed with underfloor heating system Source aplaster.ru
Minuses
The main disadvantage, being at the same time a plus, comes from the characteristics of the technology - the lack of fluidity of the building mixture. For this reason, preparing a solution without special equipment is a rather labor-intensive process.
Also, the technological process of laying the material is not yet sufficiently unified, since it is a fairly young construction technology. Experts in this field have not yet come to a consensus, so finding a quality performer is a difficult time. On the market of companies performing semi-dry screeds, one can, for example, note the company Eurostroy, which has been operating since 2012 and, judging by reviews, has proven itself on the positive side.
Semi-dry screed after sanding Source prestigehouse.ru
See also: Catalog of house projects made of reinforced concrete and expanded clay concrete blocks.
Preparation of the solution
The selection of ingredients for semi-dry screed is a very important moment on which its quality depends.
First of all, as a binder for such a mixture you need to purchase Portland cement of a grade of at least 400D20. The best filler is river or washed quarry sand. Special components will also be needed to improve the plasticity of the additive. The best option for preparing the working mixture is to use a concrete mixer. You can rent it or make it yourself from scrap materials.
Component Requirements
The prepared sand is needed with a particle size modulus of no more than 2.5, while the maximum permissible degree of contamination with clay inclusions should not exceed 3%. Occasional inclusions of organic residues or peat inclusions must be carefully removed before use. The natural moisture content of sand is not regulated, although the amount of water in the mixture depends on this. This is due to the fact that the sand is sieved on a mesh before use.
When purchasing cement, you should pay attention to the integrity of the packaging and the date of manufacture of the material, since it has shelf life limitations. When purchasing Portland cement grade 500D20, all other things being equal, you will obtain a concrete mixture of grade M350, suitable for use in difficult conditions.
The water for preparing the solution is taken from the drinking water supply, since in occasional bodies of water it may contain organic inclusions. If you are forced to use untreated water, it is better to do a laboratory analysis to determine the possibility of use. Using a low-quality solution can lead to unpredictable consequences.
Preparation
The dry composition is prepared in a concrete mixer by thoroughly mixing the components without water in a sand to cement ratio of 3:1. Only when a homogeneous mass is obtained is water added. Before adding it to the bucket, you need to add up to 80 grams of a reinforcing element, which is fiber shavings.
The prepared mass should be well formed into a dense lump that retains its shape, and when compressed, water should not be released from it.
See also: Laying parquet boards
The amount of concrete per screed can be easily calculated by multiplying the thickness of the layer by the floor area in the room where the screed is performed. 0.05 will be needed per square meter , that is, for a room with an area of 24 square meters, the need will be : 24 x 0.05 = 1.2 cubic meters of concrete. To prepare this amount you need to use 1.2: 4 x 3 = 0.9 cubic meters of sand and 0.3 cubic meters of cement. No more, since the composition of the mixture does not take into account the volume of water, which depends on the moisture content of the sand and the actual thickness of the layer.
Something to remember! The stable state of the solution is maintained for 1.0 - 1.5 hours. Then it begins to thicken and quickly becomes unusable.
Which floor screed is better
Obtaining a high-quality, flat surface is possible by using all three technologies. In each specific case, the choice of method depends on the conditions and circumstances.
For example, if leveling needs to be done in an apartment on the top floor, it is better to use semi-dry and dry technologies so as not to spoil the ceiling covering of the neighbors below, and also to reduce the load on the floors.
Also, when using these methods, much less effort is required than in the situation with a liquid analogue.
For detailed characteristics of each type, see the table.
Different types of screeds Source www.kp.ru
If we compare which screed is better: semi-dry or wet, the first definitely wins in terms of speed of work, since it requires less time than when pouring wet.
Advantages of semi-dry floor screed:
- Speed of work - the base will be ready in 1 day, and up to 300 square meters of cement-sand mortar can be laid per shift
- No cracks due to the use of polypropylene fiber fiber
- No water leaks to the lower floors
- High grade strength
- The cost is lower than when pouring wet and dry screed
Minuses:
- Thanks to the use of special equipment, you will not be able to perform a semi-dry screed yourself.
- Due to the fact that the solution is prepared outdoors, work is carried out only down to -10 degrees.
In essence, what is a dry floor screed? It is a system in which bulk material, if installed incorrectly, for example by amateurs, is capable of shrinking. And, accordingly, the floor covering will crack. And then you will have to change the flooring again and make a screed.
Thus, semi-dry screed is a serious alternative to “wet” and “dry” work, having a whole range of useful characteristics.
An example of a finished screed with fiber Source prestigehouse.ru
Reasons for choosing semi-dry screed
As a rule, the main difficulties in leveling are caused by surfaces that have a certain angle of inclination, especially if there are noticeable irregularities on it. The use of semi-dry screed in such situations is most justified.
At the same time, it allows you to form a high-quality surface around pipes or holes. This technique not only allows you to significantly simplify and speed up the work, but also significantly reduce its cost.
To give the coating the required rigidity and prevent cracking, it is reinforced. The reinforcing layer is a fiber - fibers made from special polymer components.
The creation of such a screed involves several different technologies. The choice of a specific method depends on what result is needed upon completion of the work. When laying communication elements into the floor, the layer of screed increases, especially if the rough surface is quite uneven.
Preparatory work
The process of laying semi-dry screed itself is simple, although very labor-intensive. Such a coating requires a carefully prepared surface; the quality of further work depends on this stage.
Surface cleaning
The first step is to completely remove the old coating to the base and clean the surface with sandpaper or a grinder to remove the remaining fragments of the old screed. This will remove dust and debris. If there are cracks or potholes in the coating, they are sealed with putty or cement-sand mortar. Protruding elements are removed with a grinder. Then you should carefully treat the entire surface with a primer, it is better to do this 2 times with an interval of 4 hours.
Step-by-step preparation of the surface for laying screed
Taking measurements
If you have a laser level, then taking measurements is quite simple. It is necessary to place it on the floor and turn it on, and screw a self-tapping screw into the floor opposite the wall so that it rises 10 cm above the surface. Install a rule on its head, and make a mark on the tool at the intersection of the beam and the rule. Then you should do the same operation on the opposite wall. If the mark on the rule does not correspond to the new intersection with the beam, you need to adjust the height by screwing in or unscrewing the screw. As a result, 15 self-tapping screws should be installed; they will be located at different levels, reflecting the curvature of the surface. You need to fill the screed along the self-tapping screw located above the rest, so all the unevenness will be smoothed out.
If you don’t have a laser level at hand, you can use a hydraulic level. Essentially, it is a small diameter flexible tube that is filled with water. It is necessary to measure a certain distance from the floor to the wall to make it more convenient to work, say, 1.5 m. Attach one end of the tube to this mark so that the water level corresponds to the point, the other end must be brought to the other wall and set at a height of 1, 5 m. If the water level does not reach the mark, then it is necessary to change the height so that the liquid completely fills the tube, make a mark. Thus, you should mark all the walls relative to the first point. The more points there are, the better. After this, you need to determine the lowest point.
Example:
- Let's say the value of the lowest point is 147 cm. From this number we subtract the thickness of the layer, for example, 5 cm. We get: 147 - 5 = 142 cm.
- From the previously arbitrarily marked height, we set aside the resulting distance (142 cm) and draw a horizontal line, this will be the level to which the screed should reach.
Waterproofing and insulation
For waterproofing, roll or coating materials are used. The simplest is plastic film. It needs to be laid on the floor, not secured to the walls. If one sheet is not enough to cover the entire area, you need to lay the strips overlapping 15 cm and seal the joint with tape. If the base is in good condition, you can use coating materials; they are applied and distributed over the surface with a roller or brush and wait to dry.
Insulation is laid on the waterproofing layer. Extruded polystyrene is considered the best option. It must be laid tightly and secured with special locks or adhesive tape. Mineral wool is less commonly used. It loses a little in terms of thermal insulation, and also requires the installation of an additional membrane to protect against moisture from the solution.
Laying waterproofing and insulation
Next, damper tape is applied to the lower parts of walls, columns, stairs and other structural elements. During drying, the concrete will either expand or contract, which can lead to the formation of cracks on the screed itself or on the walls. After drying, the tape is cut with a stationery knife.
Installation of beacons
On a note! Beacons are metal or plastic profiles that serve to level surfaces.
So, you need to step back 20 cm from the wall and, using a marker and a building level, draw a straight line, and draw the same lines every 60 cm. Then prepare a regular cement-sand mortar and apply it along the drawn lines in small portions, then install one beacon on the mortar. When pressing or pulling out the product, it is necessary to place it on a level. The following beacons are installed according to the previous one.
Installation of beacons on the solution
More experienced craftsmen make beacons themselves from mortar. In this case, you need to screw in several self-tapping screws along the lines and align them. After this, apply the solution to the markings, and glue a piece of tape over the screws. Then, using the rule, raise the height of the portion of the solution to the level of the tape and let it harden, then remove the tape. Such beacons do not need to be removed from the coating.
Making the solution
The modern market offers a huge number of different building mixtures that can simply be diluted with water and used. But if you decide to prepare the solution yourself, then it is important to take into account the standard proportions: 1 part cement and 4 parts sand. As for fiberglass, it must be added at the rate of 600 g per cubic meter of solution. In some cases, a plasticizer is included in the mixture at the rate of 1 l/100 kg of cement.
Manufacturing sequence: load 160 liters of sifted sand into a concrete mixer, add 180 g of fiber fibre, 500 ml of plasticizer and 50 kg of cement, mix the components thoroughly, then pour in 15 liters of water. After mixing, you need to check the quality of the solution: take a small amount of the mixture and squeeze it in your fist. If no moisture is released, then everything is done correctly.
VIDEO: The process of making semi-dry screed mortar
Basic technological steps during installation
As mentioned above, working with this building material requires some experience. The master must be able to knead the mixture exactly in those proportions that will reveal all the advantages of such technology.
Preliminary work before installation
The preparatory stage of work begins with preparing the foundation. The main operations are:
- cleaning the base from dust;
- removal of chips;
- removal of delaminations;
- jointing and sealing cracks.
This will prepare the base for the load that the screed will put on it.
After this, the surface is checked for the level of differences in area and the highest point is found. The required thickness of the screed is added to it and a zero level is obtained. Metal beacons are not used in semi-dry screeds, but are made directly from the solution.
The process of installing a semi-dry screed, namely installing a beacon Source prestigehouse.ru
Preparing the mixture
Despite certain difficulties in preparing semi-dry screed, this does not stop craftsmen from actively using it. When preparing the solution, the following materials are used:
- polypropylene fiber;
- coarse washed sand;
- plasticizer;
- Portland cement grade M500.
Mandatory equipment when installing a semi-dry screed is a pneumatic blower/mortar pump. All materials for the screed are mixed in it (cement, sand, fiberglass and water) and the finished solution is supplied through special hoses (up to the 30th floor).
The result should be a composition that, when compressed, slightly releases moisture and retains the shape of a ball. Reaching this consistency signals that the mixture is ready for use.
Preparation of the mixture Source prestigehouse.ru
Leveling and grouting
At this stage it is necessary to carry out final alignment. To do this, the rule is pressed against the beacons and passed along them, making zigzag movements. The solution from the blade can be put into a bucket; it will be useful for filling small depressions. After this, go through the vibrating plate again. Finally, you need to sand the surface with a machine or sandpaper.
Arranging semi-dry screeds is a process that requires special equipment. Even if you rent it, the amount can turn out to be quite large, so home craftsmen should calculate the budget and weigh the pros and cons.
Video description
Watch the video on how to make a dry floor screed with your own hands
Laying damper tape
A semi-dry screed does not require additional waterproofing, but it must be separated from walls and partitions. For this, a polypropylene tape is used, the height of which is made a couple of centimeters greater than the calculated thickness of the layer being laid.
Polypropylene tape is a compensator that allows you to level out expansion and contraction in the mixture that occurs during its setting. In addition, direct contact of the screed with the walls is excluded, which creates an additional barrier to the penetration of cold.
Polypropylene tape Source bitrix24.ru
Installing markers and guides
In the semi-dry screed technology, metal profiles are not used when installing beacons. Beacons are made directly from cement-sand mortar on the day of work in the form of small “islands” using a laser level. After installing the beacons, the screed is pulled from beacon to beacon using a rule, with regular checks by the straightener.
Displaying a beacon in a semi-dry screed Source instagram.com
Procedure for installing a leveling screed
The technology for forming the desired layer is simple, but requires attention and diligence.
For this work you will need at least 2 performers. One of them prepares a solution of sand concrete and delivers it to the work site. The second one carries out laying, compacting in the required places and smoothing the mass according to the level of the beacons. The volume of a single portion of the solution must be laid within one hour.
For small rooms, the solution is often prepared directly on the floor, laying out the components in the required ratio. They are stirred with a shovel until the mixture is homogeneous and formed into a slide with a small crater on top, where water is added. Stirring is done with a shovel and a portion of water added. The consistency is controlled as indicated above; if necessary, components can be added during cooking.
The solution is supplied to the floor using a shovel and leveled with a trowel. Along the wall and beacons, you need to tamp the mixture with the end end of a wooden block. Then, if necessary, the solution is added and leveled with a trowel. The formed surface is leveled by pulling the correct board along the beacons, and all irregularities are removed. Work continues until the next batch is ready.
About an hour after the start of work, another operation begins - grouting. A wooden grater is used for this. The task is to finally level out all, even the smallest, irregularities in the screed. High-quality implementation of this technological operation can subsequently eliminate the need to perform a leveling screed.
Drying of such screed is carried out for at least five days. It is very important to protect the surface from drying out with plastic film, and in hot weather to re-moisten it with periodic irrigation with water.
It should be noted that this type of screed is quite suitable for heated floors, especially for water or cable ones. Its thickness allows you to freely place the heater circuit from pipes, most often used in size 20 mm. And the reinforcement used to fix the wiring only helps to increase its strength characteristics.
What should it be like?
The flooring material, or rather the method of its installation, implies compliance with certain requirements for the base during implementation.
This applies directly to the surface on which the finishing coating will be installed. In general, when performing a screed, it is important to consider the following points:
- The area must be flat and leveled horizontally. Deviations are no more than 0.3 mm per 1 p/m;
- any surface (dry, semi-dry or wet) must be protected with thermal insulation;
- The bottom of the base is protected from moisture by a layer of waterproofing.
Positive characteristics inherent in each of the known filling methods:
- High strength.
- Resistance to atmospheric and climatic influences.
- Improves surface quality.
- They create good heat, hydro and sound insulation.
Any of the types are good, but you can get the optimal result by completing the necessary list of works using different technologies and materials.
Do-it-yourself semi-dry screed step-by-step instructions
The entire scope of preparatory work does not take much time and consists of preparing the base for the screed and preparing the working solution.
The coating is carried out on a completely cleaned surface. In addition, it is necessary to carefully eliminate all chips in the base and deep cracks. All delaminations in the base require cleaning followed by puttying. After all work completed, a zero level mark is set.
- All work can be described in the form of step-by-step instructions:
- Preparation of working solution
- If you plan to use fiberglass, then a mixture of sand, fiberglass and cement must be poured into the pneumatic hose blower. After thorough mixing, water is added and the solution is mixed again.
- If it is necessary to use a reinforcing mesh, the solution is prepared from Portland cement and sifted sand. This composition allows you to prepare the mixture directly at the workplace. The addition of plasticizers makes the working solution more elastic and easy to use.
- In addition, it is possible to use ready-made mixtures with a specially selected and optimal composition. Such mixtures can only be diluted with water in accordance with the instructions and kneaded thoroughly.
- Do-it-yourself semi-dry floor screed is performed in accordance with the “floating screed” technology and consists of the following steps:
- high-quality cleaning and priming of the base;
- laying a special edge tape;
- laying a two-centimeter starting layer followed by compaction;
- laying reinforcing mesh;
- laying four centimeters of semi-dry mixture;
- leveling the poured solution using a laser level and installing beacons;
- grouting the surface with a trowel and thorough grinding;
- the frozen surface is wetted and a cement-sand mortar is laid out on it, which is rubbed using a wooden or polyurethane trowel;
- leveling;
- dismantling beacons and grouting their installation sites;
- final grinding of the finished surface.
If a working solution that already contains fiberglass is used, then there is no need to use a reinforcing mesh.
So, to summarize, the first thing you need to do is carry out preparatory measures in your apartment or house. To do this, you need to set the zero level and pour the mixture over it. The base of the floor must be thoroughly cleaned of dust and dirt, and all existing cracks must be repaired. These factors influence the production of a smooth surface.
To obtain a solution, you should use a ready-made mixture. Add water to it in the amount indicated in the instructions. Of course, you can prepare the mixture yourself, but then you will need a concrete mixer, and the amount of liquid will have to be determined by eye.
When receiving the mixture, make sure that it turns into a lump and water appears, but does not drip. The next stage is the installation of insulating material and beacons. For insulation it is necessary to use polypropylene film.
To level the surface, it is worth installing beacons that will serve as the upper level. In this case, it is necessary to use T-shaped slats. At the final stage, concreting is carried out. The finished solution is distributed along the guide beacons. Be sure to compact the mixture and grout it.
Tips and tricks
In order for the semi-dry screed to set more efficiently and effectively, it is necessary to cover the completed surface with a layer of plastic film. The main drying process takes about twelve hours.
To install ceramic flooring, the semi-dry screed should be left for at least four days, and laying laminate flooring or parquet can be done after twenty-eight days.
The technology of semi-dry screed with the addition of fiber is based on the minimum amount of water used, which is necessary exclusively for high-quality hydration of the cement mixture.
A semi-dry screed allows you to hide most communications, achieve ideal horizontality under a decorative coating, and increase the heat and sound insulation of floors. This coating is very popular when it is necessary to reduce the time for leveling.
Author: Sergey Vladimirovich, electrical engineer. More about the author.
Comparison of characteristics
A comparative analysis makes it possible to understand in more depth the issues: which is better, a semi-dry screed or a classic screed and a dry screed or a cement screed. For comparison, let's take the following criteria:
- strength;
- cost of materials per m2 of screed;
- cost of work;
- durability;
- resistance to sudden changes in temperature and humidity;
- thermal conductivity;
- floor load;
- complexity of technology;
- surface quality level;
- screed thickness;
- compatibility with heated floors;
- application area.
Strength
One of the main criteria for evaluating a screed is its ability to withstand static and dynamic loads. After all, you can’t place a fireplace or heavy furniture made of solid wood on a floor that might fall through. In this regard, classical technology is the leader - it can withstand up to 20 MPa. The semi-dry screed is slightly inferior to it. But the data here is contradictory. Some sources consider its strength to be high, others - worse than dry. Long searches in various reference books (is it really a military secret) made it possible to find some numbers: from 1.0 to 18.0 MPa. But this cannot be.
A specific figure can be found if desired, but in a “crooked” way. It is known that the strength value is directly related to the density indicator. And these indicators are in the technical conclusion of one interesting work devoted to the study of the thermal conductivity of semi-dry unbound cement-sand mortar.
It indicates the average density of such a screed - 1450 kg/m3. The density of the leveling layer poured using “wet” technology is 1800 kg/m3. Then everything is simple: divide 1450 kg/m3 by 1800 kg/m3 and multiply by 20 MPa (strength of cement screed). As a result, we obtain a semi-dry screed strength of 16.1 MPa. A figure close to real strength. Reinforcing mesh and fiberglass slightly increase the performance. But their input is also possible in the “wet” CPR.
It was also not possible to find exact strength figures for dry screed - no one knows, no one needs it. But here everything is much simpler: just as the speed of the squadron depends on the speed of the slowest ship, so the strength of the screed is determined by the strength of one pellet: 2.0 MPa - average, 4.5 MPa - maximum.
Conclusion: in terms of strength, “wet” technology is the undoubted leader. Dry screed under a fireplace, stove, frame furniture made of solid precious wood will simply crumble. It won’t even support the weight of a car in the garage.
Cost of materials per 1 m2 of screed
When carrying out repairs, one of the main criteria is the cost of materials per 1 m2 of screed. And here we observe an interesting situation: the cheapest type of material is expanded clay. For 1 m3 you will have to pay about 2000 rubles, if you take it in bulk, without packaging. And many consumers buy into this.
In fact, 1 m2 of cement screed costs from 320 rubles. up to 397 rub. (calculations can be viewed here). A dry screed will be more expensive. Expanded clay itself will cost about 90 rubles/m2 plus flooring 280-300 rubles/m2 for one layer, but you need two.
Conclusion: despite the apparent cheapness of expanded clay, a screed made from it will cost more, and significantly. Cement screeds, despite the difference in the thickness of the mortar being laid, are completely equal, because the consumption of materials is the same, and the extra 1 cm in the thickness of the bond appears due to the lower density of the semi-dry technology.
Cost of work
You can order a professional team to install the screed:
- for dry - for 200 rub./m2;
- semi-dry - 250 rub./m2;
- “wet” - from 400 rub./m2.
These are reasonable prices for proven teams. There are also smaller ones. For example, they are ready to work using wet technology for 140-160 rubles/m2. But here the question immediately arises: why does the master not value his work? Most likely, such prices are offered by guests from Central Asia. There are also mind-blowing prices - 500-600 rubles / m2, designed for people who do not understand construction at all.
Conclusion: dry screed is the cheapest option. The most expensive is the classical method.
Durability
In the absence of extreme operating conditions, all compared types of ties have approximately the same service life.
Conclusion: no one has an advantage in terms of operational life.
Resistance to temperature and humidity changes
Expanded clay actively absorbs moisture from the air and then dries for months - this is its peculiarity. Wet screed is the enemy of laminate flooring. In addition, due to the dampness of the leveling layer, there is a high probability of fungus and mold appearing on the walls. Therefore, expanded clay is not used in wet rooms.
Cement-based screeds do not absorb water, so the technology has no restrictions on humidity. Temperature changes do not affect the ceramic pellets in any way, and the screed changes its size. A damper tape around the perimeter of the walls solves the problem.
Conclusion: it is better to avoid using dry screed in wet rooms.
Thermal conductivity
When analyzing the thermal conductivity of screeds, several important points must be taken into account.
- In what quality do the owners of the home want to see the screed? If in the form of an additional insulating layer, then the advantage is given to the technology in which the screed conducts heat poorly (the thermal conductivity coefficient is lower). If in combination with a “warm floor”, then the opposite is true, good thermal conductivity is needed.
- Expanded clay is not friendly, in general, to heated floor coverings from below.
- Through a layer of expanded clay backfill up to 5 cm thick (some experts say up to 6 cm), heat escapes like sand through your fingers. This must be taken into account, especially when installing floors on the first floors of apartments and in private housing construction.
If we talk about specific numbers, the thermal conductivity coefficient is equal to:
- for a “wet” screed - 0.6-0.9 W/m*K;
- semi-dry - 0.45-0.46 W/m*K (when used in a dry state or in laboratory conditions - 0.4 W/m*K);
- dry - 0.16-0.18 W/m*K (depending on bulk density).
conclusions based on the above figures :
- for “warm floors” it is better to use “wet” technology - denser material will better transfer heat from the heating system to the floor covering. But you can’t refuse semi-dry pouring. With good thermal insulation from below, the heat will not go anywhere - it will remain in the room. The only trouble is that it takes longer to warm up the room when starting the heating system;
- Only expanded clay can really insulate a floor, but provided that the thickness of the screed is at least 5 (6) cm. Some visitors may argue that there is a contradiction: the materials on insulation say that the effect of heat preservation with expanded clay occurs only with a backfill layer of at least 20 cm. That's right. But in the case of a screed, there is another factor that insulation does not have - flooring, which prevents the circulation of cold air between the expanded clay granules.
Floor load
The weight of the leveling layer is important for weak floors: subfloors made of boards and floor slabs with a long period of operation. According to this criterion, at first glance, expanded clay is the undoubted leader with its specific gravity of 560-780 kg/m3. In second place is semi-dry screed - 1450 kg/m3. The heaviest weight of concrete is 1800 kg/m3.
But this is only at first glance. In reality, it's not that simple. So, a 1 cm thicker layer of semi-dry screed puts pressure on the ceiling in the same way as concrete. There is complete equality here. Expanded clay is lighter, even when the thickness of the screed is doubled.
Conclusion: on weak floors there is no alternative to expanded clay.
Complexity of technology
The easiest way is to fill expanded clay. Can be done well by a novice builder. A “wet” screed is more technologically complex and labor intensive.
It is believed that semi-dry screed should be done by professionals - you cannot fill it without a little mechanization. But it is not so. The work can also be done by a home handyman. How? Read here.
Conclusion: the most complex technology for screeding is the semi-dry unbound CPR method, the simplest is the dry method.
Surface quality level
According to the criterion of surface quality, there are two leaders: semi-dry technology, which, after grouting the laid mortar, has a smooth surface and a dry one, thanks to plywood or OSB flooring.
With the “wet” method, the difference in height can reach 5-7 mm due to uneven shrinkage. Therefore, an additional finishing operation is required: grinding or pouring a self-leveling mixture.
Conclusion: you can immediately get a smooth surface using dry and semi-dry screeding methods. “Wet” technology requires refinement, which means additional costs.
Screed thickness
In Khrushchev buildings, the thickness of the screed is one of the important indicators - you can take a couple of extra centimeters from a ceiling with a height of 2.3 to 2.7 m. But reducing the height of the ceiling, firstly, negatively affects the human psyche, and secondly, all interior doors will have to be cut.
The thinnest screed for the “wet” technology is 3 cm, 1 cm more for a semi-dry screed. For some reason, it is believed that dry screed is 4 cm. But this is not so. 4 cm is only the minimum thickness of poured expanded clay or vermiculite. You also need to lay flooring on top of the backfill. This is plus more than 3.5 cm. The result is 7-8 cm.
Conclusion: the thinnest screed is with the “wet” technology, the thickest with the dry one.
Compatibility with heated floors
In private construction, when choosing a technology for leveling the base of the floor, its compatibility with “warm floors” plays an increasingly important role. Here the expanded clay immediately disappears - inside the backfill, the water heating pipes or IR film will simply be crushed. Cement mortars do not have this problem. Another plus in favor of a “warm floor” inside concrete is the approximately equal expansion coefficient of most pipes and concrete screed when heated.
Conclusion: wet and semi-dry screeds are completely, without restrictions, compatible with heated floors. Dry - no.
Application area
A dry screed has a weak point - moisture. Therefore, restrictions are imposed for use in the bathroom, open balcony or loggia, basement, garage. The fragility of the concrete slab does not allow it to be laid on unstable foundations (soil), and its weight does not allow it to be laid on weak floors. Semi-dry technology has practically no limitations. An exception is a weak reason. May not be able to withstand the load.
Conclusion: semi-dry technology has a wider range of applications, while backfill has the smallest range of applications.
How to choose?
The benefits of using one or the other option are not always obvious; the choice is largely determined by the type of building, wall materials and type of ceiling, as well as the functional purpose of the room, for example, whether it will be a bathroom, bathhouse, furnace room, or whether there will be a fireplace or stove in it.
For rooms with high humidity
This type of premises requires a special attitude towards the choice of the type of screed, so that it can subsequently function for over 50 years and does not cause trouble either to the owners of the premises or their neighbors.
Such objects include:
- bathroom;
- toilet;
- shower;
- open balcony;
- basement;
- various utility rooms.
Further, the advantages of a semi-dry screed are that they are easier to produce; the use of a wet screed will require additional costs for enhanced waterproofing.
Private houses made of different building materials
Private houses made of different wall and ceiling materials require completely different flooring options:
- in houses with light wooden floors, the semi-dry option definitely has an advantage;
- For standard panel or monolithic floor slabs, the advantage is the wet version.
Even though traditional concrete flooring has a longer hydration process and will require additional funds to level the external surface.
This is due to the fact that the floor slabs are able to bear a higher load from the concrete layer, and the cost of the material for this option will be minimal, moreover, it can be done on your own, without the involvement of qualified personnel and the rental of expensive equipment.
Apartment
For this type of living space, a more acceptable option for floor preparation is the semi-dry method , which does not require the creation of a thick layer, which is especially important in low-rise rooms of multi-storey buildings. In addition, subsequently no grinding or application of a leveling layer is required. And the work is done with virtually no dirt.
The wet method will be economically feasible only if the work is carried out independently, without inviting specialists.
Garage
In these types of premises, where it is not necessary to create high external characteristics of the floor, but it is necessary to create a high-strength coating that can withstand high static and dynamic loads, the most preferable option would be the traditional wet method using concrete mortar.
Due to the small volumes, it can be done independently, in which case the cost of such a floor will be minimal.
Advantages and disadvantages
Like most building materials, standard compositions for screeding using the semi-dry method have some advantages and disadvantages due to the composition of the material and the technology of execution.
Mixture for semi-dry screed
The undeniable advantages include:
- quite affordable cost compared to “wet” analogues;
- no need to additionally level the floors;
- no water is used during the work and the possibility of even minor leaks is eliminated;
- the presence of a porous structure of the finished screed can significantly improve sound and heat insulation characteristics;
- the possibility of defect formation or cracking of the surface layer is minimized.
The period for complete drying of the floor is only 4-5 days
There are no disadvantages when screeding using the semi-dry method yourself, which allows us to recommend it as the most practical and high-quality method for leveling the floor surface. However, it should be taken into account that mechanized leveling of large areas is very expensive, this is due to the high cost of delivering the mixture to the work site and supplying it to the laying site with special flexible pipes.
Materials and tools
The third surprise awaited me when I studied the need for materials and tools. Almost every article about semi-dry screed talks about a concrete mixer and a trowel. I naively believed that teams that do the work manually rent these machines. Imagine my surprise when, upon arriving at the site, I saw:
- several bags of M500 cement;
- a pile of sand;
- large sieve;
- several packs of fiberglass;
- plastic film;
- a stack of metal reinforcing mesh;
- a screwdriver with an incomprehensible hook;
- underlay for laminate;
- construction gun with hot glue;
- twisting copper wire;
- laser level;
- rule;
- roulette;
- construction pencil;
- bucket;
- plastic cup;
- two plaster floats;
- shovel;
- several metal pipes about 3 meters long;
- metal hook about 1.5 m long;
- construction knife;
- two pairs of concrete shoes.
These are concrete shoes.
No concrete mixers or trowels.
The presence of some tools and devices was surprising. I could not understand their role in the technological process. Even while changing into work clothes, I bombarded the builders with questions. I received detailed answers.
Cement. To get a solid base, it must be in a semi-dry mixture of the M500 brand. As a last resort, M400, but with a shelf life of no more than 2 months. No M300 brands. I knew why the foreman focused on the shelf life - every 6 months of being in the warehouse, the grade of Portland cement drops by 100 units. Was M500, sat for six months, became M400.
Sand. You need quarry sand - only it has a fineness modulus of up to 2.5 units. A little clarification is needed here: according to GOST, such sand must first be sifted through a sieve with a hole diameter of 25 mm, and then 14 mm. Everything that did not pass through the last sieve must be used. There should be no clay in the sand, or rather, no more than 3% of fine clay inclusions are allowed; accidentally introduced plant debris is completely excluded. The humidity is natural, which means any.
For information: the teams, as if by agreement, sifted the sand only once, through a fine sieve. Large pebbles rolled off the mound of cement as it was mixed. They were constantly being removed. It’s faster, but it doesn’t affect the quality of the work.
Fiber fiber. The reinforcing mesh does not prevent the appearance of cracks on the surface, but rather prevents their growth. Therefore, polypropylene fiber is introduced into the solution, which ensures the integrity of the surface.
Screwdriver. The hook inserted into the cartridge allows you to quickly twist the copper wire when tying the reinforcing mesh. This is the first time I have encountered this, although I was assured that this method has been used for quite a long time.
Pipes. Used as beacons. Only they do not deform when driven into an already laid solution.
Shovel. There are several types of shovels. There must be a scoop (popularly known as a shufel, hence the name “shufel”).
Substrate - used instead of damper tape. I cut it into strips and attached it to the wall. It's much cheaper that way.
Hook. SNiP recommends laying the reinforcing mesh on the screed layer and covering it with a second layer on top. The team works differently - they place a mesh on the base of the floor, pour a bucket of mortar onto it and use a hook to lift it up a little so that it is inside the screed, in its lower part. Simple and fast. A beautiful solution to a technological problem.
Hot-melt adhesive - glue the cut backing to the wall.
Glass - pour water into the solution, or rather onto a hill of sand and cement.
Copper wire - needed to bind the metal mesh.
Plastic film - the solution is first prepared on it, and then the screed is covered with it.
The purpose of the remaining tools is self-explanatory.
Calculation of material requirements
The required amount of materials is calculated using the following algorithm: the thickness of the screed is multiplied by the area of the room in square meters. This gives the volume of fill in m3. Next, look at the table, which shows the amount of cement per 1 m3 of mortar grades M150 and M200 and multiply by volume. We divide the results obtained by the weight of the material in the package and determine the number of bags of cement and sand after rounding up.
Table 1. Consumption of cement and sand per 1 m3 of solution.
| Cement brand | Material consumption per 1 m3 of solution | |||
| Solution grade M150 | Solution brand M200 | |||
| Cement, kg | Sand, kg | Cement, kg | Sand, kg | |
| M400 | Z90 | 1310 | 490 | 1350 |
| M500 | 370 | 1350 | 410 | 1400 |
What to prefer and in what case
The comparative analysis of screed types does not give a clear answer as to which type of screed is better. It all depends on the type of room.
Wet areas
In the bathroom, toilet, open balcony, basement, and ancillary buildings, the use of backfill is vetoed. Here, a “wet” and a semi-dry screed will cope with the task of leveling the surface with equal success.
Garage
High requirements for the strength of the leveling layer in the garage and other rooms (for example, where a fireplace or stove will be installed) exclude the possibility of laying semi-dry mortar. Only concrete screed.
Private houses
On the second floor of wooden houses, with their light floors, it is advisable to choose a dry screed. On the first floors, dry or semi-dry screed is a priority.
No one prohibits wet technology, but, firstly, you will have to wait a long time for the hydration process to complete, and secondly, floor coverings in the middle and expensive price segment most often need a flat surface, which concrete does not have. Additional finishing operations are required, which cost money.
Apartments
Dry technology is not suitable due to the large thickness of the floor cake. It is difficult to do a semi-dry screed on your own. The classic method remains. But this is when doing the work yourself.
When hiring professionals, the semi-dry method looks better in all respects: the cost of work is cheaper, and the materials are almost equal: the more expensive cement and sand of the semi-dry technology is compensated by the need to purchase a self-leveling mixture or additional grinding of concrete. In addition, there is no dirt, you can begin further work faster.
Features of the technology
Semi-dry screed - leveling the floor with a cement-sand mixture with the addition of a small amount of water. It is added exactly as much as is required for cement hydration - the formation of strong crystalline bonds.
Deprived of excess moisture, the mixture eventually turns into stone. The minimum thickness of dry screed is 40 mm. In this case, the strength is 150–250 kg/cm2, and shrinkage is 0.2 mm/m.
When dried, it does not deform and after hardening the solution forms a smooth surface. Therefore, the costs of self-leveling liquid mixtures are eliminated: the finishing coating can be laid directly on the concrete floor.