Review author: Terra Design School
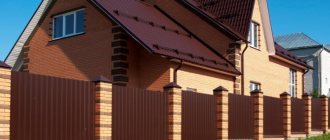
Brick fences are highly valued among residents of private houses. They are durable, practical and do not require special care. A high-quality brick fence built around the perimeter of the territory is a wonderful decoration of the site.
This is evidenced by numerous photos of a brick fence on the Internet. But before creating it, it is necessary to take into account many factors so that the fence is not only beautiful, but also durable.
Modern brick fences
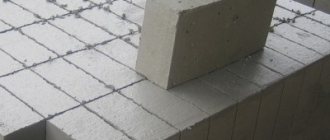
For the construction of fences, clinker and sand-lime bricks are usually used. They, unlike ordinary ceramic bricks, do not need finishing (plastering or tiling).
However, the wall should be well connected with approximately 10mm joints. These types of bricks come in a variety of colors and textures.
Pillars built from these bricks (sometimes this also applies to brick fences with corrugated sheets) should be strengthened from the inside and filled with concrete (after all, the handles of spans and gates are attached to them).
Clinker brick does not require impregnation, since its water absorption is very low. On the other hand, silicate (especially split silicate) gets dirty easily, so it must be protected with a water-repellent agent.
Facade bricks – These used to be mostly red blocks, but are now produced in shades of white, yellow, brown or grey. You can easily choose the appropriate seam color or brick texture - corrugated or hand-molded. You can build a solid fence from bricks, but most often they are used to create foundations or pillars - it is important that they are reinforced.
Concrete block pillars can have different sizes, depending on the size of the bricks.
Brick fences must match the facade of the building and the surroundings of the site. Ideally, such a fence should be placed on a foundation at a height of 10-15 cm from the ground. Between the fence and the brick part it is necessary to put horizontal insulation (for example, made of foil) to prevent water from getting into the ground.
Every 10 m it is necessary to make expansion joints (the gap between the foundation and the span) so that the fence does not crack. In turn, the top of the fence with brick pillars, walls and base should be covered with a roof that protects from water.
Which brick to choose?
The brand and type of brick product are selected taking into account the general architectural style of the house and outbuildings. In order for the fence to be strong, when purchasing a product it is important to take into account the weather and climatic conditions and the composition of the soil around the garden plot. If finances allow, it is better to use facing blocks for pillars and partitions. Sand-lime brick will cost less, although in terms of decorative characteristics it is inferior to facing brick. But the erected structure will not be durable and reliable.
Clinker fences
A brick fence can be finished with clinker tiles, which are slightly thinner than brick tiles (6-21 mm). Clinker posts after laying look like brick fence masonry, but their design is slightly different.
Like bricks, clinker fence designs can be created in a variety of colors - beige, red or brown.
The tiles should be glued to a frost-resistant clinker adhesive solution. After about 4 days, gaps will become noticeable between them - they need to be filled with grout.
Video description
For a clear overview of the foundations for a brick fence, watch the video:
The total cost of one pillar 2.5 m high starts from 12,000 rubles. – taking into account the foundation (depth from 1.5 m), mortar, concrete or steel cap, domestic single facing brick costing up to 15 rubles. a piece.
After the pillars are erected, spans are laid between them. The first row is first laid out “dry” to adjust the thickness of the vertical seams. Then the span is filled with brick into the dressing, using a template to form the seams. The cost of laying a half-brick span is from 650 rubles/m2.
After the masonry mortar has set, jointing is carried out, and a brick is laid on top or a ready-made parapet is installed.
Clinker fences - advantages and disadvantages
The abundance of clinker fences proves only one thing - this is a truly universal and very good solution. Indeed, clinker fences are very popular.
Often such brick fences are made by hand. It is not surprising, because they are easy to keep clean and do not become overgrown with algae. Clinker fences are made from the same material as ceramic tiles, so they are durable and resistant to external influences.
Fences made of clinker bricks are not subject to darkening and growth of greenery. Their surface remains beautifully painted, and they are also quite resistant to mechanical damage.
Clinker tolerates frost and rain well. In addition, it comes in many shades, so you can match it to almost any building.
However, clinker fences are not without their drawbacks. Despite the fact that they are beautiful and durable, many people refuse them because of the price.
The cost of a clinker brick fence is higher than a simple brick fence. Clinker is relatively expensive, and the construction of the fence itself takes a lot of time.
Pauses during drying of the mortar must be maintained, and setting of the masonry takes a lot of time, which can significantly increase labor costs. In addition, this type of fence requires a foundation.
Foundation for a clinker fence
Laying a clinker fence should begin with laying a foundation for a brick fence. Its type and size depends on many factors. First of all, the type of soil is important, secondly, the region of the country, and thirdly, the size and weight of the fence.
On sandy soil, the foundation for the fence can be only 60 cm deep. But already on planting soils, you need to make the foundation for the fence below the freezing zone of the ground, that is, to a depth of 80-140 cm.
The foundation does not need to be reinforced, but it is worth doing if the fence is heavy. In this case, the reinforcement can simply make the fence more stable. For clinker brick fencing, special concrete is used. It needs to dry for 7 days. During this time, it must be moistened regularly to prevent cracking.
Design Guidelines
In order not to make a mistake with the parameters of the future design, first of all, create a drawing. These drawings indicate the height and thickness of each structural element.
The height of a silicate fence varies from 0.5 to 3.5 meters. As for thickness, here, first of all, it is worth thinking about the functional significance of the brick fence. If you want to make a beautiful yellow brick fence with your own hands, which serves only a decorative function, then the masonry along the base is made of half a brick. This means that such a building element is laid out with its long side along the fence. The brickwork of a fence made of white brick in a single brick implies its placement with its long side across the base.
Useful How to lay out brick pillars for a fence: installation technology
In order for the structure to be massive and perform not only a decorative, but also a protective function, it is better to build a fence with 1.5 or 2 bricks.
Fence made of natural stone
They are similar in strength to metal fences, but do not lose their special appeal. Often the creation of foundations and pillars is made of sandstone or limestone, as well as granite. The structure is attached in the same way as clinker tiles, but the stone will require a special solution.
Walls are most often erected from hewn and split blocks (that is, of the correct shape) according to the principle of gluing masonry and using cement or cement-lime mortar (similar to brick).
A good imitation of stone are special blocks for the construction of fences - silicate and concrete blocks, which have many colors and textures. Their assembly is easy and quick.
It is also worth remembering about impregnation. Natural stone or hand-molded brick can also be imitated with concrete tile cladding.
You can easily stick it on regular (or elastic) mortar, and after 3 days you will be able to fill the gaps with mortar.
As for plastering, the cheapest is considered to be cement plaster, or cement-lime plaster painted with paint (preferably silicone, which reduces the penetration of water into the brick fence). This plaster has a huge advantage - it can be adjusted to the facade.