Choosing the type of plasterboard ceiling
The choice of the type of plasterboard ceiling depends on its purpose. The technological diversity of plasterboard structures allows you to create the following types of ceilings.
- A flat single-level plasterboard ceiling, with the ceiling level lowered by 100-1500 mm.
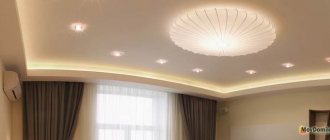
- Two-level ceiling with possible lighting.
- Two-level ceiling with figured elements;
- Curved ceiling on several levels;
- Other types of ceiling.
The appearance options for a plasterboard ceiling are very diverse and are limited only by the imagination of designers and the technology of plasterboard construction.
Lighting options
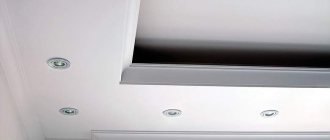
There are two main types of lighting fixtures: surface-mounted and recessed. The first includes classic chandeliers and modern pendant lamps. Such devices are attached directly to the surface of the finished ceiling. The second option is built-in lamps, the housing of which is located inside a plasterboard structure. Usually placed in groups, since each individual one gives a little light.
There is also a combination of two options; this is especially convenient for large rooms. A hanging chandelier provides general light, and additional light is provided by built-in lamps. Also often used for decorative lighting is LED strip, which is installed around the perimeter or between levels.
Plasterboard ceiling - two designs
There are two fundamentally different designs of plasterboard ceilings.
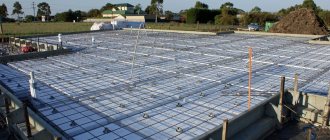
- The first design is mounted on a frame made of a special profile, which is called a profile for plasterboard, also known as the ceiling profile PP 67/27 and the ceiling guide profile PNP 28/27. Ceilings are made on a metal frame more often in city apartments and stone houses.
- The second design, plasterboard ceilings, is made on wooden beams. For this design, any dry construction timber with a width of 60 mm and a height of 30 or 40 mm is used. Ceilings on a wooden frame are most often installed in wooden houses, houses with wooden floors and attics with a rafter system.
Electrical wiring
After preparing the main ceiling level, it is necessary to work out the placement of lamps. To do this, you can invite an electrical installation specialist, or do the wiring yourself. The main thing is to follow all the rules and regulations, correctly calculate the power and placement of the chandelier and lamps. It is important to check the finished system before covering it with a frame under subsequent levels of plasterboard ceiling!
Purchase of materials for plasterboard ceilings
Plasterboard ceiling material can be divided into three groups:
- Material for the ceiling frame and its fastening (suspension) to the rough ceiling;
- Plasterboard sheets;
- Fastening and additional material for the structure.
Material for the ceiling frame and its fastening
Consider the option of a ceiling in an apartment using a metal profile for plasterboard.
A special profile for the ceiling is called a ceiling profile. Correctly, such a profile is called and labeled as follows:
- PP ceiling profile PP 60/27,
- PNP ceiling guide profile PNP 28/27.
The dimensions of the profiles are such that when assembling the structure they can be inserted into one another. The profiles are secured to the structure using special screws called “bug” (“bug” is a screw type: LB) or a special tool called a cutter.
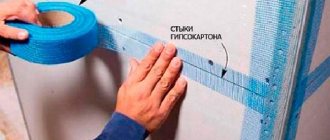
Seal the joints
YouTube channel “KNAUF Russia”
Upon completion of installation, all sheet joints are covered with putty using reinforcing tape. To do this, first make sure that the screws are securely fastened and, if necessary, tighten the protruding heads with a screwdriver.
Then use a brush to brush off any dust at the joints of the sheets and prime all cut edges. Fill the seams with putty using a putty knife. Glue reinforcing tape in the center of the joint and press it in with a spatula. Next, apply a second layer of putty. Use the same compound to seal the fastening points of all self-tapping screws.
Floating and hard plasterboard ceilings
Pay attention to this section. There are two technologies for installing a gypsum plaster ceiling on a metal frame.
The first technology is tough. She assumes that the plasterboard ceiling is simultaneously attached to the sub-ceiling and to the walls. The frame of the suspended ceiling is attached to the rough ceiling using special PP hangers (straight hangers) or clamps with rods. Direct suspension will allow you to lower the ceiling to a height of no more than 200 mm. Suspension with traction allows you to lower the ceiling by 300-1500 mm.
Note: It is worth paying attention that when choosing the type of ceiling, you must understand how much the ceiling will lower and from this make a choice of types of suspensions.
The second technology is floating. She assumes that the ceiling frame will be attached to the sub-ceiling, but will not be attached to the walls. This ceiling is made only with PP profiles, without using PNP profiles. This ceiling design is used in new buildings in the first years of completion, houses near highways and railways.
I described in detail an example of a ceiling with direct hangers in the article: Suspended ceiling with direct hangers. Here, for a variety of examples, we will consider the installation of a single-level floating ceiling on rods with clamps.
Material for single-level ceiling
To determine how much and what material you need to purchase, you must first draw a diagram of the future ceiling design. We draw the room where the ceiling is planned, with dimensions.
Ceiling hangers should be installed with a pitch of 600 mm and a distance from the walls of 250 mm (see photo). Draw the planned hangers on the drawing of the room based on the required gaps between them, and get their number. An example of the arrangement of profiles can be seen in the figure from the article Marking a single-level suspended ceiling.
When making a hard ceiling with your own hands, you would need a guide profile (PNP 20/27) around the perimeter of the room. Its length can be calculated by the length of the perimeter of the room plus 10% margin. This profile is not needed in this floating ceiling design.
The main structure of the floating ceiling frame is a kind of grid of ceiling profiles (PP 60/27). Some of these profiles will be attached to hangers (they are called main). The second part of the profiles will be attached to these profiles (they are called load-bearing). The name is load-bearing due to the fact that sheets of drywall will be attached to these profiles.
In technologies for working with plasterboard, intersecting ceiling profiles can be connected in one level (end-to-end) or in two levels, overlapping one on top of the other.
- The first connection is called a single-level connection of ceiling profiles and it is made with special “crab” type fasteners.
- The second connection is called two-level and it is made with a special two-level profile connector.
In the design of a floating ceiling, only a two-level connection of profiles is used!
I repeat and this is important . In the design of the plasterboard ceiling frame, two types of profiles are clearly separated. Some profiles are called main, the second are called load-bearing (load). The main profiles are attached to the sub-ceiling, and the load profiles bear the load from the weight of the drywall attached to them.
Important! In a two-level frame, the main profiles are located at the top of the structure, and load-bearing profiles are attached to them.
DIY plasterboard ceiling - marking
- When making a plasterboard ceiling with your own hands, it is important to make the markings correctly. You need to start work by cleaning the old ceiling and top of the walls from old building material. If necessary, the walls are strengthened with building mixtures.
- We begin work by marking the ceiling. Marking is best done using a laser level.
- We apply the lower level of the ceiling along the perimeter of the room.
On the ceiling we mark the places for attaching the suspensions, taking into account the distances from the outer profiles to the walls (at least 100 mm) and the distances between the main profiles (at least 600 mm).
For accurate marking, we mark the location (fastening) of the suspensions on the marking lines. To mark, we use a construction marking cord and, with the help of an assistant, we put the markings on the ceiling.
Cut out the sheets
YouTube channel “KNAUF Russia”
To cut the panels, mark the desired size with a tape measure and, applying the profile or rule, cut the cardboard with a knife. Hang and break the cut part, and then score the paper from the bottom side. Then use a plane to trim the edge along the cutting line.
Also, before installation, do not forget to use a plane or knife to chamfer at an angle of 22.5° on the edges that will be adjacent to other sheets. This is necessary in order to properly seal the joints with putty in the future.
Be sure to measure and mark on the sheets the places where the lighting wires are located. After finishing the work, the drywall can be easily cut through and the cables can be removed.
Installation of hangers
- According to the markings made, we install the suspension rods using dowels with screws or other fasteners.
- On the installed rods, at the same level, we attach clamps with hangers for the profiles.
Ceiling frame installation
We begin installing the ceiling frame with our own hands by installing the main profiles. They are secured with a suspension as follows.
- We attach load profiles to the main profiles. We connect them to the main profiles with a two-level suspension.
- We maintain technological distances between profiles.
Important! When making a plasterboard ceiling with our own hands, we constantly measure the horizontality of the profile levels. If necessary, adjust the level using clamps on the rods. In the photo, this adjustment is shown with arrows.
Upon completion of installation of the frame, we once again check the horizontality of the entire structure in different directions.
Fix the main profiles in one plane
YouTube channel “Stone Guys”
To obtain a perfectly flat surface for plasterboard cladding, you need to align all the beams in one line. The easiest way to do this is with regular thread.
Lift all profiles 10–15 mm up and secure by inserting screws into the holes of the hangers. Stretch a thread across the profiles between the walls and secure them with self-tapping screws on the guides flush with the latter.
Also, the correct installation of profiles can be controlled using a bubble level / YouTube channel “KNAUF Russia”
Starting from the outermost one from the wall, release the profiles one by one and, aligning them so that they barely touch the thread, secure them with four 3.5 × 9 mm screws - two on each side.
First, fix the hangers in the middle of the beams to remove any slack. After this, the main profiles will almost clearly fall into place. All that remains is to check the thread and tighten the screws into the hangers.
Covering the frame with plasterboard
Gypsum craton sheets are attached to the load profiles with TN self-tapping screws with a pitch of 150 mm. You will need an assistant or device to support the sheets. You can make a device for supporting sheets with your own hands, for example, a T-shaped support made of wooden slats.
The joints of the sheets on the ceiling should be made in the middle of the profile so that they do not hang in the air. The screw caps need to be recessed by 2-3 mm.
We have a single-level floating ceiling, so we retreat from the edge of the walls by 5-7 mm.
The joints of adjacent rows of plasterboard sheets should be offset, as in brickwork.
How many layers of gypsum plaster should be in the ceiling?
For apartments, that is, rooms that are quite small, the ceiling is made of plasterboard in one layer with sheets of 12 mm thickness. When using thinner sheets, the sheathing is done in two layers.
Wiring device
Also, during the installation phase of the frame under the drywall, it is necessary to immediately prepare the wiring for the lighting fixtures. Its installation is carried out through corrugated pipes from the nearest distribution box.
Electrical wiring in corrugated ceiling
There are a few things to note here that need to be taken into account:
- To install the wiring, you must either purchase a profile that has special holes for electrical wiring, or arrange them yourself in advance.
- The corrugated tube is secured using special clips or clamps in increments of 30-40 centimeters.
You can find out more about the electrical wiring in separate materials.
For a two-level frame you will need
A two-level plasterboard ceiling will require more material and its amount depends on the ceiling pattern. All curved edges of the structure are made from guide profiles (PNP 28/27), and how to make a two-level ceiling in detail is in the next article here.
©Gipsokart.ru
Articles on the topic
- Selecting and installing a chandelier on a suspended ceiling
- Suspended flow frame with single level connectors
- Plasterboard finishing of attics
- Suspended ceiling with direct hangers
- Suspended ceiling with a two-level frame
- Plasterboard ceiling for narrow rooms
- Plasterboard ceiling on a wooden frame
- DIY plasterboard ceiling: single-level floating ceiling on rods
- Ceiling profile for plasterboard
- Marking a single-level suspended ceiling made of plasterboard