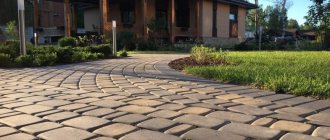
When landscaping the area in front of the house, one of the main things is paving. Stone paths provide convenience and a neat, finished look, and also decorate the landscape. Stone paving is beautiful and always modern. Sandstone, slate, quartzite will fit perfectly into any landscape.
The decor with such stones is unique and never repeated. Collected into a huge puzzle, they will turn ordinary paths into an original landscape.
Brief overview of the article
- Natural stone is an “eternal” material
- Advantages and disadvantages of natural stone
- Features of natural stone
- Types of stone for sidewalk paths
- Paths made of natural stone
- Granite tiles
- Paths made of sandstone layers
- Paths made of slate slabs
- Rock paths
- Pebble paths
- Framing for paths
- Fake diamond
- Photo of stone for paths
Natural stone is an “eternal” material
Using natural stone for paths is an excellent way to create a unique design, because... nature created it. Such a stone is not repeated and is always individual. Paving with natural stone is considered the most commonly used. The correct placement of the paths will help to collect all parts of the site and the rest of the decor into one single design.
Natural stone is a sought-after material because it has important properties such as frost resistance, wear resistance and durability. In snowy, frosty winters and rainy autumns, natural stone will retain its original appearance due to its durability and durability.
sand cushion
The cheapest option is a sand cushion. It has relatively low strength and reliability, but is suitable for paths that will not be subject to high loads. It is not recommended to use in case of high groundwater levels and moving soil. The preparation of the sand cushion is carried out by scattering the material in an even layer. It is recommended to add water from time to time, because... this will simplify the compaction process.
Advantages and disadvantages of natural stone
In addition to its decorative properties and frost resistance, this stone has other advantages:
- Big choice.
- Easy to install.
- Long term of use.
Natural stone has a service life of more than 300 years, and can be used in absolutely any design.
But this material has some disadvantages:
- High price.
- Heavyness. You will need transport to transport it.
- You will have to draw up a sketch of future roads in advance and provide specific calculations.
Many may be put off by the price, but it delivers on all the properties listed.
Features of natural stone
The main difference is that this resource was created by nature itself. Natural stone for paths is mined in quarries and undergoes little processing. When obtained, the environment is not polluted; such stone is environmentally friendly and safe for human health.
Natural stone is unique; in nature there are no two identical stones. Even production processing does not make it any less unique.
Over time, it practically does not change, it has no equal in stability and strength, it does not react to exposure to temperatures, does not crack from old age and does not deform.
Types of stone for sidewalk paths
The form of stone for paths is flat slabs and blocks. Using mechanical processing, this material can be used to make tiles, sawn stone or paving stones.
There are various types of natural stone.
Sandstone. In addition to frost resistance and strength, it has a rough surface, which makes it non-slip when it rains.
Slate. Very durable to mechanical stress and resistant to abrasion.
Quartzite. Very durable material, stronger even than slate.
Shungite. Has low water absorption and high strength.
Granite. The best stone for paving. Very durable and beautiful. It is used in the form of chipped, sawn paving stones.
Basalt. It has chemical resistance and high strength.
Any natural stone for paths in a country house will always be modern, unique, wear-resistant, versatile, and resistant to temperature changes and chemicals. Its origin is a guarantee of safety for humans. It will harmonize with any landscape, does not require special care and will retain its properties throughout the entire period of use.
Types of Garden Paths
Depending on the stones used and the method of laying, the following paths are distinguished:
- Bulk. Geotextiles are laid in the dug ditch, and screenings, pebbles or gravel are poured on top. Brick borders are made on the sides. For reliability, granite tiles are installed in the center of the path. Fix the material with a layer of sand.
- Jellied. The most reliable type of tracks. Concrete solution is poured into the prepared ditch. Natural stone and paving stones are laid on top. The base can withstand heavy loads, so they are made even near garages.
- Natural. Well-trodden paths. No costs required. A significant drawback is that it is difficult to pass during rainfall. They are quickly washed away by water. A good solution would be to decorate them with river pebbles, cobblestones, and old bricks.
Most owners of country houses choose flooded paths that are not afraid of precipitation. They are durable and resistant to mechanical stress.
Granite tiles
Granite is one of the hardest paving materials. With it you can create an excellent alley. It is naturally very special, with shades ranging from pink to gray to black.
It is permissible to make paths from both treated and untreated stone. You can lay it in a checkerboard pattern, or in the form of a Christmas tree or an arc.
To develop a “antique” design, it is better to use chipped paving stones, to create a smooth surface - sawn paving stones, and for paths - chipped-sawn paving stones.
Paths made of sandstone layers
Treated sandstone is an ideal flat stone for alleys and paths.
The color range of this stone is varied, mostly light shades, but there are burgundy, white and other colors.
Appearance, density, texture are directly dependent on the content of its constituent elements. Such paths will look natural. This stone will not absorb moisture and is rough.
Cost of services in companies in Moscow and St. Petersburg
Laying of garden paths can be ordered from specialists. But you should understand that you will have to pay a different price for each stage of work. It all depends on the complexity and labor intensity of the process. The average price list for Moscow and St. Petersburg is as follows:
- site preparation, trench – 120 rub/m3;
- laying geotextiles (cost of material included) – 100 rub/m2;
- drainage (crushed stone layer 10 cm) – 80 rub/m2;
- backfilling sand 10 cm – 70 rub/m2;
- pouring mortar – 200 rub/m2;
- clinker laying – 600 rub/m2;
- granite paving stones – 1200 rub/m2;
- sandstone, flagstone – 600 rub/m2;
- installing a curb - 200 rubles. for 1 linear meter.
In addition, the craftsmen provide a guarantee for the work done. Its duration varies depending on the material used.
Stone paths in a summer cottage are a practical and durable decoration of the area and a universal element of different styles of landscape design.
Pebble paths
You can pave an alley of pebbles with your own hands. The bulk surface is the easiest to make. Pebbles can be sea or river, but for the sidewalk it is better to choose a less smooth surface.
The advantage of such an alley is the ability to create patterns of any complexity, strength and stability. The disadvantage is that it tends to disintegrate over time. To prevent this from happening, it is better to mix it with crushed stone.
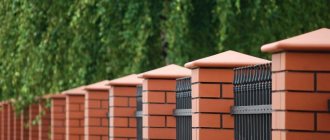
Framing for paths
The final part of the path design is creating the curb. It strengthens the edges of the path and creates a finished effect. Granite, marble, and limestone are suitable as curb stones for paths. The border will protect the path from grass sprouting and destruction.
Sequence of pavement construction
Having decided on the material of manufacture, shape, width and location of the path, you can begin arranging it:
- To begin with, draw the outline of the path using chalk, sand, and lime.
- Next, pegs are driven in on both sides of the path, and a rope is stretched between them. After the path of the track is marked, you can proceed to the main work.
- To begin with, a trench is dug, up to 50 cm deep.
- A cushion of sand and gravel is placed at the bottom of the pit.
- Curbs are installed and secured.
- Concrete is poured.
- Natural stone is laid out on top.
Attention: almost all paths in the garden and on the site require additional construction of a drainage layer so that heavy rainfall and groundwater do not erode the stone structure. Crushed stone and sand are perfect for drainage.
Fake diamond
A good replacement for natural stone is artificial stone for paths. It consists of high-quality Portland cement, ceramic chips, perlite, pumice, quartz sand and various additives.
At the same time, the stone for garden paths can be very diverse, so the paths can also be different - curved, with rounded edges. They can imitate any surface - brick, cut wood, diamonds, squares or paving stones.
The colors of artificial stone are also varied - from imitation of natural stone to the colors of fantastic stones not found in nature. You can look for tiles with a color that perfectly matches your landscape.
This material is often used when decorating paths near the house. It is easier to lay paths made of artificial material than from natural stone, because it has to be selected according to its shape.
The advantage of artificial materials is their low cost. Another option is possible - using natural and artificial stone together. There are a great many varieties to create, for example, adding decorative elements to a sidewalk made of unremarkable slate. Everyone can do something different.
Paving technologies
As in other cases, the durability and attractiveness of natural stone paths depends on the correct preparation of the base and compliance with laying technology. There are two main paving methods:
- on the base;
- into the ground.
The most popular is laying stone on a base consisting of several layers, including geotextiles, a sand cushion and crushed stone of a certain fraction, or several layers of sand without crushed stone. The stone itself is most often fixed using a dry method - using a cement-sand mixture (CSM).
smihalych2 FORUMHOUSE Member
I pour 2-3 cm of cement-sand mixture onto the compacted sand, then lay the stone. I hammer it down with a mallet and pour plenty of water on it. As soon as the stone itself dries (so that the cement does not clog in the pores), I sprinkle the entire path with the same DSP and sweep it with a brush so that the mixture fills all the voids. Since the DSP under the stone dries more slowly than the stone, moisture from it penetrates into the cracks, resulting in a “monolith” in the end. After complete drying, I carefully sweep the path. After some time, the DSP pops up here and there, but, in my opinion, this does not spoil the track, but, on the contrary, emphasizes the naturalness. I tried other options, but they didn’t suit me.
Sometimes, when laying using a dry method with backfilling of DSP joints, some of the cement settles on the stone, worsening its appearance. This can be caused by either an excess of cement proportion or insufficient mixing, as well as force majeure - if precipitation occurred before the precipitation had time to sweep away. Regardless of the causes of cement contamination, the “treatment” consists of spraying the surface with a special cement remover.
In addition to filling DSP joints, backfilling is popular.
Artemdoctor FORUMHOUSE Member
A path made of stone 4-5 cm thick - we chose 15 cm of soil, dug a depression along the axis (another 15 cm), laid geotextiles at the bottom of the trench with a groove, laid a drainage pipe. The pipe was filled with crushed stone of a fraction of 5-20 mm flush with the bottom of the trench. The groove was covered with a strip of geotextile. They put up a yellow border (painted in the paste), poured sand in layers, 5 cm each, and compacted each layer with a vibrating plate. We laid a stone on top of the sand, then washed it off from dust/sand, treated it with a water repellent and filled the seams with granite screenings. We did not use cement or mixtures; we do this based on our own experience.
The dry method is not suitable for all soils; in some cases, it is impossible to do without a reinforced concrete screed on top of the bedding, on which the stone is placed in a mortar (CPS, specialized glue, CPS with the addition of modifiers or glue). When paving pedestrian paths, laying a metal mesh on top of concrete is also redundant; reinforcement of the concrete base is sufficient.
Some prefer not solid, but step or step paths, when large slabs are laid at a distance. In such a situation, the stone can be laid directly into the ground, but only if the soil allows it.
lanser5 Member of FORUMHOUSE
But I don’t need a continuous path made of flagstone - I plan to lay individual slabs in the grass to create a “walker”. Is it possible to lay each sandstone slab separately? To avoid digging a trench? Should I make a flooring of material and sand under each individual slab? Our soil is sand.
Sandy soil allows for simplified installation.
Groundworkturf Moderator FORUMHOUSE
If the soil is sand, then you can use it on the ground. But, if you want it to be level with the lawn, then you need to add compacted sand to the desired level. No geotextiles are needed here.
Having tried different paving methods, smihalych2 made certain conclusions for himself that will be useful to those who are in the process of choosing a technology.
smihalych2
There are four most common options for filling joints between stones:
- Backfilling with sand/drops/small pebbles and other bulk materials.
- Backfilling with dry CPS.
- Filling with solution (CPS + water).
- Backfilling with soil and then planting lawn grass in the joints.
Pros and cons of these options (all of the following is my personal opinion):
- Pros: beautiful and simple to make, easy to repair. Disadvantages: after each sweeping or washing of paths, you will have to fill the seams.
- Pros: not very difficult to make, relatively reliable, does not break when soil heaves, easy to repair. Cons: in some places, the DSP can pop out of the seams when washing the paths; it is impossible to create a perfectly flat surface.
- Pros: smooth surface of the path. Disadvantages: difficulty in manufacturing (preferably a concrete base), possible cracking of the mortar in the joints due to soil heaving, low maintainability.
- Pros: very beautiful, easy to repair. Cons: difficult to care for, impractical. The path serves rather a decorative function.
smihalych2 is happy with the second option chosen, and after a few years the tracks are intact and look good.
To preserve the decorative appearance of a natural stone path, it is recommended to treat it with a water-repellent agent or impregnation with a “wet stone” effect. These compounds create an impermeable film on the surface that repels water and protects against dirt, making the maintenance of the path easier and maintaining a presentable appearance longer. However, it is worth considering that after rain, such paths will take longer to dry, since moisture ceases to be absorbed into the coating.