Create comfort in your home and install electric "warm floor" It is quite possible to install tiles with your own hands, especially since for this you can choose several types of equipment that differ both in the installation method and in the operational characteristics.
But to ensure that the result does not disappoint, it is important, before starting work, to correctly calculate the power of the “warm floor”, prepare an accurate installation diagram and take into account the design features of the floor and the functional purpose of the room.
Laying heated floors under tiles
Types of electric “warm floors”
Installation of “warm floors” pursues several goals simultaneously. Most often, it plays the role of an additional heat source, especially in tandem with convection devices, for example, traditional radiators.
In this case, the heated warm air rises, and the space below the room remains cold. This is especially noticeable to residents of private cottages with unheated basements and owners of the first floors, but not only. A “warm floor” can become the only source, but in this case it is more rational to install a system with a water coolant.
Although for small rooms, electric varieties of “warm floors” are the best option: you can think about installing it, for example, during renovations in the bathroom.
Various equipment and materials are used to install heated electric floors; the only thing they have in common is that they use electricity to operate. So, an additional heat source can be created using:
- cable, the installation of which is carried out according to a pre-developed scheme, taking into account the characteristics of the room;
- heating mats made of fiberglass with cables laid in them;
- infrared heating elements mounted on a special film, which is why this “warm floor” is often called “film”.
Which type of “warm floors” to choose depends on many factors: objective and subjective; before making the final choice, you need to understand the main design and operational differences, as well as installation features.
Installation of electric heated floors under tiles. Video:
Functionality check
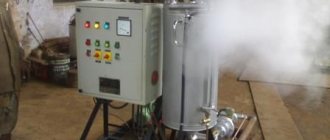
A test run of the warm floor covering system is carried out after installing the heating elements. If you do this at the last stages of the work, when the structure has already been filled with screed, it will be difficult to detect errors in the installation of communications, which means that the leak will remain invisible. To avoid flooding of the room, it is recommended to perform a test run. To do this, the warm floor covering system is turned on and the condition of the pipes is monitored for several hours, gradually increasing the heating temperature and pressure.
Which “warm floor” is better to make under tiles: nuances of choice
If a cable is chosen for installation, then in this case it must be taken into account that it will be necessary to make a floor screed with an average thickness of 30-35 mm. This leads to a significant loss of ceiling height, as well as an increase in the load on the supporting structures of the house, which in some cases may be unacceptable.
And although this is the most affordable option in terms of price, additional costs will be required, quite significant, for the purchase of dry mixtures, components, etc. The labor intensity of the upcoming work should also be taken into account.
It is also particularly difficult to carry out calculations, primarily the length of the cable, which is determined not only by the area of the room, but also by the chosen laying scheme, which, in turn, is determined by the power of the required thermal radiation. When drawing up the diagram, the location of the furniture under which the cable cannot be laid is taken into account.
In the bathroom
As a rule, the cable is purchased according to length, and all other elements and parts are additionally purchased: thermostats, sensors, fasteners, etc., although there are ready-made kits designed for a certain area.
Thermal mats based on fiberglass are also a heating cable, only laid in the base, which greatly simplifies the installation process and calculations: only that part of the area that is not covered with furniture, especially heavy ones, is taken into account.
Their use is especially relevant in houses with wooden floors, since they can be installed in the subfloor structure - a screed is not necessary for them, but if it is done, its thickness is small. The greatest difficulty is making cable connections, which in this case is not a solid structure.
But, despite this, as well as the higher cost of 1 m2 of such a warm floor, it is very popular among owners of country houses and city apartments.
Infrared heated floor under tiles
Often, a film “warm floor” under tiles or other floor covering is chosen with the motivation that it is not a source of electromagnetic radiation.
In addition, its installation does not require a screed, but if it is laid under tiles, then for installation you should purchase special elastic adhesive mixtures for “warm floors”, which ensure good thermal conductivity and the absence of deformation processes under the influence of high temperatures.
In terms of cost, this is the most expensive “warm floor”, although it is very economical, so higher costs at the initial stage are compensated by lower energy consumption during operation.
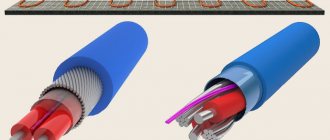
Resistive and self-regulating cables for heated floors
When choosing a cable “warm floor” for tiles, the question will definitely arise about what type of wire to use for this: resistant or self-regulating.
The former produce the same amount of thermal power during operation, the latter, depending on the degree of their own heating, that is, the more they heat up, the less heat they produce. Because of this property, they are considered more fireproof.
Resistance cables come in single-core and double-core types, and the main difference between them is the connection method: to create a closed circuit, both ends of the single-core cables are connected to a power source.
First, one end is connected, for example, in the installation box, but before the thermostat. Laying is carried out according to the selected scheme, and then the circuit is closed with the second, “cold” end, which is also brought out into the installation box.
Installation of heated floors under tiles
The cables are connected using couplings that fit under the screed. The two-core resistant cable has a connection at one end, and a plug is installed at the other. The presence of a second current-carrying core ensures the circuit is closed.
The main disadvantage of resistant cables is that they generate a constant amount of heat, which, if difficult to dissipate, can damage the system. It should also be noted that two-core cables are more attractive both from an installation point of view and because their electromagnetic radiation is less intense.
Self-regulating cables do not overheat due to their original structure, which represents a special sequence of elements connected into a single chain, from which the wire cores are formed. Between them there is a polymer gasket, which acts as a heat conductor.
Unlike a resistant cable, a self-regulating cable does not have a constant resistance: it depends on temperature. The higher the temperature, the lower the resistance in the cable, and accordingly, the less heat is generated.
In terms of installation method, self-regulating cables do not differ significantly from resistant products, but their cost is much higher.
Design and main features of the installation
The principle of constructing a water-heated floor is as follows: pipelines are connected to the heating boiler or central heating system, through which hot water is supplied to a system of pipes laid in spirals along the floors, and the water that has released thermal energy is discharged through a return pipeline back to the heating system.
Work should be performed in the following sequence:
- surface leveling, waterproofing (protection against leaks), thermal insulation, laying reinforcing mesh over a layer of foil;
- laying pipes using one of the methods (snake or spiral);
- arrangement of distribution units;
- connection to the boiler or heating system of pipes for hot water supply and return pipeline;
- pressure testing and installation of shut-off valves;
- system testing;
- pouring pipes into rooms with mortar (concrete) or laying them with boards;
- installation of a clean floor covering.
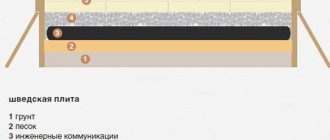
You should start laying a water heated floor with your own hands by installing a screed that levels the surface of the base horizontally. Next, be sure to provide a waterproofing layer to prevent the underlying rooms from getting wet in the event of pipe damage and water leakage from the system.
Polyethylene film or special waterproofing materials can be used as protection against moisture.
The heat-insulating layer needs to be given special attention. In the basement or first floor, heat loss constitutes a significant proportion, therefore the thickness of the heat-insulating layer should be at least 20-25 cm. On the second and higher floors, a layer 50 mm thick is sufficient.
The following can serve as insulation:
- expanded polystyrene;
- mineral wool;
- glass wool;
- technical plug;
- basalt slabs, etc.
At retail outlets you can purchase special insulation boards with recesses for laying pipes; these boards will help reduce work time and reduce labor costs.
The insulation must be covered with a layer of foil, which serves as a heat reflector and increases heat transfer. It is advisable to take a serious approach to reinforcing the base for pipes, since in a year or two the insulation will bend in places, or even completely crumble, and all the work will go down the drain.
The screed is poured with a thickness of 50-60 mm, the material is a mortar of grades 100-150 or cast concrete M-300, but certainly with the addition of plasticizers, which prevents cracking.
When heated, the mass of the screed will expand, and to avoid cracks it is necessary to make an expansion joint; The most convenient way to do this is to leave a gap of 1-1.5 cm around the perimeter, which should be filled with elastic material. Instead, before starting work, it is recommended to glue damper tape around the perimeter.
A niche in the wall is knocked out with dimensions of approximately 60x40x10 cm, depending on the number of pipelines that will be located there. There are ready-made boxes on sale, specially designed for such cases, with a set of everything necessary.
Laying “warm floor” under tiles: advantages and installation
Ceramic tiles are a durable, hygienic and practical floor covering, which has one significant drawback: high thermal conductivity, which is why its surface always remains cold. But the installation of a “warm floor” allows this operational disadvantage to be turned into an advantage, since such a coating has no problems with heat transfer.
Therefore, if the “warm floor” in the room is the only source of heating, then the choice of tiles is optimal, since it will provide good conductivity for the generated heat even when using high-power cables.
“Warm floor” has important operational advantages, including:
- creating an optimal temperature regime due to the uniform distribution of heat throughout the entire room, including in its lower part;
- reliability and long service life;
- safety: the presence of electromagnetic radiation does not need to be proven, but its influence is not as dangerous as they say;
- the ability to precisely regulate the temperature, which allows you to create comfortable conditions, but with economical use of electricity.
“Warm floor” in the house is especially effective during the off-season, when there is no need to start the heating system, but the temperature in the house cannot be called comfortable.
Also, on cold winter days you can very quickly appreciate all the benefits of “warm floors”, which allow you to enjoy comfort in your home.
But for this, before choosing a “warm floor” for tiles or other covering, you need to correctly calculate its power. Of course, in this case it is better to use the help of specialists, but you also need to know the basic guidelines yourself.
How to choose a warm floor for tiles
The average power for rooms in the house is:
- bedroom – 100-120 kW/m2;
- children's room - 150 kW/m2;
- hallway, kitchen – 120-150 kW/m2;
- bathroom, toilet – 180 kW/m2;
- glazed loggia – 180-200 kW/m2.
Of course, these data are average values, but they are quite easy to navigate in order to calculate the power of the “warm floor”.
When calculating a “warm floor”, it is necessary to take into account what source of heating the room is: the main or additional one. The calculations also take into account the thermal conductivity of the insulation used, which can significantly affect the efficiency of the system and energy savings.
But some nuances of this type of heating should be taken into account, namely:
- increased load on the home’s electrical network, which must be able to cope with increased power;
- It is possible to install a “warm floor” only at the stage of renovation of the room, since installation involves certain general construction work, although their volume depends on the type of thermal element chosen.
It should also be taken into account that, although such structures are highly reliable and have a long service life, in the event of an emergency, replacing a failed element can turn into a full-fledged repair of the premises.
Calculation of heating cable length
The length of the electrical cable will depend on the total power of the system. It is calculated by multiplying the average power (W/m2) by the total area of the room; it is also recommended to add a reserve of 30% for heat loss. Here you can focus on the optimal indicators for the kitchen and bathroom described above.
Then we determine the type and rated power per linear meter of cable - it can vary from 10 to 60 W/m. Next, we divide the total power of the system by the power of the linear meter of cable - we get the length.
Thus, it is obvious that the more powerful the heating cable is chosen, the less of it will be needed for installing the electric floor.
Installation of “warm floor” under tiles: main stages
If you decide to install the “warm floor” yourself, then it is necessary to carry out a large amount of preliminary work. First, you should find out the condition of the base on which the cable or film will be laid: it must be smooth, without defects, cracks, etc.
If necessary, a thin leveling layer of the screed is poured with cement mortar or using special mixtures. The second option is more preferable from the point of view of the time factor.
Next, you need to carry out all the calculations on the power and amount of material, and draw up a laying diagram. When drawing up a cable laying diagram, the following requirements must be taken into account:
- minimum distance from the wall to the cable is 7-10 cm;
- the arrangement of turns and spirals must be maintained at a distance of at least 8 cm from each other;
- The cable turns must not intersect or overlap each other under any circumstances.
It is also necessary to determine the location for installing the mounting box: if the “warm floor” is installed in rooms with high humidity, then it should be mounted on the adjacent wall on the opposite side.
Cables are installed in the installation box, as well as the thermostat is installed, so free access to it must be provided for control. As a rule, it is installed at the bottom of the wall at approximately a height of 30 cm from the floor.
It is imperative to prepare for installation a corrugated pipe or special couplings in which the cable will be connected.
This may not be a necessary element, but if any problems arise, you will not need to repair the entire floor; it will be enough to get to the joints, so you should not neglect this.
Requirements for slabs for underfloor heating installation
When choosing panels for installing a substrate under a warm water floor, you should give preference to the following materials:
- with a density of 35 kg/cu.m. m and more. Such panels should not be deformed due to significant load from pipelines that are filled with coolant;
The underlay under the laminate improves the performance of the heated floor - with an additional waterproofing layer. It will prevent the main heat-insulating material from getting wet, extend its service life and increase efficiency;
- with high strength, resistance and durability. Mounting plates for heated floors must work effectively in an aggressive environment, which is formed from the negative impact of screed components;
- with thermal conductivity no more than 0.05 W/m K.
Floor insulation
To direct heat flows upward in the room, you will need to insulate the floor, for which you can use insulation up to 4 mm thick; in addition, you can lay a foil covering to reflect heat waves.
If the work is carried out in a private house and we are not talking about a room above an unheated basement, then thermal insulation issues can be neglected, since all the heat produced will remain in the house, although it will spread in different directions. But in order to guarantee the required performance in a particular room, you cannot do without thermal insulation.
The best material for thermal insulation is penofol, equipped with a special self-adhesive layer and foil coating. Installation of insulation must be carried out with an overlap of 5-8 cm on the walls; after finishing the work, the excess is simply trimmed off with a painting knife.
A damper tape laid on top of the heat-insulating material along the perimeter of the wall will serve as a compensator when heated.
The cable can be laid directly on the insulation, but it is recommended to use a special metal mesh that prevents direct contact between them.
Flat mats
Flat polystyrene foam boards must be thick enough to provide effective thermal insulation. Most often, 40-50 mm is enough. The density of polystyrene foam boards should not be less than 40 kg / cubic meter. m. Otherwise, the material will be deformed and will not be able to effectively perform all the functions assigned to it.
Warm water floor on mats
Special plastic staples are used to secure the tubes. Their installation may be slightly more complicated, since before carrying out the entire complex of work it is recommended to apply the appropriate markings.
Flat slabs of polystyrene foam should be covered with plastic film after installation. It will extend their service life and protect them from the negative effects of aggressive substances that are part of the floor screed.
Thermomat 130 1.5 sq.m.
| Manufacturer: | Thermo |
| Model: | TVK-130 |
| View: | heating mat |
| Power: | 190 W |
| Heating area: | 1.5 m2 |
| Installation type: | into a layer of tile adhesive |
for comparison
old price 8,113 rub.
RUB 7,302
Product added to cart
| Photo | Name | Price per piece | Quantity | Price |
| Thermomat 130 1.5 sq.m. | 7,302 rub. | < 1 > | 7,302 7,302 rub. |
There are 0 items in the cart worth 0 rub.
Go to cart
Buy
Availability
Go to the full catalog of THERMO heating mats
Warmstad 1.5 sq.m.
| Manufacturer: | Warmstad |
| View: | heating mat |
| Power: | 220 W |
| Heating area: | 1.5 m2 |
| Installation type: | into a layer of tile adhesive |
for comparison
RUB 2,907
Product added to cart
| Photo | Name | Price per piece | Quantity | Price |
| Warmstad 1.5 sq.m. | 2,907 rub. | < 1 > | 2,907 2,907 rub. |
There are 0 items in the cart worth 0 rub.
Go to cart
Buy
Availability
Go to the full catalog of WARMSTAD heating mats