The concept of warm floor
Laying warm floor coverings and warm water floors in apartments in European countries has been done since the 80s of the last century. In Austria, Switzerland and Germany, water heated floors in apartments are installed in 60% of houses. Various energy sources are connected to heating for underfloor heating:
- infrared emitters;
- heating electrical cables;
- PLEN device, films with a built-in electric spiral and others.
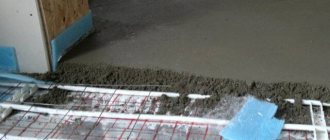
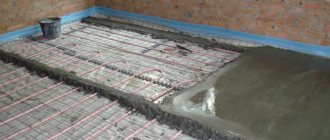
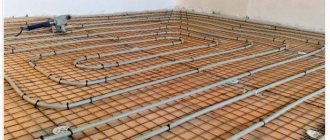
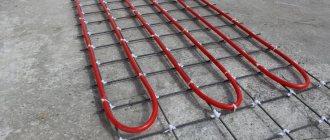
The heated floor and the technology for its implementation in the case under consideration involve heating through a laid pipeline with hot liquid, most often it is water, sometimes antifreeze or antifreeze is used. Laying a water heated floor requires laying the pipes evenly over the floor surface.
When circulating, the liquid in the heating system passes through a centralized heating source, transfers heat to the concrete, and then heats up the air. The technology for laying water heated floors involves heating water with an autonomous boiler, or heated floors in the apartment are connected from central heating. In both cases, you can turn on and install the water heated floor yourself.
Modern technologies simplify the installation of water heated floors. Pipes are used whose configuration is based on the molecular memory of cross-linked polyethylene. This has reduced the cost of materials, the connection diagram for a water heated floor and the installation technology have become simpler, and reliability has increased.
Installing and pouring a heated floor is not a complicated process; making a water heated floor with your own hands is quite possible. For this purpose, several techniques and special materials have been developed. People show interest in how to connect the warm floor of a room to the heating system, and how to implement this project on their own.
Is it possible to install such heating: is it legal?
Obtaining permission to install water heating in an apartment building can be difficult. This is due to the fact that such heating is quite dangerous to operate due to the high threat of flooding of the lower floors.
Important
To get around all the obstacles, residents try to carry out installation by connecting the system to the heating risers. This is a gross violation of the law, so it is best to obtain official consent and act within the framework established by SNiP.
According to SNiP, the heating system of an apartment can be changed by connecting a water floor only if the modification is agreed upon with representatives of the housing and communal services and the heating network office. Such autonomous heating must be specified in the design documentation.
Official registration takes a lot of time and effort. But water heating that is completely made according to the standards allows you to safely and without problems use it legally, even sell your home without additional collection of documents and permits.
Pipe length calculation
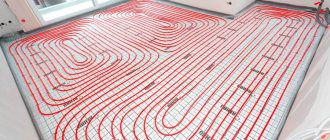
How to calculate the length and lay pipes on a heated water floor will be discussed below. There are several options for how heating pipes should be installed in a water-heated floor: in a snail shape or in straight parallel lines, or in other ways. But the main requirement is met everywhere.
The pipes are distributed evenly, the total length covering a certain area depends on the pitch between them. To meet the conditions for heating with underfloor heating, you need to correctly calculate the length of the pipe. To simplify the process, the pipe flow calculated for different options is summarized in a table.
Consumption of underfloor heating pipe depending on the loop pitch
| Pitch, mm | Pipe consumption per 1 m², m.p. |
| 100 | 10 |
| 150 | 6,7 |
| 200 | 5 |
| 250 | 4 |
| 300 | 3,4 |
Using the table, it is easy to understand how to do the calculations yourself. With a room area of 20 m and a laying step of 20 cm, the length (L) will be equal to 20 m2, multiplied by 5 linear meters/m, which will be 100 m. The length of the warm coating circuit should not exceed 70 m, this is due to the effective circulation of the coolant through the pipeline and pump capacities. If the pipe in the circuit exceeds 70 m, warm floors are not effective, then how to make the right choice?
The pitch is set to 300 mm. Length (L) = 20 m2 * 3.4 linear/m = 68 m. This fully meets all requirements. In a large room, several lines are installed, but individual heating circuits should not exceed 70 m. Using powerful pumps, it is possible to connect a warm water floor circuit up to 120 m.
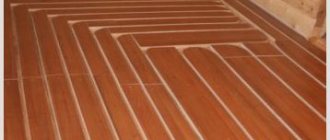
How pipes are laid
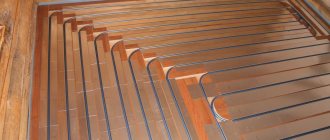
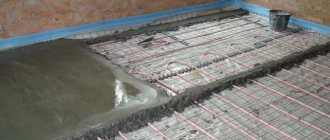
The laying technology for heated floors clearly determines what to fill the warm water floor with. There are ready-made mixtures that just need to be diluted with water in the concentration specified in the instructions. In some cases, a water-heated floor is made without a screed when the floor is made of plywood. If chipboard is laid with laminate, parquet, linoleum, it is not necessary to fill the heated floor with screed mortar. Dry screed is successfully used for warm water floors.
Before pouring and installing the floor covering, the pipes are checked for leaks. A special compressor is used, water is pumped into the pipes under a pressure of 6 bar, a process called pressure testing. If the pressure has not dropped by more than 1.5 bar during the day, the heating circuit is sealed. An incorrectly made heated floor or poor-quality installation can lead to the need to dismantle the floor covering.
Choosing an energy carrier
The main selection criterion is the cost of energy, depending on the country and region of residence. If in the Russian Federation the undoubted leader is natural gas, then in the rest of the states of the former USSR the picture is different - firewood, briquettes and coal take the first place. Don't forget about electricity supplied at half the nightly rate.
When choosing the right type of fuel, it is worth considering five factors (in addition to price):
- efficiency (efficiency) of heating equipment using this energy carrier;
- ease of use;
- how often the units will have to be serviced, prices for calling a technician;
- storage requirements.
Below is a comparative table showing the prices of various energy sources and how much a kilowatt of heat produced in real conditions costs. Building area – 100 m², region – Moscow region.
Note. The calculation results and prices are given as of February 15, 2018. Over time, the data becomes irrelevant, but the difference in the cost of 1 kW remains.
Based on the numbers given in the table, it is much easier to find a suitable option (or several). Just make an adjustment for the cost of energy in your region. Based on other selection criteria, we will give 4 tips:
- It is most convenient to use gas and electric heating equipment. There is no need to store anything, constantly maintain and bother with cleaning water heating devices.
- Burning coal and wood is the most economical way to heat. Saving money will have to be paid for with labor - sawing, carrying, loading the firebox, cleaning the chimney. It is more comfortable to burn briquettes and pellets, but the price of the boiler installation and the fuel itself increases. Plus you will need storage for storage.
- Diesel fuel or liquefied gas is the best solution for providing autonomous and at the same time comfortable heating when other energy sources are not available. The downside is the decent cost of fuel and installation of the fuel tank.
- A proven option is the combination of 2-3 energy carriers. A common example: solid fuel + electricity at night tariff.
Which fuel is best to use in specific conditions is described in detail in a separate material. We also recommend watching the video and listening to useful expert advice:
Main advantages
Compared to the old technology with radiator batteries, the new technique has a number of advantages:
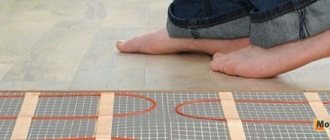
- A heated layer at the level of the feet of human feet. Feet are warm, head is moderately cool - this stimulates the human body to active life.
- The labor-intensive procedure of removing dust from hard-to-reach areas of radiators is eliminated.
- Uneven heating stimulated colds. In the case of heated floors, all these disadvantages are absent, the surface is easy to sweep and wash;
- Space is freed up, there is no need to think through options for how to fit radiator batteries and pipes into the interior of the room;
- Installation work has become much easier;
- Carrying out the work and the main elements of the system are cheaper. To heat the room, a temperature in the pipes of 55 ̊C and no more than 60-70 ̊C is sufficient. Installation and further operation of heated floors turns out to be 30% cheaper. Therefore, many people wanted to know how to make a water-heated floor.
Installation of extruded polypropylene boards
After the floor is leveled with the self-leveling mixture, you can proceed directly to laying the system itself. To do this, you first need to spread polyethylene on the floor, this is done for complete waterproofing. Polyethylene must be at least 100 microns thick.
Laying polyethylene on the floor
When joining on the floor, polyethylene must be laid with an overlap of 10-12 cm and with a margin of 8-10 cm on each side of the wall. Next, extruded polypropylene plates are laid on the floor, the thickness of which in this case should not be less than 30 mm. Polypropylene boards are primarily a very good thermal insulation material, with almost zero capillarity, very low water absorption and high compressive strength.
In addition to these characteristics, polypropylene is durable (does not rot) and chemically resistant. The slabs have standard dimensions of 1250x600 mm and locks at the ends for better joining.
Extruded polypropylene boards
When laying slabs, each subsequent row must be shifted from the previous one by 30-40 cm, so that the end seams are ultimately in a zigzag position. When installing polypropylene, liquid polystyrene foam nails are applied to the sheet lock using a sealant gun, the quantity and method of application of which is carried out according to the instructions. Polypropylene is easy to cut with a knife, so if you need a smaller sheet, it can be cut without much difficulty.
Laying polypropylene slabs on the floor
Warm floor from central heating
Organizational matters
Many apartment residents want to dismantle the radiators or additionally connect them to underfloor heating from central heating. Before starting such a reconstruction, it is necessary to resolve organizational issues, namely, coordinate the project with the management company that services the house.
Unauthorized connection to the central heating system is punishable by very high fines, in addition, they will subsequently be forced to dismantle all installed equipment.
The difficulty in the question of how to make a heated floor is the process of obtaining permission. The difficulty is that most boiler houses operate at the limit of their calculated power or have a small reserve. Several apartments can be connected; with a mass connection, the central system will not be able to function normally.
Connecting a water heated floor to a heating system has some technical difficulties. This depends on the design of the central system. So, in schemes with direct supply through one pipe, there are no options for connection. Where the coolant circulates along the circuit of forward and reverse pipes, connection is possible.
The location of the heat exchanger largely influences the decision of the management company. When the heat exchanger is located in the lower part, residents of the upper floors are more likely to receive a permit, and vice versa. After obtaining permission, you can purchase equipment and begin installation work on the central heating floor.
Connection diagram
Diagram for connecting a heated floor to a central heating system
Before pouring the pipes laid on the floor, the entire installation diagram is checked for the tightness of the heated water floor. Depending on the length of the circuit and the diameter of the pipes, the pump power is selected. The installation scheme for heated floors includes the following main elements:
- Valves at the entrance to the heated floor circuit;
- Check valve;
- Three-way control valve (thermal head);
- Circulation pump;
- Coolant temperature control sensor;
- Manifold for underfloor heating;
- Plastic pipes.
The scheme for installing a water heated floor begins with connecting the central heating system to the return line. Two valves are installed to drain the forward and reverse flow of the underfloor heating system. They are designed to allow you to turn off the water at any time and carry out repairs or maintenance of elements in the heated floor line.
The check valve ensures that the coolant fluid moves in one direction. The three-way valve is of great importance in the system; it distributes hot and cold flows, mixing them until the set temperature is reached. Sometimes this device is called a thermal head. The temperature of the water entering the heated floors from the central system can reach 70 °C, this is too much; for normal operation no more than 50 °C is required. The thermal head reduces the temperature to the value set on it, usually 40-45 ̊C.
The circulation pump circulates water within the circuit in a given direction. Temperature sensors indicate the temperature of the coolant. There are automatic control systems that combine the operation of sensors and three-way valves, but this topic requires a separate, more extensive description.
Might be interesting
Thermal insulation
Tables of comparative characteristics of thermal insulation…
Thermal insulation
Why polyurethane foam insulation is the best...
Thermal insulation
Self-adhesive thermal insulation: how to choose and apply?
Thermal insulation
What are thermal insulation materials: comparative…
A manifold for underfloor heating distributes coolant flows through pipes of different circuits. Return line underfloor heating collectors collect cooled flows, directing them to a three-way valve, where the liquid is distributed by a thermal head for further circulation in a closed circuit, maintaining the temperature set in it. Manufacturers make manifolds for heated floors from various materials:
- Brass products are durable and strong, withstand high pressure, they are universal for any type of pipe;
- Manifolds for underfloor heating made of copper can withstand the highest pressures of up to 30 bar and high temperatures in heating systems. Often used in circuits where the coolant can be oil, antifreeze or antifreeze.
- Stainless steel parts are in greatest demand due to reasonable prices and good technical characteristics that satisfy installation in apartments.
This is what the distribution manifold looks like
Three way valve design
The heating system to which heated floors are connected necessarily includes a three-way valve; its design and principle of operation require detailed consideration. Essentially, the valve works like a mixer of hot and cold water, you can make it warmer or colder.
When moving the shut-off element in the adjustment sector, the space for the flow of hot liquid increases and the space for the flow of the cold part of the coolant decreases and vice versa. In this way, the temperature in the system can be controlled. This diagram of a water circuit with a valve helps to better understand its purpose and operating principle.
Warm floor - three-way valve connection diagram
Valves with electric drives are sometimes used in conjunction with thermostats. Water flows are adjusted automatically depending on temperature changes. When it decreases, the valve shut-off device moves in the direction of increasing the hot flow, and, conversely, when the set temperature value increases, the electric drive moves the shut-off mechanism in the direction of increasing the cold flow.
Features of the circulation pump
Whether the entire system will work efficiently depends on the correct selection and installation of the pump. The circulation of the coolant depends on the length and diameter of the pipes; bends at pipe turns make it difficult to move the flow. To achieve the required rate of fluid circulation in the system, a pump is installed. Consumers have a greater preference for pumps with three pumping speeds; this makes it possible to control the temperature of the coolant, and therefore the air in the room, by changing the circulation speed.
Circular pump and its technical characteristics
When the room temperature drops, the coolant in the pipes will cool faster. By increasing the circulation rate, flows will pass through the heating element more often, increasing the temperature. The speed switch is located on the pump body and is controlled manually. There are options when the entire process is controlled by an automatic system.
Manufacturers produce two types of pumps: with a wet and dry rotor, in the first version the rotating part is in the circulating fluid, in the second version the rotor is isolated. A wet rotor is more suitable for apartments; their power is limited for rooms of 400 m2, this is quite enough. They consume less electricity and operate silently. The pump body can be made of stainless steel, cast iron or polymer; the latter option is optimal, lightweight, strong and durable.
The numbers separated by a fraction sign on the marking indicate the dimensions of the inlet and outlet holes, the last number indicates the length of the product for calculations during installation work. In order not to go into details when calculating a pipe for a heated floor, use a table to calculate the calculations when choosing a pump.
Characteristics table for pump selection
| Heating area, m² | Pump capacity | |
| radiator heating | warm floor | |
| 80-120 | 0,4 | 1,5 |
| 120-160 | 0,5 | 2,0 |
| 160-200 | 0,6 | 2,5 |
| 200-240 | 0,7 | 3,0 |
| 240-280 | 0,8 | 4,0 |
| 300-350 | 1,2-1,5 | — |
When installing the pump in a line, you cannot confuse the direction of movement of the coolant; it is indicated by an arrow on the body. The rotor must be in a horizontal position; when installed vertically, the pump power is reduced by 30%.
The pump can be placed on any section of the main line, but most often this is done at the entrance to the system after the switchgear or thermostat. It is very important that the pump is equipped with an air release valve. An air lock can block the circulation of the coolant and the operation of the pump; opening the valve will help get rid of accumulated air in the interval in the network where the pump is installed.
Selection of tools and materials
To insulate the floor you will need the following tools:
- Hammer.
- Screwdriver.
- Drill.
- Mixer.
- Aluminum trapezoidal rule 2-2.5 m.
- Aluminum level 2-2.5 m.
- Electric jigsaw.
- Caulk gun.
- Wood planer.
- Roulette.
- Knife.
- Plastic bucket with a volume of 20-25 liters.
- Pencil.
- Extruded polypropylene boards (at least 30 mm thick).
- OSB boards (at least 10 mm thick).
- Starting and finishing self-leveling floors.
- Deep-penetrating polymer waterproofing primer.
- Polyethylene (at least 100 microns).
- Drive-in dowel (at least 8x80 mm).
- Liquid nails for polystyrene foam and wooden floors.
- Plastic wedges up to 10 mm in size.
When choosing a material, the manufacturer is not as important as its quality and characteristics. You will need:
Connection to an individual heating boiler
The presence of an individual heating boiler in an apartment or private house eliminates all organizational problems in permitting the installation of water heated floors. In this case, connecting a warm water floor does not require any permits. Depending on the location and operation conditions of the facility, boilers can be of various types:
- on gas fuel;
- on liquid fuel (diesel, fuel oil);
- solid fuel: firewood, pellets, coal;
- electrical;
- combined.
In apartments in multi-storey buildings, gas or electric heating boilers are most often used; connecting a heated floor circuit to the central heating system is not required. In this case, the diagram differs slightly, but the functional purpose of the main elements remains the same.
Diagram of a water heated floor system in a private house with an autonomous boiler
Essential elements:
- boiler;
- expansion tank;
- pressure gauge;
- circulation pump;
- manifold for underfloor heating;
Unlike the case with central heating, connecting a heated floor to a boiler does not require installing a three-way valve to regulate the temperature of the coolant. Its installation is not necessary; the temperature can be changed from the boiler control panel. Temperature control sensors are also located on the external control panel.
The expansion tank serves to maintain stable pressure in the system; when heated, the volume of liquid increases. To prevent the underfloor heating collector, pump and other expensive elements in the pipeline system from collapsing, the tank compensates for the expansion of the coolant volume. The pressure gauge shows the pressure in the pipes. The main thing is that before pouring the solution into a warm floor, you need to check the functionality of all components.
Control panel on the boiler body
Regardless of the modification of the device and its manufacturer, all panels have basic options, and some additional programming functions:
- buttons or regulators for increasing and decreasing the supply coolant temperature;
- button for automatically setting a comfortable, economical temperature mode, room temperature – 20-22 ̊C;
- It is possible to program control, set the modes “winter”, “summer”, “vacation”, “function of protecting the system from freezing of liquid”.
How to make specific settings for boilers with different control panels is described in the operating instructions. Filling a water heated floor with a solution for a separate boiler is done in the same way as for central heating.
Remote control panel
First start
Upon completion of the installation of the heated floor, we carry out the first start-up; for this, the pipeline should be thoroughly rinsed with water, and the pressure in the system should be at maximum. After which, this water must be drained and the system must be purged with a compressor.
Then the circuit is filled with working coolant; if there are several loops, they are filled in turn. In this case, the air from the pipeline must be completely squeezed out through the air vent.
To create pressure in the system, the pump is turned on for a short time, this promotes the movement of the coolant, which displaces the remaining air pockets. The process should be repeated (add water and turn on the pump) until the system is completely filled.
You need to start a heated floor starting from a minimum temperature of 20 degrees. Every day add 5 degrees until you reach the working level - +40. After which, the thermostat should be set in design mode.
Video: water heated floor in an apartment
All this shows that it is preferable to make heated floors with the installation of an autonomous heating boiler; the main part of the installation can be done with your own hands. A water floor made without a screed, or a dry floor with a screed, will simplify the work and make it cheaper.
If the connection diagram for a heated floor is not entirely clear, you can and should consult with professionals about individual elements in the floor. Having studied the purpose, the correct connection of the main elements into the overall scheme, technically literate people understand that laying a heated floor is not difficult, making a heated floor with your own hands is a very real task.
Life time
The declared service life of the system is more than 50 years!
A logical question arises: where did this come from and how was it calculated? Most likely, the information was obtained based on the fact that any manufacturer of polymer materials (pipes) automatically provides 50 years of trouble-free operation for its products (subject to operating temperature).
What if there is a liquid leak or a malfunction of the thermostat? And this can easily happen due to a power surge.
What will your pipes turn into after uncontrolled heating?
That is, here initially you need to take into account several factors, and not just the material of manufacture and its factory service life.
Secondly, do not forget that there is a thermal expansion compensator inside the pipe. Who calculated how long he would work?
Thirdly, it is unknown how the chemical composition of the non-freezing liquid will affect the properties of the tube walls. The properties of the antifreeze itself also change over the years.
This means that it will have to be drained and refilled somehow. No one usually tells you about these nuances.
You just have to BELIEVE in the beautiful number 50.