Aerated concrete blocks have gained wide popularity. They are used to build residential and commercial buildings in different parts of the country, even without much experience in construction.
Building a house from aerated concrete (aerated block) has both advantages and disadvantages, which you need to know before you start.
Reliability and durability of the structure can be ensured only with the correct choice of material and compliance with building codes and technological recommendations.
Features of the material
For the construction of houses, aerated concrete blocks are used, made from:
- cement mixtures,
- quartz sand,
- quicklime,
- water,
in which, during the hardening process, a chemical reaction of lime with a blowing agent occurs, releasing hydrogen.
Aluminum powder is usually used as a blowing agent . The released gas forms numerous pores inside the block. Thanks to its porous structure, the material acquires specific properties.
According to the manufacturing method, there are 2 main types of aerated concrete - autoclave and natural hardening. In the latter case, the formation of blocks occurs gradually, under natural conditions.
Autoclaved aerated concrete is baked in special ovens at high pressure and temperature, as a result of which it acquires high strength characteristics.
The blocks can be given different shapes: standard (rectangular), U-shaped or arched.
Advantages and disadvantages
Advantages of aerated concrete (aerated concrete blocks):
- Increased mechanical strength, especially for autoclave blocks.
- Thermal insulation abilities due to the porous structure.
- Weight reduction, which makes it possible to increase the size of the block.
- Soundproofing abilities.
- Manufacturability. The material is easy to saw, drill and sand. Blocks can be given different shapes.
- Fire resistance, fire safety. Aerated concrete is considered a non-flammable material and can withstand open fire for more than 4 hours.
- High frost resistance and resistance to numerous freezing and thawing cycles.
- Harmless to humans. Aerated concrete does not contain components that can cause harm to human health.
- Breathability. The material is capable of permeable air, which provides a “breathable effect”.
- Biostability. Mold does not form on aerated concrete and harmful microorganisms do not develop.
Like any material, aerated concrete also has certain disadvantages:
- Inability to securely fix fasteners (nails, screws, etc.).
- Fragility. Aerated concrete does not withstand impact loads well. First of all, during transportation and construction, the corners and edges of the blocks are destroyed. The material is not resistant enough to crushing.
- Hygroscopicity. Moisture can penetrate the pores and accumulate in them, deteriorating the performance. In addition, when frozen, it can destroy the structure.
It is important to consider that the main parameters depend on the porosity of the structure, determined by the density of the material. Taking this into account, the following classification is carried out:
- up to 350 kg/m3 – thermal insulating aerated concrete;
- 400-650 kg/m3 – structural and thermal insulating aerated concrete;
- over 700 kg/m3 – a structural material with increased strength characteristics and low thermal insulation properties.
The service life of aerated concrete blocks is estimated at 70-80 years - the durability of the material is quite high.
Advantages and disadvantages of one-story and two-story buildings made of aerated blocks
Building houses from aerated concrete blocks has its pros and cons. How is it good compared to houses made from other materials?
Advantages :
- Construction speed . This indicator is comparable when compared with foam blocks. Brick is almost 13 times smaller in size than blocks, and therefore the speed of brickwork is significantly lower than the speed of building block walls.
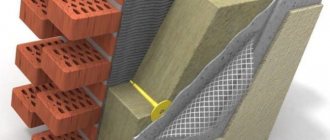
- Thermal insulation properties . In this parameter, aerated concrete is noticeably superior to other materials. So, taking into account the coefficient of thermal conductivity, a wall made of aerated concrete with a thickness of 40 cm corresponds to the following walls: made of wooden beams - 52 cm, made of foam concrete - 60 cm, made of expanded clay concrete - 100 cm, made of brick - 230 cm and concrete - 450 cm.
- Load-bearing capacity, strength characteristics . Aerated concrete is stronger than foam concrete and wood, but significantly inferior to brick and reinforced concrete. This is especially noticeable in the maximum number of floors of a house, which for timber is 1-2 floors, for foam and aerated concrete - 2-3 floors, and for brick is not limited. Concentrated crushing forces are very dangerous for aerated concrete blocks. To distribute the load, the formation of armored belts is required.
- Seismic resistance. During an earthquake, gas blocks do not crack, which ensures their high seismic resistance compared to brick.
- Price. Construction from aerated blocks is much cheaper than the construction of brick and wooden structures.
Among the advantages of houses made of aerated concrete, it should also be noted: no need for special equipment, the ability to build with your own hands, absolute fire safety, environmental friendliness, “breathing effect,” resistance to the formation of mold and fungi.
It should be noted the significant disadvantages of aerated concrete houses:
- Hygroscopicity. In this indicator, aerated blocks are superior only to wood. Even foam blocks have lower water permeability. This circumstance requires protecting aerated concrete from direct exposure to precipitation.
- Shrinkage. It is practically absent from brick. For aerated concrete, the normalized value is 0.3 mm/sq.m, for foam blocks – 0.33 mm/sq.m. During shrinkage, microcracks can gradually form along the masonry line, which sometimes affect up to 1/5 of the entire surface of the wall several years after completion of construction. To eliminate this problem, increased demands are placed on the foundation.
- Problems of cladding and fastening . Standard fasteners hold weakly in aerated concrete. For cladding it is necessary to equip special frames.
- Aggressiveness of lime remaining in the material . It can cause corrosion in metal parts of utilities laid in the wall.
- Appearance . In terms of attractiveness, aerated blocks are noticeably inferior to brick and timber, which necessitates decorating the facades.
The service life of aerated concrete exceeds the durability of timber (50-60 years), but is significantly inferior to brick, whose durability is more than 100 years. The main advantage of block construction is the speed of laying.
As can be seen from the analysis, aerated concrete has a number of undoubted advantages. However, the final choice is made based on specific requirements, the purpose of the building and climatic conditions.
Block or monolithic house: which is better?
Let's compare block and monolithic structures according to several main criteria.
- Strength characteristics
. Monolithic walls are significantly stronger. This is due to the absence of seams, the presence of which significantly reduces strength. - Duration of operation
. The service life of a monolithic wall is longer. Here again the problem is the seams. Even if the blocks themselves can last about 100 years, depressurization of the seams will occur much earlier. - Heat capacity indicators
. Block walls retain heat worse. The reason is again the interblock seams, which in this case play the role of “cold bridges”. - Price
. The cost of even reinforced concrete is significantly lower than the cost of concrete blocks. In addition, the work of pouring monolithic walls is cheaper than laying block materials. - Construction pace
. Laying block materials will require more time than erecting a monolithic frame or wall.
The above comparative characteristics clearly indicate in favor of monolithic frame buildings.
If we compare aerated concrete with brick or concrete, it clearly loses in terms of heat capacity. Such a house is not suitable for the role of a heat accumulator. To increase thermal inertia, you can use heavy materials to build interior walls.
Although the problem is not critical, it does exist. Fasteners in aerated concrete hold up worse than, for example, in concrete. Fortunately, the modern selection of fasteners is quite large and varied. If you need to hang something small and light on the wall, then you can screw a self-tapping screw or drive a nail into the aerated concrete.
Dimensions: length, height, thickness
The most important parameter of a wall is its thickness . When building a house for year-round use, it is determined taking into account heat retention inside the premises. The main indicators for thermal protection are established by SNiP 02/23/2003.
The minimum wall thickness is determined by the formula B = RoxKt, where Ro is the normalized value of the thermal resistance of the wall for a given region (degreesq.m/W), Kt is the thermal conductivity coefficient (W/degrees).
The Ro value differs significantly in different regions of the Russian Federation. So for Moscow it is 3.13 degrees square meters/W, and for the northern regions – 5-5.4 degrees square meters/W. The thermal conductivity of aerated concrete depends on its density. For 400 kg/m3 Kt = 0.12 W/degrees, and for 500 kg/m3 – 0.14 W/degrees.
Thus, for the Moscow region it is enough to have a wall made of aerated concrete with a thickness of 45 cm, and for the northern regions - 73-78 cm . With such a wall thickness, additional insulation is not required according to the standards. If additional insulation of the facade is planned, the wall thickness may be less.
When designing, it is important to choose the right size of aerated concrete blocks. Standard rectangular blocks (standard) are available in thicknesses from 100 to 500 mm, heights from 200 to 300 mm, and lengths of 600 or 625 mm. Which aerated concrete blocks are best to choose for building a house is determined by the calculated thickness of the wall. If the estimated wall thickness for your region is 450 mm, it is better to choose two rows of blocks with a thickness of 200 and 250 mm.
To build a country house (an unheated house for summer living), it is enough to build walls 300 mm thick, for which you need to choose blocks of this thickness.
For load-bearing walls, it is recommended to use elements with a height of 200-250 mm and a thickness of 200, 250, 280, 300, 360, 400 or 500 mm. For partitions, elements 200 mm high and 600 mm long with a thickness of 75, 100, 120 or 150 mm are suitable.
In openings it is better to install blocks of reduced length (up to 500 mm), 200 mm high. Thickness can be selected from 250, 300, 360 or 400 mm.
Application area
Gypsum blocks are used for partitions and the construction of non-load-bearing walls. Since products of different thicknesses are available for sale, they can be selected for use in the construction of any buildings:
- housing;
- industrial structures;
- public buildings;
- structures for other purposes (warehouses, storage facilities, etc.)
- medical institutions;
- kindergartens, schools.
The type of product (single or double) depends on the regulatory requirements for sound and vapor barrier for a particular object or the need to place communications inside wall structures.
Is it possible to build in winter?
A house should be built from aerated concrete at an air temperature within (+5) – (+30) degrees. Construction should not begin in winter .
However, it is recommended to carry out all work in 1 season, and therefore they can be completed at low sub-zero temperatures, but with the availability of special winter adhesive compositions.
In this case, special attention should be paid to storing the blocks, avoiding moisture. The masonry area requires protection from precipitation.
How quickly can you build a house from aerated concrete?
On average, the construction of an aerated concrete cottage takes six months. A team of experienced builders will build a house of average complexity in two months. The longest stage is usually the construction of the box and the installation of the roof.
The price of construction depends on the complexity of the project, the size of the house, the price of materials and the cost of renting equipment.
In general, construction with aerated concrete is economical, cost-effective and time-efficient. With proper preparation, you can handle it yourself.
How to dry the building after completion?
Dampness in a house made of aerated concrete has a detrimental effect on both the structure itself and the health of the residents. There are several ways to dry a built house:
- Forced ventilation. It is best to include it in advance in the house design.
- Mobile installations. When there is high humidity, it becomes necessary to use special air heaters.
- Windows with micro-ventilation function. For this purpose, special frames are installed through which air exchange occurs in the room. It is important to ensure that the incoming cold air is warmed up.
In any case, the moisture content of aerated concrete should not exceed 25%. At higher values, forced drying is necessary.
If the humidity is within reasonable limits, then effective heating and periodic ventilation are ensured. How long does it take for a house made of aerated concrete to dry after construction? Its walls dry out within 2-3 heating seasons.
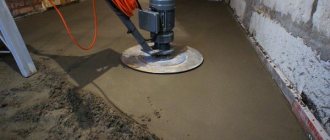
The main stages and technology of do-it-yourself work
After completion of preparatory activities and construction of the foundation, the main stages of construction are carried out. Phased construction includes the following work:
- laying walls and sealing seams;
- formation of door and window openings;
- construction of partitions;
- installation of lintels and ceilings;
- installation of armored belt.
Wall masonry
How to lay blocks correctly? Let's look at the step-by-step instructions:
- Foundation waterproofing . Along the entire perimeter, the surface of the foundation is covered with bitumen, and then roofing felt or other waterproofing material is laid in 2 layers.
- Laying the first row . It rests on a cement-sand mortar. With its help, the surface is leveled and the blocks adhere to the foundation. Layer thickness – at least 1 cm.
- Corner laying . Installation of blocks begins from the highest angle. Here the masonry rises 3-4 rows. Then, similar actions are performed in all corners. A cord (fishing line) is stretched between them to control the boundaries of the wall and the horizontality of the rows. The evenness of the first row is checked especially carefully using a building level.
- Laying subsequent rows . The surface of each row is sanded from above. The blocks are placed on special glue. The composition is applied using a notched trowel. Seam thickness 3-4 mm. In each row, the blocks are shifted relative to the bottom row by at least 8 cm. Each element is pressed into the adhesive layer by hand. The blocks should be located as close to each other as possible. Leveling is done with a rubber hammer. Cutting is carried out, if necessary, using a special saw or a regular hacksaw.
- Sealing seams . It is produced with the same adhesive composition using a rubber spatula. Before the mass dries, grouting is carried out. All excess glue is removed. Separately, it is necessary to mention when it is not necessary to seal the seams: if the walls will be plastered soon, it is not necessary to seal the seams.
When laying blocks, it is important to remember that the glue dries quickly, and any inaccuracies must be corrected immediately. During the installation process, the level of the horizontal rows and the plumb line of the vertical wall are controlled.
Openings
The wall in the places where window and door openings are formed must be strengthened . To do this, after their formation, grooves are cut on the vertical walls using a wall chaser.
On both sides, 2 parallel channels are made with a depth of about 10-12 mm. Steel reinforcement bars with a diameter of 10 mm are placed in them. After this, the grooves are sealed with cement-sand mortar.
Partitions
The partition is laid out from aerated concrete blocks in the same way as walls. Before starting masonry, markings are made on the floor and walls. The flooring in the area where the partition is installed is thoroughly cleaned, leveled and covered with waterproofing.
Partitions are fastened to load-bearing walls using T-shaped anchors or perforated metal plates . Such elements are fixed every 3-4 rows of masonry. Fastening is provided using special dowels for aerated concrete.
A partition is erected up to the ceiling. A compensation gap of 12-16 mm wide is left at the top. L-shaped fasteners can be used to increase structural strength. The gap is filled with polyurethane foam.
Jumpers
Strong lintels are needed over window and door openings. You can make them yourself as follows:
- The role of the base (formwork) is played by a board 20-30 cm longer than the width of the opening.
- 3 rows of gas blocks are laid on the board. Blocks with a thickness of 150 mm are laid on the outside, then elements with a thickness of 75 mm are laid (you can cut a 150 mm block in half) and a row of elements with a thickness of 100 mm is placed on the inside. You should end up with a U-shaped beam 100-150 mm high.
- The blocks are glued together.
- Steel reinforcement rods with a diameter of 10-12 mm are placed in the central channel.
- The reinforced channel is filled with concrete mortar.
After the solution hardens, the lintel is raised and installed above the opening. When installed, the fittings should be located at the bottom.
Armopoyas
An armored belt is required in the upper part of the load-bearing wall, where the interfloor or ceiling is installed. It is made by pouring concrete around the entire perimeter of the house with reinforcement.
The formwork is mounted permanently from an outer and inner row of gas blocks 100 mm thick. Steel reinforcement with a diameter of 12-14 mm is placed in the resulting channel in 2 rows.
Steel studs are installed vertically to secure the Mauerlat. The channel is filled with cement-sand mortar (ratio 1:3) with compaction.
Standard errors
When building a house from aerated concrete, the following mistakes are most often made:
- Uneven masonry . It often occurs due to inaccuracies in laying the first row. It is important to carefully level the surface of the foundation.
- Lack of reinforcement . Every 3-4 rows of masonry it is necessary to lay reinforcing rods along the entire perimeter of the house. Otherwise, the strength of the structure may be insufficient.
- Choosing a mortar for masonry . You should use special adhesive for aerated concrete.
- Consistency of adhesive composition . Its preparation must be carried out strictly according to the instructions given on the packaging. You shouldn't save money.
- Removing glue . Its stains should not remain on the surface of the blocks, because... this impairs breathability. Excess glue must be removed immediately, not allowing it to dry out.
- Foundation design . If the foundation is not strong enough, the load-bearing walls gradually shrink and become deformed. The foundation calculation must take into account all real loads.
- Wall decoration . When implementing it, you should not use “wet” technologies. Moisture easily penetrates into the blocks and accumulates there. Before plastering, it is imperative to apply a layer of deep penetration primer.
These errors often lead to serious problems during the operation of the house. To exclude them, all recommendations of specialists should be strictly followed.
Gypsum tongue-and-groove partitions: simple installation and no harmful impurities
The material is gypsum slabs measuring 667x500x80 millimeters and weighing about 30 kilograms. They are assembled in the manner of a designer using the “groove-tooth” system.
Alexander: Unlike drywall, you can already hang something heavy on such partitions. At the same time, the total weight of the wall makes you think about the load on the floor. I would not recommend laying them on a screed.
Maxim: Several years ago I read that you come across slabs whose grooves and ridges are so blocked that you have to plaster the entire wall. Is this kind of marriage common today?
Taras: Personally, I have not encountered such a problem. I can say that even an amateur can handle the construction of a gypsum partition; just read the instructions and watch videos on YouTube. The joints are coated with gypsum assembly adhesive, the slabs fit together well, like a construction set. Then the surface is puttied a little - and you get a neat, smooth wall. There is no need to plaster anything.
Alexander: Let's also note the environmental friendliness of this material. There are no harmful additives or impurities in it. As for sound insulation, in my opinion, gypsum is not the best option. Due to its high density, it transmits sound vibrations well. At the same time, it cuts out noise like conversations behind the wall quite well.
Maxim: What about water absorption? Much better than drywall?
Alexander: As in the case of plasterboard, there are special moisture-resistant gypsum boards on sale that can be used in bathrooms and other rooms with high humidity. They cost a little more, but this is not the case when you need to save money. I don’t know how it is with dachas, but in apartment buildings I see such partitions more and more often, even in bathrooms. People take moisture-resistant slabs, waterproof them, tile them - and there are no problems.