In a private household or on a summer cottage, an area is always allocated for placing vegetable gardens, flower beds, beds, greenhouses and other areas for growing crops and ornamental plants. To cultivate this farm, a large amount of gardening tools is required, as well as bulky equipment for field work. All these items need to be stored somewhere. It is inconvenient to place such equipment in a residential building. Therefore, the best option for storage would be an outbuilding.
Purpose of the utility unit
If a few years ago outbuildings were made only to store gardening tools, now they are trying to make the room more functional. There are even outbuildings with a toilet and shower.
They are larger in area than ordinary buildings, but they combine several structures at once, which would stand as separate buildings, thus taking up even more space.
The utility block on the site performs several functions:
- Allows you to store not only tools and garden equipment, but also old things or furniture that may still be useful;
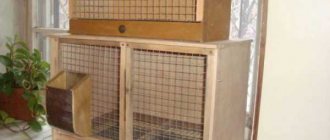
- You can attach a place for animals to the structure or place it directly in the utility room. For example, they often add an enclosure for dogs;
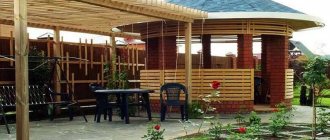
- If the size of the utility room allows, you can even equip it with a full-fledged room. This could be a summer option for overnight stays or guest accommodation;
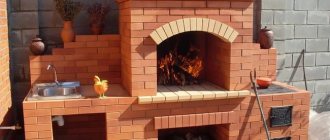
- Often a bathhouse is attached to the utility block or built on its own territory;
- An outdoor shower and toilet can be built right in it.
As you can see, the utility unit can perform several functions simultaneously. But the main one is storage. For convenience, you can equip the walls with various shelves and hooks.
The main thing is to place everything correctly so that the space is used rationally.
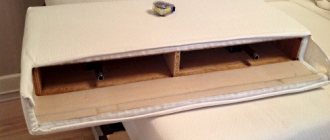
Barn wall cladding
- For wall cladding, 25x150 mm boards are used.
- First, they are installed on the front side of the building, then the sides and rear sides are installed.
- When laying the boards, they are placed end to end.
- The outside will look better if it is treated with an electric planer. This will also make it smoother, allowing raindrops to roll down faster.
Space for a utility block
A number of recommendations will allow you to choose the optimal and most convenient place for construction:
- The utility block should be located conveniently relative to other buildings. There must be a path leading to it, if their presence on the site is provided for;
- If space is allocated on the territory for a garden and vegetable garden, the utility unit should under no circumstances occupy it;
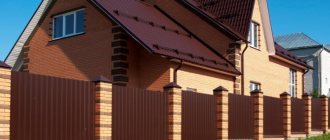
- The building must fit harmoniously into the overall picture of the landscape;
- The utility unit should be placed based on building and fire regulations.
Do-it-yourself woodshed in the country: choosing the appropriate size of the structure
Before you start assembling the woodshed, you need to assess your personal needs for wood fuel. In case of irregular use of logs (for example, for cooking barbecue), you can get by with a small design. However, the level of firewood demand may be higher. For example, in winter, fireplaces are used to heat cottages, so wood fuel is a daily necessity. In such a situation, it is best to install a large firewood burner with a good supply of logs.
In case of irregular use of logs, you can get by with a small design.
As an example, it is recommended to pay attention to the photo of woodpiles for firewood that have different dimensions. Small structures accommodate a rather limited supply of wood, which, however, can be easily replenished. Larger structures, reminiscent of barns, are intended for the constant use of firewood.
In any case, the main thing you need to focus on when choosing the dimensions of a woodpile is individual needs. Before installation, it is recommended to make an approximate calculation of the size of the structure, as well as study various photos of woodsheds. Several varieties of these buildings are used for dachas, which can be verified visually. In this case, you should be guided by the value corresponding to the required volume of wood.
Construction standards for building a utility block:
- There must be at least 4 meters between the utility block and another building;
- There should be 15 meters from the living space to the utility unit;
- If there is a well or any other source of drinking water on the site, a distance of 30 meters must be maintained between the building and them.
It is best to build the structure on a small hill, this will reduce the risk of flooding with melt water in the spring. If possible, you can install the shed so that it is an obstacle to the winds and the garden.
When choosing a location, you need to think not only about your site, but also about the neighboring one. It should not block the sunlight that enters the neighbors' territory.
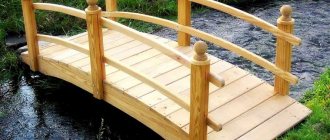
What is a woodcutter
There are several varieties! A wood shed is a separate shed for drying and storing firewood. Once upon a time, this word was used by wood merchants, and it was also the name given to boats or barges on which timber was melted down the river. The woodshed is an extension to the house made for storing lumber for heating the stove. A firewood rack is a metal stand that resembles a basket. A bundle or two of firewood is stored and transported in it (they are placed near the fireplace, solid fuel boiler, barbecue, etc.).
Woodshed - a separate shed for firewood
The most convenient place for storing logs is considered to be a woodshed, since it is dangerous to attach it to wooden surfaces if the house is made of wood - wood-boring beetles (grinder) and its many relatives may appear.
Materials for the utility room
The material may be as follows:
- Tree;
- Metal;
- Foam block;
- Profiled sheet.
You can make a utility unit not only from one type of material, but also combine them with each other. This will make the design of the utility unit even more interesting.
It is also important to think about the foundation, because despite the compactness of the building, the foundation must be reliable.
Usually the building has a frame, which can be made of wood or metal. When choosing the first material, you should carry out primary processing of the wood so that it is resistant to moisture and pests.
A metal frame will be more stable and will last a long time, but it also has its drawbacks. The main one is the higher cost of work compared to wood. Also, metal is not 100% protected from various influences and may rust over time.
If you have decided on the frame, you should move on to choosing a shelter. It can also be made different:
- From a professional sheet. The material is resistant to various influences due to its type of coating and thickness. Installation must be carried out correctly so that the profiled sheets do not rust. To do this, use self-tapping screws on a rubber gasket;
- Bituminous shingles are perfect for the roof. Under it you only need to lay a base, insulation and insulation from steam. It is quite light both in handling and in weight, so its installation will not require much effort;
- Slate can be used as a temporary shelter because it is not highly durable and resistant to impact.
With frameless technology, the walls themselves can be built from wood, brick or foam blocks. Construction from foam block will be faster because it is larger in size than brick. But this material is also distinguished by its increased cost.
If you plan to install a shower in the utility room, you need to take care of waterproofing. In no case should the wall material suffer from exposure to water, because this will quickly lead to the destruction of the building and the appearance of mold.
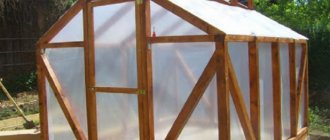
Roof arrangement
For a shed with a pitched roof, the posts on one side should be higher. Thanks to this design, rainwater will drain without accumulating. The rafter system consists of boards laid on edge. They are nailed diagonally for greater strength. For waterproofing, roofing felt is laid. The sheathing is installed.
Corrugated sheeting, slate or ondulin are used as roofing . The wavy shape and variety of colors make ondulin the most popular material. It is important to consider that with a sloping roof, ondulin does not require a continuous sheathing. You can see more about this here: https://shop.onduline.ru/blog/obreshetka-pod-ondulin-rasstoyanie-mezhdu-doskami-shag-razmery
Stages of construction of a utility block
The photo of the utility block for the dacha shows that the structure is not as simple as it seems at first glance. Therefore, when building with your own hands, it is important to plan and calculate every step.
Typically construction includes the following steps:
- First of all, you need to prepare the foundation for the utility block. This includes not only soil research and selection of a certain type of foundation, but also a construction project. If you plan to install a shower and toilet, you also need to prepare sewer pipes for them;
- After preparing the site, you can begin making the frame;
- When the frame is ready, the floor is added to it. This also includes rough coating;
- After this, they begin to build walls, install insulation, waterproofing and vapor barriers;
- The construction of the walls is followed by the construction of the roof. Beams and rafters need to be installed;
- Now you need to cover the roof with building materials.
Construction of the foundation
You can make a strip or columnar base. Frame structures should be built on the first type, and small outbuildings should be built on the second type of foundation. However, you need to know that under no circumstances should a strip foundation be erected in areas with peat soils or sedimentary soil.
To construct a columnar base, the following steps should be completed:
- under the foundation pillars it is necessary to dig holes 80 cm deep, which must be located every one and a half meters (they should be done in the corners of the object being built and in the areas where partitions adjoin);
- Fill the holes with gravel and sand or crushed stone; the thickness of this layer should not exceed 15 cm;
- install pieces of metal pipe or roofing felt sleeves into the prepared holes according to size;
- fill the area between the ground and the stand with gravel and sand;
- fill the recesses of the pipes with reinforcement (10 mm thick), which needs to be tied with 2 mm wire;
- Fill the pipe cavities with concrete mortar.
Support pillars can be treated with a special mastic to improve the waterproofing of the foundation. In addition, they can be made from concrete blocks or bricks.
To build a barn with a strip foundation at your dacha, you need to complete the following steps:
- make markings for the object being built, taking into account its overall dimensions;
- prepare a ditch 30 cm wide and 40 cm deep;
- fill the trench with sand and crushed stone. The height of this layer should be 15 cm;
- strengthen the side walls and bottom with roofing felt;
- install formwork around the perimeter of the recess;
- install a reinforcing frame over the entire area of the trench;
- pour concrete mortar;
- wait three weeks, after which the concrete will completely harden.
The foundation must be made so that it protrudes to the height of the base above the ground level.
Purchasing a ready-made utility unit
You can do without the complexities of construction and choose to purchase a ready-made option. They can be made of different materials and also have their own advantages and disadvantages:
- Metal utility units are distinguished by a high degree of reliability and stability. Such structures can even be made into several floors. The disadvantage of such a construction is the high cost and inconvenience during transportation;
- Prefabricated utility units are usually made of plastic, they are relatively inexpensive and quite lightweight. The disadvantage of this design is that it cannot always withstand frost. In addition, it definitely cannot be classified as an environmentally friendly purchase.
Roof structure
To make a pitched roof, you will need wooden boards, the cross-section of which should be 5 x 10 cm. The rafters of the barn will be made from them. It is recommended to make the structure on the floor or ground, so that it can then be fixed onto the frame posts in finished form. The distance at which the rafters should be fastened from each other is 70-80 cm. To erect the sheathing, unedged boards should be installed with a gap of approximately 15 cm. However, such a distance is established in the case when slate will be used on the roof. If rolled products are used, the lathing pitch should be 2-3 cm.
How to cheaply build a shed with your own hands without rafters? To do this, the floor beams must be placed on the top frame at a slope. They will replace the rafters.
A gable roof is erected if an attic is built. To do this, you need to attach the triangular rafters to the top trim of the frame, the walls of which must be the same height.
Photo of the utility room for the dacha
Do-it-yourself woodcutter: drawing up a drawing and preparing tools
Preparing a preliminary drawing is required if you decide to build a woodshed. This design is suitable not only for storing logs, but also for storing tools and other things. Drawing up a diagram simplifies the determination of the area of the future structure. Video materials will help you correctly design a woodpile for firewood with your own hands. Photos of various installation stages also help to understand the principles of assembly.
The supply of firewood is a value that is determined by the individual needs of the owners of the site. In order to provide heating for a residential building with an area of 100 m², approximately 1.9 m³ of dry wood will be required. It is important to remember that different tree species have different degrees of heat transfer. For example, if you use pine logs, they will need 0.2 m³ more, and birch logs, on the contrary, will need 0.2 m³ less.
Drawing of a wooden woodshed.
If necessary, you can take as a basis a ready-made drawing of a woodshed at your dacha with your own hands. It is recommended to choose the size with a slight margin, since it may always be necessary to prepare a larger amount of firewood. The structure for storing freshly cut logs should be approximately 2 times more spacious than the structure for dry fuel, since the heat transfer of wet firewood is 50% lower.
When choosing the dimensions of the wood burner, you should also take into account the characteristics of the stove. The efficiency of these devices can vary greatly. For example, for high-tech modern units this figure reaches 80%. Such stoves process one batch of firewood in about 8-10 hours, which significantly reduces the need for wood fuel.
After drawing up the drawing, you need to prepare all the necessary tools for assembling the woodpile:
- drill (for columnar structure);
- stepladder;
- regular hammer;
- hacksaw;
- plumb line;
- pliers;
- twine thread.
After drawing up the drawing, you need to prepare all the necessary tools and materials for assembling the woodshed.
Note! Dry firewood is logs whose moisture content does not exceed 20%.
Step-by-step instructions and video materials will help you answer the question of how to build a woodshed with your own hands. The purchase of the necessary raw materials is made after determining the type of woodshed and drawing up a drawing. The diagram must contain all the necessary dimensions and estimates, taking into account the amount of wood, polycarbonate or metal.
The best projects for placing houses and garages under one roof
There are three basic principles for constructing a garage, relative to a private house, which is built first and its location depends on many factors, these fundamental provisions include:
Location of the garage under the house. It helps to compactly place both buildings and save the local area and eliminate the need for repeated expensive excavation work.
Most often, this option makes it possible to take advantage of the presence of a slope on the site and build a garage with maximum savings on the construction budget, taking advantage of the landscape features of the territory.
The first floor is allocated for the garage. The second floor, located above the garage, with furnished living rooms and functional spaces, helps to make the most compact use of the land plot.
A two-story house with a garage on the ground floor looks solid and original; additional design and arrangement of the driveway makes it possible to emphasize the uniqueness of the landscape design.
The garage is attached to the side of the house. Lateral, above-ground buildings can be located on both sides of the entrance of the house, this makes it possible not to build another wall, using one of the walls of the house to build an extension.
A practical and convenient extension can be erected after the construction and operation of a private house; a common roof requires a careful approach to the arrangement of the roof and the selection of roofing materials.
Having carefully thought through the design solution, you can ensure a convenient and practical placement of both buildings, united by one roof; designers and builders offer several of the most successful options.