Hello! I have an Aquaphor Crystal N filter with tap 3. The faucet began to leak. Is it possible to repair it - replacing the ceramic pair?
You voted (2)
To disassemble your faucet, you need to: 1. Unscrew the flow control knob. 2. Remove the outer part. 3. Unscrew the nut (together with the metal ring). 4. Remove the ceramic pair.
Another question is, is there a ceramic pair of the required size in your city? Only a service specialist in your city can answer this question.
PS: The faucet must be disassembled and reassembled carefully so as not to damage the threaded connections. It is advisable to entrust this procedure to a specialist.
All the best to you.
Good afternoon. Please tell me how the crane is disassembled. I was able to remove the plug from the flow control knob and remove the screw. And then without super efforts (I’m afraid to use force, because ordinary taps can be easily disassembled) or additional tricks, it’s impossible to disassemble. Maybe there is a diagram or a more detailed description. Thank you very much. Sergey.
Good afternoon You did all the steps correctly. The handle can be removed without effort, you just need to pull it towards you, do not twist it in different directions, as the grooves of the handle can be damaged. Due to the long use of the faucet, the handle has become stuck to the faucet axle, use WD-40, then remove the handle.
Thank you very much for your answer. I'll try.
Good afternoon Unfortunately, it was not possible to disassemble the faucet - the handle cannot be removed. Is it generally possible to disassemble this faucet - “Classic faucet version 1”? Sergey.
Good afternoon Yes, the faucet can be disassembled, but apparently the handle is so stuck that even proven means (WD-40) do not help; try lightly tapping the faucet handle with some kind of wrench, if this does not help, unfortunately, the faucet will need to be replaced.
I bought a new set of Crystal A. I installed it according to the instructions, but somehow clean water immediately dripped from the spout of the tap. A week later it began to drip continuously. A call to technical support yielded nothing in essence. Did you install it yourself? That means your problems. You can take everything apart (!) and bring it to the service center (this will take a whole day). Where they will conduct an examination and maybe decide to change it. Or maybe not.
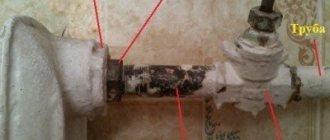
I removed the crane axle box. It looks like the problem is in the original defect of the ceramic pair, the edge is broken off, there was no fragment inside (in the photo). It turned out to be impossible to buy such a 3/8″ crane axle box; they are not available anywhere. As a result, the filter stands idle. Terrible.
I do not recommend this company's products.
Hello Dmitry. We do not waive the warranty on our filter. You can contact the service center for warranty. Since you installed the filter yourself, the technician’s visit to your home will be paid, but if our technician installed it, the visit would be free. You can call the technician by calling the numbers on the website. Best regards, Aquaphor support service Nikolay Efremov.
You released a low-quality product, I have already spent time and money on it. Now you are asking me to spend time traveling across all of Moscow from the other end of the Moscow region. The cost of a trip to you is several times more expensive than the filter itself, and even more so than a defective part. Will you compensate me for the trip? The filter turns out to be golden.
Types of breakdowns of a drinking water device
When using an Aquaphor filter, the valve fails over time, as it has its own technical resource, like any other mechanism.
Another reason for failure is a limescale layer that impairs the performance of the device.
Plaque is a deposit of calcium and magnesium salts contained in tap water. Appears due to untimely replacement of filtration elements and is the cause of faucet leakage.
Causes
Each manufacturer's cranes have:
- special look;
- dimensions;
- design features.
But the configuration and operating principle are the same for all.
Leakage may occur due to:
- wear of the crane axle box,
- deposits that have arisen on the internal elements as a result of wiping the gasket.
To find out what's wrong, you need to disassemble the tap.
We invite you to watch a video on how to disassemble an Aquaphor faucet to replace the axle-box faucet:
Replacement without overlap
First of all, there are several ways to replace a pressure tap. Among them there are some unusual ones, such as those with a tool for freezing pipes, and some simple ones, like just take it and do it. The first, again, will not work with pipes in which hot water flows, but the second is a completely extreme option.
Usually there are no special tools and devices at hand, and therefore you have to improvise. First you need to find a larger container - as large as it can fit under the tap.
Next, you should stock up on material that absorbs water well. If these are towels, then it would be better for them to be high-quality and expensive, since cheap ones usually do not absorb moisture well.
Despite the fact that you roughly know, or have seen a video or photo, how to replace a faucet in such conditions, you still should not do this unless absolutely necessary if there is a room under the room in which you will work that can be flooded - even if you are on the ground floor of a multi-story building, it may turn out that there is either a warehouse, a store, or whatever in the basement below you.
How to disassemble it yourself?
First of all, you need to prepare your tools.
Next, the algorithm of actions is as follows:
- First of all, you need to turn off the water.
- Next, you need to disconnect the hose through which the water is supplied.
- Remove the tap from the hole.
- Unscrew the valve.
- Remove the plug.
- Using a wrench, disconnect the valve axle.
This completes the process of disassembling the mechanism. Next, you need to troubleshoot the problem.
Preparatory activities
Before you start directly fixing the leaking faucet, take care of the main thing - turn off the water on the riser, otherwise flooding of the apartment - both yours and the neighbors below - will be added to all your problems. Then, having turned off the water, you can begin repairs.
To carry out repairs you will need the following materials and equipment:
- a vessel for collecting water;
- adjustable wrench;
- silicone seals;
- screwdrivers (flat and Phillips);
- fluoroplastic sealing tape;
- pliers;
- new gaskets;
- wrench;
- cleaning agent, sponge;
- rags.
All this is quite enough to fix a faucet leak on your own.
Note! If you recently purchased a faucet and still have a box left of it, it may contain a repair kit and detailed instructions with diagrams. If so, the repair will speed up significantly.
Repair if water leaks
Let's look at how to fix a leak yourself, depending on the cause of the breakdown.
- If the leakage occurs due to wear of the valve axle box, this part must be replaced with a new one.
- Disassemble the structure as described above, remove the unusable crane axle box and install a new one in its place.
- When the cause is plaque, it is necessary to clean the mechanism plates.
Features of cleaning plates
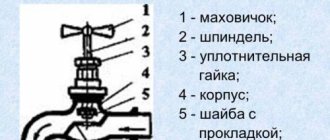
The valve head consists of 2 flat thin elements. They can be ceramic or plastic.
We disassemble the crane axle box in 3 seconds
If anyone doesn’t know how the axle box works, I’ll tell you how to disassemble it:
- Remove (or unscrew) the stopper from the rod.
- We remove the silicone (or rubber) plug from the end of the axle box.
- We squeeze the rod out of the body with all the insides.
This is what the crane box looks like from the inside.
Assembly of the mechanism after repair
After the restoration work, it is necessary to assemble the crane axle box. The steps are performed in reverse order:
- The plates must be positioned properly in the housing.
- Place the gasket in place.
- Place a plug.
- Screw in the valve.
- Using a wrench, screw the faucet axle onto the faucet body.
- Secure the faucet in place.
- Connect the water supply hose.
After this, turn on the water and perform a leak test. If it does not drip, then the problem has been successfully resolved.
Basics
First of all, do not try to do this in a multi-story building, especially on its upper floors. The same applies to heating with hot water - not only can there be burns, but hot water can cause more serious damage to your repair, and in the worst case, not only to yours.
Now let's figure out whether it is possible to replace the tap under pressure. Naturally, this can be done, but there are several conditions. To begin with, you can try this with small-diameter pipes that do not have high pressure.
Video lesson: installing a kitchen faucet
A breakdown of a kitchen faucet can happen at the most inopportune moment, when there is simply no time to wait for a plumber to arrive. Agree, the ability to replace a plumbing fixture is useful to every home handyman. Moreover, you don’t need special skills or expensive tools to do the job.
Before you change the faucet in the kitchen, you need to understand its structure and have a clear idea of the procedure. We will help you in these matters.
The article provides detailed instructions for dismantling old devices and installing new models, taking into account their design features. Having studied the material, you can easily cope with the work and save your family budget on calling a plumber.
The reasons for changing an appliance can be different, ranging from a decrease in its functionality due to wear of individual parts, and ending with replacement in order to adjust the mixer to the overall interior of the kitchen.
Regardless of the reason for the replacement, the process of dismantling and subsequent installation is almost monotonous. And the owner of the kitchen, first of all, needs...
The following parameters should be assessed:
- designer uniform;
- configuration;
- manufacturing material.
The design form is a choice at the personal discretion of the kitchen owner, but at the same time, when planning to change the appliance, it is advisable not to deviate from the overall picture of the kitchen interior. The mixer configuration must match the installation method.
Let us remind you that there are two common methods for installing kitchen faucets:
- wall;
- desktop
As a rule, in the kitchen, tabletop faucets are used, designed to be located on the panel of the utility sink or on the side of the sink. Wall-mounted ones are gradually going out of fashion or are used as part of luxury kitchen interiors.
For installation in the kitchen, faucets with two separate taps for regulating water flow or appliances with a lever-type mechanism are mainly used. The latest designs are considered more convenient and are quickly gaining popularity
Also, the owner of the kitchen who decides to change the plumbing is given the opportunity to choose from two types of devices according to the method of controlling the water flow. One type is a design with two taps (herringbone) and another type is where water is mixed with one lever.
The materials for the manufacture of mixing plumbing fixtures are usually silumin, brass, bronze, and ceramics. Devices based on silumin are less durable than brass and others.
Silumin mixers can be distinguished by weight and market price (they are lighter and cheaper). It is more practical to choose brass, bronze, ceramic products. Their price is more expensive, but they will last much longer, so in the long run such products look more economical.
Polypropylene tap - a modern solution for your communications
Faucets made of polypropylene cause distrust among many buyers due to the fact that they consider the material to be unreliable and short-lived. Meanwhile, modern technologies ensure the highest quality manufacturing, thanks to which such cranes are not inferior in properties to metal products, and in some respects even surpass them. This article will discuss the main features of this type of product and the criteria for selecting quality models.
Taps and fittings for polypropylene pipes meet the highest quality standards if they are manufactured in accordance with the technology
Advantages of this product group
Taps for polypropylene pipes can be very different: steel, brass, or made of the same material as the main communications. It is the latter option that we will consider in more detail, especially since it has a number of undeniable advantages:
A polypropylene faucet is an excellent solution for most types of communications
Important! Another important advantage is the fact that the locking mechanism is made of high-quality stainless steel, this guarantees the durability of the structure and its resistance to adverse influences.
Features of polypropylene taps
First, you should understand the basic design features, this will allow you to better understand how the system functions.
Products can be made from different types of raw materials, most often the upper limit of heat resistance is limited to 95 degrees. It is best to choose designs from the PPRC brand of raw materials; the size range of products is quite wide, but the most common sizes are 20, 25, 32 and 50 mm, but other options can be found.
Regardless of size, the structure consists of the following components:
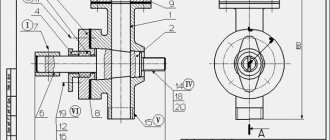
In the photo: this is what the structure looks like in cross-section
- Housing made of the highest strength polypropylene . It is very important that the assembly is cast with high quality, without any flaws or surface defects.
- The closing element is a ball with a hole for water flow . It is best if it is made of stainless steel and the surface is laser polished to ensure the tightest and most reliable fit.
- The rod is the axis on which the locking mechanism is attached ; it must be adjusted very precisely to prevent even minimal play.
- To prevent water from penetrating through the rod mounts, O-rings are used ; they must be made of high-quality rubber.
- To ensure a tight fit of the ball to the body, two rings are used , which can be used either from fluoroplastic or Teflon.
- The mechanism is adjusted using a handle, which is attached with a special screw..