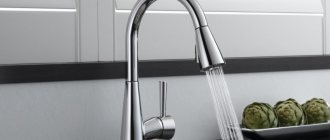
An aerator is a plumbing device that is installed on the spouts of water taps and mixers to saturate the water with small air bubbles and mechanically clean it from foreign particles.
The principle of operation of the aerator is to pass water through several meshes with different cell sizes. Thanks to this, the water is saturated with air, feels soft and splashes less when washing dishes. While maintaining washing efficiency, the aerator saves up to 70% of water
.
Why do you need a faucet aerator?
The “official” purpose of any aerator is to reduce water consumption. That is why the second name of such a device is “saver”. Savings, according to developers and sellers, occur due to mixing the water jet with air. And if, under normal conditions, approximately 15 liters of water per minute flows through a tap that is fully open, then the aerator adjusts this figure to 6-8 liters, with virtually no reduction in pressure.
In addition, a saving aerator can:
- reduce the noise of liquid flowing from the tap (air bubbles in the stream significantly soften its fall);
- reduce the amount of splashes generated when the flow collides with the container of a sink or bath bowl (thanks to the same bubbles);
- make the stream softer and more pleasant (especially important when it comes to water treatments for the face and body);
- work as an additional coarse filter (by the way, all aerators without exception are equipped with the simplest filters).
In general, all this is quite enough to make you think about choosing and purchasing such a device. Moreover, almost all of them have a universal design, which means they can be installed on any mixer.
And most aerators:
- compact and not too conspicuous;
- easy to use and install;
- For the most part, they are quite durable (if you don’t make a mistake with the material, of course).
However, aerating devices also have disadvantages:
- if the quality of water in a centralized water supply system is low, any aerator needs to be constantly cleaned, repaired, or even replaced;
- reducing the incoming volume of water flow (and this can be important, for example, when you urgently need to fill some container).
No other disadvantages were noticed with the aerators.
Noise control measures
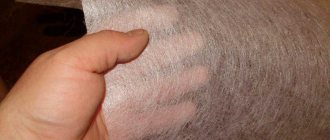
Faucets with water aerators still have a drawback, which manifests itself when the faucet is installed in stainless steel sinks. Water with bubbles falling to the bottom of the sink causes its thin walls to vibrate and creates more acoustic noise than without an aerator. There is a simple way to reduce noise levels. It is enough to glue a plate of microporous rubber or other porous material to the outside of the bottom of the sink, which will dampen vibration, and with it noise.
To select the most suitable sound-absorbing material, simply open the tap and apply the material to the bottom of the sink. Then glue the most suitable one. It is quite possible that applying a thin layer of macroflex or other foam material will also be effective. But I haven't tried it myself.
How does a faucet aerator work?
A water aerator is a simple device, however, consisting of 3 components: a body, a cartridge and a sealing gasket. The latter ensures a hermetically sealed installation of the device. The main secret of the aerator is the manufacturing scheme of its cartridge. Depending on this it can be:
- Shchelev. In such a water-air mixture is formed using a special disk with technological slots. The flow of water, crashing into the deflecting disk, passes through these narrow slits and breaks into small droplets. As a result, mixing with air occurs, and then the jet, passing through the divider, stabilizes.
- Or disk, with a reflector. These aerators have a different operating principle. A disk with small holes divides the water flow into jets, which mix with air, breaking against a special reflector. A fine mesh mesh acts as a divider in such devices.
Experts consider both methods of obtaining water-air mass to be effective. Therefore, aerator manufacturers actively use both.
Troubleshooting Methods
Repair depends on the type of breakdown, as well as the causes of its occurrence. It is not enough to simply fix or replace a damaged part; you also need to eliminate the root cause of the malfunction, otherwise repairs will have to be done regularly. Let's take a closer look at possible breakdowns, the reasons for their occurrence and ways to deal with them.
Broken glass is a common problem for those who use regular, non-tempered glass. Replacing them with new ones will not be a problem, especially if you still have the instructions for assembling the booth or if it was originally assembled without the help of specialists
At the same time, you need to pay attention that only the front compartments and sliding doors can be replaced locally, while replacing the rear panel will require dismantling the top of the structure, and this is a more responsible and complex task
The cabin windows can be equipped with aluminum edging or without it, but at the same time they are all secured in the frame with rubber seals, which are responsible for the tightness and reliability of the connection. To replace the glass sheet, one or more racks are dismantled, the seal is removed, and the fragments are removed. To install new glass, you need to do the same steps in reverse order.
DIY shower cabin repair
Transparent impact-resistant films are often used to strengthen glass surfaces and increase their strength. They cover the entire surface, after which the canvases are not afraid of even strong blows, and in terms of characteristics they are close to hardened ones. Considering the cost of glass, it is much cheaper to purchase film once than to periodically replace certain cracked booth walls. In addition, fragments can cause damage to health, so using glass “in its pure form” is also unsafe. Thus, do-it-yourself shower cabin repair in case of cracked or broken glass consists of replacing it.
A cracked pallet made of acrylic is a common phenomenon, and it’s not even about the quality of the product, but about the features of its design and correct installation. The acrylic tray is not reinforced in the center, where it absorbs maximum loads, as a result of which its surface gradually sags. Sometimes cracks appear due to careless use or when exposed to mechanical shocks, but these are special cases. Repairing an acrylic shower tray with your own hands is done using liquid acrylic, which is poured into the cracks, provided that their length does not exceed 35 cm. If there are holes on the surface, their dimensions should be within 100x100 mm. The material for repair - liquid acrylic - is sold in the form of a repair kit - a set that includes all the necessary components. It contains liquid acrylic itself, as well as a special hardener and abrasive sandpaper for grouting.
Crack formation in the shower tray - repair
The sealing of cracks in the shower tray is carried out using the following technology:
- The crack is slightly expanded using a grinder so that chamfers are formed along the edges, forming a “bowl” for pouring;
- the surface of the edges is cleaned of dust and debris and treated with alcohol;
- liquid acrylic is mixed with hardener in accordance with the instructions;
- the crack is filled with the prepared mixture, its excess is removed using a rubber spatula;
- the place of filling is sealed with tape;
- after complete drying, the time of which is indicated in the instructions for the repair kit, the tape is removed and the surface is polished with abrasive sandpaper.
The technology is indeed very simple, but its effectiveness will be reduced to zero if measures are not taken to strengthen the structure of the pallet. Otherwise, new cracks will not keep you waiting. To strengthen the pallet you will need bricks and foam. The sequence is as follows:
- the front screen is dismantled;
- a “cushion” of bricks is laid out under the pallet, which are simply stacked on top of each other without the use of mortar;
- the distance between the bricks and the bottom is filled with Makroflex 65 polyurethane foam or another that has a low expansion coefficient.
What types of aerators are there: classification
Aerators are not particularly distinguished by the variety of shapes and technical modifications. But these devices still have a classification.
Based on the material used, all aerators can be divided into:
models made of extruded aluminum, in a fragile body and with a lot of shortcomings (such aerators quickly oxidize and stick to the body, and also break even under the slightest load);- plastic devices, which are also short-lived, but do not stick to the faucet spout and are easily unscrewed (however, like previous models, they do not like mechanical stress and can quickly fail due to this);
- brass fixtures, the most reliable and durable, which practically do not rust or otherwise be destroyed.
Also, according to technological features, aerators are divided into:
- internal devices for the faucet, equipped with external threads and screwed into the mixer;
- external devices (already with internal threads), which are screwed onto the end of the mixer from the outside;
- rotating or flexible devices that extend the nose of the faucet (they look like a hose, and with the movement of your hand you can direct such a hose, and therefore the water-air flow in the direction you need);
- the second type of swivel fixtures, consisting of two parts and connected by a hinge (these are ideal for installation on bidet faucets);
- Illuminated devices that provide visual appeal to the flow of water mixed with air.
Imaginary benefit
Water dividers in no way help to really save money, since they are not able to change the composition of the water. All the miraculous properties that advertisers have endowed such devices with are conjecture. In addition, it is worth considering that the main water costs of the average family are the use of a shower and a cistern; bathrooms are used quite rarely. Savers cannot be physically installed on these plumbing elements, so theoretically they are capable of reducing the cost of not all water used, but only that which passes through the nozzles.
To reduce water consumption using a principle similar to aerators, you need to do one simple thing - reduce the pressure in the tap. It has been proven that household tasks such as washing dishes or taking a shower are not negatively affected by this method of reducing water use.
DIY aerator
Although store-bought devices for saturating water with air in order to save water flow are inexpensive, there is always a temptation for craftsmen to make an aerator for the faucet with their own hands. Moreover, the design of such devices is extremely simple, which means it can be reproduced even by the most “terry” amateurs who have never created anything.
For such technical creativity you will need:
- The body of the future device (the ideal option is the most common faucet attachment).
- A piece of dense, durable plastic (a gasket with holes will be made from it to saturate the water with air).
- Simple tools for designing the aerator and its subsequent installation.
The manufacturing process itself can be divided into 3 stages:
- Making a special gasket (making holes in a piece of plastic cut to the desired size).
- Installation of the finished plate into the body of the future aerator.
- Installing a homemade aerator on the mixer.
It is clear that the plastic plate will act as a mesh filter - breaking up the flow and saturating it with air. Thus, the main goal is achieved - saving water consumption. You will also be able to save on the purchase of an aerator. Plus, test your own strength as a craftsman, capable of making and installing things that are very useful in everyday life.
Sewer aerator - an effective solution to the problem of unpleasant odor in the room
One of the most important requirements for the sewer system is that there is no unpleasant odor in the home. To achieve this, a number of measures are being taken, which include the sewer aerator 50 or 110. But what is this device, what function does it perform and what do these numbers mean?
Next, I will try to answer all these questions, and also tell you in what cases it is necessary to use an aerator.
What is an aerator and why is it used?
Purpose of the device
The sewer pipeline itself is sealed and therefore has no odor. However, backflow of air can enter living spaces through intake points, e.g. plumbing fixtures.
To prevent this from happening, siphons are installed between each plumbing fixture and the sewer system. The latter provide a water seal (water lock), as in the diagram below.
Diagram of a water seal in a siphon
However, in some cases, as a result of a sharp change in pressure in the system, the water seals break. This happens due to the draining of a large amount of liquid. In practice, failure of water seals most often occurs after use, and it looks like this:
- during the process of volley discharge of water, the pressure in the system increases sharply;
- as soon as water enters the riser, a pressure vacuum occurs in the system due to lack of air, i.e. water works like a piston in a pump - before the flow, the pressure increases, and behind it, on the contrary, it discharges.
When such processes occur in the system, a characteristic gurgling of water is heard in sinks and washbasins, after which an unpleasant odor appears. Most often, failure occurs in one place where the water seal is weakest, i.e. siphon is small.
Of course, draining a large amount of water does not always lead to the failure of water seals. Most often, the cause of severe pressure drops is insufficient ventilation of the system. This may be caused by:
- errors in the design of the sewer system;
- simultaneous use of a large number of plumbing fixtures, for example, in apartment buildings;
- the absence of a fan (ventilation) pipe, which is led from the riser to the roof.
In this case, the problem can be solved in only one way - by installing an additional air intake point. But here another problem arises - an unpleasant odor will leak from the sewer. As you probably guessed, an aeration valve for sewerage or, in short, an aerator, is designed to solve this problem.
The photo shows an example of using an aeration valve in the system
Thus, this device performs two important functions:
- when low pressure occurs in the system, it provides air flow and thereby balances it;
- prevents gases from entering the sewer into the room as a result of excess pressure.
Device
The design of sewer aerators is extremely simple. The device includes several main elements:
- body - made of the same material as sewer pipes, i.e. PVC;
- inlet - provides air supply when pressure in the sewer system is released;
- locking mechanism - is a valve that, at increased or balanced pressure, closes the inlet. When the pressure is discharged, the valve opens the hole;
- rubber gasket – ensures reliable sealing of the inlet when closed.
Aeration valve design diagram
According to the type of device, the locking mechanism is divided into two types:
- a rod that rises with a difference in pressure;
- one-way membrane.
It should be noted that the membrane system is more preferable, as it is reliable. If left inactive for a long period of time, the rod may jam as a result of debris. In addition, the system stabilization time for such a device is higher.
If you notice that the device has stopped working or is not working correctly, you need to remove the top cover and clean its channels.
Aerator for saving: is there such a thing?
It is believed that installing an aerator on a faucet (most often on a mixer) is the most affordable and safe way to save on water consumption by saturating its flow with air.
But is this really so? Is it really possible to significantly change meter readings? Let's try to figure it out.
The aerator, as a device, gets its name from the process it carries out. “Aeration” is translated from Greek as “air,” and the operation implies the natural saturation of water with air. This passage of air bubbles through the liquid (that is, the transformation of an elastic stream into a seething stream) promises to reduce water consumption at the same pressure. And the recorded data of some studies conducted by reputable organizations allow us to talk about 50% savings in water flow, provided that an aerator is installed on the tap. Therefore, this device definitely makes sense.
Popular types of systems
There are quite a few types of air supply systems for wells and boreholes. They differ in operating principles, cost, dimensions, etc. And all of them can be used to equip the water supply system of a residential building.
https://youtube.com/watch?v=_GBKx3OyGEQ
So, there are three types of aeration devices for water purification:
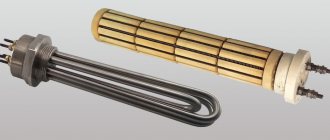
- Pressure aeration accelerates the connection of water molecules with oxygen. This aeration column is a sealed tank, has a compressor at the inlet and a fine-mesh filter at the outlet. Its operating principle is that when the tank is filled with water, a signal is sent to the compressor, which transmits air under high pressure (a special pipe is used as a conductor). Thanks to this, oxygen begins to actively interact with water, oxidizing iron and manganese. When the pressure is too strong, the sensor will work and excess air will be removed from the tank. Next, the water is supplied further through the water supply system, having previously passed through a special filter. This method is excellent for removing iron and manganese, but it does not cope well with hydrogen sulfide. Therefore, such systems are often equipped with an additional device with a reagent.
- Gravity aeration works on a slightly different principle. The principle here is similar to how a water aquarium is saturated with oxygen. In the center of the tank there is an aerator that releases air. Due to this, the water mixes well with the metal, which precipitates. This module requires an addition such as a pump. Oxidized substances settle at the bottom of the tank, so it must be cleaned every three months. This system quickly processes large volumes of water, but can only remove iron. Its advantages are counterbalanced by the large size of the equipment and the need for additional equipment.
- The injector aerator is used most often in everyday life. This system is small in size and inexpensive. The device works using the energy in the water supply and does not need to be connected to electricity. The operating principle of this device is based on the fact that, thanks to a low-pressure section, air bubbles are sucked into the pipe through a special hole. Water is discharged through a filter device.
When choosing an aerator, you need to consider your financial situation and needs.
All types of aerators can be used for domestic needs. However, the injector, due to its low cost, is considered the most popular option.
Aerator installation
Modern models of water aeration devices are durable, contrary to popular belief that they will soon fail. They are now made from appropriate materials using the latest technologies (for example, the holes in the disks today have a larger diameter than in their predecessor devices), and therefore last a long time. And in addition, such aerators are equipped with multi-stage filtration systems, which means they are rightfully considered multifunctional devices.
To independently install one of the models of such a device on the mixer, you need to fix the existing aerator at the very end of the faucet using a threaded connection, according to the diagram below:
Modernized options for aerating devices
For many users, it is the aesthetic rather than the economic capabilities of aerators that are of key importance. For their faucets in kitchens and bathrooms, these people choose decorative devices. And most often we are talking about illuminated aerators. After all, the faucets equipped with them just need to be opened for the water jet to change color.
Modernized modern versions of aerating devices are equipped with a microturbine with an electric generator, as well as a temperature sensor. These aerators are designed in such a way that the color of the stream flowing from the tap depends on its temperature:
- cool water (up to 31°C) turns green;
- warm flow (up to 43°C) turns blue;
- and hot water (from 45°C and above) comes out red.
If you look at it, this effect has not only an aesthetic function, but also a practical one - it “informs” the user about the temperature of the liquid that flows from the tap.
As for the operating temperature range of devices of this type, it is limited to 60 degrees Celsius.
Other options
Families with small children often install toy aerators on their faucets. Attachments in the form of animals, as well as fairy-tale or cartoon characters, also have universal sizes and types of fastening, so they can be easily mounted on any crane.
Toys on faucets look beautiful and unusual, and in addition to being aesthetic, they also have a practical option - they make it easier to get even the most stubborn dirty guy addicted to water hygiene procedures.
The aerator model created quite recently by the young London designer Simin Qiu is also considered an innovative development. His device turns the flow of water from the tap into bizarre spirals, creating beautiful, fascinatingly unusual “lattices” of liquid at the outlet.
Dismantling
To clean and replace, you first need to dismantle the device. And in order to carry out dismantling efficiently and easily, you should pay attention to 2 edges located on the body of any aerator diametrically opposite to each other.
Holding these edges, you should rotate the device clockwise. If it is difficult to rotate by hand, you must use a wrench or pliers. But you need to act carefully so as not to break the thread or damage either the aerator or the mixer.
Disassembly of the structure
It is easy to disassemble the aerator for cleaning. You just need to remove the mesh gaskets placed in the housing one by one. But first of all, the rubber gasket is removed and its condition is assessed. Cleaning consists of high-quality washing of the elements, removing dirt, suspended matter, and other particles.
The most effective way to remove all excess from the mesh is with an old toothbrush. And if something cannot be removed, you can use a wooden toothpick. Mineral deposits are eliminated with a dissolving acidic medium (for example, if you soak the filters for 30 minutes in apple cider vinegar). Rust is removed with special chemicals.
Using the water-saving nozzle
Tap water contains particles of rust, impurities and salts. These substances linger on plumbing fixtures, forming plaque. To increase their service life, the nozzles must be cleaned periodically. If the water pressure decreases and there is no characteristic hissing, the aerator should be cleaned.
Water divider Source bossini.it
Equipment cleaning process:
- The diffuser is disconnected from the faucet spout.
- Then remove the rubber gasket. If cracks or tears appear on the seal, it must be replaced.
- The aerator is disassembled, washed and wiped with a napkin. The mesh holes are cleaned with a needle or awl and then washed with water.
- The divider is connected to the mixer and checked for leaks.
- A well-cleaned filter does not prevent the passage of high water pressure.
Reassembly
When all the elements of the aerator are cleaned, you need to assemble the device and then install it in place. And here it is important to adhere to the rule: filter meshes should be laid strictly in layers so that the wires forming the cells are at an angle of 45° relative to each other.
Before installing the nozzle, you need to install a rubber washer and twist the aerator counterclockwise, but without excessive zeal.
You can check the functionality of the device only by opening the water. If there is obvious leakage from under the head, you will have to tighten the structure a little with pliers.
Important: Illuminated aerators are “placed” on the faucet in the same way as regular ones. They do not require any power sources, since such designs are equipped with a miniature generator that independently generates electricity.
( 70 votes, average: 4.70 out of 5)
Caring for parquet: basic rules and recommended products
Beige color in the interior: rules for creating harmony