Pipes that supply gas to stoves or other equipment operating on this type of fuel must be equipped with individual taps in order to instantly shut off the gas supply in the event of a dangerous situation.
The condition of locking devices must be constantly monitored. You may need to immediately replace the gas tap in your apartment if it suddenly breaks down.
Here you will learn all about the reasons for replacing gas pipe taps and choosing the appropriate device model. For independent craftsmen, we provide step-by-step instructions. A detailed description of the work will help not only replace the shut-off device yourself, but also monitor the actions of gas service workers.
At whose expense are the gas taps and hoses in the apartment replaced?
They scare old people with fines and offer their services at exorbitant prices.
Scammers force people to pay exorbitant prices for servicing their stoves. Marina VOLOSEVICH Change text size:AA Last week, the State Housing Inspectorate warned: from this year, owners of gas stoves and water heaters will face serious fines. They can be discharged for the lack of a contract for the maintenance of the stove and water heater, as well as for not allowing a gas service employee into the apartment.
The other day there was a knock on the door of Lyudmila Sandalova (name changed) from Chelyabinsk. Two men resolutely walked into the kitchen and began to shame the pensioner: “It’s time to change the tap, we’re writing you an order.” The replacement deadline is a month. The work costs a thousand rubles.
Consultation "Legal consultation"
Question No. 33297 Question author: Vladimir.
N 491) reads: “...5.
The common property includes in-house engineering systems of cold and hot water supply and gas supply, consisting of risers, branches from the risers to the first shut-off device located on the branches from the risers, the said shut-off devices, collective (common house) cold and hot water metering devices, first shut-off devices - control valves
Hello, Oleg! No, you are not required to change the gas shut-off valve.
Since the gas shut-off valve does not belong to the in-house gas equipment, but to the general house gas equipment, the responsibility for its proper operation and replacement, if necessary, lies with the management company, and not you.
Letter from the Ministry of Regional Development of Russia dated October 18, 2013.
In accordance with paragraphs four and seven of clause 2 of the Rules, indoor gas equipment in an apartment building includes gas pipelines, which are the common property of the owners of the premises, laid from the gas source (when using liquefied petroleum gas)
Are gas stove manufacturers required to set their service life?
What to do if you smell gas in your apartment
Current legislation does not always require manufacturers to set the service life of the products they produce.
This rule applies only to those devices that are intended for long-term use. Moreover, this must be done if, after the expiration date, the product can:
- Harm citizens using it, leading to death.
- Cause damage to the property of the owner of the product or the environment.
In all other cases, the manufacturer is not obliged to set the service life of the devices.
To understand whether this information should be indicated in relation to gas stoves (and any other devices), it is necessary to familiarize yourself with Government Resolution No. 720. It clearly states that this period is established for gas household appliances. The stove is one of these devices.
The deadline is not specified - what to do
In some cases, such information cannot be found. This is due to the fact that, despite the above-mentioned regulation, not all manufacturers adhere to it. The citizen should know that if neither the manufacturer nor the seller sets this parameter, the provisions of the law come into force.
In accordance with consumer legislation, in the absence of such information from the manufacturer, the citizen has the right to service the device for ten years.
When are gas taps replaced?
A gas valve is a shut-off valve on a gas riser. Since the valve is a moving mechanism, it tends to wear out and become unusable. Manifestations of this can be various signs: jamming, excessive rotation, the appearance of a strong smell of gas. However, only a gas service specialist can reliably determine whether the gas tap in the house needs to be replaced, based on the results of a visual inspection and maintenance.
If you have identified such signs during operation, invite a technician for unscheduled maintenance. Scheduled inspections are carried out annually, so if there are signs of malfunction, the technician or master will identify them independently.
To replace gas equipment, he has only three reasons (clause 10 of the Rules, approved by Government Decree No. 410 of May 14, 2013):
- The end of the service life established by the project or manufacturer. For valves, such deadlines are usually not established; if they are in good technical condition, they are used indefinitely.
- Determining a valve malfunction and recognizing it as unsuitable for repair based on the results of maintenance.
- Submission of an application for replacement by the owner of the equipment. Yes, you can change the faucet on your own initiative.
Maintenance
The service life of the stoves is finite, and using the equipment beyond the norm is dangerous, so regular maintenance must be carried out. Of course, the lion's share of responsibility falls on the owners of gas domestic installations. The final service life of the stove depends on them, because it can fail much earlier than the specified time if you handle it carelessly. The owner of an apartment where a gas stove is installed is obliged to ensure:
- The operation of the burners is correct.
- The tightness of the oven closure.
- The integrity of the gas hose connecting the installation with the liquid fuel supply pipe.
- The performance of the gas leakage protection system.
Within the limits of the warranty established by the documents, the owner conducts visual inspections of the equipment and, in case of the slightest malfunction, must call a technician.
After the expiration date, maintenance should be performed once a year. Based on its results, the technician gives an opinion on the possibility of further using the gas stove or replacing it.
Who does the maintenance?
Before the collapse of the USSR, maintenance of gas equipment was a mandatory measure, which was assigned to mechanics of gas distribution organizations.
The cost of their work was included in the price of utilities, and therefore there were no problems with maintenance. But the new economic era has made significant adjustments in all areas; periodic inspection and repair of installations was excluded from the price of household gas. Until 2008, there was complete confusion in this area; many companies appeared that were not responsible for either the professionalism of their staff or the quality of service. If you have any questions, you can consult for free via chat with a lawyer at the bottom of the screen or call by phone (consultation is free), we work around the clock.
The adopted legislative acts helped change the situation:
- Decree of the Government of the Russian Federation No. 549 of July 21, 2008, which approved the “Rules for the supply of gas to meet the household needs of citizens.”
- Order of the Ministry of Regional Development of the Russian Federation No. 239 dated June 26, 2009 on the “Procedure for the maintenance of repairs of in-house gas equipment.”
These documents established that the consumer bears all responsibility for operation and timely repairs. He is responsible for concluding agreements with organizations specializing in this problem, which will provide in-house gas services and emergency dispatch support. Agreements must be concluded at the stage of connecting the household to gas networks. According to legal regulations, maintenance responsibilities are assigned to organizations with certified specialists on staff who have sufficient knowledge to eliminate any problems that arise.
Gas equipment inspections
Maintenance of gas equipment is carried out in accordance with the approved Decree of the Government of the Russian Federation, List of VDGO dated May 14, 2013 No. 410. It includes the following mandatory work:
- Visual inspection to determine the integrity of the slab and other components.
- Checking the tightness of connecting parts and disconnecting equipment.
- Lubrication of fasteners, valves, taps and other mechanisms.
- Establishing the functionality of a shut-off device that allows you to shut off the gas supply if the permissible parameters are exceeded.
- Cleaning burners from dirt.
- Gas supply adjustment.
The technician must check not only the stove, but also the smoke and ventilation ducts. And if there are cylinder installations, the tightness of the connections is inspected and the gas supply pressure is checked. Mandatory oral instructions to the consumer are provided.
Regulations and rules of work
Current legislation states that only employees of the gas supply company have the right to repair gas communications. To determine the scope of work, a preliminary check is carried out. The technicians visit all apartments, inspect communications and make notes regarding the level of wear of networks and locking elements. Based on this information, a decision is made regarding the purchase of materials and the upcoming scope of work.
When visiting the site, the team is provided with an order sheet, which clearly indicates the list of planned activities. All masters carry company employee identification cards with a photograph and a hologram.
The work is carried out at public expense in accordance with current regulatory requirements. Old pipes are removed and heavy-duty new ones are installed in their place. They are selected depending on the pressure level in the city network. At the same time, all shut-off valves are changed. There is no charge to residents for this.
Relocating a gas pipe: procedure
It is strictly prohibited to move gas pipes on your own; such work is carried out only after agreement with the relevant government organizations. The transfer is carried out by specialists with the required qualifications. Without permission, you can only move the slab slightly to the side (no more than 0.4 m), if it is connected by a flexible outlet.
Without permission, you can only move the slab slightly to the right or left
Obtaining permission to move the pipe
The procedure is as follows:
- First of all, the owner of the premises should contact the gas supply organization at the place of residence (Gorgaz), where they fill out a standard application about the need to carry out work to replace or relocate gas pipes to connect the stove. It is necessary to indicate what exactly needs to be changed and for what reason.
- The application left will be the basis for calling a representative of the gas service. The date of the visit is usually agreed upon immediately. The arriving technical specialist carefully inspects the premises, listens to all wishes, studies the provided project and assesses the possibility of its implementation taking into account all technical standards. If necessary, adjustments and changes are made or other options are provided.
- After approval of the final transfer scheme, the organization providing the services draws up estimate documentation for the work being carried out.
- The drawn up estimate must be agreed upon with the owner of the property, who must give his consent.
- Upon receipt of all documentation, payment is made.
- Within 5 days after payment of funds, gas workers arrive at the work site and carry out the transfer of gas pipes according to the developed plan.
To ensure that the process of moving gas pipelines does not drag on for an indefinite period of time, it is necessary to carry out a number of preparatory measures:
- Meet with gas masters in person or call them by phone and find out what additional materials will be required. Everything should be purchased and prepared in advance. As a rule, workers bring all pipes and fittings with them, since their cost is included in the estimate. But flexible hoses for connecting gas appliances are purchased separately.
- Excess equipment and furniture must be removed from the premises, ensuring unhindered access to all elements of the gas system.
- If dismantling is impossible, you need to protect all valuables with burlap, plastic film, tarpaulin, etc. This is necessary since the upcoming activity is accompanied by increased dust formation.
Video: redevelopment of gas equipment
Gas pipe transfer technology
The process of transferring gas pipelines consists of the following sequential actions:
- Immediately after the technicians arrive and immediately before starting work, it is necessary to turn off the gas supply using a valve.
- The remaining gas must be vented through the stove or heating boiler, and the pipe must be purged to remove debris and dust.
- Using a grinder or welding, cut off the unnecessary pipeline fragments according to the adopted plan.
- Close the resulting hole with a special plug or weld it.
- Make a new hole for the gas outlet in another place in the pipeline.
- Mount and weld a new metal pipe element to the hole made, following the design.
- Cut a thread at the free end of the welded outlet and install the tap using sealants (FUM tape, tow, etc.).
- Connect the necessary gas equipment using a flexible hose.
Our neighbor undertook to move the gas pipes in the house himself. He believed that after the fact he could very easily legitimize everything. But it turned out to be much more difficult than he thought. At first he was obliged to dismantle everything, then draw up a project and start again. Through a long walk through various authorities and payment of a decent amount, we managed to resolve this issue. As a result, the rework was much more expensive.
DIY faucet replacement
To replace the tap with your own hands, you need a tool (gas wrench), a gas tap and FUM tape (you can also use special compounds to seal threaded connections). All of the above can be purchased in specialized stores or construction department stores. It is more convenient to replace the gas tap with an assistant.
It should be noted: the gas pipeline has relatively low pressure (unlike, for example, a water supply). Based on this, there is no need to shut off the entire gas network. However, safety measures still need to be taken. First of all, the window must be open when carrying out work. The doors to the kitchen should be tightly closed, and the cracks should be plugged with rags or towels.
We begin the work by dismantling the used gas tap. We remove it using a gas wrench. As soon as the faucet is removed, we plug the pipe with a thumb pad. At this time, the assistant screws FUM tape onto the new faucet or applies sealant to the threaded connection.
When everything is ready, carefully, but without wasting time, connect the gas tap to the pipe. Before screwing in the new faucet, you need to make sure that it is in the “closed” position.
Next you need to make sure the connection is tight. To do this, use the old proven method with a soap solution. A soapy solution should be applied to the connection and if bubbles appear, the connection will leak. The defect must be corrected immediately: remove the tap and repeat sealing the connection.
At the end of the work, you should thoroughly ventilate the kitchen area and connect the gas stove to the system. Even in the absence of professional skills, the operation to replace a gas tap takes no more than 15 minutes. The advantage of doing the work yourself is significant cost savings. However, if you do not have confidence in your own abilities, it is better to entrust this work to specialists from the gas supplier’s service department.
Description of the technological process
Partial disassembly of the valve for the purpose of repair, replacement of the spindle or wedge is carried out without dismantling the valve from the pipeline in the absence of pressure from the working medium. Disassemble in the following order:
— set the wedge to the upper position OPEN and remove the casing and indicator (for the electric drive of JSC Tulaelectroprivod);
— set the wedge to the middle position, lowering it by 3/4 full stroke if the valve is in the OPEN position or raising it by ½ full stroke if the valve is in the CLOSED position;
— remove the electric drive;
— unscrew the plug 2-3 turns and make sure there is no medium pressure in the pipeline;
— remove the cover fasteners;
— lift the assembly until it exits the housing. Move the assembly to the side and place the wedge in a vertical position on the pads;
— remove the spindle head from mating with the upper groove of the wedge, after which install the unit in a horizontal position on the pads. If necessary, the removed unit can be completely disassembled.
After inspecting and repairing parts and assemblies, assemble the valve in the following order:
— lubricate and place the O-ring in the groove at the end of the housing;
— strap the cover assembly with the spindle and stand in a vertical position, carefully insert the spindle head into the corresponding groove of the wedge and lower the assembled assembly into the body cavity. Lower the assembly slowly, guiding the wedge along the guides between the body pipes. The wedge must be installed in the same orientation relative to the body pipes;
The wedge must be installed in the same orientation relative to the body pipes;
— install the cover fasteners and tighten them evenly using a diametrically cross pattern:
Mkr.=(70±7) kgf. m - for DN 500;
Micro = (120±12) kgf. m - for DN 600;
Micro = (140±14) kgf. m - for DN 700,800;
Microdistrict =(190±19) kgf. m - for DN 1000,1200;
Next, install the electric drive of the valve and check the functionality of the valve.
Complete disassembly of the valve for repair of the seal assembly is carried out only after dismantling the valve from the pipeline.
After assembly, the valve must be pressurized with pressure Pn = 12.0 MPa with the valve open in accordance with the rules in force at the facility being operated. The number of test pressure tests is no more than 10 for the full designated service life of the body parts.
Replacement, verification or repair - which is more profitable?
If it is discovered that the meter is faulty, it is reasonable to ask the question: is it worth sending the device for repair or verification, or is it easier to immediately buy a new one?
Also, repair or verification makes sense if the meter is expensive. In this case, the money spent on its repair or verification may be much more modest than its complete replacement. Some meter models installed in private homes can cost around 10–15 thousand rubles.
To submit a gas meter for verification, you need to pay for dismantling and installation - about 690 and 580 rubles, respectively. For verification you will have to pay on average about 500 - 700 rubles.
Thus, checking the meter along with removing and installing a gas meter costs approximately 1,900 rubles. Also in many cities there are companies offering to check the meter at home, this will help significantly save time, but will cost from 3,000 to 5,000 rubles.
If it turns out that the meter is broken, you will need to look at the cost of repairs and draw conclusions about purchasing a new device based on this.
And even gas company employees will not always be able to replace the battery. Often you will have to send the metering device to the factory where it was manufactured, or to a specialized service, which will take a lot of time and cost about 500 rubles.
The price of a new meter for an apartment is around 2,000 rubles. This is how much the most popular models Grand-1.6 and SGMB-1.6 cost. A meter for a private house, type VK-G6, costs about 4,000 rubles. Replacing the meter costs around 880 rubles.
Based on these data, it can be calculated that installing a new meter for an apartment will cost 2880 rubles, and for a private house 4880. Verifying the meter costs 1900 rubles, plus the meter will not be in the apartment for some time. This means that all this time, gas consumption will be taken into account according to standards that are significantly higher than actual gas consumption.
Verifying the meter in a private house is justified, while the difference between verification and installing a new one in an apartment is not so big, and many people prefer to simply install a new one.
Repairing the apartment meter does not look profitable at all.
Relocation of a gas boiler in an apartment, approval
- internal gas distribution is an open system, all covering elements are camouflage in nature and should not be firmly fixed;
- It is prohibited to lay pipelines through ventilation ducts, as well as doors and windows;
- metal structures are predominantly used; flexible connections are allowed in equipment connection areas, but their length should not exceed 3 m;
- a rigid method of connecting pipes and hoses to pipes is used;
- Pipe transitions through walls/partitions are equipped with special adapters - sleeves.
For a long period of time, it maintains tightness and elasticity even under active mechanical stress. The structure of the shell is preserved even under high pressure of the transported medium or under constant mechanical stress.
Replacing a pipe with a hose
In Soviet times, gas stoves were connected using steel pipes to the gas pipeline by welding. Today, such a design is impractical and during major repairs, employees will replace the old pipe with a flexible hose. This device allows you to move the stove to a convenient distance when carrying out independent repair work inside the apartment.
Several types of flexible hoses can be used to connect the slab:
- made of rubber and fabric;
- made of rubber braided with metal;
- bellows metal hose.
A flexible connection will allow you to move the stove to the required distance.
The last option is considered the most common - it is strong and reliable. It is a metal in a corrugated shell that can bend. The pipe is cut off to avoid static charge using a dielectric insert between the tap and the hose. The stove is connected to the hose, then the metal mesh included in the kit is inserted - it protects the burner from contamination. Both ends of the hose are tightened with a wrench. At the final stage, a safety check occurs using a soap emulsion.
What is needed to change the stove?
So, you are about to change the stove. What you need to prepare for this:
- The stove itself, in the case where you do not have the preferential status necessary for a free replacement. The device must comply with GOST 33998 and have a gas control system.
- Equipment for installation, necessary tools, consumables and materials.
- Equipment - everything for sealing, flexible hoses and so on.
- Documents for redevelopment if the kitchen is moved to another location.
- Documents confirming the authority of the owner or tenant of the apartment.
- Identification.
- Consent of all apartment owners.
- All papers on gas supply.
- Technical passport of the apartment.
Again, if the location for the device remains the same and only the device itself is replaced with a similar one, there is no need to legalize the conversion.
If you are changing a gas stove to an electric one, you must legalize the conversion; if you are moving the appliance to another room, then the redevelopment. If you are simply replacing it with a similar one, you do not need to carry out any approvals on both points.
The requirements for a new stove are standard. It must have all the necessary certificates and meet the requirements of GOST.
It is also recommended to check whether there will be free access to it and the gas pipeline in case of redevelopment, whether the chimney is in working order, and whether the ventilation is functioning as required.
How to move a gas boiler or water heater to another location
It is necessary to draw up, coordinate and approve the relevant technical documentation, which is difficult. In practice, you will have to dismantle, clean and remake (digest) the supply gas pipeline, lead it into the room where the new project requires installing a boiler or water heater.
You can’t just pick up and move a boiler or gas heater to another room. The gas connection to the devices is usually done with a flexible connection, which is a corrugated stainless steel tube, the so-called “gas pipe”. In this regard, there is a clause in the regulations that does not allow the flexible gas supply to cross any structures, windows, doors or other openings.
https://youtube.com/watch?v=mCFVfZJOKy0
Sources of danger
There are, in fact, only two of them.
The fact is that independent work related to opening the gas pipeline will inevitably lead to a gas leak.
- At a certain concentration of natural gas or propane-butane mixture in the air, it will become unbreathable.
- Long before this, the gas-air mixture will become explosive. The slightest spark when turning on an electrical appliance, triggering any relay (for example, a convector thermostat) or clicking a light switch will lead to exactly the consequences that we tried to warn the reader against in the first section of the article.
The rules that will help avoid negative consequences are quite obvious.
- All work is carried out with windows wide open throughout the entire apartment or house. Yes, yes, regardless of the time of year. Don’t be afraid that your favorite cactus will freeze: if everything goes well, forced ventilation will last no more than 10 minutes.
- The room must be completely de-energized. What the instructions relate to is, I think, clear from the previous explanation. Take it seriously: as already mentioned, the cost of a mistake can be the highest.
Gas equipment should not be touched outside the apartment. Even if it is located on the street.
Equipment malfunction
Any durable goods may break during use. Not all breakdowns require replacement of the gas stove; they can simply be repaired. But device owners must clearly understand the main rule - any detected malfunctions are extremely dangerous and can create an emergency situation. If there is a gas leak, breakdowns can lead to fatal consequences, not only for the owner himself, but also for other people and premises. Each gas stove manufacturer has its own weak points. Frequent malfunctions during operation are:
- Failure of gas burners. They may not turn on at all or the auto-ignition may not work.
- The burner stops working during operation, the fire goes out due to the flame jumping through, and the gas continues to flow.
- The gas supply is so weak that it is impossible to light the burner.
- The flame smokes and burns unevenly.
- The valves regulating the gas supply do not work well - they do not turn or slip.
- There is no pressure on the oven or it is so low that it is impossible to light the burner.
- After releasing the valve, the flame goes out.
- There is a smell of gas.
In all cases, making repairs yourself is prohibited. Before the technician arrives, you should turn off the general gas supply valve and ventilate the room so that gas does not accumulate if it leaks.
Safety Rules and Tips
You must adhere not only to the step-by-step instructions, but also to the requirements for a secure connection, which include the following recommendations:
- The connections and flexible hose make them accessible in case of a sudden gas leak.
- The maximum permissible length of 1.5 m cannot be exceeded by a centimeter.
- Twisting, bending, pressing, and contact with hard surfaces is not allowed.
- Normal use is permitted only after inspection by a gas service inspector.
- Before starting work, stop the gas supply and check that the valve is sealed in the closed position.
- During the installation process, only special equipment, fasteners, tools, and seals are used.
- The use of uncertified components and sealing materials is prohibited.
- After depressurization, the pipes are plugged with a damp cloth and released immediately before connection.
- For half-inch pipes, a regular cap from a PET plastic bottle is used as a stopper.
After assembly, each connection is coated with a soapy water solution to detect leaks. Bubbles indicate that the connection needs to be unscrewed, the seal removed, a new one applied and re-twisted. After this, the verification procedure is repeated. At the end of the activities, the tap is turned off, and a master from Gorgaz is called, who must carry out an inspection and make a corresponding note in the log. Even if you have to wait several days for an inspection, do not use the oven as it is unsafe even if everything is done correctly. Only a specialist will identify a defective slab if the manufacturer allowed it.
Analysis of typical installation errors
Although the operation of replacing a gas tap is quite simple, it can end in failure for inexperienced craftsmen.
If the length of the old faucet does not correspond to the same parameter of the new one, you should use extensions, which can have internal and external threads
Typical shortcomings are:
- Inability to connect the tap to the pipe. Most often this happens due to the fact that these elements do not match in size or thread. Adapters and extensions of different shapes and sizes will help correct the situation. To avoid getting into a similar situation, it is advisable to take into account the parameters of the pipes at the stage of selecting a tap.
- Valve not tightened enough. The threads must be tightened by hand, but a wrench must be used at the end. If this is not done, the connection will not be reliable enough, which will lead to gas leakage and instability of the structure.
- Tightening the tap exclusively with a wrench. When working with a tool, the possibility of damage to the part or thread breakage increases.
- Insufficient tightness of the connection. If testing the replaced faucet shows that natural gas is being released into the air, you should immediately turn off the stove and correct the error as described above.
Do not use faucets of poor quality
In order for the equipment to serve for a long time, it is important to choose models from well-known companies. It is advisable to use brass devices that require a minimum of maintenance with maximum efficiency and durability
Silicone and other similar materials dry out and lose their elasticity, as a result of which they begin to leak gas. To prevent this from happening, it is better to use graphite-based lubricants.
Key points for selecting a device
When choosing a locking mechanism for a gas pipeline, you should pay attention to the following characteristics:
- Pipe diameter. The tap must completely block the flow of gas into the apartment. If the shut-off element does not fit tightly to the walls of the gas pipe, then its tightness will be only partial, which can lead to serious consequences.
- Coincidence of diameter and thread pitch on the pipe and tap. In this case, installation of the device is quite easy. Installing a locking element with mismatched threads and diameters is, in principle, possible using adapters, but this will require additional material and time costs for the purchase and installation of additional parts.
- Hull integrity. The outer shell of the element must be free of cracks, chips, sagging and other defects. Their presence indicates a violation of the rules for transportation, manufacturing or storage of parts, which can lead to internal malfunctions, as well as a reduction in the service life.
You should also pay attention to the quality of the products, giving preference to models from well-known companies.
How much does it cost to replace a gas meter?
According to the decree of the Russian government, replacement of the gas meter is carried out at the expense of the homeowner. This is because all the equipment in your home belongs to you. This means that operating costs fall on your shoulders.
This fact is established not only for owners of private houses. Art. 158 of the Housing Code of the Russian Federation clearly states that the owner of an apartment in an apartment building bears all costs for maintaining the premises.
So you will have to pay:
- purchasing a gas meter;
- the work of specialists in removing the gas meter and installing a jumper pipe;
- cost of services for verification and repair of the device;
- services for direct gas meter replacement.
The cost of meter replacement services will be determined by specialists on site. The price depends on the complexity of the work, the number of devices, the length of the pipe for the gas meter output, as well as on the region of residence and the tariffs of the organization.
On average, you will have to pay about 15 thousand rubles for the device, and for services to replace the gas meter no more than 7 thousand rubles.
All listed expenses apply to owners of private houses and apartments. If your home belongs to the municipality, then they must bear all the costs of replacing the gas meter.
Areas of responsibility
The first and main thing that the reader should pay attention to is that the inlet valve in the apartment falls under the responsibility of GorGaz or a similar organization operating in the area where you live. Both the repair and replacement of valves, and their periodic inspection, and the connection of gas equipment (stoves, boilers, convectors, hobs) should be handled by the mechanics of this organization.
Once again: you carry out all actions with gas equipment at your own peril and risk. The consequences of mistakes can be the most severe: a household gas explosion is perhaps the most terrible event in an apartment building, often turning it into a heap of construction waste. If you have even the slightest doubt about your ability to complete all the work, and to do it quickly and correctly, invite a specialist.
If:
- you have quite a lot of experience in locksmith work; in particular, you have had to change valves and valves under pressure;
- you know where the power is cut off in your apartment, and you have access to the switchboard and the machines in it;
- the gas pipe in front of your valve has no visible signs of corrosion;
- at your disposal are plumbing tools (at least two gas wrenches No. 1 and/or No. 2), sealing material for threads and grease or graphite lubricant -
the following text will help you replace or repair the gas stove tap yourself.
Consequences of a domestic gas explosion.
How to choose an inlet tap for an apartment
I will definitely devote a separate article to this issue, here it is briefly
Understanding the importance of the purpose of inlet valves, for the correct choice there should be only one criterion - reliability
Therefore, exclude valves made of zinc-aluminum alloy (TSAM or ZAMAK) from your choice. It is often called silumin, but this is not true, although silumin is even worse than TsAM.
Give preference to stamped brass valves with ball lock (ball valves). Don't buy valves. They are cheaper, but wear out faster. The water from the riser has not yet been cleaned by mud collectors, so the valve valve quickly wears out, although it can be repaired.
Conclusion
Currently, gas ball valves are widely used in domestic and industrial gas pipelines. This is due to the fact that they are reliable and durable. The only thing is, when choosing which gas tap is better, you should give preference to more expensive devices from well-known manufacturers, since cheap products may not meet the required quality.
You can get some additional information on this topic from the video in this article.
Source
Design
There are several types of gas bellows. Its simplest type is a banal corrugated sleeve. A more advanced version uses a protective surface made of corrosion-resistant steel. There is also an option with a polymer coating. The most reliable design includes thermal safety valves that automatically cut off gas flow if the temperature exceeds a set limit.
The bellows is more expensive than any other option used to supply gas in domestic conditions. There is nothing surprising in this, because this design is designed for maximum pressure. It is made from stainless steel hose.
Most often, AISI 316 steel is used for the hose. Since the fittings must be stronger, metal of the AISI 303 or 304 categories is used for them. Individual companies, mainly Chinese and Turkish, supply fittings made of carbon alloys. But it is advisable to use components made from the same substance. When welding dissimilar metals, electrochemical corrosion is provoked, as a result of which the weld, despite all the skill of the performers, will quickly collapse.
What you need to know: valuable tips
Before purchasing a flexible hose, it is necessary to check the size of the thread at the outlet of the plate, its classification and whether it is straight or angular. If the outlet is of a direct type (directed into the wall), you must purchase a sleeve with a square at the end.
The gas hose should not be painted - this will accelerate its cracking. A more attractive look can be created by covering it with special paper or oilcloth.
It is also strictly forbidden to tightly seal gas communications with false plasterboard panels and other structures - this will make it difficult to carry out service work on individual elements.
To camouflage the gas supply system, a collapsible box is used, which can be easily dismantled if necessary. In this case, there will be constant access to all structural elements of the gas system.
It is forbidden to use unnecessary connections. Independent complication of a gas structure, according to technical regulations, may entail a fine or disconnection from gas supply
If a technician has been called to connect a gas water heater or stove, it is necessary to check that the work is being done correctly: the excess tap from the tap on the lower side must be unscrewed, the flexible line must be directly connected exclusively to the tap located on the branch pipe, and its other end - only to the outlet of the gas stove .
It is also possible to use an adapter. Any additional installations are prohibited.
Instructions for self-connection
Paying a gas technician for installation work is not too high, but many home craftsmen prefer to do everything themselves. This is a feasible task that requires the purchase of components and theoretical knowledge.
To connect, you will also need to prepare the following tools and buy materials:
- keys: gas No. 1, adjustable 22-24;
- a screwdriver for tightening the clamp, if required;
- sealants (Loctite 55 thread, flax, FUM - tape);
- gasket ½;
- gas sleeve;
- ball valve 1/2′;
- a brush and soap solution, which will be required to control the work.
A rag and a plastic stopper will also come in handy. The rag will be used as a temporary seal against gas leaks. The narrowed edge of the plug must be adjusted to fit the hole in the supply pipe. If during the extraction process a homemade part gets stuck, you can easily remove it with a corkscrew.
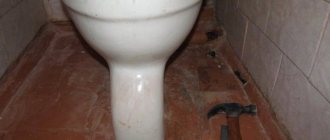
Step #1: Removing the old slab
Shutting off the crane when lowering is a primary task to ensure the safety of the work being performed. Next, you need to unscrew the locknut located on the outlet and remove the coupling. If the old slab has a coupling and locknut that were previously painted, this will significantly complicate the process of dismantling them.
Sometimes it is not possible to complete this procedure, then you will need to cut the eyeliner with a grinder.
The gas stove is dismantled after disconnecting the gas main from the conductor pipe. Difficulties that arise with unscrewing the lock nut on a metal pipe can be solved by cutting off the liner
In the process of unscrewing the squeegee located in the lowering valve, it is necessary to hold the valve itself with a key. It does not have to be removed unless you plan to replace the faucet. When they plan to delay the installation of the slab, an additional plug is installed on the lower side.
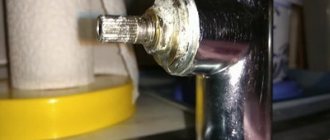
Step #2: Replace the faucet
There are situations when the wall is located very close to the tap and there is no way to dismantle it. In this case, it is necessary to bend the fastening and install a wedge between the wall and the pipeline. However, this is done in such a way that it is possible to continue doing the work.
It is necessary to prepare a piece of rag sufficient to completely block the pipe after dismantling the old tap. The next thing will be to tear it off without completely unwinding it. You will also need to prepare the selected type of seal. Do not forget to thoroughly ventilate the room during work to eliminate gas vapors.
After unscrewing the tap, the outlet from the pipe is tightly fixed with a finger and then with a wet rag. The main actions are aimed at eliminating gas escape from the pipe as much as possible. In this case, the thread on the branch should not be closed, since it will be covered with the selected sealant.
Before winding the seal, the threads on the lower end must be thoroughly cleaned. Next, its winding is carried out directly. This process ensures a reliable and airtight fixation of the new faucet, which is then tightly screwed on. The last step is to install the previously removed handle on the faucet.
Using soap foam, the tightness of the connection of the faucet and the gas pipe is checked. If the work was completed correctly, installation of the gas hose can continue.
If gas equipment is connected to the mains for the first time, you will definitely need to call a gas technician. In his presence, the equipment is checked for gas leaks when the valve is open. If the gas service worker does not find any violations, he must enter the established brand of stove into the register.
Step #3: Connecting the Flex Hose to the Stove
The external thread of the hose fitting is wrapped with a sealant. After this, it must be screwed into the tap on the branch pipe. The flexible hose is connected to the manifold at the finishing stage.
Next, the stage of test opening the tap on the lower side is mandatory to check for gas leaks. Using soap foam, the joints are treated with a brush. If foaming occurs when opening the gas tap, the work must be redone.
It is necessary to check the threads located on the manifold of the plate. Quite often it is 3/8′. In this case, you will need to install a 1/2′ adapter with a seal
If the work of replacing a gas hose is carried out in a private house where bottled gas is used, an additional replacement of the nozzle with a smaller diameter will be required. If this is not done, the burners will produce too much soot, which likes to settle on furniture and dishes in the kitchen.
Installation of dielectric insert
Many of us, at least once, having touched a gas stove, suddenly felt a weak, but very noticeable electric discharge. It would seem, what does electricity have to do with it, since the stove is gas? However, not all so simple.
In fact, there can be two reasons for the appearance of an electric discharge. The first is the application of a small negative electrical potential to the main pipes to protect them from electrochemical corrosion. Of course, at the junction of the main pipe with the section leading to the house, a dielectric insert must be installed, which isolates the apartment wiring from the main.
However, such protection works as long as the insert is in good condition. If the insulating insert fails, an electric current appears on the flexible line from the riser to the slab. The second possible reason is the use of electrical components in the gas stove. Almost all modern models of gas stoves are equipped with electrical appliances - from electric ignition of burners and oven lighting to an electric grill that rotates a spit in the oven. If the insulation of the electrical wiring of the stove is in order, there will be no problems. But if the insulation is damaged, an electric current will flow through the supply line - now from the stove to the riser.
Whatever the reason, the consequences of the above-described phenomenon can be extremely dangerous - the current flowing through the liner, especially when using sleeves in a braid, which is made from wire of a small cross-section and, therefore, has a high resistance, can heat up the sleeve braid so much that it simply burns the existing Inside there is a rubber hose. In this case, a gas leak will inevitably occur, which, in contact with the heated braid, can easily ignite or even explode. By the way, this is why metal-braided rubber hoses are not recommended for permanent connection of household gas appliances.
To avoid these troubles, it is enough to use a special dielectric insert when installing the liner. Typically, such an insert is made of plastic or combined materials (for example, the insert itself is plastic, and the threaded parts are metal).
Insulating insert: on the left - plastic with metal thread, on the right - plastic
Our company’s specialists are always ready to install the dielectric insert for you. GazService-NN specialists will carefully, quickly and efficiently install the dielectric insert. At the same time, you do not have to purchase it yourself; we will always have all the necessary consumables, including dielectric inserts for gas.
By entrusting the work to “GazService-NN”, you will not have to worry about the consequences of poor-quality installation, because we are a specialized service company for the installation and maintenance of gas equipment and have all the necessary documents to carry out this type of work. If necessary, we will also replace other elements of the gas system and inexpensively install or replace any gas equipment in your apartment or house.
Who sets the deadlines
On June 16, 1997, Decree of the Government of the Russian Federation No. 720 was adopted , which provides a list of durable goods that pose a danger to life after a certain period. This document lists the types of products and components for which the manufacturer is obliged to set expiration dates, since after expiration these products can harm the health and life of people, as well as the environment. The List also includes the item “household gas equipment”. When purchasing a gas stove, you should pay attention to the expiration dates given by the manufacturer. Often they do not exceed 10-15 years, but one should not assume that when they end, the installation itself should be hastily thrown away. The state standard considers the maximum duration of operation to be 20 years, and one should focus on this figure. If, after the expiration time specified in the documentation, the stove itself has no external defects, such as burnt-out ovens or non-functioning burners, then it can continue to be used. The possibility of further operation can be confirmed by a specialist who assesses the operating condition of the installations.
Refusal to replace the gas meter
Replacing and installing a gas meter is voluntary for every owner. Payment for gas upon consumption is always less than the average tariffs set by the management company.
Many owners of private houses and apartments receive notifications that the device needs to be checked and replaced, and they strive to quickly submit an application.
However, this should not be done for several reasons:
- perhaps the notice was sent not by the organization servicing the house, but by a third-party company that has nothing to do with the control of gas equipment, but simply seeks to sell its services;
- The time frame for checking or replacing the device has not yet arrived. To establish the exact date of the warranty period of the gas meter, it is necessary to check the certificate and manufacturing date of the device;
- the owner does not need to replace the meter and wants to abandon it.
The latter option sometimes also arises, despite the fact that it is cheaper to pay for gas with a meter. As a rule, such cases arise if the deadline has come, but the owner is selling his home and does not want to spend money on replacing equipment.
Sealing of modern gas meters occurs using special plastic blanks and does not take much time
It is also worth refusing a replacement if the apartment is transferred from the category “with gas service” to the tariff “with stationary electric stoves”. Typically, such transitions are made in Khrushchev-type apartments, when the gas supply to the apartment is completely stopped and additional capacity for electric stoves is installed.
The owner needs to know that neither the management company, nor the HOA, nor any other organization can force him to install a gas meter in his apartment.
Examination
After any work, make sure there are no gas leaks. Checking is also necessary if the gas tap in the kitchen sometimes leaks and you cannot determine the exact location of the leak. The algorithm of actions is extremely simple: a soap solution is applied to all threads with a shaving brush; The leak will make itself known by swelling bubbles.
Like that.