We're already in the twenty-first century, and wallpaper is still one of the most popular materials for wall decoration. Of course, this is due to their affordable cost and simple installation. Meanwhile, the service life of wallpaper sometimes does not stand up to criticism: it peels off the wall, bursts, and becomes moldy. Don’t rush to blame the manufacturer for this - you simply forgot that the walls need to be properly prepared for wallpapering (you can learn more about this in the article “Preparing walls for wallpapering: step-by-step instructions”). One of the key stages is leveling, which is achieved through the use of putty compounds. What putty is best for walls under wallpaper? We talk in detail about all the nuances of choice and offer 5 excellent options that definitely won’t let you down.
- The importance of alignment;
- Various types of putty;
- Dry or ready-made option;
- 5 great options on the market;
- Useful tips for proper puttying;
- Video for better clarity;
- Conclusion.
The Importance of Alignment
This is surprising, but many people sometimes sincerely ask the following 2 questions: “ why line the walls with wallpaper
?”
and “ is it necessary to prime the walls before wallpapering
?”
Let's imagine a situation where brand new wallpaper is successfully pasted on the wall - and the owners meticulously examine the result. The drawing is slightly skewed in several places, but in others it perfectly reflects the relief features of the capital surface. “ Just think, it’s completely unnoticeable
!” - the owners will say and get down to their favorite things. And soon they will start rearranging the furniture in the apartment and, pushing the chair too intensively towards the wall, will pierce the freshly pasted wallpaper. Who knew that there was a hole in this exact place, you ask. And we will answer: the owners knew, but did nothing about it.
more than 3 centimeters
, don’t expect anything good even from the most spectacular wallpaper. They will:
- fall away;
- burst;
- distort the applied drawing.
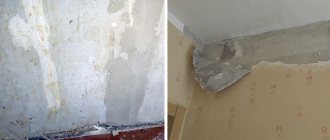
Deformed joints
Even a smooth surface can present unpleasant surprises after wallpapering. We are talking about “opened” joints.
Defective batches of wallpaper are quite rare. Therefore, deformed joints are most often a result of non-compliance with the technology of gluing panels and improper preparation of the surface of walls and ceilings.
The glue on the edges of the sheets already located at the gluing site dries faster than in the center. In combination with the high hygroscopicity of the putty layer, this causes rejection of the edges of the canvases.
The absorbent characteristics of the putty can be improved by using a two-layer coating with deep penetration primers.
Another way is to generously lubricate the joints of the sheets with wallpaper glue.
Various types of putty
Surely, you have seen putty in construction stores more than once, but you didn’t even suspect that it turns out to differ not only by belonging to one brand or another. Now you will know what's what. Here are the known types of material for leveling walls, depending on the nature of the component base and drying speed.
Plaster
- allow you to perfectly level the wall;
- dry quickly;
- Not recommended in rooms with high humidity and sources of water.
Cement
- moisture resistance;
- severe shrinkage;
- very long drying period.
The advantage of this type of putty is that it can be used in almost any room, but due to strong shrinkage, its use is very limited.
Polymer
- are supplied ready-made;
- allow you to make the wall perfectly flat;
- in terms of density they are inferior to the gypsum alternative.
The last moment is like a fly in the ointment in a common barrel of honey. It seems that polymer compounds are ideal for use in any situation. However, due to the characteristics of the base material - often acrylic - they are more suitable for preparing walls for painting. In addition, when choosing, you should also be guided by one more point - what function the putty will perform:
- starting leveling
- used only if there are serious defects on the wall, suitable for wallpaper only when used as the first layer; - finishing
- as a rule, it has good strength of the composition and ideal whiteness, applied on top of the starting layer; - universal
- the use of this type is limited to cases where there are no noticeable flaws; it is more expensive than the options discussed above.
How to do the work yourself?
- At the preparatory stage, cracks on the surface must be widened and oil stains must be degreased.
- Deep cracks are filled with polyurethane foam, acrylic sealant, recesses up to 5 mm are filled with starting putty with a serpyanka gasket.
- Copper in the room should be covered with insulating material (polyethylene).
- After the fragmentary finish has dried, use a construction vacuum cleaner to remove dirt and dust.
Puttying process:
- Apply 2 layers of concrete contact with a drying break.
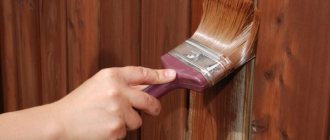
- Apply the primer with a long-haired nylon or fur roller.
- Apply a strip of mounting adhesive along the width of the reinforcing mesh (1 m) with an allowance of 5 cm at the edges.
- Fix the fiberglass at the top edge of the wall, using a herringbone motion, remove bubbles with a plastic spatula.
- Accelerate the air, moving from the middle to the edges, do not press on the tool.
- Apply 1 layer of penetrating primer, wait until dry (3-4 hours).
- Mix the solution with a construction mixer until there are no lumps and a paste-like consistency.
- Follow the instructions on the package, the average proportions are 5 liters of water per 25 kg of mixture.
- Let the solution sit for 3-4 minutes, stir again.
- Using a 450 mm spatula, apply a layer of the starting composition to the strip without pouring.
- Apply the composition with horizontal or vertical movements in the direction of lighting.
- Maintain a thickness of 1-1.5 mm, cut off the solution with a spatula immediately after application.
- After the starting coating has dried, apply 2-3 layers of the finishing solution in the same way.
- After the final coating has dried, sand the surface using a circular float with a P180 nozzle.
Reinforcing mesh is necessary to prevent cracking of the putty and enhance adhesion. If the surface is being prepared for wallpaper or panel cladding, then sanding can be neglected. Before decorative finishing, apply 1-2 layers of penetrating primer. After sanding, it is recommended to dust the surface with a construction vacuum cleaner. Do not use a damp cloth.
Putty for concrete surfaces must have elasticity and thixotropy (liquefaction and increase in viscosity when drying).
Attention
Acrylic compositions are suitable for wet rooms and facade work, and gypsum compositions are suitable for interior work.
Dry or ready-made option?
Another problem that may await you in the store. What putty is best to use for walls under wallpaper? Dry or ready-made option?
Experts unanimously say that it is better to prefer the first option of putty. The arguments are extremely transparent: dry putty is perfect for interior work, while the ready-made version is used mainly for exterior work. It’s also worth paying attention to a couple more points:
- does not shrink at all or not so severely;
- requires compliance with cooking rules;
- can be stored for a long time.
It is not possible to purchase ready-made versions of putty for future use - their shelf life is limited. They also give noticeable shrinkage, which is generally unacceptable when used as wallpaper. Add to this the decent cost - and your choice will be obvious!
Required Tools
Before starting work on leveling the walls, you should find out what tools you will need:
- spatulas of several sizes: wide (40-50 cm) and small, as well as an angular option;
- a drill with a special attachment for preparing a putty mixture;
- brushes and rollers for priming walls;
- metal rule for leveling the starting layer;
- building level - helps to control the correct verticals of the walls;
- sandpaper or mesh for grouting transitions and bumps;
- containers or buckets for mixing the solution.
Useful tips for correct puttying
It is not enough to choose a putty suitable for use under wallpaper - it is also important to know how to use it correctly. Failure to comply with many points threatens to disrupt the process of preparing the wall for gluing - and the result will cause polar emotions instead of satisfaction. Therefore, pay attention to the information:
- if your walls are full of unevenness, cracks and other defects, then follow the following sequence: starting putty - priming - final putty - final priming;
- do not take long breaks while leveling the walls: a maximum of five minutes between moving from one wall to another;
- putty is scooped out of the container with a small spatula and placed on a wide one - you need to lean it perpendicular to the wall and apply a layer of the required thickness to the wall;
- They begin to putty the walls from the corner, while observing the horizontal direction.
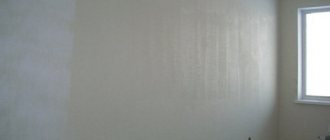
Why do you need to putty the walls before wallpapering?
Most modern wallpapers are glued end-to-end, because of this, any unevenness of the wall surface will be noticeable on the canvas and the seam will stand out strongly. This can be avoided by first preparing the wall, that is, covering it with putty.
Additionally, the building material performs other functions:
- increasing the strength of the base;
- improving the adhesive properties of the material with which the walls are covered;
- reducing the ability of the material to absorb moisture, which saves glue and eliminates the possibility of fungal infection;
- color alignment.
Important
If you plan to stick wallpaper on the walls, the surfaces are first primed with resin-based compounds. This creates an additional layer that protects against moisture.