Small apartments, inherited from the Soviet past, cause a lot of trouble for the owners.
For example, renovating a bathroom in a Khrushchev-era building requires special ingenuity, due to the limited space in it and the presence of standard communications. Nevertheless, modern decorative and technical solutions simplify the reconstruction of such a room.
Anyone can now create a cozy bathroom design in a Khrushchev-era building, and you can get inspiration simply by looking at dozens of ready-made solutions.
Bathroom layout
A standard Khrushchev-era bathroom occupies 3 square meters. m when combined with a toilet and 2 sq. m with separate.
Any renovation begins with removing the partition between the bathroom, thereby increasing the usable area of the room. It is advisable to leave a separate option only if there are small children in the apartment.
The issue of communications is always no less problematic. In standard bathrooms, very often they cannot be moved to another location, and laying additional pipes greatly increases the cost of renovation.
Thus, when planning a design, it is recommended to focus on the established communication terminals without changing their location.
With shower
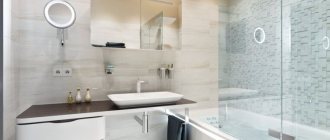
If in a Khrushchev-era building you remove the wall between the toilet and the bathroom, you get a niche into which the shower fits. This type of bathroom layout is becoming increasingly popular. Here it is advisable to lay the walls and floor with tiles, and use tempered glass as a fence.
There is another option - a corner location of the shower stall.
It is possible to use either a finished structure or a pallet with fencing. But there will be less space inside the room than with the first method, and the toilet with sink will have to be located on the left and right sides.
Bathtub combined with toilet
In order not to waste useful space, it is recommended to combine a bathroom with a toilet in Khrushchev-era buildings. Instead of a shower stall, you can install a full bath. The standard layout provides for its presence in the allotted space of 175/75 cm.
The disadvantage is that there is no space left for a washing machine, which, however, can be easily solved by placing it under the sink. This option is convenient because there is no need to redesign the entire bathroom.
Types of plumbing fixtures
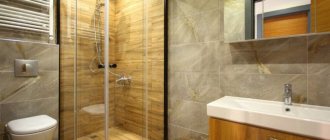
In small bathrooms, typical of Khrushchev-era buildings, the bathtub is most often replaced with a shower corner or stall.
This solution helps save space and frees up space for other equipment, such as a washing machine, and furniture.
Shower cabins
The shower cabin is a monoblock or prefabricated rectangular structure. In addition to the shower head, faucet, hose and other shower accessories, it includes a tray, a lid and four walls with a door. It is most often mounted to the wall or in the corner of the room, but the solid structure can be installed in any part of the room.
Advantages of a shower cabin:
- variety of models;
- saving water;
- small consumption of space in the room;
- tightness (water does not come into contact with the floor and walls);
- the possibility of installation in any part of the room, which allows you to experiment with the design of the bathroom;
- availability of additional functions: hydromassage, bath, tropical shower, radio, lighting, etc.
The shower cabin is designed for receiving water procedures.
For convenience and saving space, the cabin is often equipped with an internal mirror, shelves or stands for hygiene items, a soap dispenser, and hooks for towels and bathrobes. The set of accessories depends on the model.
Shower corners
A shower corner is a simplified version of a cabin. It differs in that it does not have back panels - the sliding curtain door is mounted directly to the bathroom walls. Advantages of a corner compared to a cabin:
- low price;
- compactness and ergonomics;
- ease of installation;
- ease of cleaning and maintenance.
A shower corner is a simplified system consisting of glass walls.
Disadvantages of a corner shower:
- less strength and reliability;
- lack of tightness: adjacent walls are constantly located inside the shower, and therefore require additional finishing to protect them from heat and moisture;
- Possibility of installation only in the corner of the bathroom;
- lack of additional functions.
A shower corner is a cheaper and more compact option, which is perfect for arranging a bathroom on a budget, for example, in a Khrushchev-era building for temporary residence.
Color solutions for a bathroom in Khrushchev
The visual perception of the room will depend on the correctly chosen design. For small bathrooms, it is worth taking a closer look at solutions such as minimalism or modernism.
Soft colors with simple shapes increase the space without overloading it with unnecessary details. Classic designs with decorative elements, bright colors and wooden furniture are more suitable for large bathrooms.
After completing the bathroom renovation, multi-colored rugs, towels, bottles and tubes will appear there. During the construction phase, these colors should be taken into account.
But within 3 square meters. m are allowed to use a maximum of 2 colors. Many will argue that this bathroom design is very boring, however, with a carefully done renovation, even a monotonous design looks great.
White
For the bathroom, colors that are close to light are suitable. Usually they are already present due to the plumbing and ceiling, so, one way or another, they will look advantageous together with other shades.
Advantages:
- When washing in the sink or taking a shower, drops form on all possible surfaces. After drying, such stains are not very visible on light-colored furniture.
- Black tiles are expensive and hard to find. And there are many white tile options in any hardware store and their price is significantly lower.
The second color for the bathroom is chosen from light gray, beige, blue, and bright shades, however, it is worth remembering one trick: the more saturated the second color, the more white there should be in the room.
Conversely, the less contrasting the accent color, the more it can be used in the design of the room. Such a bathroom will look harmonious and stylish.
Multi-colored tiles
Creating combinations of all kinds of tiles on the walls of the bathroom is a bad idea. Such solutions are suitable exclusively for large bathrooms, but not for Khrushchev-era buildings.
Expert opinion
Olga Kovalenko
Since 2010 I have been engaged in interior design and architectural design.
The use of different tiles in the bathroom is allowed only to delimit zones, and not for decoration.
It is enough to adhere to the rule that only 1 type of tile is allowed on 1 wall. The only exception is the horizontal division of a room using two different types. However, there should be no transitions or curbs.
Decorative tiles are not used in the bathroom. Such elements are very mediocre and create “visual garbage”. It is better to resist the desire to decorate the room with such tiles, as this will spoil its design.
Ceramic tile
Tile is a good material for a homemade shower cabin; it meets all operating requirements. Tiles come in many colors and sizes.
To create a shower from ceramic tiles, you can use a tray, or when laying out the tiles, make a slope directly into the floor.
Bathroom finishing
The bathroom is a place where a person carries out hygiene procedures every day, and, therefore, cleanliness and neatness here are already perceived as beauty on a subconscious level.
Therefore, before cladding and choosing a design, technical nuances are first decided.
Plaster
There is no need to skimp on plaster. Residents of Khrushchev apartments know firsthand how crooked the walls are in the rooms. Irregularities occur in all planes, and in the worst case they have bumps or depressions. The corners don't live up to the name as they are actually rounded.
This creates a particular problem for bathrooms, where the walls have to be tiled and a sink with a shower stall attached to them. As a result, due to these irregularities, it is impossible to lay the tiles correctly, and plumbing installed with gaps spoils the design.
Previously, this problem was solved by installing a nondescript baseboard along the edges of the bathtub, which is unacceptable in modern design.
Typically, waterproof or facade plaster is used to decorate bathroom walls. Visually, the room will be slightly smaller, but if the goal is to create a high-quality design, then there are no other options.
Gaps
When decorating a bathroom in limited conditions, it is necessary to strive for a monolithic interior. The absence of gaps creates a clean and tidy environment, which is important in a room where objects are located close to each other.
The minimum set of design changes means that the bathtub is covered with tiles, a cabinet is mounted on the wall, and the sink is installed on top of the countertop. To avoid overloading the sink, a glass with toothpaste and a brush is attached to the wall.
Modern bathroom designs do not use floor-mounted toilets. Wall-mounted options with installations are preferable in all cases. Hanging models are more expensive, so finding a cheap option will take time. However, as practice shows, even the most budget option is better than the floor-standing one.
Ventilation
The problem with bathrooms in Khrushchev-era buildings is ventilation, which causes fungus to form on the walls. The fact is that previously most windows were wooden, seals were not used, and there were huge gaps under the doors.
This allowed air to circulate in the bathroom, and the mold problem was not as severe. Modern sealed windows and doors have eliminated drafts, but the fungus has increased.
The standard layout allows 2 types of ventilation:
- ventilation duct;
- wall fan.
Walls
In order to avoid frequently having to renovate your bathroom, you should immediately abandon materials that do not withstand humidity well. These include wallpaper and non-waterproof plaster. Plastic panels and tiles would be much preferable for the bathroom.
They cope well with constant condensation, dampness and temperature changes. You can also hide protruding pipes behind the panels that spoil the interior.
Tiles are also used for finishing rooms with high humidity. Unlike panels, it is less vulnerable to mechanical damage and gives more scope for experimenting with design. The shape of the tiles is mosaic, square and rectangular.
Ceiling
To finish the ceiling, it will be most convenient to use waterproof acrylic paint or plastic lining. Nevertheless, stretch ceilings remain the preferred option for the bathroom, in terms of design and practicality.
In addition to their attractive appearance, they create the illusion of a high room, full of light and air. In addition, this design will help protect the bathroom from flooding from above.
Floor
To finish the floor in the bathroom, choose ceramic or porcelain tiles. The solution is not bad, but it is increasingly being replaced by self-leveling coatings made from polymer mixtures. Such floors are more waterproof and wear-resistant.
They are also easy to clean, however, and the cost of such a solution is much higher. It is advisable to choose the color of the floor a couple of tones darker than the walls, which also visually increases the height and ennobles the design.
Stages of repair work - step by step
This section of the article will discuss the stages of repair work with a brief description of their implementation. After studying this information, you can determine whether you can reconstruct the premises yourself, or whether it is better to invite professionals.
So, a few words need to be said about the features of bathrooms in houses built by Khrushchev, which have not been subject to redevelopment or major repairs for a long time, sometimes even since the start of their operation.
A bathroom in a Khrushchev building may have this original appearance. And this is not the most terrible thing you’ll ever encounter...
As a rule, the walls of the room are still covered with Soviet-era tiles, the surface of which is covered with small cracks and chips, and some finishing elements have completely fallen off. The towel dryer is an ordinary steel pipe, bent into a U-shaped loop, which is connected to the riser with unsightly welds that often leak.
Do you need this window? Considering it as an “escape route” is ridiculous, and there is no saving on lighting, given the current variety of LED devices.
The wall separating the bathroom and the kitchen area is equipped with the notorious, incomprehensibly necessary window, which many owners previously covered with frosted film or, after removing the glass, covered the opening with plywood.
Pipes can be scary to touch - often with the slightest effort they simply crumble into dust
As a rule, water supply and sewerage pipes look horrifying. Sometimes, when dismantling them, they simply fall apart in your hands, since during operation their internal parts have become thinner due to corrosion and have lost all strength.
The plaster of the walls, especially in their lower part, under the constant influence of moisture, lost its strength and began to peel off and crumble, so dirt constantly appears on the floor in the form of a cement-sandy wet mass.
If the bathroom is in this condition, then a major overhaul is simply necessary. In order to save money, repair work can be done with your own hands by selecting materials with affordable prices, which are abundant in construction stores today.
| Illustration | Brief description of the operations performed |
| Bathroom renovation begins with shutting off the water supply. Then comes the rather dirty and hard work of freeing the space from worn-out plumbing accessories. The dismantled bathtub, toilet and sink are removed from the room and usually melted once into scrap, otherwise other work will be very difficult. | |
| The next step is to clean the surfaces of the walls and floors from old tiles or other decorative coverings. The tiles are easily removed using a hammer drill, into which a special chisel attachment is installed. There is no such tool - you can remove it manually. Usually this stage of work does not cause difficulties and goes quickly. True, there will be plenty of garbage, and so will the hard work of transporting it to a landfill. | |
| If you plan to level the walls using ordinary “wet” plaster, then after removing the decorative coating, it is recommended to apply notches on the surface. Most often, notches are made using an ax. The old coating, as well as debris generated during the application of notches, should be immediately removed from the room, since deposits of bags will become a serious obstacle to the further process of arranging the bathroom. | |
| Next, the water and sewer pipes are dismantled. Quite often, after assessing the condition of the main sewer section, it is necessary to remove it completely. To carry out this work, you will have to make peace and come to an agreement with the lower and upper neighbors, since the new pipe will need to be cut into the common house main, and the connection of the riser elements, as a rule, is located just below the ceiling surface or 200÷250 mm above the floor. When a pipe is removed, a through hole will necessarily form in the floor slab, which will subsequently need to be sealed. In any case, it is best to change the entire riser at once. | |
| If the hole turns out to be wide, then after installing the pipe, installing the formwork below, you will have to fill it with concrete mortar. Small gaps remaining around the pipe can be easily filled with foam. It is important to correctly calculate the installation height of the tee in the new riser, with the help of which the toilet and drain pipe will be connected to it - the line from the bathroom, sink and kitchen sink. | |
| The next step is to replace the water pipes. The old wiring is completely removed and a new one is installed, for which metal-plastic or polypropylene pipes are most often used. | |
| If you plan to hide all the “beauty” of the wiring, then grooves are cut into the wall, in which the pipes will be hidden. It is necessary to deepen the pipes so much that their outer side is located at least flush with the main surface of the wall. If in the future the surface is planned to be leveled with plasterboard sheets, then when cutting channels for installing pipes, it is necessary to take into account the thickness of this “dry plaster” (12 mm), that is, the grooves should not be made too deep. The process of replacing any pipes is quite complicated for a beginner, and if there is no experience in plumbing installation, then it would be better to invite an experienced specialist who will make a reliable tight connection of both the sewer riser section and the water supply pipes. | |
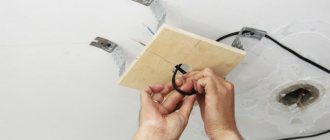
| If you plan to install a washing machine in the bathroom, or simply increase the number of sockets by distributing them in different places, then for installation of wiring in the surfaces of the walls and ceiling, grooves are also installed. You won’t have to scratch the floor slab if the design includes a suspended ceiling that will hide all the unsightly electrical wiring. For fire safety purposes, all electrical cables should be enclosed in a special corrugated insulating tube. | |
| Before moving on to the next stage of work, the surfaces of the room should be strengthened with a deep penetration primer with an antiseptic effect. The composition is applied using a roller in two and sometimes three layers, each of which requires good drying. Well, if old spots of mold are clearly visible on the walls, then you will have to first carry out “treatment” with potent compounds, then thoroughly clean these spots, and then perform priming. | |
| If the bathroom walls are in poor condition, you will have to work on them, leveling them with plaster or “dry plaster” (plasterboard). If you choose the simpler, second option, then you must choose exclusively moisture-resistant drywall and attach it directly to the wall using a special mounting adhesive. Some craftsmen use polyurethane foam with a low expansion coefficient to fix sheets. The use of this technology for installing drywall is possible if the unevenness of the walls is no more than 20 ÷ 30 mm. | |
| When leveling the walls, a box is usually immediately installed to cover the vertically located riser pipes. If the communication lines are already located in a niche, then it is also recommended to cover it with plasterboard, securing it flush with the main surface of the wall. | |
| To install a plasterboard box, you will need to install a frame structure made of galvanized metal profile around the riser pipes. When installing it, do not forget to provide a special inspection window - for access to water meters and taps that shut off the water supply. | |
| Leveled walls (whether with plasterboard or ordinary plaster) should be primed well again. In order not to waste time, the primer can be applied to the surface before installing the suspended ceiling frame. | |
| While the walls are being prepared for further finishing, you can start installing the frame sheathing for the suspended ceiling. The frame can be made from 30×40 mm timber or galvanized metal profile. Here it is necessary to take into account that the profile will be cheaper, but it is easier to attach the panel ceiling to the wooden elements of the sheathing. Using the frame, you can not only disguise electrical wiring, but also level the surface of the ceiling if it is not level enough. Therefore, before you start fixing it, it is necessary to make markings on the walls and mark lines along them, which will also become the top level for wall cladding. Some craftsmen prefer to finish the walls first and then install the ceiling. In this case, the sequence does not matter much, since the junction of the vertical and horizontal surfaces will be covered with a decorative corner or ceiling plinth. | |
| The next step is leveling the floor. Before starting this work, the floors should also be primed with a composition, best of all, that has the effect of penetrating waterproofing. When the soil dries, a damper tape is placed around the entire perimeter of the room, at the junction of the floor and walls, the width of which should be 25÷30 mm greater than the thickness of the future leveling screed. This material is designed to compensate for the required space for the frozen solution during its thermal expansion. If the floors are relatively flat, then a self-leveling floor with a waterproofing effect can be used to level the floor. | |
| If a steel bathtub was purchased for installation for reasons of economy, then while the self-leveling self-leveling floor dries, you can work on improving its characteristics. In order for the water drawn into the metal bath to maintain a high temperature for a long time, and also to reduce the noise level from the water drawn into it, polyurethane foam having an average expansion coefficient is applied to the outside. Applying this layer is not difficult; it will slightly increase the weight of the product, but will add comfort during its use. | |
| When the screed has dried and is ready for tiling, markings for laying tiles are applied to its surface. It is better to start installing this material from the door of the room, this way you will be able to avoid a large number of cut elements that will be in plain sight. For floor tiling, it is recommended to use floor tiles with a textured surface, as they are safer for the bathroom - not so slippery when wet. The joints between large tiles should be 5÷7 mm wide. Maintaining a uniform thickness of the joints is achieved by installing special plastic calibrator crosses between the ceramic products, or special elements of tile leveling systems. | |
| The period of hardening of the tile adhesive before movement on the coating is possible is indicated by the manufacturer on the packaging. After waiting this time, you can proceed to grouting the joints between the tiles. The joints are filled with a composition specially designed for this purpose, which, when hardened, guarantees waterproofing of the coating. The grout usually takes about a day to dry. After which you can move on to wall cladding, which can also be made with ceramic tiles or PVC panels. | |
| Before you start finishing the wall, you need to mark it, determining the height of the bathtub - this will be the line from which the cladding of vertical surfaces usually begins. Better yet, the seam should be approximately 20-30 mm below the level of the bathroom - then it will not constantly get wet. Very often, in order to save money on the walls hidden by the bathroom, owners do not lay tiles at all, although experienced craftsmen strongly recommend doing so. For example, you can use old finishing material for this purpose, even if it has an unpresentable appearance. This is not scary - it will have not so much a decorative as a protective function. | |
| To simplify the task, a guide profile is fixed along the broken line, on which the first row of tiles will rest. It is clear that the guide is fixed temporarily, and it is removed after the glue under the tiles on the top of the wall has completely hardened. | |
| Laying tiles usually starts from the corner of the bathroom that first catches your eye when entering the room. To determine whether it will be possible to lay out a row of whole tiles, they should be placed on a guide, observing equal seams, the width of which should be 1.5 ÷ 2 mm. however, all this can be calculated in advance on the diagram. | |
| If the row will consist not only of solid tiles, but also cut ones, then it is better to place them in a less noticeable area of the wall. | |
| It happens that you can do without cutting tiles by using decorative inserts of the required width. But this should also be thought out in advance, and not spontaneously during installation. | |
| Laying is carried out using tile adhesive, which is applied to the walls (some prefer - to the tiles) and spread with a notched trowel. Having tiled the front wall, you can proceed to laying tiles on the side surfaces, also starting work from the corner. We won’t talk much about this, since a separate, very detailed article on our portal is devoted to the process of laying tiles on the walls in the bathroom. | |
| Due to inexperience, it can be quite difficult to cut round holes in tiles for sockets and pipe penetrations. How to properly cut tiles and drill holes in them is described in detail in the article on our website dedicated to this topic. | |
| The opening for the inspection window is closed with a special door that has a reliable frame and an easy-to-open flap. This part can be “planted” using “liquid nails” glue. At this stage you can install sockets. | |
| The next step in the example under consideration is to cover the frame of the suspended ceiling with PVC panels. The joint between the tiles and the panels can be arranged in two ways - by attaching a starting profile around the perimeter of the sheathing, into which the edges of the panels are pushed, or after fixing the lining, a decorative plastic corner or plinth is secured to the joint using “liquid nails”. Before installing the panels into which the lighting fixtures will be built, markings are made on them, and holes of the required size are cut along them. They can be cut with a knife or an electric drill with a “crown” attachment of the required diameter. | |
| After the glue and grout of the cladding have completely dried, all plumbing accessories are installed and connected to the water and sewer lines. The bathtub takes its place first, as there is still work to be done on it, closing the unsightly space below. This work also begins with marking. On the surface of the floor, under the outer edge of the bathtub, a line is cut along which the guide profile is mounted. Then vertical posts are fixed to the opposite walls, which are installed in a metal profile at the bottom of the frame being created. | |
| Next, the resulting structure is covered with an upper horizontal profile, after which the sheathing is strengthened with additional three to four vertical posts. Additionally, they can be connected to each other with a middle profile attached to the racks from the inside. Instead of metal profiles, a wooden beam treated with an antiseptic can be used to create the frame. | |
| In this version, an inspection window is provided in the bathtub casing to monitor the siphon. If you plan to arrange such an opening, then it must be provided for at the stage of creating the frame. | |
| OLYMPUS DIGITAL CAMERA | The finished frame is covered with moisture-resistant plasterboard, which is attached to the profiles using metal screws. After which the surface of the skin is coated with a primer and dried. |
| The final stage of laying the tiles is to cover the plasterboard screen under the bathtub. | |
| When the screen is equipped, all that remains is to install the toilet, securing it to the floor with special fasteners that come with the product, and at the same time connecting it to the sewer. Then it is necessary to install the sink, connect faucets, cistern and other plumbing equipment. A mirror, hangers and other necessary accessories are hung. | |
| A towel dryer is connected to the hot water supply pipes exposed on the wall surface, which is hung on specially fixed brackets on the wall. You can also learn how to properly connect a heated towel rail in the bathroom |
* * * * * * *
Based on the information presented, you can try your hand at construction and carry out many stages of the work yourself. Detailed instructions on almost all construction and finishing operations can be found on our portal.
As a result, the “shabby” bathroom in the old Khrushchev building will acquire “new youth”.
And, traditionally, at the end of the publication - a short video showing another option for renovating a bathroom in a Khrushchev-era building.
Proper lighting in the bathroom
The standard layout of a Khrushchev-era bathroom did not include windows, so the problem with daylight is solved by using artificial lighting fixtures.
The use of ceiling lamps remains widespread, which designers today recommend abandoning. Instead, multi-level lighting is much preferable. With its help, the walls “move apart” and the space visually expands.
By installing special switches, you can also adjust the light brightness. Thus, in the morning, by setting the maximum power, you can help the body awaken, and in the evening, with dim light, set yourself up for rest.
You can select several zones even in the smallest bathroom. The main thing is that all lighting solutions are also supported by functional necessity, and not just design.
The most popular lighting options:
- Lamps above each plumbing fixture. An easy way to highlight different areas.
- Highlighting technology with light. Lanterns are located absolutely anywhere in the bathroom.
- Several sources on the ceiling, aimed at the desired areas.
It is imperative to highlight the area of the bathroom near the mirror, without using too bright and blinding lamps. The lamp should be directed at the face of the beholder and not be reflected in the mirror. For this, lampshades with frosted glass are used, which gives a pleasant diffused light.
The spectrum of lamps in the bathroom should be as close as possible to natural light
Ceiling structures
This is the most popular category of devices, of different shapes and sizes. There are 2 models: suspended and near-surface. For a bathroom in a Khrushchev-era building, the second option is better suited.
Recessed lamps also deserve special attention, since they can be installed on the ceiling at different points.
Some models allow you to change the angle and distribute the light differently. You can also adjust the brightness of the room by routing the wiring to different buttons.
Wall lights
There are 3 types of wall lights.
- Near-surface. Structures that fit tightly to the wall.
- Sconce. They are mounted in the bathroom using a bracket, on top of which a decorative lampshade is installed.
- Hanging. They are various bowls on mounts.
There is also the option of floor lamps, but for bathrooms in Khrushchev-era buildings it makes no sense to consider them, as they take up a lot of space. In fact, these are ordinary floor lamps with various lampshades.
Shower doors
If the cabin is rectangular, everything is solved more or less simply: the rectangle can be cut out of glass in the workshop. There are many canopies for glass doors, you can choose the one that is more convenient for your case. Just order doors with canopies: you will have to drill holes for them, and it is best to try them on.
It is advisable to take tempered glass. Even if it breaks, it will be into small fragments with blunt edges that are difficult to injure. But, most likely, the fragments will remain hanging on the film. The downside of this glass is that it is expensive. To save money, you can order a regular thick one - 5-6 mm, and at home cover it on both sides with a translucent polymer film. You will have to tinker, but the effect will be almost the same as with tempered glass: the fragments will be on the film.
The simplest, but most expensive option is to install glass doors in a homemade shower stall
One point: the glass is washed before applying the film, then degreased. The film is glued to wet glass. This makes it easier to expel air bubbles, and you can also move the film for a while.
If you don’t want glass doors, but need translucent ones, you can make them from polycarbonate, but not cellular, but sheet. You will have to find a suitable furniture profile, make a frame out of it, and put polycarbonate into the frame with sealant. For reliability, you can also attach it through with screws and washers.
Another option is to buy ready-made doors. There are also glass ones specifically for cabins, or you can use plastic folding “accordion” ones, as in the video.
Placement of furniture, appliances and accessories
The limited space of the Khrushchev-era building makes it difficult to make the bathroom design fully comfortable and functional.
On an area of 3 sq. m need to be placed:
- bath or shower;
- sink;
- toilet;
- locker;
- washing machine.
At the same time, all these items should look harmonious and be easily accessible. In order to achieve convenience, you have to use non-trivial solutions and pay more attention to details.
Sink and toilet
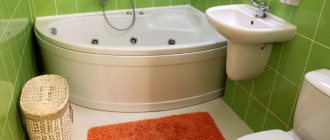
Proper bathroom fixtures should be convenient and not take up much space. Corner sinks and bathtubs are perfect for this. In this way, areas of the bathroom that are usually empty are used and expand the space for maneuvers.
The toilet, as mentioned earlier, it is advisable to choose a wall-hung one. The best option would be a corner model with a vertical drain system.
Washing machine
Since in Khrushchev-era apartments there is usually little extra space in the kitchen or hallway, a bathroom with a washing machine is the most logical solution.
Despite the limited space of the bathroom, it must be positioned so that the useful part of the wall on top does not remain empty.
Among the options are the following:
- under the sink;
- in the corner near the shower stall.
For a bathroom, the best option would be to install a washing machine under the sink. If for some reason this is not possible, then it is installed in a corner, with shelves for various utensils placed on top.
Cabinets and shelves
Clutter can ruin any bathroom design, even the most original one. The problem is especially typical for Khrushchev houses, where there are not very many places to store things.
If instead of a cabinet under the washbasin there is a washing machine, then the only possible solution for arranging all kinds of utensils is to install a small wall cabinet above the bowl.
Models made of white gloss look especially good in the bathroom, which are not difficult to find.
Showers with drain
Arranging a ladder in a Khrushchev-era building requires a special approach: the age of the screed and floors requires special care when waterproofing. But with it, the design of a small bathroom becomes truly “solid.”
When arranging your bathroom, don't hesitate to experiment with color and light. The combination of dark black tiles with patterns in contrast with white looks very interesting. In this case, competent planning made it possible to place everything necessary. On the left is a mirror with a sink and a washing machine. A Hansgrohe shower with a drain and a simple curtain took its place in the corner. On the right is the toilet and boiler.
When arranging a shower corner with a drain, analyze how necessary hard doors are, since they visually conceal the space. In some cases, a regular curtain will be much cheaper, no less effective, and at the same time a small bath will appear larger
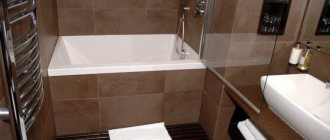
And this is a bathroom of 1.9 sq.m. A shower stall with a low tray is located in the corner. Its dimensions are 90x90 cm. With this layout, there was no longer room for a washing machine.
Here the owners filled the shower tray themselves. Cement, sand, bricks. The borders are made of blocks. Next is a triple layer of waterproofing. All work took approximately three days. The size of the cabin was 80x80 cm. On the walls there are Glamor tiles from Keramin. The size of the bathroom is traditionally small for Khrushchev - only 150x140 cm.
As the owners of this shower with a drain say, there are no problems with its operation. Water does not splash or leak. There is also no mold.
Often, when arranging a shower corner in a Khrushchev-era building, mosaic is chosen as a wall finishing material. If the walls are left plain, then the ladder and beautiful glass doors become the main element of the interior.
Real examples of good design (with photos)
You can find a huge number of good bathroom design options online. We invite you to familiarize yourself with the most successful of them, which will allow you to gain inspiration and gain new ideas.
Khrushchev Bathroom: 75 Photo Ideas inside Bath In Khrushchev - Gooblogs
Choosing an interior style
It looks like what kind of style can we talk about 2.5-3 square meters? And it is the coherence of all the details in one ensemble that will make the bathroom interior in Khrushchevka truly comfortable and aesthetically pleasing.
Modern style bathroom
The simplicity and functionality inherent in modern style are perfect for arranging a small bathroom. The combination of smooth and unpainted surfaces, mirror and matte textures, innovative materials and convenient plumbing will turn a former Soviet bathroom into a comfortable spa.
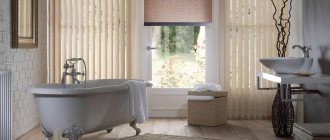
Classic style bathroom
Khrushchev bathroom decor in a classic style is an ideal choice for connoisseurs of luxury. A bright, warm palette will give the room a special delicate shine, and golden-beige accents on a creamy background will give a feeling of sublime harmony.
Bathroom in Provence style
The gentle spring Provençal style will undoubtedly appeal to romantics. The style is characterized by soft pastel colors, small floral patterns and antique furniture. Overall it creates a feeling of airiness and rustic simplicity.
Bathroom in minimalist style
Achromatic colors, clear lines, neat shapes and a lack of decoration distinguish the minimalist style from others. With such an interior, a bathroom in Khrushchev will always look clean and spacious.
Scandinavian style bathroom
Northern European design is all about winter colors and natural textures. Colors used: snow white, clear ice, stone grey, dark blue, black and bleached wood.
In a Scandinavian style bathroom, patchwork tiles with ethnic patterns, monochrome diamonds, and other geometric patterns look beautiful.
If the bathroom is combined with a toilet
With the initial layout of an apartment with a combined bathroom, or in a situation where the owners themselves combined a toilet with a bathroom, removing partitions and thereby expanding the room, it is appropriate to apply a zonal division of space and pay special attention to the design of the sewer riser.
Optimal design solution:
- Use a glass partition as a dividing element, which will disappear into the interior.
- Hide the riser in a plasterboard box.
- Finish the top with tiles.
A competent approach to choosing and installing a toilet will help you free up a little extra space:
- It is better to choose a narrow product;
- it is appropriate to use a corner structure;
- The ideal solution would be to use a hanging option with installation.
High-tech and loft
You rarely see bathrooms decorated in this way in Khrushchev-era buildings: after all, they require more space and are extremely selective in what they fill. You also won’t see a lot of detail here: if any object is placed in the interior, it performs an applied function, and does not just take up space in space.
These styles are characterized by emphasized asceticism and persistent appeal to industrial themes.
The photo shows a wonderful example of using tiles that imitate aged concrete. The option is not for everyone - just like the loft itself as a whole.
Shower stall instead of bathtub
Installing a shower cabin is an effective and practical solution that will save room space and water. But don’t forget about the downsides: constantly accumulating plaque that needs to be removed, and if the shower pressure is weak, then taking a shower will become long and difficult.
For a small room, you can opt for a corner booth; for a small room, you can opt for a rectangular booth.
The types of doors include hinged, folding and sliding. The best booth size is 80*80 cm.
Bathroom interior design 2022 - 150 photos of perfect design- How to care for a cast iron bathtub
- Bathroom design 6 sq.m. with washing machine and toilet
Possible methods for expanding space
When starting construction work, it is useful to take into account all the nuances of the initial layout and possible technological techniques that will allow you to achieve an expansion of the bathroom not only visually:
- combining a bath, toilet and joining part of the hallway. With a separate bathroom, redevelopment of the bathroom really increases the bathroom by combining it with the toilet or adding some part of the hallway. This will require changing communications. After all, the water supply and drainage of the bathroom are tied to the risers, and during redevelopment, their location will need to be changed. Quite an expensive and labor-intensive process;
- re-arranging the arrangement of objects in the room. A less radical way is a compact layout of large interior items and the use of various building materials for interior decoration. The main thing is that the bathroom does not end up looking something inharmonious, so it is advisable to decorate the entire apartment in a single manner.
In both options, the arrangement of a bathroom in a Khrushchev-era building consists of a number of mandatory measures. It will be necessary to dismantle the previous covering of the walls, ceiling, old plumbing and Khrushchev-era pipes. Then, when planning finishing work, you need to take into account that in Khrushchev-era buildings the walls are very uneven. Therefore, in order to perfectly finish the surfaces, it is necessary to carefully perform plastering. The choice of plumbing fixtures, accessories, and building materials for finishing is of great importance. Here, manufacturers provide a wide field for creativity to make a miniature bathroom area functional and cozy.
Furniture
It is necessary to choose high-quality furniture that can serve you for many years. Do not forget about its functionality and the size of the bathroom, which is not able to accommodate large furniture. Below we will analyze the functionality requirements of bathroom items.
It is recommended to place the toilet 20 cm from the adjacent wall, the height of the edge is about 40-45 cm from the floor. There should be a free distance of about 20 cm between the toilet and other objects.
Washbasin - at least 20 cm from the side wall, edge height - about 80-85 cm from the floor, mixer should be fixed at a distance of 20-25 cm above the washbasin, free space above the washbasin - 100*70 cm.
The height of the bath is 55-60 cm, the tap is about 10-25 cm. The free space between the bath and washbasin should be 20 cm.
The installation height of the mixer is 100 cm, the shower head is 170-190 cm.