You may need to measure the size of your balcony door when replacing or repairing it. But few people know that these parameters are determined by GOSTs and regulations. When taking measurements yourself, it is convenient to use several techniques that allow you to perform the work no worse than a specialist from a window company. Nowadays it is possible to make a door according to individual measurements.
Apartment buildings are built according to standard designs; as a rule, standard door and window frames are installed. Manufacturers of window blocks offer products of standard sizes for sale. If a private house is being built, then the designer has much more freedom of choice. He gets the opportunity to order wooden or plastic frames according to individual sizes.
Understand the basics
How does a balcony differ from a loggia?
First of all, let's clearly separate these concepts. Both are glazed, so most people call the resulting space a balcony, although this is incorrect. And some people mistakenly believe that if you install windows on the balcony, it automatically turns into a loggia.
Balconies on the left, loggias on the right
The key difference between the two designs is that the balcony has no walls and protrudes beyond the facade, while the loggia has side walls and, on the contrary, is recessed deep into the building. In other words, outside air affects the balcony from three sides, but the loggia only from one or two, if the apartment is corner.
What result should you expect?
You can insulate both, but the final effect will vary greatly. A well-insulated loggia is no different from a room. If there is a heat source, it becomes a full-fledged living space for year-round use.
Due to the absence of solid walls, the thermal resistance of an insulated balcony is much worse - it is comfortable to stay there until late autumn at most. A sufficient level could be achieved with an additional layer of thermal insulation, but this is irrational due to the small area of the room. After insulation there will be almost no free space left.
What about glazing?
Since 25% of heat loss occurs through windows, it makes sense to insulate a loggia or balcony only if you have energy-saving windows. If wooden frames with one glass are installed, you will first have to replace them with modern ones.
Double-chamber double-glazed windows with higher thermal resistance weigh a lot, and they can only be installed on loggias. Balcony floors have weak load-bearing capacity, and it will most likely not be possible to install such windows there.
Balcony-dressing room
For larger cabinets, use walls opposite each other. If the balcony is not narrow, then an excellent option would be to install a full-fledged wardrobe. Install drawers for shoes under the window sills.
An example of placing a cabinet on a balcony
Dressing room on the balcony
TIP: If storage systems are open, it is better to store clothes in covers. This way they will not deteriorate from direct sunlight.
Dressing room on the balcony example layout
Think over the design
Before starting work, you need to decide on the type of insulation, choose the option for wall finishing and finishing flooring, and also decide how the room will be heated. All this will determine the design and the algorithm for its installation.
Insulation
Since the insulation of a balcony or loggia is done from the inside, it is important to use a vapor-tight material to avoid the formation of condensation and the appearance of fungus.
instrumentgid.ru
Extruded polystyrene foam (EPS) is best suited for this. When installed with sealing of joints, it allows you to turn the room into something like a thermos, which will retain heat well by cutting off the outside cold. At the same time, with EPS you can achieve sufficient thermal insulation, taking away a minimum of precious space from the room.
Some people consider polystyrene foam to be toxic. This is not entirely true. The material is indeed flammable and releases harmful substances when heated above 60 °C, but this does not make it dangerous, since EPS is always covered with finishing.
Wall decoration
After good insulation, any type of finishing can be applied to the loggia or balcony. Depending on the chosen coating, the technology for thermal insulation works is slightly different.
- Wooden lining, PVC or MDF panels - to attach to the wall you will need to first make a sheathing.
- Decorative plaster or putty followed by painting - this type of finish can be applied directly to the insulation.
- Wallpaper - the easiest way to glue it is on drywall attached to a wooden sheathing.
Flooring
The floor of an insulated loggia is no different from the floor of a room, so all existing finishing coatings can be used there. However, for each type you will need one or another version of the subfloor.
- Laminate, linoleum, carpet are laid on sheets of plywood, chipboard (chipboard), CSP (cement particle board) or OSB (oriented strand board) fixed over wooden joists.
- Tiles and porcelain tiles are laid on a concrete screed.
Balcony floor slabs have low load-bearing capacity, so only floors on wooden joists are allowed on them. On more durable loggia bases, in addition to this, you can also pour a screed under the tiles.
In both cases, if desired, you can equip an electric floor heating system. The only difference is that a film infrared floor is used for the construction on the joists, and a heating cable or heating mats are used for the screeds.
Heating
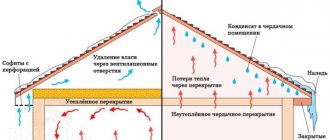
It is important to understand that insulating a balcony or loggia will only prevent the walls from freezing and slightly increase the temperature compared to the street temperature. To maintain a comfortable microclimate in winter, you cannot do without a heating source.
There are three main ways to heat a room:
- Electric underfloor heating is the most expensive and difficult to install option, but at the same time the most effective and convenient.
- Convector - a heater installed near an external wall can be turned on only on the coldest days or only when there are people in the room.
- Central heating radiator - according to the law of the Housing Code of the Russian Federation, Article 25. Types of reconstruction and redevelopment of premises in an apartment building It is prohibited to move the device to a loggia or balcony, but if the partition is removed or the door is constantly open, the battery will cope with heating even from the room.
Kinds
According to the relative position of the balcony door with the window, there are three main design options when:
- The door is located to the right of the window;
- The door is to the left of the window;
- The door is located between two windows.
Both window and door sashes can be hinged, hinged, or perform both functions. In some cases, combinations with a blind window are used - this depends on the preferences of the owner.
According to the features of application, four groups of balcony blocks can be distinguished:
- Standard – the most used option, convenient and quite budget-friendly. As a rule, plastic windows in this design are made with supply valves built into the glass unit, which allows you to regulate the air supply. A hinged door leaf is often used. The lower part of the door leaf can be made of either a plastic sandwich or a double-glazed window;
- Stalinsky - installed in old buildings with small balconies, which, due to their “age,” do not withstand glazing, so these systems have a distinctive feature of a narrow door and the absence of blind windows;
- For an insulated balcony , it usually has two windows: one solid, the other tilt-and-turn. The door also has swinging and tilting functions;
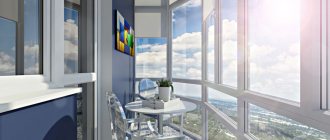
- A French window instead of a balcony block (glazing) - performed in private construction or in a new building. It is absolutely not suitable for standard high-rise buildings and panel houses due to the design features of load-bearing walls.
Based on the material used, blocks are made from aluminum or PVC profiles and from modified wood. Aluminum profiles are more expensive, and also unsuitable for open balconies due to high heat transfer.
As for modified wood, this option is suitable for a specific interior, but in certain properties it will be inferior to plastic, including in terms of cost.
Prepare surfaces
Take things out, remove shelves, hangers and other items. Clean the walls of old paint and plaster. If there are areas of fungus, remove it and thoroughly treat the areas with a special antiseptic, and then dry all surfaces thoroughly.
YouTube channel “We build for ourselves”
To prevent blowing, seal all cracks around the perimeter of the fence slab, as well as in areas adjacent to the side walls, floor and ceiling. Remove old plaster from the joints and fill them with foam.
The point is to cut off any flows of cold air from the street and make the room as airtight as possible.
Install sockets and lighting
If you plan to use the insulated space as a work office or recreation area, you must install the electrical wiring in advance. To do this, install sockets, lighting and switches in the right places.
YouTube channel “We build for ourselves”
It is better to run the cables along the internal wall adjacent to the room. It is not insulated, so all the wiring will be easy to hide inside the frame or layer of plaster. Sockets and lighting can be connected from the nearest outlet in the room. But to power the heated floor, it is advisable to run a separate cable from the distribution panel.
Balcony redevelopment
There are two options for remodeling the balcony:
- The first is to leave the balcony in its place and make repairs inside. For example, from the balcony where the winter tires are stored, make an additional seating area
- The second option is to combine the balcony with the room. If the implementation of the first idea only requires resources for finishing the balcony, then the second will also require additional costs for remodeling the room, which needs to be legalized. For example, the most common option for such redevelopment is connecting a balcony to the kitchen. Such a combination implies complete or partial dismantling of the window sill, which is prohibited in some houses.
Balcony as an extension of the living room
The algorithm is this: first you need to think over a new layout, then coordinate it with the relevant authorities (BTI, housing inspection, architecture department, Ministry of Emergency Situations, SES, etc.) and only after that make repairs.
Documents regulating redevelopment on the balcony:
SNiP 01/31/2003 Residential multi-apartment buildings
SNiP 2.01.07-85 Loads and impacts
IMPORTANT: Illiterate redevelopment can affect the structure of the entire house as a whole and make it unsafe for life.
Learn the technology of working with EPS
Expanded polystyrene is sold in the form of slabs measuring 60 × 120 cm and thicknesses from 20 to 150 mm. The sheets have an L‑shaped lock along the contour, which simplifies installation and prevents blowing through the joints.
You can attach EPS to walls in different ways. The most common is foam adhesive in cans, which is applied around the perimeter of the sheet and in the middle. Another option is to fix it in the corners and in the center with umbrella dowels with a plastic or metal core. Also, polystyrene foam is attached over the entire sheet area using adhesive mixtures for insulation.
To form a single thermal insulation contour, all junctions must be sealed. It is important to leave 10-15 mm gaps at the walls in the corners, under the ceiling and at the floor, so that you can fill them with polyurethane foam later. It is recommended to coat the joints in the locks between the plates with foam adhesive or seal them with foil tape.
YouTube channel DendenTV
The required thickness of insulation can be achieved either with one sheet or with a combination of two. In this case, the second option is even preferable, since the fragments of polystyrene foam are tightly adjacent to each other and form a single layer, and by shifting the joints between the plates, maximum protection against blowing can be achieved.
After completion of the work, you should end up with an inextricable structure, where each EPS sheet fits tightly to the adjacent one, and all joints between them in the corners, under the ceiling and near the floor are sealed with polyurethane foam.
Insulate the parapet
The fence slab borders the street and is exposed to cold air the most, so the thickness of the thermal insulation here is maximum - 80 mm. It is better to use not one 80 mm sheet, but a “pie” of slabs: 50 + 30 mm.
YouTube channel “We build for ourselves”
If dimensions allow, the wooden sheathing is mounted on top of the second layer of EPS, securing the bars with anchors or dowels directly through the insulation. When the width of the window sill is limited, the sheathing is attached to 50 mm polystyrene foam, and the second layer of insulation is laid between the frame bars.
If plaster is chosen as a finish, you can do without constructing a frame. In this case, the mixture is applied directly to the surface of the EPS. For better adhesion, the sheets must be treated with a grater or scratched with a regular hacksaw.
Advantages
Block is a structural prefabricated element or product, usually factory-made, used in modern industrial construction.
Nowadays, PVC balcony blocks are clearly popular, because... Modern metal-plastic window and door systems have a number of advantageous advantages:
- Durability – a PVC balcony block with high-quality installation will last for decades;
- Sound insulation and dust resistance - helps solve a particularly “painful” issue for residents of large cities with a lot of transport, where noise and dust from busy streets bring quite a lot of trouble;
- Tightness - due to a more precise connection of the surfaces of the structure, the block practically does not allow dampness and cold to pass through, therefore, unlike its wooden counterpart, it does not require insulation;
- There is no need for frequent repairs and painting - metal-plastic does not deform due to temperature changes, is resistant to fading in the sun and remains “in shape” in any weather conditions (does not swell from rain and snow, does not crack from the sun);
- Safety – PVC blocks have special protective devices that prevent them from swinging open during ventilation or additional “locking” elements from possible opening of the door by children.
If we add to the above that PVC systems are completely environmentally friendly and incredibly aesthetic, then it will become clear why most homeowners want to replace a wooden balcony block with a metal-plastic one.
Insulate the walls
YouTube channel “We build for ourselves”
For walls, a 50 mm layer of EPS is sufficient. The work is carried out according to the same principle. If necessary, the sheets are cut to the required size with a sharp knife. To join the pieces together, an L-shaped lock is formed at their ends using the same knife.
It is better to insulate in two layers (30 + 20 mm), and attach the frame on top of the EPS. But if the window is installed without additions and the space is limited by the width of the frame, the second layer of polystyrene foam can also be laid between the frame bars.
YouTube channel "XPS TechnoNIKOL"
If you are going to plaster the walls in the future, then lathing is not needed. It is enough to secure the sheets and roughen their surface with a grater or hacksaw.
The final touch
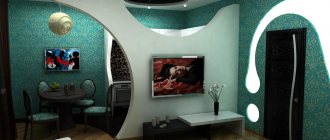
After renovation, the balcony must be furnished, and curtains must be selected for the windows. For each room, according to its purpose, you will need furniture that matches the style:
For a small room, install folding chairs, a table and cabinets.
In a narrow space, folding, wicker, and plastic furniture are suitable. Transformable furniture (two in one) will come in handy.
For a Provence-style balcony, a rocking chair, an antique-style chest of drawers and a round table will look good.
In the greenhouse you can install a rattan bench made by yourself. You can also make furniture from various materials, such as pallets.
The balcony, finished with wood or plastic, is furnished with wicker furniture; it is also suitable for non-glazed balconies.
When choosing furniture with upholstery, you should pay attention to the quality and shade of the material; light colors will quickly get dirty. The strength of the fabric is also important.
Insulate the ceiling
The ceiling borders the neighbor's apartment, not the street. Therefore, the same layer of EPS as on the walls is sufficient here - 50 mm. Laying is done according to a familiar principle. Fastening of your choice: glue-foam, dowel-umbrella, adhesive mixture. Expanded polystyrene is a very light material and is securely attached to the ceiling solely with glue.
YouTube channel “We build for ourselves”
When installing, pay attention to the height of the windows. If the frame is installed right up to the ceiling without additional profiles, then due to the thick layer of insulation, the window sashes may not open. Take into account the thickness of the sheathing and finishing so that after installation there is a gap of at least 5–7 mm to the sash.
Insulate the floor
To insulate the floor, you will need EPS with a thickness of at least 50 mm, or better yet, 80 mm in two layers. Extruded polystyrene foam has a high density and can withstand loads of up to 30 tons per square meter, so it can serve as a floor base.
YouTube channel "XPS TechnoNIKOL"
After installation on the EPS, it is enough to lay down plywood, chipboard, DSP or OSB - and on top you can lay a finishing floor covering like laminate or linoleum. When installing a heated film floor, you must first lay penofol or other heat-reflecting substrate.
YouTube channel “Vladimir Odorov”
For laying tiles or porcelain tiles, a reinforced cement screed is poured directly onto the EPS, into which, if desired, cable underfloor heating or thermomats can be installed. If the heating elements are small in thickness, they can be easily placed in a layer of adhesive when laying tiles.
The floor on a balcony or loggia is always lower than in the room, so many people prefer to bring them to the same level and remove the step. This is done using logs made of wooden beams 50 × 50 mm or 40 × 40 mm.
YouTube channel “We build for ourselves”
First, transverse logs are laid in increments of 40–60 cm and secured to the slab with anchors. Then the gaps between them are filled with insulation and foamed, and longitudinal logs with a similar pitch are attached on top and leveled. Next, a second layer of insulation filled with foam and plywood or other sheet material is laid.
What documents are needed
When contacting the authorized body, the applicant must have the following documents with him:
After all documents have been submitted, the applicant is given a receipt indicating how long the response will be ready.
No later than 45 days (unless otherwise established by the administrative regulations for the provision of services of a specific local government body), the authorized body must convey to the applicant the results of consideration of his application: approve the redevelopment or refuse.
The decision is sent to the applicant no later than 3 working days from the date of adoption.
Refusal to redevelop can be appealed in court within 3 months.
Finish
At the very end, the ceiling, walls and floor are finished. If plaster is chosen, then a reinforcing mesh is glued onto the sanded EPS surface, and then two layers of plaster and paint are applied.
YouTube channel “Vladimir Odorov”
When covering with clapboard, plastic or MDF panels, molded materials are attached to a wooden frame on the walls and ceiling.
YouTube channel “Loggias. bye"
For wallpapering, the easiest way is to cover the walls with moisture-resistant plasterboard. Use the sheathing as a frame, seal the joints between the sheets with putty and, having primed the surfaces, stick the wallpaper.
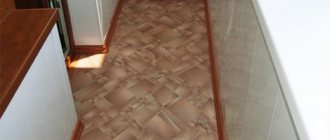
Lay the flooring
The final stage of finishing is installation of the finishing floor. Laminate or linoleum is laid on the previously prepared base. If you plan to have a warm floor, then it is installed first. Next, the baseboards are installed.
YouTube channel “We build for ourselves”
The exception is tiles. Due to wet processes during installation, it is better to install it at the stage of floor insulation and before starting to work with the walls.