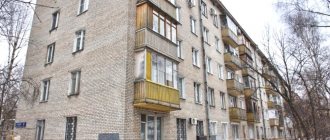
In the late 50s and until the 80s, many houses were built throughout the Soviet Union, which were popularly called “Khrushevkas”. These are 5-6-story buildings without elevators or garbage chutes, which were built mainly from reinforced concrete slabs, less often from brick. Their distinctive feature is the extremely small size of both the rooms and the kitchen and bathroom. Everyone who lives in Khrushchev-era apartments clearly understands the difficulties associated with arranging comfortable housing in such dimensions. Carrying out repairs in a Khrushchev building with your own hands often becomes a very labor-intensive and complex process. In order for the result of the renovation to be a comfortable and complete apartment, you should take into account the features of these buildings and understand that there are a number of restrictions and reservations in terms of the choice of finishing materials and methods of implementing your design solutions.
Features of the structure of Khrushchev buildings, their types
Before moving on to tips for repairs in Khrushchev-era buildings, it is necessary to outline the features of buildings that fall under this name. After all, they have in common only small dimensions, often a combined bathroom and low ceilings, but in terms of design, the differences are quite significant, which should be taken into account when planning repairs, both major and light decorative. They are also united by the period of construction - 60-80 years of the last century. At that time, a whole group of projects was developed and introduced into mass construction. Among them:
- Panel houses made of reinforced concrete panels with load-bearing longitudinal external walls;
- Houses with external brick walls, internal frame made of reinforced concrete columns;
- Panel houses made of reinforced concrete with load-bearing longitudinal and transverse walls.
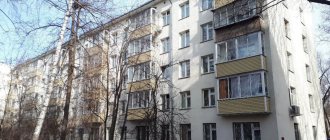
A typical building of its era in Moscow.
The main design feature is the presence inside the structure of load-bearing columns and crossbars on which the floor slabs rest. In all types of houses, floors were made using 220 mm reinforced concrete slabs with voids.
Internal partitions can vary significantly in material. Thus, in panel houses, thin walls, only 40 mm thick, made of foam concrete and gypsum concrete were most often used. Another design option was wooden partitions, which were covered with shingles and plastered.
The layout of the apartments assumes the presence of small walk-through rooms, a combined bathroom and a small kitchen, which in the best case could have an area of up to 7 m2.
Ventilation is organized centrally with air ducts leading to the kitchen and bathroom. In panel versions there are no window sills on the window openings.
Thermal insulation of external walls is in most cases insufficient. This is especially noticeable for the central and northern regions of the country.
Reinforcement of joints and finishing work
After installing the drywall, begin processing the joints. To do this, apply a thin layer of putty on them, after which reinforcing tape or sickle is pressed into it. Cover the top of the tape with another layer of putty.
After the putty has dried, the surface in this place is sanded with sandpaper. We treat the entire ceiling with a primer. After it dries, they begin finishing. There are several options for this finish:
- painting (for rooms with high humidity, acrylic latex or silicone paints are suitable; for living rooms, you can use water-based paint);
- The option of gluing wallpaper is convenient because in addition to color, you can give the product the desired texture;
- the surface is also covered with self-adhesive film to obtain a glossy coating that will visually expand the room (this option is also suitable for kitchens, because the coating is easy to clean).
After finishing is completed, lighting fixtures are installed. Spot built-in lamps have latches on the body that securely fix them to the surface of the structure. The LED strip and power supply are placed in a shelf of a plasterboard box.
Source
Major renovations in Khrushchev
The main objectives of a major overhaul should be the following:
- Ensuring sufficient thermal insulation;
- Replacement of glazing;
- Kitchen and bathroom layout with possible expansion;
- Comparison of floor levels throughout the entire apartment;
- Finishing walls and ceilings throughout the apartment;
- If necessary, remodel rooms.
Let's consider all these points in turn and outline the key points related to the structural features of Khrushchev houses.
Open the wiring
Many people don’t like the way exposed wiring looks, but in an apartment with this layout it will be the most successful option. It's all about too thin internal walls and partitions between apartments. Their thickness is so small that it is very difficult to hide the wires efficiently and safely. Interior designers recommend not to be afraid to do open wiring in your apartment, because it can always be organically integrated into the interior, the main thing is to show your imagination.
Thermal insulation in Khrushchev buildings
According to GOST requirements, wall insulation should be carried out only from the outside. This is especially important for Khrushchev-era buildings, because if you insulate them from the inside, then the reinforced concrete blocks and brick external walls will quickly begin to deteriorate, which will only worsen the situation. This all has to do with the placement of the dew point in the walls during temperature changes. Those special moments when internal insulation is permissible are not applicable for this type of house.
External thermal insulation, although it saves you from the cold, often spoils an already unsightly facade, so it is better to decide the issue of external insulation in the same style for the whole house.
From the outside, you can use any available method. Most often this is covered with polystyrene foam. In some cases, if we are talking about the first floors, it is possible to form sheathing and insulation with mineral wool. In the last decade, we can see the activity of state utility organizations, which systematically carry out major repairs of buildings built in the 60-80s and full insulation of the entire building using sheathing and mineral wool. So you should check with your housing and communal services about plans for restoration and major repairs of your home.
Read more about external thermal insulation of walls here, and about internal thermal insulation here.
Replacement of glazing in Khrushchev
The main difficulty in glazing Khrushchev-era buildings is the absence of window sills as such in most houses and the small thickness of the external walls. Particular attention should be paid to measuring the window opening before ordering windows. At the same time, immediately consider the size of the window sills and slopes.
Often the window opening from which old wooden glazing has been exposed is an uneven rectangle. So the measurements should be averaged over the smaller size. The good thing is that there is no thick layer of delay between the window frame and the edges of the window opening, so there is no need to chisel the walls in search of the edge of the base when taking measurements.
Most Russian companies with “experience” have extensive experience in glazing Khrushchev-era buildings and standard solutions for mass-produced houses. Therefore, if you choose the right contractor, there should be no problems.
Making wide window sills will not work. More precisely, it is inappropriate. The result will be too small a window sill support area on the window opening, and as its width increases, the strength of the entire structure will suffer. In addition, the circulation of warm air near the window will deteriorate, which can negatively affect new plastic windows.
Particular attention should be paid to the issue of insulating the window around the entire perimeter and under the window sill using polyurethane foam. It is best to completely dismantle old plaster slopes. The new window sill is further strengthened by laying it on a mortar bed.
Don't highlight flaws
As you already understand, the issue of the height of the walls in an apartment with such a layout is very sensitive, so their owners try to hide this drawback rather than emphasize it. In order to more or less smooth out the height of the walls, it is better to abandon high floor skirting boards and ceiling cornices, or at least paint them in the color of the walls, so the room will visually “grow”.
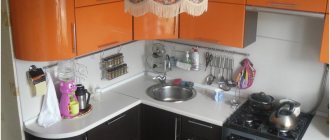
Planning and renovation in the kitchen and bathroom of the Khrushchev building
Kitchen
The main problem when renovating a kitchen in Khrushchev is the layout and choice of materials for its finishing. It all depends on the size of the room. In addition, the floors in the kitchen and bathroom differ in most Khrushchev apartments in level from the rest of the apartment. To top it off, walls made of gypsum concrete or foam concrete, as well as external reinforced concrete ones, are not straight.
In order to slightly expand the room, you can move the internal partitions of the apartment. This will take up space near the corridor or next room. The external walls and the system of columns and crossbars are load-bearing, so that the internal partitions can be demolished and moved. However, it is mandatory to formalize all changes and obtain all necessary permits. It’s better to play it safe and invite a designer who will determine for sure whether the necessary partition can be demolished. It is better to build a new kitchen wall from moisture-resistant plasterboard.
One of the most popular options for “saving” a kitchen in a Khrushchev-era building is to combine it with a room, since the non-supporting walls allow for their demolition. And from a plasterboard partition you can make additional storage space. The main thing is imagination and the presence of an “extra” room in the apartment.
The second point in the kitchen is communication. Gas pipes, water supply and sewerage are located in the most unfavorable places and most often are 5-7 cm away from the walls. The appearance of communications also leaves much to be desired. As for gas pipes, only gas services can help with this, they can move the pipes to the very corner and make the entry more civilized.
It is better to replace water supply and sewerage pipes with plastic ones and lay them as close to the floor as possible. Only in some houses can you afford to hide pipes in the wall, thereby facilitating the process of installing a kitchen wall.
Suitable materials for wall decoration include:
- Tile;
- Painting;
- Wallpaper.
It is undesirable to form stucco molding or decorative skirting boards at the border between the ceiling and walls. This will only visually reduce the already tiny kitchen.
An excellent solution for a kitchen in Khrushchev is a countertop-window sill and cabinets along the window.
Don’t try to “shove” a huge table into a small room - don’t be lazy and look for original solutions in furniture stores.
Folding furniture can be an irreplaceable solution. If you have a large family and little space, you can hang not one, but a couple of folding tables.
And of course, in a small kitchen you need to use the walls as much as possible for storage, maybe then there will be at least a little free space left in it. This is best learned from Scandinavian designers.
Bathroom
It is imperative to accompany the renovation of a bathroom in a Khrushchev building by replacing the waterproofing. It is better to replace drains and sewer outlets with plastic. However, there is no need to save money. You should contact the neighbors on the riser and carry out work on the riser centrally. If this option does not work, then replace the pipes with the plastic-to-metal transitions leading out to the neighbors. By doing this you can protect yourself from breakdown of the remaining pieces of old pipes in the ceilings.
Video: example of renovation of a combined bathroom in a Khrushchev building
Advice: For such small bathrooms as in Khrushchev-era apartments, options such as a corner bathtub or a sink with a low profile, under which the washing machine is located, are better suited.
Installation of a metal frame
The installation of suspended plasterboard ceilings begins with the installation of guide profiles. The work sequence is as follows:
- On the walls of the room, we drill holes for dowels in increments of 20 cm. After this, we screw the guide profile.
- Next, we install the suspensions on the ceiling.
- After this, we insert the ceiling element into the guide strips on the walls and fix it with self-tapping screws.
- We fix the edges of the suspensions to the ceiling profiles using self-tapping screws, aligning all the elements in one plane. To facilitate horizontal alignment, we stretch a cord between the guide profiles.
- We install the jumpers in the ceiling profiles and fasten them with self-tapping screws.
- We lay the wiring under the lighting fixtures.
To connect several ceiling profiles in one plane when creating a podium, we use cross-shaped connectors and anchor suspensions. To bend the profile to form a curved edge of the podium, we make cuts on the shelves of the ceiling strip and bend it along a given radius. The steeper the radius, the thicker the cuts we make.
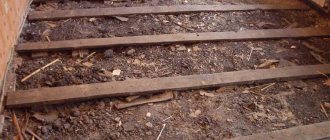
Leveling the floors throughout the entire Khrushchev apartment
Often in Khrushchev-era apartments, the floors in the kitchen and bathroom are designed differently than in the rest of the apartment. In the kitchen and bathroom a screed is formed, and in the rooms there is a wooden floor made of boards or parquet on the joists. The option with a screed in rooms is somewhat less common, only it differs in level. Due to the thin thickness of the floors and the use of joists and wooden flooring, sound insulation between floors is as poor as through internal partitions. Due to the long service life of buildings, which were designed for 25, maximum 50 years, Khrushchev-era buildings often exhibit problems associated with waterproofing problems.
When renovating floors, several problems must be solved:
- Bring all floors to one level or create adequate transitions;
- Restore or completely replace the waterproofing layer in the kitchen and bathroom;
- Provide insulation and soundproofing of floors throughout the apartment.
Actually, all work is carried out in accordance with generally accepted rules and instructions. Just keep in mind that a thick layer of screed cannot be formed due to the large resulting load on the floors; they are not designed for this. Insulation from dense polystyrene foam 2-5 cm thick and the formation of a thin screed or self-leveling floors are best suited.
Wait for the sewer
If the cast-iron riser in the Khrushchev is still more or less suitable, then do not rush to change it. First of all, examine its condition to see if there is any corrosion or leakage. If the result is satisfactory, abandon the idea of replacing the pipes. Firstly, this is not an easy job, for which it is better to turn to a professional for help. And secondly, you will still have to coordinate repair work with the management company.
Finishing walls and ceilings in Khrushchev-era buildings
The difficulty of finishing in Khrushchev-era buildings lies in the extremely small thickness of the partitions. As mentioned above, the partitions here are made of gypsum concrete, foam concrete or wood. Due to the differences between these materials, the features of their finishing and restoration are also different.
Wooden partitions are formed with shingle upholstery and plastering. Such walls are subject to deformation, and it is very difficult to avoid the formation of cracks, even after professional repairs. Any renovation of a room in a Khrushchev-era building should begin with strengthening the walls along the edges using metal corners. Afterwards they can be plastered using reinforcing mesh. Suitable finishing materials include thick wallpaper, cork and cork wallpaper, painting or decorative plaster. The main thing is that the finishing layer does not exceed 1-2 cm. After all, with small rooms, you should not waste a single extra square centimeter of space. So any type of sheathing that is mounted on the sheathing is unacceptable.
Partitions made of foam concrete and gypsum concrete are easy to finish. They are practically not deformed and are quite durable. The main problem is to equalize them. It is unlikely that it will be possible to use a productive method with beacons, and it will again take up too much space. So you have to tinker with leveling the walls using several layers of starting putty in those places where deep differences are found. Several layers are necessary, because with a putty layer thickness of 2-3 mm, shrinkage of the solution during hardening is already noticeable and it may crack.
Another option would be to either cover the walls with thin plasterboard sheets, or completely replace the partitions with plasterboard mounted on a profile frame. The latter option will immediately solve another pressing problem of Khrushchev-era buildings, namely the difficulty in wiring electrical wires and installing sockets and switches.
If you need to drill a socket for a socket or switch, you must do this with extreme care and precision. The thickness of the partitions is so small that you can easily make a through hole into the next room or even neighbors. When using special attachments, it is necessary to use a limiter on the drill in order to drill to a strictly defined depth.
Important: Do not tap walls for wiring using a hammer drill or impact drill. It is best to use a grinder with circles on concrete. This is the only way to guarantee the safety of the thin partition.
The ceilings in Khrushchev-era buildings, just like the walls, are not even. The joints between the slabs are most often very clearly visible and sometimes the differences can reach 2 centimeters. To bring the ceiling to one level, you can only offer the simplest form of a suspended ceiling. In this case, the profile frame is attached without suspensions directly to the ceiling using special holders in the form of perforated strips.
Sheathing with plasterboard
Next, the assembly of the suspended plasterboard ceiling is carried out using gypsum plasterboard. We first install whole sheets of drywall on the metal frame. All joints of the material must be on the ceiling profiles. If necessary, cut the product to the required size.
First, we hem the bottom part of the box or podium, not forgetting to cut holes in the sheet for mounting the lamps. After this, we sew up the side of the box or podium. If you are cutting sheets of drywall, use a plane to make a chamfer on the cut for puttying and reinforcing the joints.
Important! We fasten the gypsum boards with self-tapping screws, which we install in increments of 150 mm. To bend the sheet, we go over it with a needle roller and moisten it a little with water.
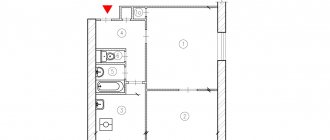
Redevelopment of Khrushchev
By their design, Khrushchev houses are based on load-bearing external walls and a system of columns. This makes it a little easier to approach the issue of redevelopment. Almost all partitions inside the apartment are not supporting and can be dismantled. This allows you to expand or combine rooms to create larger spaces. As a result, you can convert an ordinary three-room Khrushchev apartment into a normal full-size two-room apartment. In another option, you can expand the main room, which will be used as a living room or hall at the expense of the bedroom.
Tip: To understand how to remodel your apartment, find its passport with a plan on top or draw a diagram of it on paper. When thinking about changes, forget that it is your apartment in the picture and don’t think about the complexity of the redevelopment - this is the only way to come up with an interesting option. And the result of fantasies is to “stretch” your technical and financial capabilities.
An option for redevelopment of a 2-room apartment, providing for the creation of a single zone from the kitchen, living room and hallway and expansion due to part of the bathroom corridor.
It is better to build new partitions using drywall. In this case, brick is of little use, since the weight of the structure will be too large. Absolutely all redevelopment work must be certified and carried out after approval and receipt of permits. First of all, this is due to the safety of the entire building as a whole. After all, if at least a few residents move the partitions, the distribution of loads on the floors and columns will radically change.
Read about the specifics of developing redevelopment projects by following the link. Information on legalizing the demolition of walls in an apartment would also be very helpful.
Replace wiring
Each apartment has a certain amount of electricity. In the case of “Khrushchev” buildings, it should not exceed 3 kW. This fact contributes to a thoughtful approach to the issue of changing wiring. Experts recommend minimizing risks by replacing standard aluminum wiring with more reliable copper wiring. In addition, in the Khrushchev it certainly wouldn’t hurt to put a separate machine on each busy line.