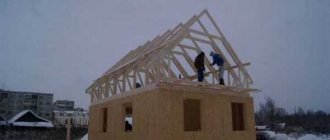
Even at the design stage of the building, it is necessary to decide on the design option for the roof truss system. However, the choice is not difficult. If there is an internal main partition wall, layered rafters are used to form the roof. If there are no such partitions, then hanging rafters are installed, which rest solely on the external walls.
Hanging rafters are used in the construction of single-bay houses, industrial buildings, workshops, trade pavilions, and in the construction of attics without internal walls.
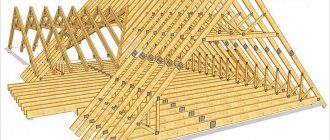
Structural elements of a layered rafter system
Attic
The attic is a space surrounded by the ceiling of the last floor and the lower level of the rafter system. For layered rafters, this is the level of laying the rafter beam.
Mauerlat or rafter beam
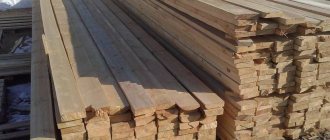
These are the structural elements on which the rafter legs rest. Timbers (less often boards) are made laid on top of the outer walls of the house. Their task is to accept and evenly distribute the load of the rafter system along the walls. The second purpose is to prevent the rafter legs from rotting.
The Mauerlat is made (mostly) from timber 160 by 140 (170) mm. The mauerlat is usually laid on supporting walls. If the walls of the house are made of fragile materials, then the rafter beams are laid around the entire perimeter of the house. The same assembly is chosen for frequent installation of rafters.
If rafters are rarely installed, then the laying of the mauerlat along the entire perimeter is replaced with short bars (short bars) 700 ± 100 mm, laid only under the rafter leg.
Worth paying attention. The rafter beam, on the one hand, distributes the load, on the other hand, protects the rafter legs from contact with the house and, as a result, from rotting, therefore, the rafter beam must be treated with an antiseptic.
In addition to antiseptic treatment, a layer of waterproofing material (for example, roofing felt) is laid on the masonry under the mauerlat. For inspection and repair, you need to leave at least 400 mm of distance from the attic floor to the rafter beam.
Rafter leg
The rafter leg is the main structural element. Made from boards, paired boards, timber. The dimensions of the boards depend on the length of the leg. In the table we look at how to choose boards for the rafter legs.
The pitch between the rafter legs depends on the material of the rafters and the weight of the roof. Thus, rafter legs made of timber with a ridge height of 1800-2000 mm are installed at intervals of 1500-2000 mm, the same option made of plates is installed at intervals of 1000-1500 mm.
Upper ridge girder
This element takes over the upper end of the rafter leg of the gable roof. The purlin is installed on racks, which in turn rest on boards called benches.
Sill
A log is a board that serves as a support for a rack for fastening a ridge girder, a gable roof, or in a layered rafter structure. The bed is laid on the internal support of the house. It is done by analogy with the Mauerlat.
Rack
Racks are supporting structures to support the ridge girder of a gable roof. The racks are installed on the bench, which lies on the internal partitions of the house. Distances between racks are 3000-5000 mm.
Struts
These are boards that support rafters longer than 6000 mm. Struts are installed at the Mauerlat and/or at the racks under the upper girder.
Rigel
A crossbar is a board installed between paired rafter legs to strengthen the rafter structure. Used for long rafters (span more than 12 meters).
Note: In a ridge, paired rafters are fastened with a dowel or bolt, overlapped or locked.
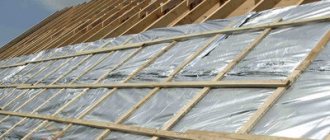
Lathing
Lathing is a structural element that fastens the rafter legs along the length and serves as the main one for installation (laying) of the roof. The sheathing is made from boards. The sheathing made of boards can be replaced with roofing decking, for example, for a soft Andulin type roof.
filly
This is a structural element intended for fastening the sheathing. They are placed on the edge of the rafter leg. They are made from 40 mm boards, which are placed on edge and hemmed to the rafter leg. The edge of the filly rests on the wall in a cut-out groove (wooden house) or is embedded in the masonry (stone house).
General principles for calculating hanging rafters
As you have already seen, the hanging rafter system is a complex structure and requires correct calculation based on many factors. Incorrect final parameters will lead to the fact that the roof will not be able to withstand potential loads, which can lead to deformations and collapses.
Therefore, it is advisable to entrust the calculation of hanging rafters to professionals or use a ready-made house project. As a last resort, calculations can be performed using one of the online calculators, of which there are quite a few on the Internet.
The following data is used for calculation:
- dimensions of the overlapped room;
- presence of an attic;
- expected maximum load;
- slope angle;
- type of rafter system;
- wall material;
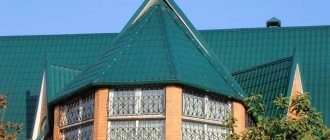
- roofing material.
As a result of the calculation, the following is determined:
- rafter section;
- rafter pitch size;
- farm shape.
Assembly of the rafter system briefly
Layered rafters are assembled locally, with alternate installation, now on one side, now on the other;
In a ridge, paired rafter legs are fastened with a dowel or bolt(s). For high-quality fastening of paired rafters in the ridge, you can make a gash of half the thickness (rafter lock). You can overlap the rafters;
The bottom of the rafter leg rests against the rafter beam (mauerlat). A ledge is cut out on the rafter leg. The bottom of the leg is attached to the supporting wall from the inside using twisted wire. One edge of the wire hooks onto a crutch driven into the wall, the second edge of the wire wraps around the edge of the rafter leg and the filly nailed to it. In the log house, the crutch is driven in at the level of the second crown (from the top);
Roofing felt or any rolled waterproofing material used in construction is laid under the rafter beam and the bed (if any).
©DomiTy.ru
Articles on the topic
- The design of hanging rafters and the name of its elements
- What is the difference between layered and hanging rafters: diagrams, drawings
- Pitched roofs: designs and shapes of pitched roofs
- Roof structural elements: general descriptions and diagrams
- Rafter leg connections: building up and strengthening
- Classification of roofs by shape and design
- Types of roofs, which roofs of a private house are most popular
Design features of hanging rafters
Why are rafters called “hanging”? Because they literally hang in the interspan space, relying only on the outer walls. There is no internal support. However, hanging systems, due to their design, do not bend and are able to cover spans of up to 14-17 m!
Of course, hanging rafters are only part of the rafter system; they are not used by themselves. Only in conjunction with other elements (bolts, headstocks, crossbars, struts, etc.), together with which the rafters form trusses or arches.
In the case of hanging rafters, the simplest truss is made up of two rafter beams connected at the top point at an angle (in the form of a triangle). Horizontally, the rafters are fastened with a tie, which is usually a wooden beam. But it can also be metal, for example, made of profile metal. Then such a puff is called a cord.
Tightening performs an important function. The rafters, fastened at the ridge and resting against the walls, tend to move apart. And the tightening holds them, allowing you to maintain the triangular shape of the arch. The resulting thrust is not transmitted to the walls, and horizontal forces are neutralized. Thus, only vertical forces act on external walls when using hanging rafters.
The tie is not necessarily located at the bottom of the truss; sometimes it moves up, closer to the ridge. It depends on the type of arch structure and what kind of work the tightening has to do. If the tie is located at the base of the rafters, then at the same time it serves as the floor beam of the underlying floor. When constructing an attic, it is convenient to place the tie rod (crossbar) above the base of the rafter legs, so that it becomes possible to arrange a floor with a full ceiling height.
If the span between the walls is more than 6 m, the hanging rafters are supported with braces and hangers (headstocks) for strength. And the tie is not made whole, but consisting of two spliced beams.
There are several design options using hanging rafters. Let's look at them all separately.
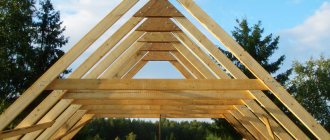
Design #1. Triangular articulated arch
The simplest farm in the form of a triangle. Consists of two rafter beams that meet at the ridge. The lower bases rest against a horizontal beam. A tie is secured at the bottom of the triangle. For the system to work correctly, the height of the ridge in the structure should not be less than 1/6 of the span of the truss.
This scheme can be called classic. In it, the rafters work to bend, trying to move apart, and the tightening holds them and receives tensile loads (works in tension). The tie is not a load-bearing element, so it can be replaced with a rolled metal tie.
To reduce the degree of bending of the rafter beams, the ridge assembly is cut with eccentricity. Due to this, when the rafters are exposed to external loads (atmospheric phenomena, roof weight, own weight, etc.), along with the expected bending, a bending moment in the opposite direction appears. This allows not only to reduce bending deformations, but also to use beams of a smaller cross-section for the rafters. Accordingly, this helps reduce the cost of construction.
As a rule, this design of hanging rafters is used in the construction of an attic attic. In this case, the tie rods play the role of attic floor beams.
Design #2. Articulated arch with headstock
A more complex scheme, which is needed in case of overlapping spans of more than 6 m.
The problem with such a system is the long string, which will experience enormous loads and, as a result, bend under its own weight. To prevent deflection, the tie is suspended from the ridge. How? Using an additional element - headstock. It is a wooden block that plays the role of a pendant. If the suspension is made of metal, then it is called a cord. An ordinary metal rod is often used for these purposes, which in practice works well in tension.
Thus, with the help of a headstock suspension, it is possible to support a long draw and level out its deflection. The tie itself is made up of two parts-beams, joined to each other (in the center of the structure).
The design of the headstock is simple, but builders often make mistakes in its design. The most important thing: the headstock should only work in tension, not compression. It should not be confused with a stand, resting against the beam and the cornice assembly. In this case, the element will compress rather than stretch.
Such confusion may arise because the post and headstock are very similar in design. But their purpose, as well as their operating principle, are completely different. The headstock, unlike the stand, is not rigidly secured with a tightening. It is suspended on a curtain rod, and a tie is attached to its lower part using clamps.
The required tightening length is obtained from the component parts, connecting them with an oblique or straight cut and securing with bolts. The tie is connected to the suspension through a clamp.
The considered scheme is suitable for agricultural and industrial buildings with large spans. However, it is no longer used in its original form and is considered obsolete. But some of its elements are very successfully used in construction practice, in the development of other types of arches.
Design #3. Articulated arch with raised drawstring
In this scheme, the tie is not installed at the bottom of the arch, but moves upward, closer to the ridge. The higher the tension is installed, the more it stretches.
The raised-tie structure is used in the construction of attic spaces. The height of the ceilings directly depends on how high the tie is located.
The rafter beams of the structure rest on the mauerlat, and not on the tightening. Moreover, the mount is not rigid, but movable, sliding like a slider. It allows you to compensate for changes in the size of beams (their movements) that occur with fluctuations in humidity and temperature.
If a uniform load is applied to the slopes, then the system will be stable in any case. If the load is greater on one side, the rafter system will move towards the prevailing load. To prevent this from happening and to ensure that the roof remains stable, the rafters are installed with extensions in both directions, outside the walls.
The tie in such an arch is not a support; it is subject to tensile loads when constructing an attic, and tensile-bending loads when constructing an attic.
In attic spaces, the tie rod is often used as a beam for attaching a suspended ceiling or insulation. To protect it from sagging, a suspension is installed. With small expected loads and a short tightening, the suspension is nailed to the crossbar and the ridge, fastening the joints with two boards on both sides.
If the tightening is relatively long, then several pendants are used, and each of them is secured with nails. Large loads require additional use of clamps.
Design #4. Hinged arch with crossbar
The scheme is similar to the previous one, but has a difference: the lower sliding support in the cornice assembly is replaced with a similar rigid one. Rafter beams are cut into the mauerlat or support bars are used for fixed fixation.
Replacing the support changes the nature of the stresses arising in the arch. The structure becomes spacer, exerting pushing forces on the walls and the mauerlat.
The tightening is installed at the top of the arch. At the same time, its purpose changes. It no longer works on tension, its operating principle is based on compression. A tightening that works in compression is called a crossbar.
An arch with one raised crossbar is designed for a small thrust load. For heavy loads, a tie rod is installed in addition to the crossbar. The result is hanging rafters, the design and components of which are similar to a conventional three-hinged arch. Mauerlat is no longer required for them.
Design #5. Arch with suspension and struts
A diagram that complements the arch and headstock system. It is used when the length of the rafters is so large (up to 14 m) that it creates a significant deflection under its own weight. To level out bending stresses, the system is supplemented with struts that support the rafter beams.
Usually the struts rest against the internal walls. But in hanging systems there are none, so the struts rest against the only existing stop - the headstock. The result is a rigid structure with the following principle of operation: the rafters bend under the influence of an external load, press on the struts, the suspension stretches and attracts the ridge beam, at the same time the upper parts of the rafters are also attracted, the rafters press the struts.
Since this scheme uses long rafters, a long tie is used accordingly. As a rule, it consists of two parts-beams (although it can also be single-element), connected in the middle of the span by an oblique or straight cut. The connection between the tightening and the headstock is made through a clamp.
Essentially, all existing hanging arches are variations of the conventional three-hinged arch. All other additions - headstocks, crossbars, struts - only increase the rigidity of the rafters. And the load-bearing capacity is not changed.
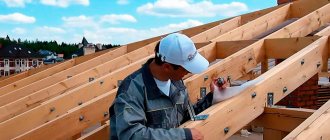
Installation of hanging rafters
After selecting the truss structure and calculating it, you can begin installation work.
The installation of hanging rafters at a construction site is carried out according to the following scheme:
- For installation accuracy and convenience, mark the center of the roof and the height of the ridge. To do this, two boards are temporarily fixed along the gables in the center, and a mark is made on them according to the height of the ridge.
- A template is made for the rafter legs. Take a board, lean it against the mauerlat with the lower end, and against the height mark of the ridge with the upper end. Mark the locations of the upper and lower cuts.
- Using the template, the required number of rafter beams is made. Depending on their future location in the farm, they are marked on the right and left rafters. They are laid out in pairs (since each truss consists of two rafters - right and left).
- Begin assembling the first truss (arch). Two rafter beams are connected at the top with an overlap, butt or by cutting.
- Install the tightening and, if provided for in the design diagram, the headstock and struts.
- They lift the truss onto the roof and install it from the end of the building (on the pediment). Fastening is carried out to the Mauerlat using corners and nails or self-tapping screws.
- The same arch is installed on the side of the second pediment.
- A string is pulled between the pediment pair of arches so that the remaining arches are installed clearly along the line and at the designated level.
- The remaining arches are placed between the gables with the spacing provided for by the project. The height of the arches is controlled with a stretched string. To correct small errors in size, the height is adjusted by placing wooden planks under the rafters.
This completes the installation of the rafters. Now you can begin the next roofing work: laying insulation and waterproofing, filling the sheathing, installing roofing material.