Properly organized supply ventilation in an apartment is the basis for a comfortable microclimate in a living space. Very often natural air exchange does not provide sufficient fresh air and it is necessary to look for alternative ways to improve supply ventilation.
We will tell you everything about the existing options for organizing air exchange and help you choose the optimal method. The presented article describes in detail the simplest options for devices for improving ventilation and complex technical systems. Taking into account our recommendations, you will significantly improve your living conditions.
The need to install fresh air ventilation
Some ordinary people think: if there are vents and the ability to open windows, why install ventilation equipment? You can clean the air in your apartment this way. But in reality, it turns out that natural ventilation does not cope well with this task, and the circulation of air masses does not occur. Unpleasant odors emanating from the kitchen and bathroom stagnate in the house, humidity or dryness is created, and a person begins to experience discomfort.
Following the fashion and advertising of plastic window manufacturers, many of us install them in our apartments. Thanks to this, the space is sealed and an obstacle to free natural air exchange is created. A heavy atmosphere forms inside the room.
The issue of air purification becomes especially relevant in winter. Ventilation through windows causes heat loss and drafts. If you do not open the windows and avoid ventilation, the air in the rooms becomes dry and the amount of oxygen in it decreases. It makes people feel bad.
Do-it-yourself forced ventilation allows you to avoid all these problems. It can be done in several ways:
- install fans in a window or in a specially made hole in the wall;
- arrange a supply and exhaust air duct;
- install a system of inlet openings (valves).
Now the most popular is supply and exhaust ventilation, driven by mechanical devices.
Local
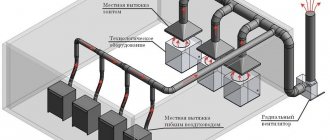
It works to provide clean air to specific places indoors. Polluted streams are also removed from specific areas where they are formed. A current option for large premises where a limited number of workers can be accommodated. Air exchange is organized only for places where the main activities for the performance of duties are carried out. Air heater – additional equipment.
Here, ducted or ductless arrangement options are distinguished.
What functions does the ventilation system perform?
Fresh air must penetrate into the premises: without it, a person feels tired and unwell. In unventilated rooms, harmful microorganisms multiply, an unpleasant odor appears and mold spreads.
Mold is the first sign of high humidity in a room
Lack of fresh air leads to fungal growth
In the warm season, you can use open windows for ventilation: air flows circulate freely throughout the rooms, removing dust, wool and other contaminants. During the cold season, a forced ventilation system is used for ventilation. Its functions:
- removal of carbon dioxide;
- normalization of humidity levels;
- air purification in rooms.
People exhale carbon dioxide, so it accumulates indoors. If you don’t remove it, the rooms will be stuffy and uncomfortable. It is difficult to work in such conditions: concentration decreases, and a feeling of constant fatigue appears. In a stuffy room, a person does not get enough sleep and feels exhausted.
Open windows often to let fresh air into your home
High indoor humidity leads to the formation of fungus and mold. Glass surfaces fog up: condensation accumulates in double-glazed windows and forms on mirrors. An unpleasant musty smell appears in the bathroom and kitchen.
Foggy windows indicate faulty ventilation
Animal hair, mold spores, dust, and allergens accumulate in the premises. The surface of the furniture emits formaldehyde vapors - it is part of MDF, chipboard and fiberboard. With insufficient ventilation, harmful substances enter the lungs along with the inhaled air.
How much fresh air should you have in your home?
Before creating new or improving existing ventilation, it is necessary to carry out preliminary calculations - to determine the optimal volume of air exchange in a particular apartment. These indicators will be different for different rooms.
Average data that needs clarification:
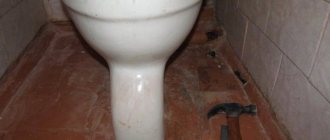
- Bathroom, bathroom. If the toilet and bathroom are located separately, the air exchange rate will be 25 cubic meters each. m per hour for each room. If the bathroom is combined, then the norm will be 50 cubic meters. m per hour;
- Kitchen. The optimal indicator when using an electric or gas stove in the kitchen is 60 and 90 cubic meters. m. per hour, respectively;
- Living spaces. The minimum volume of air exchange for each household is 30 cubic meters. m per hour. If the living room area is less than 20 square meters. m per person, then for each meter there should be at least 3 cubic meters. m per hour of air exchange.
If your home has a stove or fireplace, or other devices that absorb oxygen in large quantities, air exchange rates will increase significantly.
How to determine that an apartment has a faulty ventilation system
Apartment buildings are equipped with a natural ventilation system. Special compartments are installed in the kitchen and bathrooms through which the exhaust air goes outside through channels. After several years of operation, the mines become polluted and air masses are removed less well.
The following signs indicate that the ventilation system in the apartment is not working properly:
- increased humidity in the bathroom;
- formation of condensation on mirrors and windows;
- unpleasant odors in the bathroom;
- spread of smoke and steam from the kitchen to all rooms;
- stale indoor air.
Supply ventilation in the apartment solves these problems; it provides a constant flow of fresh air. The microclimate becomes comfortable for work and rest.
Ductless
ductless ventilation
In this case, an almost complete absence of ducts is assumed. An example of such systems is ordinary fans. They can be ceiling-mounted or laid under the ceiling. They consume less energy and differ from analogues in affordable prices.
It solves not only the main tasks, but also some others that are assigned to the system. If necessary, turns on the recuperator and silencer.
Options for ventilation systems for apartments
One solution in this situation is to install forced ventilation. What options do you have to choose from in this case?
Duct systems: for those who are not limited in funds and free space
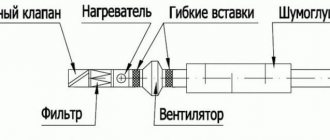
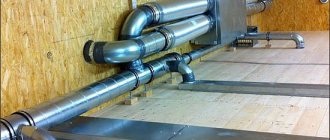
A ducted supply ventilation system for an apartment is an engineering complex that is capable of providing forced (using a fan) inflow, filtration, heating and removal of air masses. Duct ventilation usually includes fans complete with a muffler, corrugated pipes, filtration units, and a recuperator/heater. Air ducts, as a rule, are mounted above the ceiling, and the equipment itself is mounted on a balcony or loggia. This option is one of the best, almost silent and comprehensive.
At the same time, this is an expensive pleasure - along with installation, such a “flush” will cost an average of 300,000-500,000 rubles for an apartment with an area of 90 sq.m. or more. Not suitable for standard housing in high-rise buildings with ceiling heights of 265 - 275 cm and a total area of less than 100 square meters. It also requires annual full maintenance and cleaning of the air ducts.
Option two: installation of ventilation valves
In this case, the flow of air from the street is ensured through special valves that cut into the profile of the glass unit of the plastic window. This option requires replacing the glass unit with glass with a prepared hole. There is an alternative - you can look for special windows on sale with already built-in ventilation valves. The asking price is about 40,000 rubles for one standard window.
Option three: ductless “inlets”
Ductless ventilation systems are a type of ventilation equipment that does not have air ducts. It provides air flow through a through hole in the wall adjacent to the street. Such “inflows” are divided according to the method of supply:
- passive (the air flow enters the apartment by gravity, due to the pressure difference);
- forced (equipped with a built-in electric fan and heating).
An example of passive ductless ventilation is a supply valve - a plastic tube with thermal insulation and sound insulation. It is inserted into a hole that is drilled in the wall.
An active “intake” is a device equipped with a fan and a filter (or a set of filters). Mounted on an external wall.
Forced supply ventilation
It should be noted that there is also forced exhaust ventilation, which differs from forced supply ventilation only in that the fan is installed on the hood. There is another option, which is called a forced supply and exhaust circuit. This is when fans are installed for both air supply and exhaust. This system is most often used in private housing construction. In apartments - either exhaust or supply. Although it should be noted that today manufacturers of ventilation equipment offer various new products in the form of air handling units for apartments. They are compact, effective, but not cheap.
Since the topic of the article is supply ventilation of the apartment, we will consider this option. As mentioned above, the supply circuit means the presence of a fan. Therefore, there are air valves on the market, inside of which low-power fans are installed. The photo below shows two types of such devices: with a cylindrical channel shape and a rectangular one.
Two types of air valves with fans inside
In principle, the process of installing such a valve is no different from the previous one:
- You also need to use a puncher and a crown to make a through hole;
- install a cylindrical valve into it;
- fill the space between the device and the walls of the hole with foam;
- connect the fan to the mains supply;
- install a cover on the street side that will protect the hole from the entry of birds and small animals, debris and dirt;
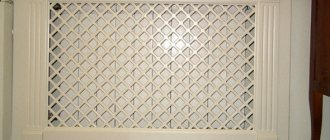
- A decorative grille is installed on the inside of the valve, with which you can regulate the power and direction of the incoming air flow.
Forced ventilation in an apartment is not only about installing valves with fans inside. There are several options for organizing a ventilation system of this type.
Air conditioner with forced ventilation for an apartment
Conventional air conditioners work like this: the air from the room is forced through a filter, then through a heat exchanger, where it is cooled, and then it is reintroduced into the room. That is, the air masses are purified, cooled, but do not become fresh and saturated with oxygen.
Today, air conditioner manufacturers offer models in which small fans are installed as a separate element; with their help, fresh air is driven into the rooms of the apartment. The design features of fan installation vary greatly from manufacturer to manufacturer, but the meaning is the same for all. The fan is connected to the street by an air duct, which passes through the same channel as all communications of the split system.
It is necessary to indicate that the fan itself can be installed outdoors or inside the house on the housing of the indoor air conditioner unit. The photo below shows the first option with installing a fan outside, which is connected to the room in the apartment with a hose.
Air conditioning with fresh air from outside
Comment
All described problems with Minibox Home-350 ventilation:
- are subjective, and their presence is only my opinion: if only because I cannot guarantee the performance of my device for measuring pm2.5. In addition, the measurements were made with a difference of minutes or hours between each other, which already makes all experiments inaccurate.
- Applies to my installation only; other customers may not have them.
Everything described in the article is my personal opinion. All statements about products and companies are my value judgments and not facts.
Budget options for restoring air exchange
Wall and window valves do not have a fan. The air flow occurs due to the difference between street and “home” pressure. A prerequisite for the operation of overhead inlets is proper exhaust ventilation.
Features of different types of window valves
The design of all window climate control devices is very simple. A typical valve consists of an air intake, a telescopic duct and an indoor unit.
The air intake is installed outside the frame. The external unit is equipped with a visor and a grille that prevents insects from getting inside. The telescopic channel cuts into the frame, forming a through gap for the unhindered flow of air.
The indoor unit is mounted on the side of the room. Some models of inlet units are equipped with a filter and a valve that regulates the throughput of the device
Based on the design features and installation method, the following climate control devices are distinguished:
- slotted;
- folded;
- invoices.
Slot models. The throughput capacity of the unit reaches 20 cubic meters per hour - the influx of air masses is carried out through a micro-hole up to 1.6 cm high and up to 4 cm wide. The device consists of two blocks, which complicates its installation - milling of the window frame is required .
Rebated valves. This is the most affordable and easiest way to ventilate a room. The air flow is carried out through slits in the vestibule. The main advantage of the models is the ability to install them on a window in use without milling a groove.
Additional advantages of rebated models include: low cost, preservation of the sound-absorbing and heat-retaining properties of PVC double-glazed windows and the possibility of automation.
The valve capacity does not exceed 5 cubic meters/hour. To ensure a larger volume of air supply, it is permissible to install several valves on one window
Overhead climate products. This option is rarely implemented in domestic conditions due to the complexity of installation - the valve is inserted at the stage of assembling the double-glazed window. In addition, the product worsens the heat and sound insulation of the window.
Overhead modifications have found their application in production and warehouse premises. The productivity of climate control devices is about 100 cubic meters per hour.
In the simplest models of window inlets, the size of the gap, and, consequently, the intensity of the air flow, is selected manually - the position of the valve is adjusted. High-tech devices are equipped with humidity and atmospheric fluctuations sensors.
Wall model: device and installation
Externally, the wall valve resembles a cylindrical flask or a wide pipe, with a diameter of about 10-16 cm.
The plastic air duct is equipped with the following elements:
- thermal insulation layer - a “sleeve” passes through the entire flask, preventing freezing of the wall and reducing the noise effect from the street;
- filter – located at the outlet of the air duct, provides rough air cleaning.
In some models, an O-ring (silicone) with flaps is placed in front of the filter. The purpose of the part is to equalize the air flow in windy weather.
On the street side, the wall air duct is closed with a metal grille and an anti-mosquito insert, and on the inside - with a decorative cover with an adjustable handle
When choosing an air supply device, the power and “operating” temperature of the unit are first assessed. On average, the productivity of a wall climate product is 40 cubic meters/hour. This value is enough to ventilate a room of 13 sq.m.
The operating temperature range is indicated by the manufacturer on the packaging or in the instructions for the device. For harsh climatic conditions, special models have been developed to prevent the formation of condensation and the appearance of an ice plug in the channel.
The following photo selection will clearly introduce the technology of installing a wall valve:
Image galleryPhoto from At a height of approximately 2 - 2.2 m from the floor plane, we drill a hole in the wall. We select the drill bit in accordance with the size of the future ventilation duct. We rework the hole with a drill of a smaller diameter, trying to give it a slight slope towards the street. In the hole drilled and cleared of dust, we first install insulation, made in the form of a pipe, then a plastic air duct. We cut the insulation flush with the surface, the air duct should protrude by 1 cm. We apply the lower part of the housing to the installation site and mark the fixation points of the device through the holes in it. We fix the lower part of the housing to the wall by drilling holes at the marked points. We place the included filter in the housing. We snap onto the upper part of the housing, equipped with a device for adjusting the air flow. We check the functionality of the system and the ability to regulate the volume of air flow entering the room. On the outside of the wall, we install a grille with inclined lamellas, it will protect against insects and birds. Step 1: Drilling holes for installing the valveStep 2: Refinishing the hole with a drillStep 3: Arranging the drilled holeStep 4: Marking for attaching the valve bodyStep 5: Installing the filter into the fixed bodyStep 7: Installing the supply valve coverStep 7: Checking the functionality of the systemStep 8: Installing the grille from the facade
Stage 1. Determining the location. When choosing a wall, you should consider some nuances:
- It is better to install it on a supporting structure;
- optimally – the valve “exit” to the insulated loggia;
- It is better to avoid installation from the side of the roadway.
Valve manufacturers have designated recommended and undesirable areas for installing the device. When installing, it is important to consider the air flow vector.
In the first option, fresh air entering the apartment warms up at the top and falls down. The second option is that the air masses are heated by the heating radiator
Stage 2. Preparation and drilling of the wall. On the inner wall, mark the place for the through hole and draw the diameter of the valve.
Channel drilling procedure:
- Perform initial drilling with a diamond core bit to a depth of 10 cm.
- Remove debris and use a chisel to knock out a small notch for stable placement of the drill.
- When drilling, keep the slope outward - this position of the air duct will prevent rainwater from getting inside the device.
It is better to carry out the work with an assistant who will periodically wet the drilling area. Humidification will reduce dust levels and protect the instrument from overheating.
Stage 3. Installation of valve components. Clean the groove from dust and place a heat-insulating “sleeve” in the channel. Using screwing movements, install the cylindrical body of the device, and secure the fine-mesh grid on it.
A panel, a ring with dampers and a filter are fixed from inside the wall. The final stage of assembly is installation of the lid with the adjusting handle
Ways to increase the efficiency of inflow
Various techniques aimed at improving the performance of supply ventilation are divided into two main categories:
- measures that increase air flow without blowers;
- use of forced air units.
The first group includes: manual or automatic ventilation, installation of a window or wall valve.
Manual ventilation. Opening the window for 15 minutes every 3 hours. It is almost impossible to implement the method in practice - there is no time or no one to constantly open and close the window. An alternative option is to open the window sash in micro-ventilation mode.
The disadvantage of this method is that dust from the street and noise enter the apartment through the gap. In winter, micro-ventilation gradually cools the room
Automatic ventilation. A servo drive is installed on the flap of the window. The device is programmed to open the transom at specified intervals or is equipped with a weather sensor.
The “intelligent” mechanism reacts to changes in humidity and changes in the atmosphere - during rain, strong wind or snow, the sensor will work and the window will close on its own.
It is possible to connect the automatic electric drive to the general fire safety system. If there is smoke in the room, the drive will operate and the window sash will open.
The automatic ventilation method has the same disadvantages as the manual method.
Window and wall valve. Overhead and built-in air inlets perform the same function - they provide access to fresh air flows into the room. Varieties of valves differ in characteristics and installation technology.
Wall valve models are more productive; they are advisable to use in spacious rooms. Window vents are suitable for compact rooms
Installing a wall device is more complicated than installing an inlet on a window sash, as it requires drilling a through hole through the load-bearing structural element of the building. Products for windows are cheaper than their wall counterparts.
Ductless devices for forced air flow:
- Ventilators. Essentially, this is the same wall valve only with a built-in fan. The supply of fresh air does not depend on the external parameters of the atmosphere (temperature, pressure), but is determined solely by the performance of the fan.
- Breezers. Unlike ventilators, the installation provides high-quality multi-stage filtration. An additional plus is the presence of climate control. The user sets a comfortable temperature, and the smart device automatically heats the air.
- Air conditioners with air supply option. Multifunctional two-block split complexes with air mixed from outside are equipped with an air duct connecting both buildings, as well as an air mass filtration system.
The listed devices are installed without laying an air duct and work to supply air to one room. To comprehensively restore the supply ventilation function in several rooms at once, duct systems are used.
The installation of air ducts must be taken care of even at the repair stage. Otherwise, you will have to dismantle the finishing or create a false box for laying ventilation ducts
Features of duct supply systems:
- high performance;
- possibility of air heating;
- control automation;
- sufficient sound insulation;
- high cost of components;
- complexity of installation.
Duct ventilation is rarely installed in apartments. Priority areas of application: offices, cottages and public premises.
You can learn how to check the efficiency of wall and window ventilation valves by reading the following article.
Main stages of supply ventilation device
To make fresh air ventilation in a house or apartment with your own hands, it is important to carry out competent preliminary work. It consists of several points.
Carrying out calculations. For a private cottage under construction, the ventilation system can be designed together with the general plan. For a finished building and an apartment in a high-rise building, an autonomous air duct is created, taking into account the area of all rooms and each room separately. All calculations are carried out according to a formula that uses the values necessary for optimal circulation of air masses. These include:
- total power and performance of the supply system;
- fan input power;
- air flow rate;
- maximum noise level from device operation;
- diameter of inlet openings, dimensions and length of pipes;
- power and energy consumption of additional devices (heater, recuperator, etc.).
When carrying out calculations, the coefficients established by SANPiN are taken into account.
Based on the calculations performed, a detailed layout of all components of the device is drawn up.
Next, parts are selected from the remaining building materials and the missing elements are purchased.
Now it has become possible to purchase ready-made ventilation devices of the supply and supply and exhaust type. Different manufacturers have different prices. But why spend extra money if every man can install such a system at home on his own. Do-it-yourself supply and exhaust ventilation takes longer and is a little more complicated. It is much easier to equip a regular flow-through air duct.
Exhaust ventilation
The task of exhaust ventilation is to remove exhaust air, airborne particles and unpleasant odors from the apartment. Exhaust ventilation systems are divided into local and general. They can work either autonomously or in combination with natural or forced ventilation.
A feature of all exhaust ventilation systems is the presence of exhaust channels through which exhaust air is discharged outside the room. In this case, air intake grilles are always installed in the kitchen and bathroom. Thanks to this arrangement of the exhaust ducts, unpleasant odors and moisture do not spread throughout the apartment and are “locked” in a limited area.
A typical example of local exhaust ventilation combined with a natural ventilation system is a kitchen hood
.
Quite often, small fans are installed in the ventilation shafts of bathtubs and toilets to remove excess moisture and unpleasant odors from the premises.
Recuperation units for apartments
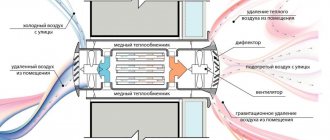
The disadvantage of many supply ventilation systems is the high energy consumption for heating or cooling the air entering the apartment. Recuperation units will help reduce energy consumption - they use the thermal energy of exhaust air masses to heat fresh air from the street.
If there is a high temperature difference between the street and the apartment, the recovery unit will not be able to achieve the required parameters, and the air will have to be heated, but the energy consumption in this case will be much lower than for conventional heating of supply air.
The higher the efficiency of the model, the less the need for additional air heating. On average, the efficiency of modern air handling units is 85-90%, which often makes it possible to completely abandon the use of a heater.
Monoblock air handling units with a recuperator take up relatively little space - they can easily be installed on a balcony or loggia. Among the products of leading manufacturers of climate control equipment, models with a capacity from 150 to 2000 m3/h are widespread. For comparison, a one-room luxury apartment with an area of 60 m2 with two residents requires an average air exchange of 300 to 500 m3/h.
Calorifiers-heaters
When air is taken in, it organizes a preliminary increase in the flow temperature. The option is effective in any use scenario. With a closed circuit, the heating efficiency remains as high as possible. Once inside the home, the characteristics do not change significantly. The automation system is often supplemented with not one heater, but several at once.
It is not always worthwhile to equip the system with all the solutions that exist on the market at once. The choice is determined by the needs of the customer and the capabilities of the specialist responsible for solving the problem. Preliminary accurate calculations help to avoid overpayments. This will make it easier to decide which functions are most important for a particular house or apartment. It is important to pay attention not only to personal comfort, but also to maintaining a healthy environment in general. Fresh air strengthens the immune system and eliminates a large number of negative effects. The correct organization of the systems themselves is also important.
Combining ventilation and air conditioning in an apartment
A city apartment can rarely boast of having extra space, so combining ventilation and air conditioning systems into a single complex
not only reduces installation costs, but also saves valuable space.
The simplest version of a ventilation and air conditioning system is a conventional air conditioner with a fresh air supply function
. It will not be able to provide full air exchange, but at least in one room there will be an influx of fresh air. It can be used in conjunction with Ventmashine ventilation units.
Another option for comfort lovers would be a duct system.
ventilation and air conditioning. It is based on a central air conditioner with the option of adding fresh air or a supply and exhaust unit with a cooler. If desired, the installation can be additionally equipped with a recuperator.
Conclusions and useful video on the topic
This video is a kind of educational program about ventilation. Here the very concept of ventilation is discussed in detail and all issues related to its competent design are covered:
Master class on installing a ventilation system:
Both business managers and private developers must understand that the normal functioning of those for whom they are responsible depends on the effectiveness of ventilation. Sometimes people's lives are also in question. You cannot miss this moment and save on it.
Have questions about the topic of the article, found any shortcomings, or have valuable information that you could share with our readers? Please leave comments, share your experience, and participate in discussions.
Do-it-yourself supply ventilation installation
Supply ventilation in an apartment in a multi-storey building can be connected to a common house natural air duct system. To do this, you first need to check its condition in a simple way. A notebook sheet is applied to the ventilation hole. If the paper adheres to it and is held, then there is traction and the air duct can be used.
If the channels are clogged and clogged, you can try cleaning them. But in a large house this can be problematic. Then supply ventilation is installed using valves. They are bought in the store. How many of these parts are needed depends on the size and total area of the space. Valves come in different capacities.
The simplest models of these devices include an indoor unit, a protective grille and a connecting pipe. They are usually installed above the radiator to minimize heat loss.
- In the selected location, primary marking is carried out: the outline of the valve device is outlined.
- If it was purchased assembled, then you need to disassemble and free the body.
- Using a hammer drill, a through hole is made in the outer wall, trying to maintain a slope angle of no more than 7 degrees.
- A tube covered with insulating material is inserted into it. It should be invisible from the outside, and protrude 1 cm from the inside.
- At the points where the tube is attached, holes are drilled in the wall for dowel-nails.
- They fix the body of the supply valve, which is additionally clamped by the insulating layer of the tube.
- When the base of the device is securely fastened, the parts that were removed during disassembly are inserted into it.
- A grille is installed outside.
- After this, the operation of the supply valve is checked by opening and closing the valve.
During operation, it is necessary to disassemble and clean the valve twice a year from dirt and dust that clogs it through the cracks in the grille.
Installing fresh air ventilation in an apartment is a simple and reliable way to improve air quality and maintain a favorable microclimate.
Installation stages
The use of this type of ventilation is relevant in any room - from the bedroom to the kitchen. The number of valves can be selected in this way:
- 1 valve under each window.
- 1 valve for every 15-20 “squares” of area.
To install the ventilation valve you will need the following set of tools:
- Pencil (marker, pen).
- Hammer.
- Crown for concrete (diameter – 60 mm).
- Drill for concrete (diameter – 40 mm).
- Drill for concrete (diameter – 6 mm).
- Industrial vacuum cleaner (if not, use a broom and dustpan).
- Polyethylene (or rags) - to cover the work area.
- Thick and durable plastic garbage bag.
The product is installed above the battery so that the outlet “looks” at its center. In this case, the distance from the case (or rather, from the outlet) to the radiator must be at least 15 cm.
Drilling a hole for the air duct of the Domvent valve
Now let's look at the process step by step:
- Marking is carried out: the housing is applied to the wall in the selected location.
- Mark the center of the hole for the pipe and the holes for the fasteners.
- Using a crown with a diameter of 60 mm, the wall is drilled to a depth of 7-10 cm. In order not to litter the floor in the room, you should place a bag under the hole (or lay down film/rags).
- Using a drill with a diameter of 40 mm, the wall is drilled through.
- A plastic tube is inserted into the hole made. From the outside it should be flush with the surface of the wall, from the inside it should protrude by 7-10 mm. If necessary, the pipe should be cut to the required size.
- A heat insulator is placed on the end of the tube closest to the room. It should protrude from the hole by about 10 mm, no more. If necessary, excess is cut off.
- From the outside (from the street) a grate is glued to the tube (this will have to be done while leaning out of the window).
- Using a drill with a diameter of 6 mm, holes for fasteners are drilled.
- Fastener plugs are inserted into the holes.
- The valve body is pressed against the wall and fixed with self-tapping screws.
- An anti-mosquito net and seals are installed in the housing.
- The housing closes.
The procedure itself, with the participation of two people and the presence of the above-mentioned tool, will take about an hour on average. The cost of installing a Domvent ventilation valve by hired specialists will cost approximately 2,000 rubles.
Installation stages (video)
Care and cleaning
Over time, the use of the product leads to the fact that the seal located inside the housing gradually becomes dirty. It is recommended to clean it approximately once a year. The warm season is best suited for this, since the use of a ventilation valve is primarily relevant in cold weather.
To clean the sound absorber of the Domvent ventilation valve, you need to remove the housing cover, take out the seal and simply shake it several times to get rid of dust. Alternatively, you can do this with a vacuum cleaner (which is much more effective).
If there is too much dirt, you can wash it with a polyf under low-flowing water. In this case, the seal must be dried before installation. After cleaning, the sound absorber is installed back and covered with the housing cover.
Disassembled Domvent valve body
In addition to getting rid of dust, in winter you should pay attention to the condition of the outer grille - in severe frosts it can freeze. To solve the problem, the valve damper must be completely closed until the ice has completely melted.
Reviews about the model
It’s easy to find reviews about this model - many people have already installed it in private houses, apartments, and non-residential premises (offices, workshops, and so on).
Alexey V., 30 years old, Omsk:
About 3 years ago, supply valves were installed in our office so that noise (we are located in an area with constant construction) would not distract people from work. In winter, of course, you have to close it - despite the fact that the valve is located near the battery - the air still comes in cold.
But in the summer it is an irreplaceable thing. There is no need to open the windows, and the air conditioner is also turned on less often.
Dmitry A., 41 years old, Krasnodar:
In our country now, probably, all new buildings are immediately equipped with inlets. Last year we were choosing an apartment, probably looking at 15 options - and almost every new building had valves. The one we chose in the end turned out to be a Domvent: one in each room.
The model is not bad for its price - it has inflow adjustment and insulation (although it is more likely for show - such insulation is of little use, especially in colder latitudes). Well, it doesn’t let in much air - one valve is definitely not enough for the room.
TOP best air handling units
The best inexpensive air handling units
These models have a low cost (we have placed devices with a price of up to 25,000 rubles in the budget mechanisms segment). Thanks to this, such ventilation units are suitable for buyers with a limited budget. Most often, such models are used for domestic use.
Domovent Solo RA1-35-9R
This model is a supply valve. The device has a low price. The manufacturer of this mechanism saved money on the control panel - it is not included in the package. The unit can be turned on using the switch located on the power cable. You can still regulate the ventilation performance using a pull cord switch. The package weight is 2.5 kilograms.
Cost: 7,500–8,500 rubles.
Domovent Solo RA1-35-9R Pros
- low price (the model is available for budget buyers);
- small dimensions;
- high degree of protection.
Minuses
- There is no control panel.
Blauberg Fresher 50 1000045121
The model of this air handling unit has a high-quality filter, which in turn is capable of fine or coarse cleaning (depending on the desire of the buyer). Products can be connected to each other in series and form a chain. The design also includes a humidity sensor and a sensor that measures the carbon dioxide content in the room.
Cost: 14,000–16,000 rubles.
Blauberg Fresher 50 1000045121 Pros
- high degree of protection;
- several operating modes;
- low cost of the model;
- energy saving.
Minuses
- Thick walls are required for installation.
Aeropac SN
This model is universal. The device can be used both in an apartment and in a residential building. This ventilation is used less often in offices. The housing of the air handling unit is very durable. The model is able to withstand falls or loads. The device can be mounted next to the battery (to increase the room temperature in winter). Installation on an air duct is also possible. The mechanism has a fairly low level of electricity consumption.
Cost: 18,000–21,000 rubles.
Aeropac SN Pros
- the model has a long cord;
- can work on filters from other manufacturers;
- strong, durable construction;
- You can make a hidden installation.
Minuses
- not controlled using the remote control.
Tion Lite
The model is small in size; among the entire Tion line, this model is the smallest. The device can be mounted into the wall at any angle - this does not affect its performance. You can also select the filtering level. In total, the model can operate at six speeds. The display of the device reflects all the most important information - full climate control is provided.
Cost: 23,000–25,000 rubles.
Tion Lite Pros
- small dimensions of the model;
- there is the possibility of hidden installation;
- heater power is 850 W;
- can be installed at any angle.
Minuses
- insufficient quality of noise reduction.
VAKIO Lumi
This model can be mounted on walls with a thickness of 15 cm or more. The model is small-sized. Ventilation has a high degree of filtration. The installation efficiently cleans the air from street dust or harmful substances. The model has three modes of operation: supply, exhaust, and can also be used as a passive valve. The device perfectly dampens noise coming from the street. The mechanisms can be combined into a joint group of 10 installations.
Cost: 20,000–22,000 rubles.
VAKIO Lumi Pros
- possibility of combining into one cluster;
- control can be carried out from me on the case or using the remote control;
- inexpensive maintenance;
- Can be installed on thin walls.
Minuses
- The kit does not include a heater (additional purchase required).
The best premium air handling units
In this section we have included air handling units with a price starting from 45,000 rubles. These mechanisms are capable of providing hundreds of square meters of space with fresh air. They usually come with many different sensors and more options available.
AIRNANNY A7 BabyCare H11
This device was created specifically to control the climate inside a children's room. The model continuously introduces fresh air into the room, monitoring the state of the environment: humidity, temperature and other indicators. The mechanism can be configured to operate automatically. The device has a robust design that can withstand mechanical damage or loads. The model is also resistant to hypothermia – it can function at a temperature of -20°C.
Cost: 47,000–49,000 rubles.
AIRNANNY A7 BabyCare H11 Pros
- withstands negative temperatures;
- favorite among ventilation for children's rooms;
- there is no sound or light alarm - nothing will interfere with the child’s sleep;
- many different options.
Minuses
- large dimensions of the model.
Tion 3s Plus
The model can immediately supply fresh air and filter it. The model perfectly cleans the air flow from dirt and dust. The device collects and displays several environmental parameters at once: it shows air temperature, humidity and carbon dioxide concentration. The product has six different speeds for operation. Maximum productivity is up to 140 cubic meters/hour. Depending on the selected power, the noise level from the installation ranges from 19–47 dB.
Cost: 50,000–53,000 rubles.
Tion 3s Plus Pros
- 6 speed modes;
- energy efficiency;
- controlled remotely (via smartphone using Bluetooth function);
- filters are easy to replace.
Minuses
- There is no control panel on the ventilation itself.
Ventmachine Satellite
The device has excellent performance, but at the same time produces a low noise level during operation. There is also the possibility of installing a model with wiring for several rooms. That is, one such installation can easily replace several cheaper options (the price of this model is quite high). The device has a long service life. Ventilation can serve its owner for decades.
Cost: 150,000–155,000 rubles.
Ventmachine Satellite Pros
- a sufficiently high coefficient of suppression of external noise (coming from the street);
- high service life;
- many functions included (fire sensor, carbon dioxide sensor);
- Durable stainless steel construction.
Minuses
- high cost of the model. Further maintenance will also cost a pretty penny.
Problem Analysis
So you bought a breather or air purifier. How do you know that it is working and cleaning the air? Without a measuring device - no way.
Before solving a problem, you need to learn how to measure it.
Metrics
I decided to find a device to measure CO2 and air pollution.
Air pollution is most often measured using the PM2.5 metric.
This is the content of particles <= 2.5 microns in size in the air. For comparison, the thickness of a human hair is 50 microns. Why this size? In my opinion, for convenience: particles of this size are the most common and harmful to health. What other metrics did I use?
- PM10 - content of particles <= 10 microns in size. The size was chosen specifically: the natural filters of the nose only retain particles > 10 microns in size.
- HCHO - formaldehyde, emitted, for example, by furniture.
- VOCs are volatile organic compounds found, for example, in exhaust gases.
We do not consider rare metrics - NOx, SO2, CO - since the instruments for measuring them are not widespread.
Below we consider only PM2.5 and CO2.
For CO2, the recommended level indoors is 500-800 ppm, typical outdoor levels are 400-500 ppm.
With PM2.5 it is more difficult. In Australia, by law, the annual average concentration must be no more than 8 μg/m3. In Europe - no more than 25 μg/m3. In the USA - no more than 12 μg/m3. Does this mean that values below the threshold are safe? No. Every 10 µg/m3 of PM2.5 concentration increases the risk of lung cancer by 36% . The only safe level is 0 µg/m3. Read more about health hazards in this article.
I set myself target values for CO2 metrics - 700 ppm, PM2.5 - 8 μg/m3.
Disadvantages of PM2.5 Reduction
Reviews sometimes write that lowering PM2.5 levels relaxes the immune system, but I have not found scientific evidence for this.
Measuring instruments
I bought an Air Quality Pollution Monitor for $130 to measure. But it showed zero PM2.5 levels all the time. I haven't figured out how to calibrate it correctly.
So I bought a separate AirVisual Pro for $270 to measure PM2.5. After a year of using it, I am completely satisfied with it.
The large number on the green background on the left (13) is the US AQI level. In this device it is just a different scale for PM2.5. The small number on the black background on the left (3) is the PM2.5 concentration. On the right is the carbon dioxide level (982).
I took photos of the devices at the same time. It can be seen that AirVisual Pro detects PM2.5, but the first device does not.
Operating principle of the AirVisual Pro device
AirVisual Pro uses a laser to calculate PM2.5. There is a constant flow of air through the device thanks to the fan inside. The laser emits a beam through a stream of air. The beam is reflected from suspended particles in the air. Only that part of the laser radiation that is reflected from the particles reaches the photometer. Thus, the device calculates how much was suspended in the air flow. This mechanism is capable of detecting particles from 0.3 µm to 2.5 µm. The resulting values are calibrated against temperature and humidity.
An infrared lamp is used to calculate CO2. The principle is similar: the lamp emits infrared light into the air stream. Carbon dioxide particles absorb it, so not all the light reaches the detector of the final radiation. The carbon dioxide content is calculated from the fraction of light that reaches it.
Read more about the AirVisual Pro device here.
We measure the air
With CO2, everything is easy: we close the windows, go to bed with my wife, and after a couple of hours the level of carbon dioxide rises from 600 to 1200 ppm. I wake up at ~1300ppm. With the windows slightly open, it’s cold, noisy and ~600ppm.
Volunteers with AirVisual Pro instruments share PM2.5 data. This data is collected on a map here, and there is also such a map. Typical PM2.5 levels in my area are 12 µg/m3 or 50 US AQI. On weekends there are often spikes in PM2.5 levels up to 20-30 μg/m3 - most likely these are emissions from enterprises.
Inside my apartment the PM2.5 level is 10-20% lower than outside at the same time. Why? I don't know, maybe there is a device error.
How else were PM2.5 measurements useful to me?
- When my wife and I were choosing an apartment, we went with the device. If the environment is important to you, this is an objective way to measure it. In articles “The 10 cleanest areas of the city” there is often bullshit.
- When turning on the humidifier, we noticed that the PM2.5 readings were rising sharply. It turned out that ultrasonic humidifiers should only be filled with distilled water. Otherwise, the humidifier will release impurities from the water into the air. This is harmful to health, so we no longer use an ultrasonic humidifier.
- When we iron clothes, PM2.5 levels rise. There is research on this topic. It’s not clear what to do about this, but we know that the procedure is harmful to health

I realized that there were definitely problems in my area and my apartment. The air is dirty and CO2 accumulates quickly.