The balcony in the apartment is used as additional space. To make it residential, and therefore expand the area of your apartment, you need to think about thermal insulation. And to make it comfortable to be in, it’s worth working on its decoration.
As a result, you will have at your disposal an additional, albeit small, room where it will be comfortable both in the warm and cold seasons. Below are step-by-step instructions for putting this space in order so that it is pleasant to be in it.
Preparation for repair
At the stage of preparation for repairs, it is necessary to create a project, according to which the work itself will then be carried out. Even at this stage, they find out the costs that the homeowner expects. Before you make a balcony with your own hands, you need to determine in what order the individual operations will be carried out.
You need to choose ideas for a balcony that appeal to all family members, including photos on the Internet, and determine at a general meeting which of them will be used in the future.
Also, at this moment it is determined whether the balcony space will be heated or not. If the answer is yes, then choose the best heating method. In addition, they decide what material will be used to decorate the outside of the structure and insulate it.
Along with general decisions regarding repairs, the preparatory stage also includes a number of works, including:
- Removing dirt from the surface of the balcony and dismantling the old finishing of the balcony, including cladding and a layer of paint;
- Identification of voids in the floor and ceiling, if necessary, strengthening of the balcony slab;
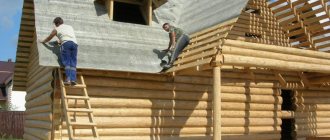
- Construction of a parapet and additional partitions, or if they already exist, but are not in the best condition, repair them. It must be remembered that the balcony cannot bear too much weight of the structures. To avoid this, you can use foam blocks or other building materials with low mass for the parapet;
- Sealing cracks and irregularities on the surface of the balcony with cement-sand mortar;
- Leveling the loggia floor to obtain a smooth surface.
When the space preparation work is completed, the main repairs need to begin.
Examples of using a balcony for various premises
Only at first glance it may seem that the limited space of the balcony significantly reduces the list of possible options for using this additional room. The modern owner has not used this utilitarian room as a storage room for a long time, but arranges there an office, a workshop, a greenhouse, a children's area, a playroom for adults with billiards, a gym, a hookah lounge, a place for meals and even a bedroom.
In order to place a complete and functional environment on several square meters with a specific geometry, it is necessary to resort to various design techniques. This involves not only the visual expansion of space through the use of light finishes, mirror, glossy and glass surfaces, but also the installation of compact furniture (often custom-made to individual sizes), maximum floor clearance - folding furniture, shelving and consoles that are attached to walls.
A place for dining is one of the most popular options for using a balcony or loggia. If your balcony offers an excellent view of the city skyline or, better yet, you can see the sunrise or sunset from the windows, it would be unforgivable not to take advantage of such a wonderful opportunity. The width of some loggias allows you to install a compact dining table, while in others you have to be content with a bar counter or a narrow console (most often an extension of the window sill). Installing a compact round (oval) table or folding panel can also be an effective technique.
Another popular solution is to organize a corner for reading and relaxation on a balcony or loggia. It’s logical to install shelving for your home library and create a comfortable place to read books in a light-filled room. Even if the balcony glazing is framed, there will still be enough natural light for comfortable seating. In this case, in addition to shelves with books, you will need to install a pair of comfortable armchairs or a compact sofa or ottoman.
In order to organize a modern office, you need very little usable space. It is precisely these modest dimensions that a balcony or loggia has. A small console can be used as a work surface (modern laptops or computer screens take up little space), a comfortable adjustable chair and a pair of hanging shelves for storing documents and office supplies.
One of the most popular options for organizing storage systems in balcony spaces is the installation of shelving. Even a shallow shelving unit, mounted from floor to ceiling, allows you to arrange a huge number of household items. At the same time, the structure does not look massive due to the absence of facades.
Built-in wardrobes are no less popular. But considering that in a small area it is necessary to install a storage system from floor to ceiling, it is better to give preference to light wood species. It would not be amiss to use glass and mirror surfaces - they will help lighten the image of the cabinet.
Even a small space under the balcony window sill can be used rationally. Shallow shelves hidden behind sliding doors can accommodate a large number of necessary small items.
It is effective to use corner sofas as seating areas, under the seats of which there are spacious storage systems. For small-width balconies, you can use similar, but only linear models.
The balcony is an ideal place to use homemade household items. For example, from construction pallets you can construct benches and sofas, tables and stands, shelving and other storage systems, even beds. Thus, you can not only save significantly, but also create a truly unique image of an additional room.
But in modern design projects there are also completely unusual options for using the available square meters. A gym, or rather a mini-room, a laundry room, a Finnish bathhouse or a Russian steam room is not a complete list of creative ideas. But it is important to understand that organizing many of these original projects will require not only large resources, but also appropriate permits.
Choosing the right glazing
The initial stage of the repair procedure is the selection of glazing for balcony windows and then its installation. There are two options, “cold” and “warm”.
- Cold glazing means installing window products made of polyvinyl chloride or aluminum, in which the glass is made of a single layer. This system will protect those on the balcony from gusts of wind, dust will not penetrate into the space, and rain and snow will not get there. But in this case the heat inside the balcony will not be retained. And in the cold season there will be low temperatures.
- Warm glazing means that window products made of wood, warm aluminum or PVC profile are installed on the balcony, and a single-chamber or even double-glazed unit is placed inside. Then those living in the apartment can go onto the balcony and stay there for a while even during the cold season. Another case is the glazing of a balcony, when this space is supposed to be connected to the living room to which it adjoins. Then they buy structures that have an installation width of 70 millimeters or more, inside which there is a double-chamber double-glazed window, the thickness of which is 40 millimeters.
Glazing a balcony with your own hands is not difficult for a person with minimal repair experience, and inviting a specialist for this purpose is acceptable, but not necessary.
Ceramic tile
The simplest, most affordable, and never outdated type of wall material is ceramic tiles. It truly is a panacea in many situations. As in the case of artificial stone, tiles are usually used to cover surfaces most susceptible to contamination, and the upper part of the walls is painted or wallpapered. If the design of the balcony allows, it can be completely tiled with ceramic tiles, choosing different shades of tiles for the panels and top.
Unlike many finishing materials, tiles can be used to cover not only walls, but also floors, harmoniously combining colors. A warm floor with electric heating is installed under the tiles, and then the room can be used comfortably even in winter. This is especially convenient when the balcony is adapted as a study or attached to a living room or kitchen.
Office on the balcony
In addition to those already listed, we can name some more advantages of ceramic tile cladding:
- Unlimited service life;
- Easy to clean, not afraid of aggressive agents;
- Does not fade under the sun;
- The widest range of colors, sizes, textures.
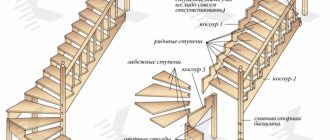
Laying lags
Often the balcony floor has an uneven surface because the house is not new. During operation, many cracks, potholes and irregularities form in it. Also, the floor is often not completely horizontal; it runs with a slight slope in the outer direction, designed to divert precipitation that gets inside.
If the unevenness on the floor is very pronounced, then leveling it with a cement screed means that the mass of the entire structure will increase noticeably. Also, after the screed is completed, the cement will dry, which will take a certain period; during this time, work will not be possible, so the repair will be delayed.
There is another option, leveling using logs made of natural wood (light wood species). Floor joists are wooden blocks with a square cross-section of 50x50 millimeters; you will also need plastic spacer wedges and anchor dowels.
Before laying the logs, you need to make sure that they do not rot. For this purpose, the workpieces are treated with impregnation or an antiseptic, then dried.
Before laying the logs on the balcony floor, it is covered with a layer of waterproofing film. Alternative methods are laying roofing felt or mastic with a bitumen base.
window space
It is better not to touch the plastic window, since it itself has an attractive aesthetic appearance; you can limit yourself to painting the ebbs and slopes. For plastered slopes, it is advisable to use acrylic or latex paint for facades.
Wooden windows can be painted or opened with a protective decorative agent, then varnished. The old coating must first be removed, cleaned well and coated with primer.
Slopes made of brick are processed in the same way as the entire wall.
A variant of the idea for decorating a window from the outside can be seen in the photo.
Lathing walls and ceilings under panels
The next stage of finishing the balcony with your own hands is lathing the ceiling and walls. The sheathing itself is a timber structure that acts as a frame for the balcony. Subsequently, the interior finishing of this balcony is mounted on the sheathing. The sheathing is made from high quality timber, it is required that it be dried. Before installation, it is necessary to coat the timber with an antiseptic, which will increase the service life of the sheathing. The thickness of the lathing depends on what kind of insulation will be used on a given balcony.
First you need to apply markings to the walls and ceiling, which will make it possible to accurately determine where the individual elements of the sheathing will be located.
Then the timber is cut into pieces of the required length and attached to the walls with dowels, carefully observing the markings.
Electrical wiring
First, you need to connect 220V to the loggia (for the needs of the loggia, a wire with a cross-section of 1.5 mm is enough) and secure it in a convenient place, depending on where the sockets, light switch and lamp (if available) will be located, the wiring box. It is better to hide the wiring in a plastic corrugated cable. wiring, we didn't use it. The corrugation is attached to the wall with special dowels and clamps. In the places where the socket, switch, lamp, and junction box will be installed, leave about 30 cm of cable reserve for convenient installation.
Electrical wiring along the wall of the loggia.
Lighting and socket connections
If the householder decides to connect the balcony to the electrical network, then this stage of work is carried out at the same time as the installation of the sheathing. Inside the balcony, electrical cables and other communications are laid, and the points where sockets and switches will be located are also determined.
Even before performing all operations, you need to decide how many lighting fixtures will be located on the balcony. You need to know, preferably accurately, about the total illumination power. Taking into account this value, the method of power supply is selected. It could be:
- Socket in the apartment, which is located at the shortest distance from the balcony;
- Junction box;
- Electrical panel
To protect these communications from any accidents, it is necessary to take the electrical wires into special metal sleeves, which will significantly complicate access to them.
Heating
To improve the microclimate on the balcony during the cold season, it is recommended to install a heating system in the room. Installing water radiators from central heating can be problematic, so it is best to install electrical appliances. They are used as needed so that there is not a lot of energy consumption. For example, if the recreation area is used for evening tea, then the heater is turned on 30 minutes before the event. This time is enough to warm up the room.
Repairing a balcony yourself is not an easy task, but it can be done. The main thing is to adhere to the rules indicated above, and then there will be no problems with the reconstruction.
Insulation of walls, ceilings and floors
Inside the balcony you need to insulate the walls, with the exception of the one that separates this space from the rest of the apartment. The ceiling should not be insulated if the floor is insulated on the balcony located directly above it. And if the ceiling is insulated below, then this loggia does not need to insulate the floor.
You can prevent heat loss from the loggia space by insulating the walls with one of several materials. Among them:
- Polystyrene foam, which gives a good level of thermal insulation. This material also has a low mass and low price.
- Mineral wool has excellent thermal insulation. At the same time, it absorbs moisture well, accumulating it, therefore, if this material was chosen, it is necessary to provide a layer of waterproofing;
- Penoplex is a material with good strength and does not suffer from moisture;
A common technique when repairing a balcony with your own hands is a combination of two materials. So, penoplex can be used to insulate floors and walls, and for the ceiling you can purchase polystyrene foam due to its low mass. Individual insulation elements are installed in the spaces formed by the sheathing, using foam or glue to secure them in place.
Nowadays, foil-coated thermal insulation materials are increasingly used.
They make it possible to simultaneously solve both the main problem - thermal insulation, and achieve good moisture insulation.
How to dismantle balconies (loggias) and repair damage with your own hands
To begin repairing the balcony, you need to do preparatory work. First of all, you need to take off the old shirt, unscrew and take out everything that is not included in the balcony package.
Now you should check for damage that may have occurred over time. These may be cracks and crevices along the edges that need to be eliminated. To do this, the surface is cleaned of all debris, stones, and chipped parts. After this, the damaged areas are treated with a primer, you need to wait until it dries and apply a cement layer. For minor damage, one cement layer is sufficient. The cement mixture must contain an adhesive base so that it does not erode or crack.
If the cement surface has various voids, then they must be carefully cemented.
Warm floor
If it is decided that the balcony will be heated, then when renovating it with your own hands, you can think about installing a heated floor on the balcony; this method of retaining heat guarantees comfort if family members are going to enter this space during the cold season.
There are the following main types of heated floors:
- Water floor. It will require less electricity to heat it. When arranging it, you can save usable space. However, this type of floor requires labor-intensive installation and during its operation it is relatively difficult to adjust the desired heating temperature.
- Electric floor. This method means easy adjustment of the balcony heating temperature, the heat will also be distributed as evenly as possible throughout the entire space, and it is inexpensive. But when choosing an electric floor, you will have to pay more for electricity than when installing a water floor; also, with this method, an electromagnetic field appears on the loggia.
Installation of electric-type heated floors is carried out as follows:
- A heat-insulating layer is placed on top of the screed on the floor; it can be polystyrene foam, penofol or mineral wool;
- A reinforced metal mesh is placed on top;
- A heating cable is laid on this reinforced mesh;
- Install a temperature control device;
- Everything is concreted on top with cement;
- Linoleum flooring or tiles will be placed on top of the cement.
Another method is a film heater, which heats the space using infrared rays. Then there is no need to fill the screed. Laminate or linoleum is placed on top of such an infrared heated floor.
- Scaffolding company Podem
LG TV repair in Astana
Entrance groups from the Horizon company
Preparatory work
Before the main work, it is recommended to prepare the foundations. To do this, you should follow the recommendations given below.
Surface preparation
Algorithm for preparing surfaces for repair:
- dismantle old window frames and coverings from all surfaces;
- building foundations are tapped with a hammer to detect and remove unstable fragments;
- metal parts are cleaned of rust and treated with an anti-corrosion agent.
Attention! If the floor reinforcement is thoroughly rusted, it is recommended to fix new material on top. It is best to lay a mesh with cell sides of 150-170 mm, connected from class A-III reinforcement, with a diameter of 3 mm.
Slab restoration
Do-it-yourself slab restoration can only be done if the building base has minimal damage or simply needs leveling. If the floor is destroyed to a significant extent, it is recommended to invite professionals.
The help of specialists will be required in the following cases:
- a piece of cement has collapsed, resulting in through defects or a significant part of the reinforcement being exposed;
- a deep crack has formed at the junction of the slab with the house;
- the concrete base has collapsed or the material has peeled off.
Self-leveling of the slab is carried out as follows:
- the building base is primed, the primer is applied in two layers and after each treatment a break is taken so that the product hardens;
- Cement plaster is laid, the material is leveled over the surface using the rule;
- install the formwork using a board 15-17 cm wide;
- Concrete is poured, the material is leveled, and activity is stopped until the composition hardens.
Replacing the fence
At the very beginning of the work, the old fence is dismantled along with the glazing and coverings. After this, a new structure is installed. To do this, it is recommended to invite professionals. Specialists will take the necessary measurements, after which they will manufacture and install the fence. Usually the structure is made of metal, but you can order the parapet from glass or other material, depending on personal preferences.
You can also do the fencing yourself. For this, a rectangular profile pipe is used. This material has the following advantages:
- strength;
- ease of use;
- external attractiveness.
To manufacture the fence, measurements of the balcony are taken and a diagram of the parapet and its installation are developed. After this, the material is prepared, and the pipe parts are welded together according to the plan. The fence is then installed on a concrete base using anchors.
To make a parapet, you can also use foam blocks. The material is laid on a concrete base using a repair mortar. If you do not have a welding machine and experience in drawing up diagrams, it is best to use this particular method of arranging a parapet. The further type of work will be considered based on the fact that the fence was made of foam blocks.
Selecting materials for finishing walls, floors and ceilings
Now there are a lot of materials that are used to cover walls during the repair of balconies and loggias. It is not difficult to decorate the inside of a balcony with your own hands using any of them; the owner of the house can purchase any of the materials mentioned below.
Fiberboard or PVC panels are common, as are oriented strand board and plasterboard.
Among natural materials, it is worth mentioning wooden lining.
The lining has excellent environmental characteristics, it is easy to work with, and this finish will retain its appearance for a long time. And, of course, she looks great.
You can start installing it from any selected corner of the loggia, with the very first element being installed using a level. Following this, subsequent panels are placed so that they fit into the groove of the previous ones, so finishing the balcony with clapboards with your own hands is done simply.
There are also a lot of materials on the market for flooring. You can build a plank floor, cover it with laminate or linoleum, or lay ceramic tiles. The choice depends on the financial capabilities and design requirements of the homeowner.
The ceiling can be finished with PVC panels or the natural material described above - clapboard. In addition, you can install a suspended ceiling. Standard whitewashing is also a completely acceptable option.
The use of PVC panels is a very practical option, which at the same time leaves room for design delights, since these elements can not only be given any color, but also products similar in appearance to marble, stone or wood can be purchased.
When installing the covering on the ceiling, it is important to ensure that in its finished form it does not interfere with opening the balcony window.
Loggia 6 sq. m.
Photo of the renovation of the 6 sq.m. loggia. m clearly illustrate the fact that a large space opens up a wide field for the imagination.
Here you can not only functionally use square meters, but also introduce into the interior those decorative details that would hardly be appropriate if there were space restrictions.
- The recommended color scheme for a room of this size is warm, pleasant shades. They will create an indescribably cozy atmosphere.
- The walls should be finished with Venetian plaster, choosing a composition in beige-pearl tones. It looks impressive and stylish. In this case, you can do without any decorative addition.
- The partition under the double-glazed window should be coated with white paint and decorated with square panels in pinkish-chocolate tones, stylized as compact cabinets.
- A glossy stretch ceiling would be appropriate in such a loggia. It will allow you to visually expand it. As for the lamps, it is worth stopping at a chandelier with semicircular shades and several sconces. As for the floor, it is better to use laminate. It should be darker than the decorative panels.
- Blinds should be installed on the windows - they will protect the room from the hot sun. Wicker chairs and drawers, a round tea table, and a couple of modern linens will perfectly complement the decor.
Installation of the lamp
To illuminate the loggia, you can use standard chandeliers, floor lamps, sconces, LED strip, as well as spotlights. In cases where the size of the loggia is significant, it is necessary to take care of comprehensive lighting so that individual devices illuminate individual parts of its space.
You also need to make a careful choice between direct and diffuse light sources.
Direct light makes sense if you want to create a reading space, illuminate a clearly defined area or object, or if the space has a low ceiling. Diffused light helps create a generally comfortable environment in the room.
Tips for landscaping a loggia: options for using the area
To summarize all of the above, let me give you a few more tips on landscaping your loggia. This space can be used at your discretion, but, as a rule, an office, a children's playroom or a greenhouse are arranged here.
Landscaping of the loggia - photo
If the loggia is adjacent to the kitchen, then this area is often used as a dining area.
Or install a bar counter.
An interesting option is to arrange a gym or workshop on the loggia.
Here you can also create a small recreation area, a children's bedroom, a school corner and anything else. It all depends only on your imagination.
Flooring
If the floor surface on the balcony is perfectly flat, you can use plastic self-adhesive tiles; when there are uneven surfaces, preference should be given to another option.
If you have limited options, an excellent solution would be to use old pallets and wooden slats. The wood should be treated with a protective agent, which will improve the moisture resistance and reliability of the material.
A tufted rubber carpet would also look good. It needs to be laid loosely; for a stronger fixation, you can use double-sided tape.
The photo of a budget balcony shows examples of how you can decorate the space stylishly and beautifully.
Metal siding
Modern material, great for exterior decoration. Siding panels are strong, reliable, and at the same time quite easy to work with. Manufacturers provide a wide range of color solutions. Has a high fire safety class. Fungus and mold do not spread on it.
Not afraid of severe frosts. Disadvantages include colors fading in the sun. The cost of such finishing is higher than when using gypsum fiber board or plastic panels.
Types of interior decoration of balconies: saving wisely
The modern market of decorative and building materials offers many options for interior decoration of balcony walls. When choosing one type of finish or another, the consumer is guided by both personal preferences and the size of his budget.
- The most economical option, which can significantly reduce cost estimates, is the use of lime whitewash. However, in a short period of time, the limestone layer becomes clogged with particles of dust and debris, which cannot be removed. Such walls have to be refreshed with a new layer of whitewash at least once a year, because... otherwise, the walls will acquire a gray tint, giving the balcony an untidy appearance.
- Using decorative plaster to decorate the interior walls of a balcony will cost a little more. The plaster should be applied to a rough wall that has been well treated with a primer mixture, after which it should be protected with a layer of water-repellent mortar. This type of interior decor allows you to hide minor defects in the starting surface and keep the interior of the balcony clean.
- Covering the interior walls with wooden clapboard is a fairly expensive way to decorate the interior space of a balcony. The advantages of wooden panels include their naturalness, environmental friendliness, and presentable appearance. The obvious disadvantages of wooden lining is the need to periodically apply a protective layer of varnish, especially in the case of direct exposure to ultraviolet rays on the material. In addition, like any other wood, wooden lining loses its original structure in conditions of high humidity. Therefore, it is advisable to periodically treat the surface of the panels with a water-repellent solution and avoid getting moisture on their surface. During the cleaning process, you should avoid using liquid cleaning products.
- Plastic lining has a low cost compared to wooden lining, but its color range is very limited. It should be noted that this material has a long service life and is easy to care for. During the cleaning process, simply wipe the plastic surface with a damp cloth, which will remove accumulated particles of debris and dust.
- Plastic polyvinyl chloride (PVC) panels are a product of modern chemical production. Their distinctive features are the low cost of the material (at the level of plastic lining) and the wide variety of available colors. Among other things, PVC panels can have a variety of textures that reliably imitate natural stone, wood, marble and much more. At the moment, it is possible to choose between PVC panels with lamination and PVC panels with thermal printing. The buyer will be able to purchase panels with lamination at a higher cost than panels with thermal printing. This is explained by the fact that in the first case the available color palette is much wider and there is the possibility of applying various types of texture and relief to the surface of the material.
MDF (fine fraction) lining is carefully compressed cardboard, wrapped in a film that has a pattern or texture on its surface. The protective layer of this material is a high-density glossy film that protects MDF panels from external negative factors. This type of cladding has been used to decorate the interior walls of balconies not so long ago. Its positive aspects: a variety of available textures and colors, simplicity and speed of installation work, aesthetic appearance. Disadvantages: short service life, poor resistance to high humidity. It is not recommended to use MDF panels on a balcony with low waterproofing. This material quickly absorbs moisture, which contributes to rapid destruction.