If you are planning to replace or install new windows, you will need to learn the installation process. It all depends on how you will install the windows: either with your own hands or by hiring a third-party company. It takes approximately 4 hours to dismantle and install the structure if you do not have experience in this matter. For a company employee who does this often, such work will take no more than an hour. But installing tilt-and-turn windows yourself requires some construction skills.
Window system components
Before you begin installation, you need to understand the nuances and details. First, you should find out all the names of parts and materials. The main load-bearing part is the frame. In the version of plastic windows, its production is carried out from a plastic profile, which can be single-chamber, double-chamber, etc. A special insert is placed in the center of the structure to ensure rigidity. In plastic systems, this insert is made of plastic; in metal-plastic systems, metal is used.
The profile system is assembled from 2 or more chambers
In addition, the profile is divided into classes: premium, standard and economy. All profiles manufactured at the plant are subject to certain standards. If you want to make a choice in favor of good tilt-and-turn windows, take the standard class. In terms of color, white windows are most often found, but other colors can be used: wood, brown. Products made from colored profiles will be more expensive than white ones.
conclusions
Now you know how plastic windows are installed, so you can safely get to work. The final check of all elements can be carried out only 24 hours after completion of installation (then the foam will have already “set”).
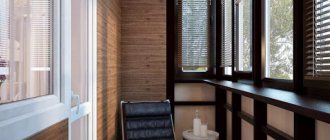
The described technology is quite applicable to balcony glazing, although it also has its own nuances - such as, for example, installing a parapet to create a partition.
Plastic windows
Installation of a plastic balcony block
Installation of a plastic balcony block
Installation of a plastic balcony block
Installation of a plastic balcony block
Installation of a plastic balcony block
Installation of a plastic balcony block
Find out how to properly make slopes on windows with your own hands from our new article.
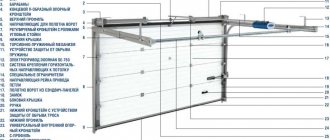
Components of a plastic window
The main element of a window unit is the frame.
The design of a plastic window includes the following parts:
- frame – the main structural part;
- if you have a large window, most often it is divided by a vertical partition, there may be several of them - it all depends on the choice of design;
- the part that is motionless is called blind, and the part that opens is called the sash;
- double-glazed windows can have different properties, for example, tinted, energy-saving, reinforced, using inert gas. In addition, they are single-layer, two-layer, three-layer or multi-layer - the choice is great;
- In order for the glass to hold securely, they are pressed with a bead, which is a thin plastic strip. For tightness, a rubber seal is used, most often black;
- fittings are always used - this is a special set of tilt-and-turn mechanisms that help open and close the doors and provide various functionality;
- in addition, seals are needed to ensure the tightness of the entire structure;
- Ventilated holes for drainage are made on the inside of the frame, which are covered with caps. Moisture formed when the temperature changes outside and inside the room passes through them to the outside;
- another part of the structure is the ebb - it is mounted outside, and the window sill is installed from the inside;
- parts located on the side of the frame are finished with slopes.
Stand profile: what is it?
Before deciding whether such a part is needed or not when installing a plastic window, you should understand its structure and purpose.
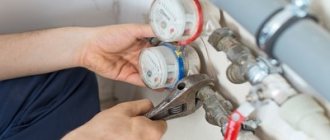
Structurally, the stand (window sill, bottom) profile is a profiled strip attached to the lower end of the window frame. Made from PVC with increased resistance to environmental influences. This material is more durable and successfully withstands low temperatures and high humidity.
Is it possible to install the window yourself?
There is an opinion that installing windows in a house or apartment is a rather complicated procedure. It must be said that this is not so. What do you need to know during installation? To perform these works, you do not need special professional tools and equipment, or vast experience. The procedure includes two main points:
- dismantling the old window block;
- installation of a new window.
Dismantling an old window takes an average of 1.5 hours.
If we talk about the time required to complete the work, then the first stage will take about an hour and a half. Installing windows yourself will take less than three hours. It must be said that if you nevertheless decide to opt for the services of specialists, then you should demand certain guarantees from them.
If you installed the tilt and turn windows yourself, this will void your warranty. In this case, it is necessary to purchase structures directly from a manufacturer who has been working on the market for a long time and has good reviews from customers. If you decide to buy single-chamber or double-chamber windows in winter, you can always count on a significant discount.
When a window is purchased from a company that also carries out installation work, the customer has a warranty on the fittings for about 5 years. If you install it yourself, you can get a warranty directly from the manufacturer, that is, at the place of purchase.
In order to install windows in a brick house, cinder block house, gas block house or apartment, you must first order a tilt-and-turn or blind structure from the manufacturer, and this requires accurate measurements.
Types of plates
There are two types of anchor fasteners. Rotating models are used when installing complex PVC windows or openings of non-standard shape (arches, trapezoids). The mechanism ensures maximum adherence of the plate to the wall and frame. The turn signal consists of a steel strip and bent teeth. When installed, the element protects the glass block from deformation.
Type of anchor plates Source pmfz.ru
Fixed models are used for standard installation. The parts are fixed inside the opening, selecting the desired angle for fixing the PVC window. For better adhesion, there are special rings (“claw hooks”) on the surface of the metal fasteners. The strips are 15 cm long and 2.5 cm wide.
Manufacturers of plastic profiles often produce anchor plates for their products. Fasteners are universal and replaceable. If a part cracks during installation, it can be easily replaced with a model with similar characteristics from a hardware store.
Mounting plate Source novosibirsk.kassot.com
Anchor plates are made of strong galvanized steel. To prevent installation parts from rusting or collapsing, the surface is coated with anti-corrosion varnish. Each manufacturer has its own requirements for metal thickness, so the parameters range from 1 to 2.5 mm. For plastic windows of standard sizes, 1.5 mm models are sufficient, for heavy three-leaf or multi-chamber windows in high-rise buildings - from 2 mm. Those that are too thick (more than 2.5 mm) will have to be formed on a template, which can lead to destruction of the protection.
Step-by-step instructions for correct measurements
When you place an order, you will be asked to indicate the following dimensions: the width and height of the structure, the width and length of the slope and window sill.
Before ordering a window, you must take correct measurements of the structure.
Before you start measuring, do not miss an important point - what type of opening you have: with or without a quarter. Look carefully at the window opening: if the outer part is narrower, it means there is a quarter-sized opening in front of you . The measurement is carried out as follows: you need to measure the narrowest part, you will need to measure in several places, find the smallest value, add 3 cm to it. The height is indicated as it is. If your opening is even, then the measurements are done as follows: after measuring the width, subtract 3 cm; Having measured the height, minus 5 cm. Read a detailed article about measuring windows.
Before taking measurements, you need to determine the type of window: with or without a quarter
To determine the size of the window sill, you need to add about 10 cm to the width of the opening inside the window. For low tide, the same is done, only along the outer part of the window. Everyone chooses the width for the window sill for themselves: it is better if it protrudes slightly beyond the radiator.
In addition, when placing an order, you need to decide what components your design will be made of: what options for two-, three- or single-leaf windows you need, how they will open, on which side the capercaillie is located. Don’t forget to decide on the type of fittings (handles, locks, ventilation mechanisms).
If you order several designs at the same time, the width of all openings may be different, but the height should be the same; you must choose the smallest size. Please note that window openings can be located at different distances from the floor. In apartments, the distance from the floor to the window is approximately 80 cm, while on the balcony the windows can be from the floor. Accommodation in a private house can generally be anything at the discretion of the owners.
What does a double glazed window consist of?
Internal components:
- Glass cloth.
- Sealed air space.
- Frame or profile.
- Plastic glue.
- Molecular sieve.
- Sealed components.
Replacement of glass unit
A double-glazed window is a sealed type installation consisting of two or more glasses. They are separated by a corresponding number of air chambers.
An important detail is the spacer frame. The part is responsible for preserving the air inside and does not allow condensation to accumulate. The main function is to maintain a distance between the glasses inside.
The molecular sieve is made of a material with drying properties using granular elements. Designed to protect against condensation.
Features of measurements for glazing balconies
To determine the width of the glass structure, it is necessary to measure the length of the part of the balcony on which the balcony window will be installed, minus 7 cm on each side. This distance will be required for the installation of the corner profile to which the structures of the side elements of the balcony are attached. The height is calculated as the distance from the support to the roof on the balcony or loggia, and a tolerance of 3 cm must be subtracted for the gap.
Balcony measurement diagram
If the glazing of balconies will be done from the floor, then the height must be measured, respectively, from the floor to the roof. The side elements are measured in the same way, only the width is minus 7 cm for the corner profile and 3 cm for the gap with the wall of the house. Read more about panoramic glazing of balconies and loggias.
Advantages and disadvantages
Anchor plates for installing plastic windows are inexpensive and practical fasteners that will save effort and money during installation. If the technology is followed, glass blocks perfectly resist temperature fluctuations, protecting the package from deformation. Reliable parts can withstand operating loads (wind, rain) well and will not become loose from the recoil of opening the doors.
Elements made of galvanized steel Source barnaul.veka.ru
Preparing to install a window structure
After you remove the old window, you will need to inspect the resulting opening, remove all parts that may fall off or collapse; if there are protruding elements, they should be knocked down. Then clean the opening from construction debris and dust. If there are large depressions, it is better to cover them with cement. You can also treat everything with primer.
The base will need to be cleaned before installation.
(function(w, d, n, s, t) { w[n] = w[n] || []; w[n].push(function() { Ya.Context.AdvManager.render({ blockId: "RA-510923-1", renderTo: "yandex_rtb_R-A-510923-1", async: true }); }); t = d.getElementsByTagName("script")[0]; s = d.createElement(" script"); s.type = "text/javascript"; s.src = "//an.yandex.ru/system/context.js"; s.async = true; t.parentNode.insertBefore(s, t) ; })(this, this.document, "yandexContextAsyncCallbacks");
Having finished working with the opening, you need to prepare the PVC window, which is to be installed. To do this, you need to remove the window sashes; if it is solid, double-glazed windows. If your frame has small dimensions, then you can install it without removing the double-glazed windows and sashes . The outer part of the frame should be freed from the film that protects it.
Windowsill
Traditionally, the window sill does not differ in color from the frame and is made of PVC. Its plane can extend beyond the frame by no more than 20 mm. The opening under the window sill must be filled with foam or mortar.
From the outside, the window sill rests freely on the sealant, but from the inside it is attached either to the frame or to a stand under it. The edges of the window sill must extend under the slopes by at least 20 mm.
The thickness of the wall determines the width of the window sill. It should not protrude more than 60 mm beyond the inner plane of the wall. Then the warm air flows coming from the radiator will be able to flow around the window sill and prevent the window from fogging up.
When installing a window sill on a plastic window, you should make sure that the canvas is slightly inclined to the floor at an angle of 5-6 degrees. This will prevent the accumulation of moisture and dirt, but things left on the window will not fall.
Installation Technology Guide
The finished plastic window is brought into the opening, placed on support blocks and aligned horizontally. After this, using a level, the window is aligned vertically and secured in this position with spacer blocks.
Installation of both fixed windows and opening sashes is the same. There are two options for installing windows: with and without expansion of the structure. When using the first option, holes are drilled through the frame through which anchor bolts are driven into the wall. This method is more complex and more reliable.
When installing a window using the unpacking method, holes are drilled in the frame and wall, into which anchors are then driven in.
Places for attaching anchors and support blocks
If the installation is carried out without unpacking the frame, the window is secured using special anchor mounting plates, which are attached to the profile and then to the wall. This option is faster. However, it must be taken into account that under significant wind loads, the frame structure may warp or it may sag. If you decide to mount it on a plate, you should choose thick, wide options. Please note that if the region in which you live has a strong wind load or windows will be installed at a height, then you should use the option of unsealing the frame.
Mounting on anchor plates
Layout of anchor plates
There are nuances to placing a window in the opening. If the walls are made of foam blocks, brick, cinder block, gas silicate or concrete, then the frame is placed 2/3 deep from the internal thickness of the opening. If the walls are insulated with foam plastic, then the fastening must be done before the insulating layer. When insulating and facing with bricks, the window is installed in the insulation zone.
It is very important to choose the correct installation depth
The installation sequence must be followed:
- Having inserted the frame, level it using support and spacer blocks;
- then attach it to the wall;
- after installing the structure, it is necessary to assemble the window;
- then you need to check the normal operation of the shutters and all mechanisms; to do this, open and close the window;
- after everything has been checked, the doors must be tightly closed and the gap around the structure must be sealed. For this purpose, polyurethane foam is used.
However, it must be remembered that in direct contact with sunlight and the external environment, the material loses its properties and is destroyed. To protect it, it is necessary to create a reliable barrier on both sides of the foamed gap; this can be a special film that must be glued to the outer and inner parts of the window. After the foam has dried, it is necessary to finish the slopes on both sides (external, internal) of the structure. You can open the window a day after blowing the gap with foam .
To ensure proper installation of both window sills and window sills, follow these simple rules:
- we install the ebb from the outside in a special slot in the frame or attach it to it with self-tapping screws;
- the window sill is installed as follows: it is necessary to trim it from the edges so that it fits the width of the window opening and rests against the end of the stand profile;
- the level is leveled using special pads, after which the space under the window sill is blown with foam or filled with mortar.
According to the principle described above, windows are installed on a balcony or loggia, in brick or concrete walls. However, keep in mind that the entire weight of the window structure will be carried by the parapet, so you need to strengthen it.
Installation
There are 2 ways to install a window sill profile.
Method No. 1
With this option, the window sill strip is installed first, and then the frame.
- A piece of the required size is cut.
- It is placed in the opening and leveled using a building level.
- A preliminary fitting of the window frame is done. If there is a gap between it and the top of the opening, it can be eliminated by raising the support bar. To do this, you can place pieces of timber under it.
- The space between the bar and the opening is filled with polyurethane foam.
Mr. Build recommends that to prevent the “bare” bottom profile from becoming a weak point of the entire structure in terms of freezing, it must be additionally insulated. To do this, extruded polystyrene foam, cross-linked polyethylene or other insulation in the form of a bar is inserted into one of its chambers.
Mistakes you can make when installing windows
There are a number of points that you should pay attention to when installing the structure so that it has a long service life:
- you cannot install the window with the glazing beads facing outward, as this reduces the structure’s burglary resistance, since the glazing bead can easily be pulled out and the glass unit removed;
- you need to be careful about leveling the structures when installing the window, otherwise opening and closing the sashes will be difficult;
- It is imperative to protect the mounting foam from direct sunlight to avoid its destruction;
- It would be wrong to choose to fix the frame structure only with mounting foam: it is absolutely necessary to attach it to the wall, otherwise it may simply fall out.
By following all the installation rules, you can successfully install the window structure yourself, and if you seek the services of professionals, you will be able to monitor their work at any stage.
Thermal conductivity and sound insulation of the window: so that noise and cold do not sneak into the house
Thermal conductivity of plastic windows
In addition to the manufacturer, when choosing a window, it is also necessary to take into account such quality as the thermal conductivity of the structure. According to SNiPs and territorial building codes, the heat transfer resistance coefficient of a window varies depending on the climatic conditions of the region of residence. Structures that are installed in residential premises should not have a heat transfer resistance lower than that specified for the specific region of residence.
Thermal conductivity directly depends on the design and type of glass used in the double-glazed window. If you order windows with energy-saving glass, the thermal insulation of structures increases by 10-15%. The cost of energy-saving glass is about 250 rubles. for 1 sq. m.
The thermal conductivity of a window may decrease due to poor-quality installation, or less often due to manufacturing defects. Very often, in the process of improper installation, a chip or crack appears on a double-glazed window, and the structure loses one of its main qualities - tightness. Visually, this manifests itself as fogging of the inner surface of the glass. As a result, in winter the room will become colder, and the house will have to be heated more.
To improve the thermal conductivity parameters of the window, you can prepare a support profile. From the point of view of thermal conductivity, the stand profile is the weakest point in the window structure. To attach the drain, you will have to drill it, which will further worsen the thermal conductivity parameters. To normalize the thermal insulation properties of the window, the internal volume of the stand profile can be filled with polyurethane foam. This should be done the day before installing the window so that the foam completely hardens. Foaming of the stand profile is not provided for by GOST; window companies also do not practice this operation.
Soundproofing properties of plastic windows
This parameter is essential if there is a busy highway or railway near the house. However, it is always more pleasant if external noise from the street does not penetrate inside the house. And this cannot be achieved without high-quality window sound insulation.
Comb
A simpler and cheaper ventilation limiter. The design does not allow the doors to move around in strong winds, opening and closing randomly.
The main purpose of the comb is to regulate ventilation
The comb does not provide protection for children, but it allows you to regulate the intensity of ventilation, which is very convenient. The plastic models are weak, but they still work properly for several seasons.
The price of a comb with installation is from 300 rubles.
Low tide
The ebb and flow is an important part of the window design. Installation of a low tide on a plastic window is mandatory, since the design removes excess moisture from the room, but does not take much time. From the street side, the ebb tide is attached with self-tapping screws to the stand profile.
- Pool finishing: description of all types and features of modern finishing
- How an independent examination of construction work is carried out: an overview of all stages
Fasteners for the construction of frame houses: features of the right choice
To prevent water from getting inside the system, all connections must be well treated with sealant. The edges of the low tide need to be deepened into the walls. To do this, you need to first make recesses with a hammer drill.
To reduce noise from rain, the lower part of the ebb is glued with a strip of sound-proofing material or a “cushion” is made of polyurethane foam.
Assembly seam
An assembly seam is an element of an abutment assembly, which is a combination of various insulating materials used to fill the installation gap and having specified characteristics. The seam must meet the following requirements:
- Ensuring reliable fastening of the window unit to the wall;
- Ensuring the required temperature and humidity conditions at the junction of the window frame and the wall. In this case, the window unit must be installed in such a way as to avoid freezing of the window slopes and the frame profile itself;
- Density and tightness;
- Low thermal conductivity and high durability;
- Susceptibility to thermal expansion and contraction of the window unit without loss of tightness.
GOST establishes the requirements that the three-layer construction of the construction seam meets - it ensures ideal preservation of the thermal insulation properties of the foam.
Assembly seam – 3 layers:
- External – waterproofing, vapor permeable;
- Central – thermal insulation;
- Internal – vapor barrier.
This design is designed to ensure the resistance of the assembly seam not only to atmospheric influences, temperature and moisture, including from the inside, but also resistance to operational influences. In addition, it must be resistant to various types of deformation, both temperature and force.
The outer (outer) layer of the assembly seam protects it from moisture penetration, exposure to ultraviolet radiation, exposure to temperatures from -35 to +70°C, and partially prevents the penetration of cold air through the assembly seam, etc.
In addition, the outer layer of the installation seam must have high vapor permeability ( vapor permeability coefficient
outer layer material –
at least 0.15 mg/(m*h*Pa)
to remove condensation moisture from the installation seam to the street.
Today, the most mature technology is the construction of the outer layer of the assembly seam using vapor-permeable self-expanding sealing tapes (PSUL). There is a fairly wide range of names for this type of material, but not all are suitable for sealing window installation joints. PSUL tapes intended for installation of window blocks must withstand water pressure in a compressed operating state of over 300 Pa. The PSUL must be resistant to ultraviolet radiation (the total irradiation dose to the front surfaces during testing is at least 5 GJ/m2
).
Applying a layer of plaster, putty or painting compositions to PSUL is not allowed!!!
The central layer must provide the specified resistance to heat transfer of the assembly seam and the necessary sound insulation.
To create the middle layer, polyurethane foam or, more simply, polyurethane foam is used. (Spray foam is a polyurethane foam sealant). The central layer must be made without voids, cracks, peeling and overflows. Shells larger than 10 mm are not allowed. The water absorption of foam insulation of the central layer when completely immersed for 24 hours should not exceed 3% by weight. The high heat and noise insulation characteristics of polyurethane foam are maintained only in a dry state. Humidification negates all of its above-mentioned advantages. Therefore, keeping the insulation in as dry a condition as possible is the main task performed by the outer and inner layers of the assembly seam.
The inner layer must be sealed and provide reliable insulation of the central layer materials from the effects of water vapor from the room.
Vapor barrier materials along the internal contour of the installation gap must be laid continuously, without gaps, tears or un-glued areas. Vapor barrier materials of the inner layer of the installation joint must have a vapor permeability coefficient of no more than 0.01 mg/(m*h*Pa). Vapor barrier sealing tape is made of aluminum foil, coated on one side with a self-adhesive plastic-elastic mass based on butyl rubber with a high degree of adhesiveness. The tape must be glued tightly along its entire length. Any gap or swelling is a channel for moisture penetration. The width of the tape is determined by the formula: the width of the installation gap plus 30 mm or more.