A double-walled coaxial chimney is used to remove combustion products from gas boilers and water heaters equipped with a closed combustion chamber. It significantly simplifies the installation of water heating devices in terms of smoke removal; you do not have to build a classic pipe from a modular sandwich or ceramic blocks. The procedure is as follows: get acquainted with the design, study the requirements of the standards for installing a coaxial chimney and do the installation work yourself, using this manual.
Formation of condensation in the chimney
Moisture in the chimney impairs draft; this is easy to notice with constant use.
Sticky soot blocks the pipe. In the masonry of brick chimneys, smudges appear at the seams, the bricks are saturated and destroyed. At the bottom of the channel, the temperature of the exhaust gases is maximum. Moving upward, the flow cools, lingering at the bends, and settles in drops on the cold surface of the chimney. Metal pipes that are not insulated cool down in a few minutes (when switching to a smoldering combustion mode), brick and ceramics give off heat more slowly. Hence the ability of the metal to collect drops of moisture on itself.
Insulating the pipe helps keep the temperature of the exhaust gases above the “dew point”. With a “lined” chimney, the space between the masonry and the pipe is filled or filled with non-flammable insulation (expanded clay, stone or glass wool). The top and bottom of the gap are sealed with a plug.
If the diameter allows, it is reasonable to assemble an analogue of the sandwich system. Having insulated the outside of the existing metal pipe with a layer of 5-10 cm of mineral wool, it is necessary to protect the entire structure on top with metal sheets or a pipe of a suitable diameter. On the outside, the channel experiences less stress, so a more aesthetic material can be chosen.
Correct installation of the chimney is important. The joints of the insulation and pipes should be staggered. The metal is connected with heat-resistant sealant and fasteners, and the entire structure is tightly fixed with clamps. If the joints in a homemade or purchased sandwich system are not sealed, condensation will seep in and destroy the insulation. In response, the temperature and fire danger will increase. The chimney will more often than not be damp and clogged.
Conditions under which excess condensation forms:
- burning with raw wood;
- cold chimney (not insulated or not used for a long time);
- weak combustion of fuel (with a lack of air, too weak draft or too strong), for example, in boilers in smoldering mode.
In a poorly calculated chimney design, the escaping gases also cool quickly. Channels with high heights, complex bends or narrowing diameters slow down and cool the smoke. If the cross-section is larger than optimal, then the draft weakens and condensation also forms.
Wood-burning stoves with 5-7 channels are difficult to warm up with a small load. The smoke will go into the chimney cold. To warm the smoke and reduce the amount of moisture, the design makes a thin direct connection between the firebox and the upper last channel. Also, previously, firewood was sprinkled with rock salt before the firebox - it removed some of the condensation. An ancient method of prevention.
Components of the strapping
Which components and elements will be included in the set of heating system components depends on the type of heating system:
- Heating with natural (gravitational) circulation of heated water (coolant) - popularly called “physics” heating;
- Forced circulation – with connection of an asynchronous circulation pump;
- Mixed scheme.
Set of strapping elements
In a scheme with natural water circulation, the set of piping elements will be as follows:
- Heating boiler - after it, the heated coolant rushes up and moves through the pipes, returning to the boiler slightly cooled;
- Heating piping pipes - most often for a “gravity” scheme, metal pipes are used that are larger than plastic pipes, with a diameter of up to 2 inches. The diameter is selected based on the need to minimize coolant resistance for its unhindered circulation;
- Expansion tank - installed at the highest point of the system, and can be open or closed in design;
- Heating devices – radiators, radiators or registers;
- Mayevsky tap - installed on the heating radiator to bleed air;
- Fittings - welded or threaded turns, doubles, tees made of cast iron, brass, bronze, copper or stainless steel, tees, drains and other types of connectors;
The advantage of the “physics” system: easy independent installation, simple circuit, common parts and assemblies, low cost of components.
Disadvantages: large size of components, inertness, insufficiently fast heating of wiring and heating devices.
Heating scheme with gravitational water circulation
Replacing a brick pipe with a metal one
If a brick chimney is not enough, it can be further extended using a metal pipe. The task is labor-intensive, but completely achievable
It is important to approach it with full responsibility
To begin with, a flat steel platform with a pipe is made. Moreover, its diameter should be the same as the diameter of the metal pipe that is planned to be used. The platform must be securely secured. It is fixed with dowels and screws. Sealing will add additional reliability.
Work order:
On the brickwork you need to mark the points at which the fastening will be installed. They cannot be placed on a masonry seam. It is advisable to place them closer to the center of the brick, and not on its edge. Holes are drilled in the marked places to place dowels. At the same points, holes are made on the flat surface; the self-tapping screws will go there. Fireproof sealant is applied to the brick base, then a steel platform is placed there. Self-tapping screws are screwed into dowels
It is important to ensure tight fit and uniformity. Now all that remains is to wait for the sealant to dry completely and proceed directly to extending the chimney using a metal pipe
Important installation details:
The decision on how to insulate a metal chimney pipe should be made based on the budget, as well as the needs of the structure.
It is important to approach the task as responsibly as possible, performing work in full compliance with all standards and nuances. Then the chimney insulation will last a long time without complaints.
Two boilers in one chimney. Is it possible to connect two heating devices to one chimney?
Is it possible to install pipes from two sources at different heights and from different sides in a single-pass ceramic chimney, for example, Tona? For example, from a heating stove and a water heater with the condition that they will not be heated at the same time? Or is a two-pass chimney still needed in this case?
It is possible, but with serious restrictions:
Gas heat generators must only have separate chimneys
As an exception, in conditions of reconstruction it is allowed to connect two gas water heaters to one chimney if there is a cut in height of at least 0.5 m. Stoves, fireplaces, solid fuel boilers in existing buildings (note, in existing buildings, not newly built ones) if it is impossible to organize separate chimneys are allowed to be connected to a common channel provided that there is a cut-out at least 1 meter high if the heat generators are located on the same floor and a cut-out one floor high if they are located on different ones. The cross-section of the common channel must correspond to the sum of the cross-sectional areas of the chimneys connected to it.
The cross-section of the combined part of the chimney must be equal to the sum of the cross-sections of the connected channels
Building codes do not provide any concessions in case heating appliances are not used simultaneously. Theoretically, operating heaters, even gas ones, in separate mode is possible, but in practice you will not be able to convince either a gas service representative or an Emergencies Ministry inspector of this. They simply won’t sign your documents or turn on the gas. In addition, the standards were not written simply at the whim of engineers; they establish safe rules for the use of heating equipment.
To summarize: for gas appliances - definitely no, for solid fuel appliances - yes, with the above reservations. The standards must be followed, because the fire inspector is required to check the smoke removal systems in your home. We advise you to find the opportunity to install a separate chimney even if all your heat generators use solid fuel. Still, possible draft problems are not worth the money you can save on a chimney. In addition, if you ever change your equipment to gas, there will be no problems with chimneys.
More detailed information can be found in the following documents:
For Russia - SP 60.13330.2012 SNiP 41-01-2003 “Heating, ventilation and air conditioning”; “Rules for the production of pipe and furnace works” VDPO, agreed upon by the Main Directorate for the Production of Pipe and Furnace Works of the Ministry of Internal Affairs of the Russian Federation and Gostekhnadzor in 2001.
Purpose
To eliminate it, you need a smoke exhaust pipe that will remove carbon monoxide to the street and will not cause harm to household inhabitants. For a gas water heater, you can install a chimney yourself.
Varieties of corrugation
In the production of corrugated pipes, two main materials are used:
- Aluminum;
- Steel.
Aluminum, or rather its alloys, are used for equipment with temperatures up to 500 degrees. As the temperature rises, the walls begin to burn out. Therefore, such materials cannot be used with solid fuel boilers and fireplaces. But in the case of geysers, they are perfect.
It is not subject to corrosion, so it can be installed even in conditions of high humidity. The only weakness of aluminum is acidic and alkaline environments.
Stainless steel is not temperature sensitive and can be used in high temperature environments. Alloy steel is not afraid of high humidity.
Advantages and disadvantages of corrugation
The advantages of corrugation include:
- The spiral shape of the corrugated pipe is the most convenient for gas venting. Since carbon monoxide is much lighter than oxygen, it rises. Unlike smooth-walled tubes, it goes in a spiral and leads out. Square pipes are prone to condensation forming in the corners, which over time corrodes the profile.
- The round cross-section is convenient to install. There is no need to use adapters or additional adapters.
- In case of damage, it is possible to quickly change the pipe. Minimum tools and time saving.
- No corners or other fittings are needed. The corrugation bends easily and allows you to turn it in any direction.
- Flexibility allows you to lay the pipeline the way you want it.
Flaws:
- Insulation required. Mobility requires thin walls, so they cool quickly when the temperature drops. Mandatory insulation with mineral wool or asbestos is required.
- High susceptibility to shock. Direct mechanical impact will lead to guaranteed damage to the tube.
The corrugation for a stainless steel geyser can be used in a private house and apartment.
Reason #2 – poor ventilation
Incorrect air exchange, in one of the rooms or in the entire building, is also a factor explaining why there is no draft in the stove of a house or bathhouse. Combustion products are not removed properly and/or in full if:
- In the boiler room/room, windows are constantly or often open, which are also installed at a level significantly higher than the firebox door.
- There are strong drafts that disrupt the usual movement of gas masses through the rooms.
- There is no flow of fresh air, and the sleeve seems to “suck” it from the street so that a vacuum is not created.
The difficulty and even danger here is that these shortcomings may not manifest themselves for a long time, and then lead to the release of exhaust gas, and this is fraught with carbon monoxide poisoning.
If a new stove smokes, most likely during the process of laying it some technological regulations and standards were violated. Perhaps the chimney openings were too narrow or the design of the furnace wells was damaged. Unfortunately, it is not possible to get rid of this with your own hands. The oven will have to be rebuilt.
How to calculate the minimum required power
In most cases, to determine power (Q), a simplified formula is used, where 1 * kW of thermal energy is taken per 10 m2 of heated area.
- *approximate heat loss of a brick building with ceilings of 2.7 m from the central climatic zone of Russia.
For example, for a residential building of 120 m2 located in the Moscow region, the minimum required power of a parapet gas boiler will be Q=120÷10×1=12 kW.
We also recommend making a reserve of 15–20% of the power so as not to operate the heat generator at its limit for a long time, i.e. for the same object Q≈14–15 kW. Also, if we are talking about a double-circuit model, then you will have to add about 15–20% more to provide hot water supply, the total result will be Q≈16–17 kW.
In an apartment of 120 m2 (not corner), heat loss is a priori 10–15% less, so for a unit with one circuit Q≈12.5–13 kW, with two circuits Q≈14.5–15 kW.
How to accurately calculate the required boiler power Individual calculation, formula and correction factors
Reason #2 – poor ventilation
Incorrect air exchange, in one of the rooms or in the entire building, is also a factor explaining why there is no draft in the stove of a house or bathhouse. Combustion products are not removed properly and/or in full if:
- In the boiler room/room, windows are constantly or often open, which are also installed at a level significantly higher than the firebox door.
- There are strong drafts that disrupt the usual movement of gas masses through the rooms.
- There is no flow of fresh air, and the sleeve seems to “suck” it from the street so that a vacuum is not created.
The difficulty and even danger here is that these shortcomings may not manifest themselves for a long time, and then lead to the release of exhaust gas, and this is fraught with carbon monoxide poisoning.
If a new stove smokes, most likely during the process of laying it some technological regulations and standards were violated. Perhaps the chimney openings were too narrow or the design of the furnace wells was damaged. Unfortunately, it is not possible to get rid of this with your own hands. The oven will have to be rebuilt.
Preparation for installation
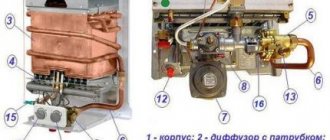
Figure 4. Installation diagram of a parapet boiler: 1 - air duct pipe; 2 — air duct section; 3 - boiler; 4 - seal; 5 — M6 bolt; 6 — clamp; 8 - chimney pipe; 10 — M8 nut; 11 — washer 8; 12 - chimney protection; 13 - eye; 14 — M10 pin; 15 — M10 nut; 16 - washer 10.
The very first thing you should start preparing for installation is to read the detailed instructions for installing the device and purchase everything that is necessary to install the boiler and connect it to the heating system: fittings, fittings, fasteners, etc.
The next stage of preparation is the selection of tools. To make a hole in a stone wall, you will need at least a hammer drill, or better yet, a hammer drill with a diamond bit that matches the diameter of the air duct pipe (for Aton boilers, the air duct diameter is 240 or 270 mm). If there is no crown, you can get by with a small-diameter drill, the length of which is sufficient to pass through the wall. If you work without a crown, then you will need a spatula, and if you have to work high, where you cannot get to it from the street, then you will need a spatula as long as the thickness of the wall. You will need drills for stone with a diameter corresponding to the fastening elements of the boiler being installed.
You will also need keys (in particular, an adjustable wrench) and screwdrivers in accordance with the fasteners supplied to the boiler and connections to the pipelines.
To remove the coating from the wall, you will need a knife, a spatula, a sponge and a basin if the wall is covered with wallpaper, or another appropriate tool.
The measuring tool you will need is a level and a ruler, most likely you will need a square. You will, of course, need a pencil or marker for marking.
Personal protective equipment: glasses, mask, vibration-proof gloves, possibly knee pads.
Is it allowed to connect two stoves or two fireplaces to one chimney?
Tight dampers can solve the problem of smoke getting into any of the rooms, but you cannot operate two stoves at the same time. Poor draft of the second stove and smoke on the second floor are the consequences that can occur, but the main question is air exchange in the house: how to regulate the combustion modes of wood and draft? How is supply ventilation arranged in each room? What are the air exchange conditions in the house (are the rooms connected via a flight of stairs or is it completely insulated)? In this case, there will be more questions than solutions. Therefore, each stove must have a separate chimney device.
Diagram of a two-pipe chimney.
In Europe, it is allowed to connect several gas appliances to one common chimney. All furnace work is carried out either by specialized companies or by licensed professionals. There are no universal recommendations or solutions in this case; everything must be considered individually. The situation with apartment heating (use of gas) and the removal of combustion products into a common similar device is somewhat different. Gas closed boilers are equipped with an automatic system for regulating combustion and operation in the event of a drop in gas pressure. Modern wood-burning fireplaces and inserts do not have such functions.
If two fireplaces are connected to a single smoke duct on the same floor, the distance between the connection pipes must be at least 1 m, and the cross-section of the chimney will need to be increased.
Simultaneous operation in this case will not cause problems. First, you should melt a more powerful hearth.
Where to buy a parapet gas boiler for heating a private house or apartment
In Moscow and Moscow Region
- MirCli (mircli.ru/search?keyword=parapet+gas+boiler+heating) – Leningradsky Ave. 80, building G, tel. +7 (863) 303–35–06, +7 (800) 775–29–90.
- ProComfort (pro-komfort.com/kotly-otopleniia/parapetnye-gazovye) – 1st Vyazovsky Prospect, 4, building 19, tel. +7 (800) 333–56–02, +7 (863) 333–26–06.
In St. Petersburg
- ThermoMIR (thermomir.ru/parapetnye_gazovye_kotly_rossijskogo_proizvodstva) – st. Lensoveta building 62, building 1, tel. +7 (812) 615–80–19, +7 (800) 500–47–02.
- TeploDvor (ru/kotly-otoplenija/napolnye-gazovye-kotly/parapetnye) – Vitebsky Ave. 3/B, office 25, tel. +7 (812) 628–13–33, +7 (800) 775–21–95.
And in conclusion, I would like to clarify that such boilers are not yet a full replacement for either wall-mounted or floor-standing units. In fact, in the desire to “embrace the immensity,” manufacturers take half measures, cutting back on certain parameters. Personally, we recommend taking a familiar, but more reliable and effective analogue.
Gas boilersParapet boilers
Merging options
There are several approaches to solving the problem of combining two structures. Their type depends on the stage at which such a decision was made. The most popular are two ways to accomplish the task.
- Installation of two fireboxes in one housing. As a rule, already at the stage of pouring the foundation it becomes known that the future structure will perform two types of tasks. The body of the fireplace is laid out according to a certain pattern, in which two fireboxes are formed. One firebox belongs to the stove, and the second to the fireplace. Common models are those that are a stove on one side and a fireplace on the other. These devices heat different rooms, and it seems that they function separately.
- Equipping the furnace firebox with a glass door. This allows you to turn a stove into a fireplace with a minimal investment of money, preserving all the functional features of the original device. Thus, a fireplace stove is obtained thanks to an elementary addition.
Undoubtedly, if two devices are combined into one, then there are only one advantages, however, in the case when the originally built stove was built by your predecessors and you want to make two functional devices out of it, you will have to call a professional craftsman. Even if you plan to carry out all the work yourself, you need a clearly developed plan. It will tell you exactly how to implement the join.
Why does the boiler blow out in the wind and what to do in this case?
Blowing out may indicate a failure in the connection of the chimney and automation; more often it indicates a lack of wind protection on the head. However, in general, blowing out the burner flame by the wind is a significant and most well-known problem with parapets, which is why they never gained super popularity.
As a rule, the casing of a coaxial chimney, manufactured in a factory, already has a special insert that protects against gusts of wind. If it is not included in the kit, then you will have to look for a suitable deflector or make it yourself: give a sheet of galvanized steel the desired shape, and then attach it to the head with press washers or rivets.
Factory wind protection and an example of a homemade solution by the owners.
When the boiler still goes out after installing the protection, there is no point in doing anything further: you can, of course, continue to install new heads and deflectors, add bends to the coaxial pipe, or install a vertical chimney, but then the whole point of installing a parapet model will be lost.
Main types
In words it is quite simple to explain the principle of unification according to which the fireplace stove is built. The real device is complicated by the fact that today it is customary to equip it with additional functions. Thus, there are models with ovens, hobs, niches for drying fruit, barbecues, barbecues, etc.
- Ancient traditions are embodied in modern stoves with benches. Of course, the stove has somewhat lost its purpose, and the stove bench serves, for the most part, to add some color, but it is functional. You can climb on it at any time and warm up. Such stove options require a dedicated area of the room. So think about where you can install it.
- Due to its shape, a wall-mounted wood-burning stove-fireplace does not take up very much space, but it allows you to heat two adjacent rooms at once. It is mounted so that its firebox opens into one room, and the back wall is part of the partition. In a small house, this design will provide warmth in any weather.
- A real center that can gather everyone around it is a stove with an oven and a hob. It can zone a room, allocating space for a full kitchen and a hallway. To welcome guests and prepare a festive dinner, it is enough to light only one firebox. As a result, you can get a warm room, a great view of the burning flame and a lot of cooking possibilities.
Firebox walls
The walls of the firebox of fireplaces with increased heat transfer (Fig. 5.2, 1-3) are placed “on edge” with a distance of 6 cm from the fireplace body to form an air chamber behind the walls.
The side walls of the upper firebox 1, in accordance with the recommendations for the design of a classic fireplace, are installed at a slight angle relative to the side walls of the fireplace body. However, experience shows that it is not possible to find the optimal angular position of the walls (and, accordingly, find the angle that defines this position) in fireplaces of a small group (A = 51 cm and A = 63 cm) and the effect of their rotation remains practically zero. Let us remind you that turning the walls of the firebox is done to better reflect heat into the room. Some experts believe that it is better to use the rotation of the walls to maintain the fuel combustion process, so they try to concentrate this direction in the middle of the firebox. For this reason (due to low efficiency) in fireplace 2 (this is a fireplace A = 51 cm), the side walls of the firebox are placed without turning, they are parallel to the walls of the fireplace body. The picture is different in the firebox of fireplaces of the medium and large groups, as can be seen from the fireboxes on the right (4-6). But even in these cases, it is impractical to set in advance a specific angle that determines the position of the side walls of the firebox. It is clear that it will depend not only on the width of the portal (dimension A), but also on the selected depth of the fireplace body (and, accordingly, the depth of the firebox). For medium and large fireplaces these values can vary significantly. In our example, the depth of the fireplace body is 2.5 bricks; it could be 3.0 bricks, which could also affect the choice of the angular position of the firebox walls.
Therefore, for fireplaces of medium and large groups, it is also impractical to set the specified angle in advance; usually it is ~ 30 °. The decision is best left to the discretion of the designer or performer.
Rear wall of the firebox
The beginning of its laying (2 rows on edge for fireplaces on the left and 4 and 5 rows for fireboxes on the right) should be placed in a binder with the side walls of the firebox, this is somewhat difficult to do, but the problem is solved by appropriate trimming of the brick
Let us pay attention to the exception made with firebox No. 4: for laying the first 4 rows, halves of bricks were used, sawn lengthwise: 250 x 60 mm. This frees up an additional 6 cm of the depth of the firebox, or more precisely, its hearth, in favor of placing a fire pit (this is in conditions when the depth of the firebox, and therefore the hearth too, is made minimal)
Firebox No. 4 is the only one where the rear inclined wall is laid in horizontal rows, and the inclined surface of the wall is formed by an angular cut of the brick (20o from the vertical). Accordingly, the outer bricks are intertwined with the side walls, which are laid with a bevel. Due to this, the entire firebox receives strength properties: under temperature loads it does not form cracks and crevices, which, as the solution crumbles from them (with poor, low-quality solutions), can become through.
Pages: — — | — — | — — | — — | — — | — — | — —
Prices: summary table
Rating of the most popular models of parapet gas boilers:
| Model name | DHW, l/min | power, kWt | Efficiency, % | Flow, m3/h | price, rub. |
| LEMAX Patriot-12.5 | —— | 12,5 | 87 | 0,75 | 21 500 |
| ATON Compact-12.5EB | 5–6 | 12,5 | 90 | 1,53 | 25 000 |
| TERMO MAX C-12E | —— | 12,0 | 90 | 1,39 | 18 000 |
| Hephaestus VPR KSG-10S | —— | 10,0 | 92 | 0,60 | 21 500 |
Is it possible to combine two stoves into one chimney?
As an exception, during reconstruction it is allowed to connect two gas water heaters to one chimney if there is a cut at least 0.5 m high.
Stoves, fireplaces, solid fuel boilers in existing buildings (note, in existing buildings and not newly built ones), if it is impossible to organize separate chimneys, can be connected to a common duct, provided that there is a cut at least 1 meter high, if the heat generators are located on the same floor and cuts one floor high, if they are located on different floors. The cross-section of the common channel must correspond to the sum of the cross-sectional areas of the chimneys connected to it.
The cross-section of the combined part of the chimney must be equal to the sum of the cross-sections of the connected channels
Building codes do not provide any concessions in case heating appliances are not used simultaneously. Theoretically, operating heaters, even gas ones, in separate mode is possible, but in practice you will not be able to convince either a gas service representative or an Emergencies Ministry inspector of this. They simply won’t sign your documents or turn on the gas. In addition, the standards were not written simply at the whim of engineers; they establish safe rules for the use of heating equipment.
To summarize: for gas appliances - definitely no, for solid fuel appliances - yes, with the above reservations. The standards must be followed, because the fire inspector is required to check the smoke removal systems in your home. We advise you to find the opportunity to install a separate chimney even if all your heat generators use solid fuel. Still, possible draft problems are not worth the money you can save on a chimney. In addition, if you ever change your equipment to gas, there will be no problems with chimneys.
More detailed information can be found in the following documents:
- For Russia - SP 60.13330.2012 SNiP 41-01-2003 “Heating, ventilation and air conditioning”; “Rules for the production of pipe and furnace works” VDPO, agreed upon by the Main Directorate for the Production of Pipe and Furnace Works of the Ministry of Internal Affairs of the Russian Federation and Gostekhnadzor in 2001.
- For Ukraine - DBN V.2.5-20-2001.
- For Belarus - SNB 4.02.01-03
Loading…
When building a new house, many owners of suburban areas think about installing two stoves, but do not know how to properly arrange the smoke outlet. To avoid unnecessary costs and problems, you can consider several options for installing a heating system. To make the combustion products exit more efficient, two stoves should be combined into one chimney.
Installation work
Assembly occurs in the following order:
- Choose a location where the pipe will go straight up. There should be no obstacles along the way that have to be avoided. Any bevels will interfere with outflow.
- An elbow is installed at the outlet of the column. Installation of flexible corrugation made of steel is possible. Insulation is not needed in this place, since condensation does not form due to the high temperature.
- Now we install the chimney. It is mounted on a bracket and clamp.
- The outer part should be insulated if it is bare. This way you will get rid of excess condensation and protect the pipe from contact with moisture and the environment.
- A fuse is installed on top to protect the drain from moisture.
- A condensate collector is installed.
Installing a geyser hood is the same in both an apartment and a private house. The difference is in the installation of the chimney. In apartment buildings, a vertical chimney is made with an additional bend and a passage through the wall.
Problems arising with one chimney and two fireplaces
Building two stoves or fireplaces and then venting them into one smoke duct can cause problems in the future. These include:
- poor traction;
- smoke on the top floor;
- a short pipe and, as a result, the inability to melt the upper device.
Large plumes of smoke from a second floor fireplace may be caused by an uneven chimney. If during masonry the formation of protrusions was allowed or the cross-section of the passage increased, then carbon monoxide does not exit correctly. Smoke entering an uneven section of the pipe begins to change its trajectory and form “vortices”. Then he finds himself in a second connected passage and follows it into the room. In this case, it will not be possible to build one chimney; you need to install two pipes. You can also make two outlet channels in one pipe or connect the upper chimney to the main pipe at an angle. Thanks to such solutions, smoke will be eliminated and normal draft will be maintained during operation of the upper stove.
Normalization of draft is achieved by igniting a fireplace that has large dimensions. To prevent smoke from getting from one stove to another, it is necessary to make several tight dampers instead of one and ensure that the pipe is hermetically sealed.
If the final decision was made to make one chimney for two fireplaces, stoves, barbecues, etc., then without the proper experience it will not be possible to fully do this. It is better to contact specialists who have the proper knowledge and experience in arranging such structures.
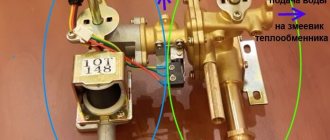
Direct installation of the boiler
Installation diagram of the partition on the chimney casing.
Next, the gas boiler itself is installed (due to the huge variety of boilers on sale, the sequence of steps in each specific case may differ from the one shown) (Fig. 4. Installation diagram of a parapet boiler.).
If the wall where the boiler is installed has a flammable coating, then this coating should be removed at least in an area corresponding to the projection of the gas boiler onto the wall.
In accordance with the chosen location for installing the boiler, a hole is made in the wall for the coaxial pipe. If the hole is drilled with a diamond core bit, it is drilled to size with a slope of approximately 1:100 towards the street. If the hole for the air duct is made with a small-diameter drill and a spatula, then a circle with a diameter equal to the air duct is marked on the wall from the inside of the room and holes are drilled around the circumference at such a pitch that the jumpers between the holes are about a centimeter. Afterwards, these jumpers are knocked out with a spatula. It is quite possible that the inner surface of the hole thus obtained will have to be somewhat trimmed with a spatula.
You should be careful and take into account that the drilled (hollowed out) material may fall; therefore, it is necessary, if the work is not carried out on the first floor, to ensure that there are no strangers in the place where a piece of stone may fall.
An air duct pipe is installed into the resulting hole and securely fixed in it. At this stage, you should check that the pipe slope matches the required one. For a wall of one and a half bricks, the outer edge of the pipe should be 4 mm lower than the inner one. The pipe is fastened according to the boiler manufacturer's instructions.
On the wall, starting from the position of the already fixed air duct pipe, holes are marked for the boiler mounting system. Fastening elements are attached to the wall, on which the boiler will subsequently be hung, or attached if it is floor-standing.
The air duct and chimney pipes are installed inside the air duct pipe.
The boiler, according to the installation instructions, is hung on the wall or installed on the floor in the proper position.
The chimney pipes and then the air duct are attached to the body of the gas boiler according to the manufacturer's instructions.
On the outside of the wall, if provided for by the design, a protective casing is installed on the protruding end of the air duct and secured according to the manufacturer’s instructions.
Underwater sections of the water supply system are installed if the boiler is intended to be used as part of the heating system, and not independently.
The air supply is regulated in such a way as to ensure even and stable combustion of gas in the combustion chamber without restarting the boiler. This can be done at your own peril and risk, but it is highly advisable that a representative of the gas industry be present.
Water fittings, pipes and other elements of the heating system are connected to the boiler.
In any case, putting a parapet-type boiler into operation is possible only with the participation of a gas industry worker.
Ways to improve traction
If there is poor draft in a chimney, this is usually due to design errors. The desire to explain it by unfavorable weather conditions is unfounded, since these factors are also taken into account when making a competent decision.
What could be the reason? And the reasons may lie in:
- Insufficient height of the chimney as a whole or that part of it that rises above the roof.
- Incorrectly chosen channel section: a pipe that is too narrow cannot ensure the exit of the entire mass of gases formed; If it is too wide, it warms up worse, turbulence in the flow of gases is possible in it, and cold street air can form reverse flows.
- Poor pipe insulation.
- Too long non-vertical sections, especially at the top of the chimney.
- Due to the lack of combustion air in the room, it was necessary to provide an additional supply channel in the chimney design.
- Overturning of the draft by the wind, which occurs due to insufficient height of the pipe above the roof. Air flow turbulence occurs at the roof ridge; on the leeward slope it is directed downward and is capable of blowing flue gases back into the chimney.
It is much more difficult to determine the cause in each specific case, since several factors often act at once, none of which plays an independent role.
To improve draft, it is necessary to change the design of the chimney. And sometimes it’s not too significant - for example, increase the thickness of the thermal insulation on the last one and a half to two meters of the pipe. Sometimes a problem such as excessive traction may arise. You can deal with it using a gate. It is only necessary to provide for its installation before starting the installation of the chimney itself.
Single and Dual Circuit Devices
Parapet boilers are produced in a standard rectangular shape, single- and double-circuit, left- and right-handed, which makes their installation easy and convenient.
Single-circuit ones are intended only for heating. They are equipped with a plate heat exchanger, which ensures the rate of heat exchange between the gas burner flame and the coolant.
The double-circuit parapet boiler has an additional copper coil, which provides the house with hot water supply. Water is heated only by flow. If you use a storage tank, the size of the equipment will increase significantly, which will make it impossible to install it in an ordinary apartment.
An exception
Building a two-sided fireplace with your own hands is almost the same as building a regular fireplace, the only difference is the need to equip it with two doors equipped with heat-resistant glass. In addition, you can buy a ready-made double-sided fireplace in a specialized store, and then you will only have to make the foundation for it and lay out the chimney with your own hands.
Both rooms into which the double-sided fireplace doors open should not be accessible. In addition, the firebox should not be located next to the door or windows in the room
This is important not only from the point of view of comfort; frankly, it is difficult to sit comfortably near the door, but it is also important from the point of view of the fire safety of the fireplace. If you have chosen a wall-mounted type of fireplace, then you must remember that it should be placed exclusively near a brick wall
- When building a fireplace, it is necessary to very carefully protect the floor underneath it from exposure to high temperatures. For this you can use fireproof brick or metal sheet. The size of such a platform should be several centimeters larger than the size of the fireplace base.
- When building a fireplace, certain proportions must be observed. For example, the depth of the fireplace should correlate with the area of the room where it is located, approximately 1 to 50. Accordingly, if we are talking about a double-sided fireplace, then both rooms into which the combustion chamber opens are taken into account. And the height of the fireplace should not exceed its depth by more than 2 times.
The fact is that the entire structure must dry very well. And such a long drying time is due to the fact that when building a fireplace, they use bricks that were previously soaked in water. Yes, and the solution needs to dry. If you light a fireplace without waiting for it to dry completely, the entire masonry may become covered with cracks, and such a structure will not last long.
We suggest you familiarize yourself with How to make a pipe in a bathhouse
Unfortunately, for some people the law is not written. If, nevertheless, the option of two fireplaces or a fireplace plus a stove in one smoke channel is being considered, then some nuances should be taken into account in order for such a system to work correctly:
- suitable shape and height of the chimney;
- a channel with a larger cross-section than for one device;
- the presence of several dampers to completely block the smoke channel;
- alternate kindling of devices;
- the distance between the chimney entrances to the channel must be at least 1 meter;
- correct regulation of draft in each fireplace and proper ventilation;
- The fuel in both devices must be the same.
Only by following all these rules can you achieve uninterrupted operation of the chimney when several heating devices are connected to it at once.
Building two stoves or fireplaces and then venting them into one smoke duct can cause problems in the future. These include:
- poor traction;
- smoke on the top floor;
- a short pipe and, as a result, the inability to melt the upper device.
Large plumes of smoke from a second floor fireplace may be caused by an uneven chimney. If during masonry the formation of protrusions was allowed or the cross-section of the passage increased, then carbon monoxide does not exit correctly. Smoke entering an uneven section of the pipe begins to change its trajectory and form “vortices”.
Then he finds himself in a second connected passage and follows it into the room. In this case, it will not be possible to build one chimney; you need to install two pipes. You can also make two outlet channels in one pipe or connect the upper chimney to the main pipe at an angle. Thanks to such solutions, smoke will be eliminated and normal draft will be maintained during operation of the upper stove.
If the final decision was made to make one chimney for two fireplaces, stoves, barbecues, etc., then without the proper experience it will not be possible to fully do this. It is better to contact specialists who have the proper knowledge and experience in arranging such structures.
We invite you to familiarize yourself with Stones for baths and saunas: which ones are better suited and most often used?
The best known manufacturers and models: characteristics and prices
Lemax Patriot-12.5
This unit can be briefly described in two words – simplicity and efficiency. Despite the fact that the heat exchanger is made of ordinary steel, thanks to its coating with anti-corrosion enamel and an inhibitory composition, it is less susceptible to aggressive substances: acids, salts and mineral oils and can last 12-15 years.
With a power of 12.5 kW, its fuel consumption will be no more than 0.75 m3, which is one of the best indicators. But the “picture” is spoiled by a rather clumsy rectangular-shaped case and an uninformative control system: of the devices for monitoring current parameters, only a thermometer is included “by default.”
Manufacturer: LEMAX (LEMAX), Russia.
Floor-standing gas boilers The most detailed selection instructions and the best models
ATON Compact-12.5EB
A relatively multifunctional boiler with a power of 12.5 kW is distinguished by its modest dimensions, which is not inherent in every double-circuit analogue: for flow-through heating it uses an S-shaped coil made of copper - a metal more resistant to corrosion and with increased thermal conductivity, serving up to 17 years .
The hot water supply rate t 35±5 °C can reach 5–6 l/min, while fuel consumption will not exceed 1.53 m3/h. The convenience of installation work will allow you to appreciate the model even more - versatile outputs allow you to connect it on both the right and left sides.
Cost: 23,350 – 27,500 rubles.
Manufacturer: ATON (ATON), Ukraine.
TERMOMAX S-12E
Another unit, devoid of any hints of design. Despite this circumstance, you should not write it off, because the lack of external attractiveness is compensated by economy, efficiency and real comfort of operation: the main control elements are located directly on the front of the outer panel.
On request, the boiler can be supplemented with an expansion tank and a circular pump (not included in the basic package), which will make it suitable for connection to complex heating systems, including those with high hydraulic resistance. Maximum gas consumption at a power of 12.0 kW is 1.39 m3/h.
Cost: 15,860 – 20,340 rubles.
Manufacturer: TERMOMAX (TERMOMAX), Ukraine.
Hephaestus VPR KSG-10S
Perhaps this option is one of the best parapet gas boilers for heating a private home: it is clear, almost silent (distinctively quiet at start-up) and quite highly efficient, given the ability to operate in the “small flame” mode, which allows reducing the average gas consumption to 0.60 m3/h.
Despite the fact that the unit itself has a Russian-made assembly, it contains the well-known Italian automation of the “SIT” type, which, based on the current heat losses, maintains an optimal power level (within 10 kW), as well as a slot burner of the “BRAY” type , which does not require air flow adjustment.
Cost: 19,680 – 23,840 rubles.
Manufacturer: Gefest WPR (Hephaestus VPR), Russia.
What problems might arise?
When building two stoves and combining their chimney, country house owners face the following difficulties:
- smoke on the top floor
- weak traction,
- inability to light the upper stove due to the small height of the pipe.
The first problem can be solved by creating two separate chimneys in the pipe. Thanks to this, smoke will be eliminated, and normal draft will be maintained when the upper stove is operating. You can also connect the upper chimney to the main pipe at an angle.
Smoke may also be due to uneven pipes. If during masonry the builder allowed the appearance of protrusions or, conversely, an increase in the cross-section of the passage, this may affect the movement of combustion products. When it enters an uneven section of the pipe, smoke begins to change its trajectory and form “vortices.” As a result, it can get into the second connected passage and further into the room.
When building two furnaces, you should think carefully about whether it is necessary to connect them into one pipe. If this is possible, then the idea should be abandoned. But if you follow the rules for laying a chimney, no problems should arise.
Differences between a boiler and a gas water heater
When choosing a separate water heating system from a single-circuit unit and a column, consumers are also faced with the question of using a boiler. The geyser and the boiler are designed to achieve the same result - heating water for domestic hot water needs. However, there are significant differences between these devices:
- Geysers are instant-type water heaters, which allows you to start dispensing hot water immediately after turning on the unit and opening the tap - it takes no more than 1 minute to achieve the required temperature. The boiler is a storage tank, the water in which is heated using heating elements. Depending on the useful volume of the tank, heating can take from 1 to 5 hours.
- Hot water prepared in a boiler has a constant temperature and can be simultaneously distributed to several consumers at once without losing the level of comfort. As for the gas water heater, as the intensity of the jet increases, the efficiency of heating the aqueous medium begins to fall, since the burner does not have time to transfer the required amount of thermal energy to the flow.
Boiler or geyser https://howmaster.ru
- The gas water heater provides a continuous, uniform flow of hot water, while the emptied boiler requires a long time to reheat the tap water newly entering the tank.
- When the boiler fails, every home craftsman has the opportunity to clean the heating elements and the inner surface of the tank from scale, change the magnesium anode or perform minor repairs. If gas equipment breaks down, only representatives of accredited utility services have the right to intervene in the system.
- When heating, the boiler consumes a large amount of electricity, increasing utility bills.
Based on the opinions of experts, we can conclude that using a geyser is the most practical solution. In order for the equipment to last a long time and not break down, you need to choose a product from a well-known manufacturer, whose products have a large number of online reviews from satisfied users. In addition, before installation and start of operation of gas units, a long-term agreement should be concluded with accredited organizations for periodic routine maintenance work.
Boiler in the boiler room https://www.zaggo.ru/
Below you can see a comparative overview of geysers and boilers: