- Do-it-yourself compost pit: options for manufacturing and design
- How to make a compost bin: features of this type of construction
- How to properly make a compost bin at your dacha: choosing a location
- What can and cannot be put in a compost bin
- Features of caring for a compost heap: recommendations from experts
- Compost pit: what is it and what is it for?
- DIY compost bin: manufacturing options and design requirements
- DIY compost bin: manufacturing options, photo examples
- DIY compost bin: manufacturing options and instructions
Is there a difference between a compost bin and a heap?
It so happened that a secluded place on the site where biological waste is stored is called a compost pit. And it doesn’t matter whether it’s a pit, a heap, or, for example, some special container. In fact there is a difference. And significant.
There are aerobic and anaerobic methods for producing organic fertilizer. That is, with or without air access. Rotting in an earthen pit occurs anaerobically, without heating. Provided that the top of the composter is hermetically sealed with a film sprinkled with earth.
In the absence of air, thicker, better quality humus is formed. The process lasts a year and a half. Unlike a heap, when laying a hole, the layers are compacted, less earth is used, and more greenery is used. Only healthy plants can be placed, since cold oxygen-free fermentation does not kill pathogenic microbes.
You can plant vegetables in fully or half-finished compost: pumpkin, squash, zucchini. A fruit tree planted in a compost pit will feel great.
What standards are there for them?
The box should be located at a distance of at least:
- 8 meters from the place where drinking water is located.
- 7 meters from the home and the same distance from the basement.
- 200 cm from the fence with the neighbors.
- From 5 meters to the drainage area in the bathhouse.
It turns out that this structure should be located near the toilet or fence.
Do-it-yourself compost pit: options for manufacturing and design
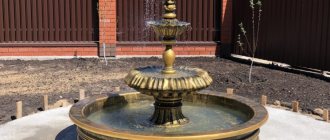
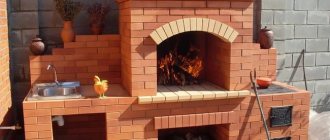
The better the quality of the soil, the richer the crop grown on this land will be. But it happens that the initial data is not very good, and you have to fertilize the soil. To do this, you can use various fertilizers, but it is best to make a compost bin , which will become a source of environmentally friendly material. Let's consider how a compost pit should be made, manufacturing options and materials suitable for this purpose.
Using a compost pit or box you can create nutritious soil for garden and vegetable plants
Compost container options
The most common options for laying compost in Russia:
- homemade composters from scrap materials and household items (for example, a barrel with holes drilled for ventilation) are widely used, but are not always convenient: they have a too narrow “neck”, are not aerated enough, and do not use space optimally);
- factory boxes are good for their ergonomics, presentable appearance, strength, and the fact that they are often collapsible, but nevertheless they are not cheap;
- capital (immovable) independent buildings from excess building materials, erected in a certain place on the site reserved for compost;
- compost pits.
The last option is the most basic. It’s better than nothing, but it’s only suitable for a demanding gardener for the first time, as it’s significantly inferior to even a primitive box.
The humidity in the pit is difficult to control, it is inconvenient to get compost from its bottom, and it does not provide protection from wild animals (for example, rats). In addition, the pit will have to be covered with something to protect the substrate from rain, snow and direct rays of the sun - a tarpaulin or film can easily be blown away by the wind, and the cover will need to be made separately.
How to make a compost bin: features of this type of construction
In order to understand how to properly make a compost pit, you first need to understand what it is used for. Typically, a compost pit is used to dispose of organic waste, which, as a result of the rotting process, turns into organic fertilizer. There are many design options and each owner can only choose the most suitable option for himself.
By following the rules for laying layers and fertilizers in a compost pit, you can obtain nutritious soil in a short time.
A compost heap does an excellent job of disposing of mowed grass and fallen leaves. Under the influence of time, moisture and microorganisms, all this turns into fertilizer, which can be used to grow any type of crops both in gardens and in the vegetable garden.
Making a compost heap of organic fertilizers with your own hands is not at all difficult, especially since there are many ideas for independent implementation that can be used as a basis. You can make your own compost pit using pallets, which are usually used for transporting and storing building materials. They can be bought at a fairly low price, or it is quite possible to simply find them on your own site.
How to check the quality of compost?
A high-quality substrate obtained after three years of overheating has the appearance of a brown crumbly mass with a characteristic soil odor. Particles of plant residues are easily rubbed by hand, which means that the efforts were not wasted, and an excellent organic fertilizer is obtained without financial investments.
The construction of a compost pit on a personal plot is an indicator not only of the owner’s hard work, but also a sign of high agronomic culture. Creating compost is an affordable way to always have high-quality fertilizer, which contributes to a high yield.
You can save your energy and purchase composters in specialized stores, or you can make them yourself.
Finnish technology
Convenient form for storing waste. Looks like a cube with equal sides (1x1x1x1 meter). This is the most optimal size for uniform overheating of the substrate. If you do less, the mass will dry out; if you do more, the contents will “burn” from the excessively high temperature. The top is made in the form of a gable roof, one side serves as a hinged lid. It is better to attach it to the door hinges and screw on a convenient handle.
One side of the box, at the bottom, must be equipped with a door - 40x40. It is good to remove the finished fertilizer through it. Mature compost is located in the lower layers of the pit, in the middle there is still active work of microorganisms, and fresh waste lies on top.
One wall of the box, facing the yard, can be made blank. As with the pit, the box can be built into two compartments, but this is not so important here.
Alternating layers
In order to set up a compost heap according to all the rules, it is enough to follow some recommendations for its construction. Then you can get excellent compost in a short time. The compost components are mixed and placed in a pile in layers. The main thing is to follow the order when laying layers.
The first layer in our pile is soil. It is poured about 30 cm thick, then there is a layer of dry grass. It must be dried and crushed in advance. The thickness of its layer is about 10 cm. A layer of leaves and a layer of weeds are laid on top. Each of these layers should be no more than 30 cm.
All layers of the heap must be moistened with water.
You need to constantly add bone meal, mineral fertilizers, and manure to the pile, but not fresh. In addition, add kitchen waste, avoiding fat and bones, and, as already mentioned, spoiled food.
The pile needs to be stirred and shifted all the time. It should not dry out or be excessively wet.
How long will it take for the fertilizer to be ready?
Even before making a compost pit, it is worth asking about all the processes that take place in it. To ensure good aeration, the substrate needs to be stirred from time to time. With the correct balance of moisture, heat, and air, the temperature in the mass reaches 50-70 degrees. Then, as the mass matures, it drops to 40-45. In total, the process takes up to 2 years, but if you use forced aeration, one season is enough!
The final product is pleasant to the touch and free-flowing, similar to humus.
What proportions are best?
It is ideal to create a ratio of green waste (with nitrogen) and brown waste in a ratio of 1:25 or 1:30.
In relation to fallen leaves the figures will be 1 to 50, and to freshly picked grass - one to 15.
If you have such a pit at your dacha, then you can save a lot on the purchase of manure and humus. The resulting mass is used as a complete fertilizer.General requirements for a compost heap
When making a composter with your own hands, it is important to comply with the following requirements.
- The width and height of the structure must be at least one meter. This volume will ensure heating of the biomass to the required temperature. The larger the composter, the higher the degree, which means faster results.
- No bottom. First, the earth supplies the raw materials with bacteria and worms. Secondly, it absorbs excess liquid.
- The filling of the compost bin must be well ventilated. This will prevent rotting, creating conditions for rotting.
- The presence of an upper cover that protects from direct sunlight so that the contents do not dry out and the seeds do not germinate.
- Treatment of building materials with protective and disinfecting agents.
What you need to know about installation
Before installing the structure, it is necessary to provide fire safety measures. Namely, provide a free space around it of 100 cm.
The best place is where there is nothing and which is hidden from curious observers. In addition, a good place for it is a shady area. The main thing is not to place it in lowlands, otherwise the processes may stop when the temperature drops.Selecting a location
A number of conditions must be met
It is very important to decide on a location. We do not recommend organizing a compost bin too close to a house or other residential premises, at the very entrance to the site or near entrance roads, etc.
However, anything can be seen. The owner will explain this by saying that he does not want any specific place to disappear. In fact, it is recommended to organize the box in a secluded place, for example, in the corner of the plot, in the shade, and not in the sun (the compost does not need to dry very much).
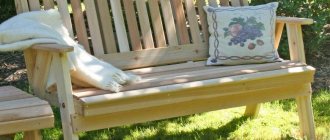
It is also necessary to make it convenient to approach the compost bin, for example, make an ordinary path, because you will have to walk there constantly (with weeds and buckets of unnecessary waste from the kitchen). In front of the box itself, it is advisable to make a platform with bricks so that you can come up with a cart when the time comes to pick up the compost.
Space for a compost bin. The illustration for the article is used under the standard license ofazende.ru
What is recommended to add
- Food that has spoiled, manure, etc.
- Sawdust, wood shavings, dried leaves.
- Peat.
- Tops of garden plants, cut weeds, lawn grass.
- Waste of plant origin from food - peels of vegetables and fruits, shells of nuts and eggs.
Tips for making compost
If you want to know how to properly make compost at your dacha, follow the recommendations of experienced gardeners regarding what can and cannot be put in the composter, how to speed up the ripening process and how to ensure that the finished fertilizer brings maximum benefit to the plants and improves the structure of the soil.
What not to put in the composter
To ensure that the nutrient substrate is saturated with all the microelements necessary for plants, but does not contain harmful substances, compost must be prepared only from waste of organic origin. But you shouldn’t push everything into it; there are some restrictions.
Infographics - what compost should consist of Source vokrugsada.ru
Here is a list of prohibited products:
- Roots of perennial weeds and grass with ripened seeds - they may not burn out completely and remain viable.
- Leaves of fruit trees and shrubs infected with fungal infections and other diseases.
- Kitchen waste of animal origin - bones, meat, fish, sausages, fats, etc. They will rot, emitting an unpleasant odor and forming a breeding ground for pathogenic microorganisms.
- Citrus peels are also not suitable for compost - their smell repels worms and beneficial insects.
- Fruits and tops of garden plants infected with late blight and other infections.
- Ash from coal, briquettes, burnt building materials with synthetic components.
- Pet feces and litter from pets.
How to dispose of waste
The fermentation processes of organic matter proceed best and fastest when they are laid in layers. Conventionally, all organic waste is divided into green and brown. Green ones include fresh mown grass, vegetable kitchen waste, and brown ones include hay, straw, and dry leaves.
This video explains how to properly place compost:
It is advisable to place green and brown waste in a compost heap in layers and sprinkle it with soil, manure, humus or already matured compost, in which active bacteria are present in large quantities. The green part of the waste releases heat during decomposition, and the brown part, due to its low caking ability, provides breathability.
Rules for placement and construction of composters
To prevent the sun from evaporating moisture from the heap, it is better to place it where its direct rays do not penetrate - in the shade of trees or buildings. In this case, the composter should be located at a distance from sources of drinking water and on the leeward side, so that odors from it do not reach the windows of your and neighboring houses and recreation areas.
To ensure rapid decomposition, the compost must be stirred periodically. But this is not an easy task, so it is better to arrange a composter of 3 sections. One will store fresh waste, the second will ripen last year’s compost, and the third will contain ready-made fertilizer.
DIY 3-section composter made from pallets Source blogspot.com
It is not necessary to make a lid for the composter, but its presence makes life very easy - it eliminates the attacks of cats, dogs and rodents who want to feast on kitchen waste, protects the pile from drying out, and protects you from unpleasant odors.
Important nuances of composting
In order for organic materials to be processed efficiently (in a short time and completely), the following is necessary:
- carbon;
- oxygen;
- nitrogen;
- water.
Before laying, the compost must be crushed as much as possible. It usually matures after two years, but you can use chemicals to speed up the process, in which case one season will be enough. You can also use sectional composters, where some of the fertilizer ripens by the first spring.
The components of humus can be divided into two categories. The first is nitrogenous (green):
- manure and bird droppings;
- mown grass, weeds (without seeds and roots), dense stems of cultivated plants;
- vegetable food waste.
The second group is carbon (brown) materials:
- chopped wood;
- straw and hay;
- dry leaves;
- bark, sawdust, branch cuttings;
- clean (not coated, unprinted) paper and cardboard.
The best composition of compost is a mixture of waste from the green and brown groups, mixed evenly for better contact or laid in thin levels interspersed with layers of manure: this creates the balance of substances released during decay necessary for complete decomposition.
Basic requirements for a compost bin
No matter what the compost bin is built from, and in what location of the garden plot, the requirements for the construction must be fully observed, otherwise a high-quality and useful organic substrate will not be obtained.
- The presence of ventilation holes for oxygen penetration.
- A cover or any covering structure that prevents precipitation from washing away beneficial substances into the ground.
- High-quality impregnation of the wooden walls of the box with special solutions will protect the container from moisture, insects and rotting.
- Painting the structure will also help preserve the box and extend its service life.
- Shade or partial shade will protect the ripening compost from drying out.
Types of structures
Depending on the materials used, there are different options for making a compost bin:
- wood;
- metal;
- slate;
- plastic.
There is an option to make containers from ready-made pallets. The Finns have developed container technology with the installation of a temperature sensor and an air supply system.
Step-by-step production of a wooden container
At the first stage of manufacturing a structure from boards, a drawing is prepared.
There is no point in using new boards as a material. For example, wood from window frames will do. It is first inspected for the absence of rot. For work you will need lumber 90 cm wide and 200 cm long. As well as bars with a cross section of 5x10 cm.
The work consists of successive steps.
The boards are measured according to the drawing, and the lines are marked with a pencil.
Using a hacksaw, lumber is sawed, planed with a plane and treated with a protective solution.
The assembly of the frame begins with the manufacture of long shields. To do this, 3 beams are laid out on the ground and boards are nailed to them. For ventilation purposes, a gap of 30-40 mm is left between them. Short side walls are formed directly on site. To do this, boards are nailed to the bars, except for the 2 bottom ones. A door is installed at this location. The lower mature compost will be removed through it.
The door is made of 2 boards, which are held together by 2 small bars. It sits on the bunker using hinges. To secure the door in the closed position, a long nail is nailed from below, and its end is bent at an angle of 90 degrees.
The dimensions of the box are measured on the ground, and a layer of soil is removed.
Bricks are placed in the pit, which are located exactly under the vertical bars. The structure is placed on them.
To hold the door open, you need to make a hook out of wire. On one side it forms a loop. Through it, the hook is nailed to the boards located above the door. For this, nails without a head are used. A ring is nailed to the edge of the lid. A hook through a ring holds the lid.
The composter is ready. Drainage from short branches is laid at the bottom.
Next comes the waste. A thin layer of selected soil is poured between their layers. At the same time, constant watering is carried out from a watering can. The more diverse the waste involved, the more valuable the final product will be.
Made of metal
When making a container from metal, it is not necessary to use anti-corrosion protection. Aluminum or galvanized iron construction is acceptable.
Metal sheets are fastened with vertical corners using bolted connections. The metal gains temperature well, but also releases it quickly.
When fastening, a gap is created between the sheets. This is especially important for a metal container, since the material does not breathe.
From slate
If there are unnecessary pieces of slate left at the dacha, then it is convenient to use them for a composter. They will fit even with broken edges.
The side walls are made from 4 pieces of slate. To prevent them from falling, metal pipes are driven into the ground on 4 sides.
Made of plastic
Often plastic containers are purchased ready-made. They do not require additional modifications. They have a number of advantages:
- do not corrode because they are resistant to the external environment;
- due to its low weight, it is easy to transport;
- have different shapes and volumes;
- long service life.
Container with a sealed bottom and lid. The system is well ventilated.
Requirements for a compost container
If a universal ready-made container is chosen as a place for the formation of natural compost, some requirements must be observed to ensure the most beneficial effect of this structure:
- the container or box must have holes on the walls for unhindered penetration and free circulation of air flows;
- the structure should be placed on a certain hill, slightly above ground level;
- doors or removable structures must be provided on the walls;
- the height of the design box must be suitable for the height of the person who will be engaged in periodic loosening of the mass;
- It is recommended to leave the bottom earthen to maintain a constant level of natural soil moisture and to ensure free access for earthworms.
A mobile (portable) container or box for ECO compost looks original and creative on a personal plot. This allows you to place the structure anywhere in the garden.
In addition, the mobile container saves time and physical effort when feeding plants.
Preparing to build a pit
Before you build a compost pit, you need to properly prepare for it.
Selecting a location
When choosing a location, you need to consider the following points:
- the distance from the pit to the water source must be at least 8 m;
- the basement should be no closer than 7 m from the pit;
- a shower or outdoor toilet should be located at a distance of 6–7 m from the structure, the same distance should be from the house and summer kitchen.
Advice! To avoid misunderstandings with neighbors, it is not recommended to make a compost pit in close proximity to a neighbor’s fence. Ideally, step back 2–3 m from it.
A compost pit is not the most beautiful structure on a personal plot, so it is better to choose a place for it in the far corner of the garden.
Material selection
Some gardeners dig a compost pit directly in the ground. This is not the best option, because its contents will have to be stirred regularly to ensure the necessary aeration.
A structure in the form of a box without a bottom, as well as with holes in the walls, is considered more functional and convenient to use.
To build a box you can use:
- wooden boards or pallets;
- slate sheets (flat or wave);
- metal profile or mesh;
- dense plastic;
- brick or cinder block;
- concrete.
Recommendations from experts
Expert advice will help you build the right hole:
- It is better to leave the bottom of the hole earthen. This will allow excess water to drain and ensure the correct consistency of the finished compost. When using a ready-made compost box with a perforated bottom, it is raised slightly above ground level and placed on supports made of bricks, cinder blocks, etc.;
- for the same reason, it is not recommended to cover the bottom with film, roofing felt or other solid material. You can cover the pit with them from above. This will help increase the temperature inside the pit and speed up the decomposition of waste;
- when equipping a compost pit in the ground, you should not make it deeper than 0.5 m;
- To protect against specific odors and flies, the top layer of the contents of the compost pit is covered with peat or green grass.
Space for a compost bin
This much-needed container needs a properly chosen location. You should not plan to build a permanent structure near a garden house or at the gate; the possible smell of rotting residues and the unattractive appearance of the substrate will not decorate the site. Hide the compost bin in a secluded corner of the garden, away from “human eyes”, where it will not take up much space, interfere with movement around the site and be useful. The optimal place is the back yard of the estate or a corner of the garden located in the partial shade of fruit trees. You should consider and lay out an approach to the compost bin in the form of a path, because visits will be frequent, first to add vegetation and household waste, and then to remove rotted substrate.
Don't forget about ease of access to the pit and choose the most suitable location for you.
Compost containers: types and features
Based on the size and location of the personal plot, as well as the resourcefulness of the owner, compost containers are constructed in various types and sizes.
Most owners of country plots are faced with the need for compost bins at their dachas.
- Compost pit. If the plot is very small and the prudent owner uses every centimeter of garden land, then building a large box is simply not advisable. A capital structure will take up a lot of space, and there will simply be nothing to fill it with, and due to the small size of the site, there is no need for a large amount of organic raw materials. You can simply dig a hole in the corner of the site, line it from the inside with impregnated and painted boards, and place plant and household waste there. Of course, such a structure will not produce full-fledged compost, and using the pit is not very convenient, but the resulting substrate will still fertilize the beds.
- Plastic or metal boxes. The modern agricultural industry offers its consumers metal or plastic boxes for use as compost boxes. These containers are really nice and practical. You can purchase several boxes, place them in a corner of the garden and fill them with waste and vegetation, observing the recommended compost cycle. Such structures will serve you for quite a long time, but will require financial investments at the time of purchase.
- Compost in a barrel. If the farm has a wooden tub or tin barrel, they can also be used as a container for compost, only first you need to make several holes in the wall for air access and the migration of worms and insects that eat plant debris and produce such valuable and necessary humus.
- Slate sheets. To make such a box, no longer needed slate sheets are suitable, which will not rot or decompose during use. Slate sheets are secured to each other using boards, section partitions, back and side walls are made. But the front wall is constructed from boards, laying them horizontally in several rows in the grooves of the racks for ease of disassembly while removing the molding and finished substrate.
- Brick. A very expensive material, but the structure will be of high quality and capital, and will last for decades. If you buy not new, but used bricks, then the costs will not be so critical. Lay out a rectangular structure from old brick, leaving small openings in the walls - “windows” for air ventilation. Build the front wall and roof from boards.
- Wooden pallets. Recently, wooden pallets have not only received a second life, but have also become indispensable on the site and in furniture production. Boards or knocked down wooden pallets are quite suitable for constructing a compost bin. Two or three sectional boxes are laid out from wooden material, the boards are fastened together, and covered with a wooden lid. The capital compost bin is ready and will last for many years.
You may ask, why are two and three section buildings needed?
Do not place pits close to drinking water sources.
Composter size calculation
Before starting work, it is necessary, of course, to decide on the dimensions. It is believed that humus matures completely in two years. Accordingly, it is necessary to estimate how much garbage suitable for putting into the device can accumulate during this time. If there was already a compost heap or bin on the site before, this is easier to do. If not, you should calculate how many times a week/month garbage is thrown out, what percentage of this garbage is suitable for putting in the composter and what is the volume of the trash can/bag.
For example: in a private house during the warm season, garbage is thrown out every day, the volume of the bucket is 10 liters. Organic waste accounts for 80% of this volume. In winter, garbage is thrown out every two to three days, the volume of organic matter in waste is 60...50%. Accordingly, we take as an average 7 liters per day and a half.
(365/1.5)x7=1700 l.
Considering that garbage is not water, and one cubic meter contains not 1000 liters, but approximately 700...800 (taking into account compaction and different sizes of waste), we assume the volume of the composter is approximately 4...5 cubic meters. This volume will give a box with sides 2x2x1 m (4 cubic meters) or 2x2.5x1 m (5 cubic meters).
Compost from fallen leaves
Separately, I would like to mention compost made from fallen leaves, which is also known as “leaf soil”. The basis of this type of compost is fallen leaves, which lose minerals before falling, so that only hemicellulose and lignin remain in their tissue. These substances decompose very slowly, although they are one of the most valuable components of humus. When making a compost heap from leaves, you should know that they contain another difficult-to-decompose substance - tannin. It has astringent-disinfecting properties, which greatly inhibits the processes of compost formation. Large concentrations of tannin are found in beech and oak leaves; the tannin content is especially high in chestnut, willow and sycamore leaves. Because of this, the foliage of these tree species is of little use for compost and can only be used to cover the pile.
Briefly about the main thing
There is nothing complicated about how to make compost at your dacha with your own hands. To do this, various organic waste collected on the site and in the house is stored in a heap. To prevent the appearance of decomposing organic matter from disturbing the eye, boxes are built for it from boards, construction pallets and other similar materials, mesh baskets are made, or any containers of suitable volume are installed. There are also ready-made plastic composters on sale. The ripening time and quality of compost depend on compliance with the laying rules.
Read later
Manufacturing from pallets
A special feature of the product is the absence of fastening screws. The connection is made through slots in the pallets.
For manufacturing you will need materials and tools:
- pallets;
- hammer;
- roulette;
- assembly adhesive;
- gun;
- level.
The work consists of the following steps:
- At the first stage, all the pallets are disassembled and slots are made in the boards using a jigsaw.
- Then they gather again. One side is installed at an angle. This is necessary to remove fertilizers.
- During assembly, you should constantly use a level to prevent distortion of the structure. All seams are coated with assembly glue.
- At the end, the product is coated with an antibacterial solution.
What materials are suitable for the box?
When making compost pits, it is permissible to use many materials that are familiar to us. In fact, it's a box without a bottom. Boards, bricks and concrete, pallets, sheets of slate or metal, and fine-mesh iron mesh are used. Some gardeners create their fertilizer in sturdy trash bags.
What is compost and what natural processes accompany its preparation - a scientific approach
Botanists know that garden crops respond well to organic fertilizers obtained as a result of the processing by microorganisms of all kinds of plant and animal residues.
They are called "compost" (from the Latin word "compostitus", meaning "composite"). The term composting is used to develop it.
The process of destruction of complex organic substances in science is called biodegradation. It occurs under the influence of living organisms. The speed at which it occurs depends on many factors:
- organic composition;
- ambient temperature and humidity;
- degree of sunlight exposure;
- number of microorganisms:
- a number of other conditions.
The processing of obsolete organic matter is carried out by soil inhabitants of both flora and fauna.
For a long time, villagers determined the quality of the soil for high yields by the presence of worms in it. The more there are, the richer the soil is considered. If there are practically none, then one can only dream of fertility.
Dead vegetation is well processed by the larvae of the bronze beetle. They do not feed on living plants.
They are often confused with beetles - the larvae of the cockchafer that eat the roots of plants, causing great harm to garden crops.
Microorganisms play a huge role in the processing of organic matter. First of all, these include bacteria that live in the soil. They come in two opposite types:
- aerobic (“aero” - atmosphere, air), which require oxygen for their vital functions, use it as an oxidizing agent to produce energy;
- anaerobic - not requiring oxygen. They live and reproduce inside the soil, where aerobic microorganisms die.
Energy metabolism in aerobic bacteria occurs intensively, with the release of heat. It is marked by the heating of rotting products, as well as the spontaneous combustion of damp grass collected in a heap, poorly dried hay, and grain.
Fungi also process organic matter in the soil. Among them there are both those requiring oxygen and anaerobes. They develop in moist soil and decompose wood fibers well.
How I confused the larvae of the bronze beetle and the cockchafer
Once, during an autumn bike ride, when I was trying out another homemade bag, I found on the edge of the forest 1.5 km from the dacha a large pile of leaves dumped from a dump truck by a housing and communal services driver. It had already lain for a couple of years and turned into black humus. He began to carry it in bags:
- two loads on a bicycle cart;
- one is on the trunk.
I made a couple of dozen flights, but didn’t manage to get everything out before the frosts. I left a smaller portion for next year. Loading took most of the time, because there were large white beetle larvae in the pile.
I didn’t know then that only the bronzeback feeds on dead organic matter. Took her for a Khrushchev. I had to take the humus with mittened hands and literally throw out the larvae from each handful.
In the spring, I distributed all the humus for potatoes. I was very pleased with the harvest. Therefore, after cleaning, I went to pick up the rest. But in its place there were powerful thickets of well-fed weed stems, and nothing could be found under their roots.
Bronze grass larvae and wild grass processed organic matter practically without residue already in the third year.
In nature, composting occurs naturally, it is comprehensively provided by representatives of flora and fauna.
What processes ensure high-quality composting?
To prepare compost, you need to fulfill only three conditions:
- create reserves of raw materials for processing;
- launch worms and microorganisms into the introduced organic matter;
- provide optimal conditions for their life.
Nature is designed in such a way that soil inhabitants themselves process all plant residues. Our role is to make their work easier. To do this you will need:
- maintain biological heat inside the waste within 30-50 degrees due to the occurrence of redox reactions involving carbon;
- facilitate the provision of nitrogen cycle in nature by soil inhabitants;
- create good air exchange with oxygen access to microorganisms;
- provide optimal moisture for aerobic processes, eliminating rot or drought.
How to select raw materials for compost based on the composition of chemical elements
In practice, gardeners often compost any organic waste without particularly worrying about its composition. This is not entirely correct.
It is important to take into account that in order to obtain a good fertilizer, raw materials must be packaged according to the ratio of the content of carbon and nitrogen (C/N). The optimal value is considered to be 27-30 to 1.
Such proportions are typical for garden waste, dry hay and weeds. All other components are usually divided into “green”, in which nitrogen predominates, and “brown” - carbon.
Their approximate ratio in the most common raw materials is:
- corn leaves - 75;
- shredded newsprint - 175;
- autumn leaves - 60:
- pine needles - 80;
- sawdust - 320;
- straw - 75;
- cut clover - 23;
- food waste - 20;
- lawn grass - 20;
- manure - 15.
Using these data, it is difficult to achieve an ideal ratio of components. They are provided as a guide for drawing up the structure of the compost pie.
In practice, experienced gardeners get good results by focusing on their own sense of smell and the temperature of the prepared fertilizer.
When a heap has an unpleasant odor, it is a sign of insufficient brown matter (carbon deficiency). Cool interior and no visible fumes - the nitrogen content (the green component) needs to be increased.
In a balanced pie, optimal ripening is marked by three characteristic features:
- the usual smell of good soil;
- release of internal heat;
- slight evaporation of moisture.
Always analyze this triad; all practitioners are guided by it when selecting the composition of chemical elements.
Compost pit and heap: what is the difference and how I made my first mistake
For some reason, the two different terms “pit” and “pile” are perceived the same in relation to composting, although technically they are completely different concepts.
This misinterpretation misled me when, out of inexperience, I first started composting. The same mistake is repeated by most beginners.
A compost pit involves removing the top layer of fertile soil, which I did, but quite deeply.
Then I filled the entire space with freshly cut wet grass. It turned out to be a pile of one and a half meters. On top I added a little last year's leaves, weeded weeds, manure, threw some soil on it, and left it to ripen, as advised.
The next day I noticed that the pile began to decrease in height. But I didn’t attach much importance to it. After some time, the processes of decay began.
Now I understand how it all happened:
- wet, freshly cut grass contains excess nitrogen and water, which creates excellent conditions for the development of aerobic bacteria;
- their number increased sharply: as a result of feeding, they heated up the pile and used almost all the oxygen;
- its absence led to a sharp extinction of aerobes;
- the grass settled and became denser, began to cool and turn sour;
- Lactic acid bacteria and other anaerobes came into play: mold, yeast, fungi.
Don't repeat this mistake.
By the way, I conducted a small experiment on this topic with mulching potatoes with mowed grass from fresh nettle shoots. I covered all rows with a thin layer, and covered two rows thickly, about 10 cm.
The thin bedding quickly dried out in the sun, changing color from green to brown, and the thick bedding began to “burn” and emit a rotting smell. I had to correct the situation.
How to make?
- Remove the fertile layer of soil.
- Wooden planks are mounted with self-tapping screws. It is necessary to leave gaps of 3-5 cm.
- Next, dig wooden blocks in the corners to a depth of 40 cm.
- The lower third of the wall in front is made so that it can be removed. Then it will be convenient to get ready-made compost.
Ready-made plastic solutions
If you don't have enough time or just want to try it out, you can purchase a ready-made garden composter. The stores offer an excellent selection and a large assortment with various box sizes.
Rules for filling the pit
To make a good nest, it is important not only to properly arrange the hole, but also to fill it. There are several rules to consider when making compost.
Preparation of material
It is best to grind all components before adding. This will make the worms' work easier and speed up the maturation of the material. You can use garden shears, a shovel, and other available equipment for this.
It is better to grind the components before placing them in the compote structure.
Selecting Additional Components
To improve the quality of humus, additional components are used to prepare compost:
- pieces of vegetables, fruits. They accelerate the ripening process of the product, attract worms, and increase the content of nutrients in raw materials. However, they are added in limited quantities to avoid the occurrence of fungus;
- clay, garden soil. These products quickly absorb excess moisture, allowing you to obtain not humus, but a soil mixture that can be used for growing seedlings;
- lime. It increases the potassium content in the finished product, normalizes the acidity level, destroys harmful microorganisms, and prevents the growth of seeds;
- ash. Increases the potassium content in the product, normalizes the acidity level;
- rotted horse manure. Accelerates compost maturation.
To improve the quality of humus, additional components are used to prepare compost.
Preparing the composter
Not only the material needs preparation, but also the composter itself. It is necessary to place wood chips or crushed stone at the bottom. This is a drainage layer that removes excess liquid from the product and prevents the material from getting wet.
The walls of the composter need to be insulated. Branches are used for this. They are installed vertically in several layers.
Instead of branches, you can use compressed hay.
Warming compost with branches in several layers
Waste stacking
Rules for laying materials:
- each layer should have a thickness of 5-10 cm;
- the material is compacted tightly after laying each layer;
- When laying, alternate raw materials that emit carbon and nitrogen. Ratio 3:1 respectively;
- you need to alternate layers of wet and dry material. The first raw material should be 5 times more than the second;
- The top of the compost is moistened, but not abundantly.
The quality of humus in a compost facility depends on the correct placement of materials.