Photo: stroymaster-base.ru Wood is still the most popular and versatile building material for all occasions. Wooden fences are stylish and beautiful, practical and durable, and also absolutely environmentally friendly. They will fit into any site: it doesn’t matter what the house is made of or what kind of landscape design you have. Classic is a classic! You can work with wood in completely different ways, so we share photos and ideas.
Fence construction diagram
Regardless of the chosen material and type of structure, the entire construction process consists of the following points:
- Assessment of site parameters and soil preparation.
- Construction of a trench for support pillars.
- Pouring support structures.
- Installation of main sections.
Each stage is mandatory and, with the right approach, allows you to make a fence for a long service life.
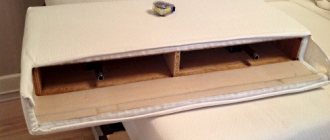
How to paint plywood
Before we start painting the cut plywood sheets, we prepare it. Sheets needed:
- sand it (sandpaper No. 80-100);
- prime (alkyd primer);
- dry;
- slagging;
- prime again;
- dry again.
If the plywood is high-quality waterproof, then you can skip some preparation steps, but treatment with an alkyd primer is in any case not superfluous - even if the plywood is FSF.
Grinding is carried out first perpendicular to the fibers of the material, then along (with finer sandpaper).
We pay more attention to the ends of the plywood. First, it is advisable to trim them a little (diagonally - from the edges to the middle). We do not skip the ends when treating plywood sheets with protective impregnation and painting. In general, the ends can be painted 1-2 times more than the remaining surfaces of the sheet.
Assessment of site parameters
First of all, the owner of a summer cottage and the builder should assess the nature of the soil:
- Strength level.
- Presence of groundwater and karst voids.
- Presence of old foundations.
The site must be prepared for construction: cleared of debris, removed fragments and large boulders, leveled all holes and uneven areas.
Construction of a trench for support pillars
For supporting structures, it is necessary to prepare holes of appropriate depth (depending on the selected material and type of fencing). The walls of the pit should be leveled and compacted well. A sand cushion and broken crushed stone are laid on the bottom, and then the first support is installed.
Installation of supporting structures
The support is secured in a vertical position using wooden posts or stops. The presence of a deviation angle from the axis is checked using a building level.
To fill a trench, cement mortar is mixed and poured into the pit. The mixture is allowed to harden, periodically wetting the surface of the solution with water.
It is recommended to use reinforced iron bundles and scraps of old pipes as supports. Load-bearing structures are placed along the boundaries of the site, at regular intervals.
Installation of main sections
After securing the foundation and supporting structures, the installation of fence sections begins. The installation method in this case depends on the selected material.
The last two points in the work are appropriate in the case of constructing a mesh fence, profile fencing or wood picket fence.
For poured cement fence and brickwork, a different technique is used.
Note!
Shed for a summer residence: TOP-130 photos of modern options for a shed for a summer residence. Types of sheds, their sizes and shapes, choice of materials for building a shed for a summer residence
Closed gazebos: advantages and disadvantages of closed gazebos. Choosing the location, size and shape of the gazebo. Necessary materials and tools (TOP 100 photos)
Chicken coop for a summer residence: TOP-110 photos of building options. Varieties of chicken coops, DIY instructions for beginners
Support structures are made according to a similar principle, but a brick block or a strong pillar of concrete and decorative stone is built on top of the metal frame.
Selecting types of supports
The initial stage of work is marking. To do this, wooden pegs are driven in along the perimeter of the fence in places of future supports in increments of no more than 2.5 m. A rope or cord is pulled tightly between them. The average depth of the holes for the pillars is 70 cm. The above-ground part of the supports should not exceed 2 m in height.
Depending on the type of raw material for the pillars, the technology for their installation also differs.
Tree
This is a timber or rounded log, which is pre-treated with antiseptics, and the part that comes into contact with the ground is coated with bitumen mastic.
Brick or stone
To install such massive supports, you will need to pour a corresponding foundation. Point-type installation is allowed, but it is safer to fill the tape.
You will read about how to correctly calculate the amount of material, choose the laying method and the appropriate type of brick in this article: “How to make a fence with brick pillars.”
Features of working materials
In modern building materials stores you can find the most popular materials for arranging fencing in the country:
- Metal grid.
- Profiled sheeting.
- Wooden beams.
- Concrete blocks.
- Brickwork.
- Decorative rods for weaving.
Each of the presented options differs in construction technology, financial investments, and operating features. In these master classes we make a relatively cheap fence with our own hands.
Lattice
This is the most elegant type of wooden fence. The slats intersecting each other are located horizontally and vertically, or at 45 degrees to the ground. A lattice made of slats of different widths or with different spaces between them looks unconventional. Climbing plants spreading across the trellis look very decorative.
To extend its service life, any type of wooden fence needs a topcoat.
Mesh fence
The simplest option and economically accessible to every dacha owner. Step-by-step instructions that will help you learn how to make a chain-link fence with your own hands:
- The first three stages of construction work are carried out in accordance with the given plan.
- After preparing the supporting structures, the mesh is unfolded and tensioned.
- There are two main methods of fastening a mesh structure: continuous, when fastenings are made on each post.
- The second method is sectional, where mesh sections are placed in rigid frames and then attached to supports.
For fastening, pre-welded hooks and screws are used.
Note!
Pergola - the use and benefits of a pergola on the site. Types and shapes of structures, internal filling and decoration of pergolas (photos of new designs)
- Do-it-yourself barbecue - step-by-step instructions on how to build a barbecue at home (photos and videos)
- Brick barbecue: advantages and disadvantages of the material. How to create a brick barbecue with your own hands. 120 photos + instructions
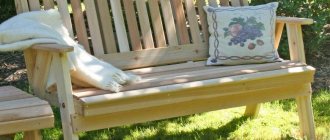
Fence
This is a traditional option for a garden or cottage. Two base boards are attached horizontally to the load-bearing posts, and the fence boards are directly placed on them vertically at certain intervals.
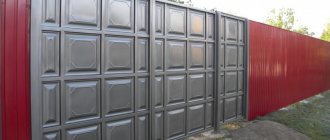
Corrugated fencing
A very popular way of arranging high-quality fencing today. We make a fence from corrugated board with our own hands, according to the following instructions:
- After installing the support pillars, crossbars are welded to install sheets of material.
- Profile sheets are screwed over the transverse supports.
Screws and large bolts are used as fastening elements.
Advantages
- Simplicity and ease of installation, suitable for a beginner.
- The material is environmentally friendly and does not cause harm to the health of the owner and family members.
- Examples of possible installation options are so varied that a horizontal fence will be a wonderful decoration and addition to a private building.
- With the right approach, installation will take no more than a day.
- The fence protects the owner from prying eyes, and there are no barriers to the penetration of clean air.
- Installation is possible from different types of wood, the main thing is that the quality is appropriate.
Does this fence suit your site design?
YesNot sure
Wire fence
Quite a decorative fencing option for a summer cottage or private house. Elegant decor and original appearance are the main advantages of this method.
Step-by-step instructions for beginning craftsmen describe in detail how to make a wicker fence with your own hands:
- Willow twigs are most often used as the main material. They have a fairly flexible structure that allows you to simulate the shape and size of a decorative fence.
- Support structures are installed according to a similar principle, but with a reduction in the distance between adjacent pillars.
- The most voluminous willow rods must be dug into the ground in a vertical position, placing them between metal posts.
- They begin to knit the rows of the fence, retreating 15 cm from the ground level. This step will save the fence and material from rotting and damage by pests.
- The technique of knitting vines is in a checkerboard pattern. Metal wire should also be passed at regular weaving intervals to enhance the strength of the fence.
Such a fence is decorated at the request of the master.
Preparatory work
Such a fence is built in order to protect against both intruders and stray animals. For this reason, it must necessarily have high levels of stability and strength. We can also say that the material used (in our case, wood) is highly susceptible to environmental influences. For this reason, it is imperative to take special measures, which include the following:
- Treatment of pillars with a special primer, which has deep impregnation properties. This is necessary not so much for protection from the effects of rain and snow, but because these elements are located in damp soil, where rotting can begin within a few weeks.
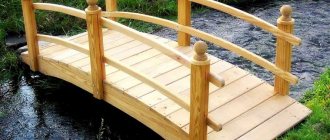
Wooden fence
The principle of installing a fence does not differ much from the classical method. The arrangement of supporting structures and crossbars is carried out in the specified order.
Note!
Gazebo with barbecue - TOP-140 photo examples, pros and cons of gazebos with barbecue. The best options for gazebos with barbecue in a summer cottage
- DIY tandoor: 100 photos of the best options. Construction instructions at home
Wooden gazebos: advantages and disadvantages of wooden gazebos. Easy to install, environmentally friendly and practical. A selection of examples (photo + video)
The main difference is that the wooden planks are positioned strictly vertically and with gaps between adjacent elements.
This type of fencing is decorative, has a rich appearance, and also stylishly emphasizes the overall interior of a garden or summer cottage.
Carrying out any model of a fence on a summer cottage requires a creative approach from the master, the presence of certain construction skills and the ability to follow step-by-step instructions.
And advice from experienced craftsmen and photos of original fences made by yourself will help you decide on the technique for carrying out the work.
Ladder or Christmas tree
On such a fence, the boards are not positioned horizontally or vertically, but at an angle and overlapping. Each subsequent board partially overlaps the previous one, which creates absolute opacity and at the same time does not interfere with air movement.