When performing repair and finishing work, special attention is paid to creating interior design. Various materials and coatings are used to decorate walls. The most popular among the known options are decorative plasters.
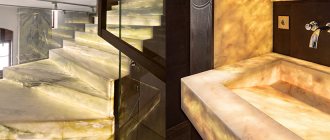
One of the varieties of such options is decorative plaster, which creates the effect of stone on the wall. When using this material, a coating is created on the wall that imitates decorative stone. To create a stylish and unique design, you should study the features of choosing a material, as well as learn about methods of applying the composition to wall surfaces.
Basic properties, material classification
Decorative stone comes in two types - for interior and exterior use. For external stone, cement, sand and various pigments, dyes and other additives are used. The basis of the inner stone is gypsum. It is mixed with white cement, pozzolanic additions, oxide pigments, etc.
This connection produces a fairly strong material that:
- resistant to temperature changes;
- retains color when exposed to ultraviolet rays;
- hygienic;
- has low weight compared to natural stone;
- environmentally friendly;
- durable.
Features of plastering work on the facade
When decorating the facade of a building with decorative plaster, the following features of the work should be taken into account:
- For the facade, you should choose stronger and more wear-resistant materials, since the plaster will be in contact with the external environment.
- It is worth taking into account sudden temperature changes, so before purchasing the mixture you need to pay attention to the main characteristics of the plaster.
- For external walls, it is recommended to use decoration in the form of stones and cobblestones. This coating will create an imitation of real rocks.
- If overheated for a long time, the composition may dry out, which will lead to a deterioration in its properties. In this regard, it is recommended to periodically moisten the composition while performing work.
Classification of decorative stone
Depending on the production technology and the raw materials used, artificial stones come in several types. Some of them can only be produced in industrial enterprises. In artisanal conditions, decorative stone is produced from gypsum, cast acrylic and concrete (reinforced or molded) stone.
Artificial stone for external cladding, in particular reinforced concrete, is made from the following materials:
- sand;
- cement;
- fillers;
- colored mineral pigments;
- hardening accelerators;
- special plasticizers.
Concrete stone is used to make decorative cobblestones and boulders, which do not differ in appearance from natural ones, as well as for cladding the outside of buildings.
Artificial acrylic stone is made on the basis of acrylic resin with the addition of a composite material, hardener, and colored pigment. It is used for interior decoration in residential and public spaces. The disadvantage of this material is that it can be easily scratched.
Read also: Antimonopoly policy of the state
But it is compensated by the ability to restore the glossy surface with simple polishing.
The composition of gypsum cast stone includes:
- gypsum;
- white cement;
- pozzolanic additions;
- oxide pigments.
Such additives make gypsum less brittle. It is used only for interior decoration, as it is not resistant to low temperatures.
Decorative gypsum tiles are environmentally friendly, practical to use, maintain natural humidity in the room, are also suitable for long-term use and are inexpensive.
DIY artificial stone
Recommendations for using finishes
If you plan to finish the external walls of a building, it is better to use a mixture whose binder base is cement.
This plaster composition is most suitable for surfaces exposed to sudden temperature changes and is resistant to humidity.
It is recommended to apply the plaster solution in small areas, and not over the entire facing surface.
The thickness of the finishing layer should be no more than 10 mm.
Watch a video on the topic:
Before carrying out work, the surface should be primed.
The benefits of making tiles yourself
Gypsum tiles can be used to finish:
- Slopes. After installing the windows, during repair work, the slopes on plasterboard windows are decorated with gypsum tiles.
- Fireplace. A plasterboard fireplace is covered with gypsum tiles to add naturalness and originality.Use of gypsum tiles
- A flight of plasterboard stairs is lined with gypsum tiles to create the interior of the house.
- Doorways are decorated with gypsum tiles.
- Walls in a room, in a living room, in a hall. Laying gypsum tiles under the brick, highlighting significant places, for example, the wall on which the TV is installed.
- Columns and niches made of plasterboard. Finishing occurs to accent the background of the overall interior.
Benefits of making tiles yourself:
- to make tiles you will not need a lot of space, as well as drywall tools;
- it is possible to produce tiles without using a vibrating table;
- The manufacturing technique is easy. It will be understood by a person making tiles for the first time;
- painting the tiles is done independently;
- All materials for tiles do not have a high cost, which makes the manufacturing process enjoyable.
Return to contents
Errors when simulating masonry.
Do-it-yourself stone imitation differs from a professional one only if serious mistakes are made:
- Uneven drawing. The “masonry” should be level, the general direction of the longitudinal edges of the stones should be strictly horizontal.
- Scales. A relief that looks like scales is a sign of unprofessionalism, since stonework of this shape does not exist in reality.
- The accuracy of the shapes of the stones does not have to be perfect: the stones do not rub against each other. Therefore, you should not be afraid to make wider depressions in the places where the ends of two stones are connected.
- Roughness. “Burrs”, small pellets must be cleaned off.
Otherwise, imitation of stone with plaster is no more difficult than any painting and plastering work and can be performed by a non-professional of any level. Especially if this work is done for oneself: shortcomings are forgivable, but the work is exciting and interesting.
How to calculate the amount of decorative stone on the walls?
If you have to buy a ready-made stone, it is important to calculate the required amount of material in advance - this will help to avoid unnecessary expenses. For any group of elements, you should add 5–10% for breakage, incorrect cutting, and other flaws in the work. Most craftsmen lay stone without leaving seams. When cladding walls, taking into account the gaps, you don’t have to make an allowance for errors.
Calculation of the amount of decorative and artificial stone for cladding an arch in a room
Order of counting elements:
- Flat parts. You should multiply the length of the wall by the width to get its area. Next, in the same way, calculate the area of all openings (windows, doors, niches, arches) and subtract them from the total, because they are not subject to cladding.
- External corner details. The range of most companies includes special elements made of decorative stone. They are used to decorate only the outer corners of windows, doors, and niches. Having measured all the lengths of the angles, they need to be added together to obtain a number in linear meters.
- Internal corner details. For arrangement you will have to cut flat stone. It is necessary to calculate the length of the internal corners in linear meters, multiply it by the overlap coefficient (0.25). The result will be the area covered by the wall with corner elements in square meters (it is already included in the main one and is calculated for reference).
Tools, molds and DIY procedure
Materials and tools required for making gypsum blanks:
- Gypsum-based composition.
- Water.
- Forms.
- Construction mixer or drill with a mixing attachment.
- The bucket is rubber (it’s easier to clean later).
- Spatulas of different sizes.
- Scales or ladle, measuring cup.
- Spray.
- Laundry soap.
Instead of a rubber bucket, you can take any container or use plastic canisters. It is recommended to purchase a more durable gypsum, for example “G-16”. Gypsum marked G-6 will produce very fragile products.
Stages:
- Moisten the molds with water diluted with laundry soap, then it will be easier to remove them. Planed soap is diluted in warm water, which is then poured into a spray bottle. You can grease the mold with a mixture of wax and turpentine in proportions 3:7.
- Prepare a table or surface for work. Any working surface must be perfectly flat.
- Prepare the mixture by stirring the ingredients with a mixer. Gypsum is poured in small portions so that lumps do not form.
- The process of mixing the composition should not be long, since the solution quickly hardens. While the solution is liquid, it must be immediately poured into molds. After pouring, the surface is leveled with a spatula.
- After 1–2 minutes, the surface must be smoothed again with a spatula.
- After 15–20, unmolding is performed. To do this, the form is pulled to the edge of the table so that part of it hangs in the air. This part of the mold must be pulled down so that it separates from the stone and the finished tiles must be removed.
- Dry the workpieces. This can be done, for example, with a hair dryer or another method. Experts recommend drying tiles outdoors.
Attention: To work with plaster, flexible forms made of polyurethane or silicone are required, since the plastic is very hard.
We invite you to watch a useful video on how to make decorative stones from gypsum with your own hands:
separate material
Making stone with your own hands
The production of stone is not a complicated procedure, although some effort must be made to obtain a high-quality result. So that gypsum tiles meet all requirements, the process is divided into successive stages.
Preparation
Includes preparation of tools and materials:
- white dry gypsum mixture;
- settled water without impurities;
- sand;
- convenient container for mixing the solution;
- molds for casting and glass for closing them;
- drill with mixer attachment;
- coloring pigments.
Materials for making tiles
It should be noted that all components must be prepared in advance. You need a comfortable place to work. Much attention is paid to the selection of forms; they can be purchased in the store, but in order to save money, self-made ones are suitable.
It should be borne in mind that gypsum has a rapid setting, so all work must be carried out without delay.
Matrix for stone
How to make a matrix for creating decorative tiles? This is a very important question, because the appearance of the product depends on proper manufacturing.
- It all starts with choosing a sample to obtain a template. In order for the process to occur quickly enough, several matrices are made.
- It is necessary to select or make a box that will be slightly larger than the selected sample. To do this, you can use wooden slats that are nailed to a flat base. It is important to achieve a complete absence of cracks.
- All parts are well coated with grease. Instead, you can use suitable types of lubricants.
- After thorough lubrication, the product is placed on the bottom of the box exactly in the center, leaving gaps along the edges. If the template is created from several stones at once, then they are laid at some distance from each other.
- The prepared silicone is poured in and distributed evenly throughout the box. Everything is compacted well to form a dense matrix. To do this, use a brush dipped in dishwashing liquid.
- Next you need to level the silicone. This is done with a spatula for laying plaster.
- It will take quite a long time for the product to dry completely - from one to two weeks. After this, the box is disassembled and the mold is removed. It often happens that minor defects form on the surface; they are covered with silicone.
Attention! It is important to consider that DIY decorative stone is of high quality only if the template is executed correctly. If the work needs to be carried out in a short time, then it is better to choose ready-made forms that allow you to reproduce different textures.
Production process
Decorative tiles are made as follows:
- The gypsum mixture is prepared. The solution is needed exactly as much as is required to fill all the forms. Excess cannot be reused.
- The composition is prepared according to a certain scheme. The dry mixture in the proportion indicated by the manufacturer on the label is gradually poured into a container of water and mixed thoroughly. To add strength, sand is added; its volume should be no more than 10% of the volume of gypsum. It is required to obtain a fairly fluid, but not liquid consistency.
- The mold for the stone is prepared in advance with your own hands so that it can harden.
To ensure that the back side of all tiles is smooth, place the mold on a straight surface and use a level to check for horizontal deviation
- The matrix is pre-coated with a composition that will facilitate better separation of the tiles; various solutions can be used for this.
Many masters advise using a fairly simple recipe: Beeswax is thoroughly melted in a water bath, after removal, drying oil is added to it, the composition is mixed well. Next, turpentine is added and kneading is carried out again. Proportions: two parts wax to one part drying oil and turpentine. - If you want to get a colored stone, then the selected color is pre-mixed. It is worth noting that in this way the product turns out to be of a non-uniform color. This can be easily corrected by painting after production.
- The solution is carefully poured into the prepared form, and the mixture is leveled using a spatula. To make a gypsum stone without significant defects, the matrix is covered with glass and shaken well. Movements should be smooth and more like vibration.
The process of pouring and leveling the mixture with a spatula
- The forms are left to dry completely. This will take from 30 to 50 minutes. Due to the fact that the templates are made of silicone, the resulting parts can be easily removed. They are laid out in a prepared place. It should be taken into account that stone-look gypsum tiles should not be exposed to direct sunlight, and the room should be well ventilated. In this case, the use of heating devices for forced drying is not allowed.
The process is repeated until the required amount of material for wall cladding is obtained. To produce decorative elements for a small room using two molds with 4–5 compartments for pouring, the work will take at least a week.
Attention! If you reduce the time by changing the technological process, gypsum tiles may end up with numerous hidden defects.
The video below will help you visually study the process of making artificial stone.
Application technology
The essence of the technique of simulating natural materials comes down to three main stages:
- Create an external surface texture - blocks, cobblestones, bricks, solids.
- Give the necessary shape to the relief, which is typical for blocks, cobblestones, bricks, as well as surfaces made up of these elements.
- Use paint close to natural shades.
It is worth highlighting some special techniques. With the “Wild Stone” technology, plaster is applied to a small section of the wall, after which it is covered with a finishing coating and then a trowel is used to give the appearance of a stone surface. Upon completion of drying, veins are made by coloring by rubbing into the surface with a sponge.
The Marmorino technique is performed by knocking out rectangular boundaries with a chisel on completely dry plaster. The “Torn Stone” style is designed in an illogical way, but the notches are made in a chaotic manner.
Preparing the base
In work where you need to create a decorative coating with maximum imitation of natural stone, every stage is important, including preparation. This especially applies to interior decoration. The main thing is to ensure adhesion of the plaster to the base, which will allow you to lay the material in an even layer. Subsequently, dirt stains should not appear through the finish.
The scope of preparatory work comes down to the following:
- The surface is cleaned of all contaminants without exception.
- Uneven walls are leveled using cement-sand mortar or gypsum mixture.
- If there are chips, cracks, or large gouges, the defects are repaired with cement and sand and the use of reinforcing mesh.
- If necessary, the walls are treated with special degreasers or antiseptics.
- Give time to dry.
- In order to increase the adhesion of the plaster to the wall, the surface is primed. This especially applies to gypsum panels, OSB, and fiberboard.
Attention! To decorate the foundation of a house like a stone, insulated with foam plastic, you definitely need a concrete “crust” and reinforcement with fiberglass mesh (2 layers). The first is on top of a 20 mm thick spray, the second is on top of another spray of the same thickness. At the end, the mesh is covered with a final coating of 25-30 mm.
Before starting work, it is necessary to eliminate defects and apply a primer
Applying plaster
Natural stone plaster is not applied all over, but in sections of 2-3 m2. The specific parameters of the processing area fully depend on the skill, speed of work and the technology used.
Creating the necessary structure is carried out using different techniques:
- Using a trowel involves distributing the plaster mixture over the surface, making short strokes. The material itself is laid using the overlapping method. Trimming with a trowel creates a small “fur coat” on the walls.
- Rollers also help create an original pattern with an interesting texture.
- Using a brush to create finishing coatings is not difficult, and the work is done quickly.
- It is convenient to apply plaster under wild stone with a sponge, which allows you to almost exactly imitate natural contours with a great emphasis on naturalness.
- The machine method of applying the plaster mixture ensures a high level of adhesion of the solution to the base. In addition, the work speed increases and less material is wasted.
It’s easier to create relief on the walls by first preparing a suitable matrix with the desired pattern. In the case of manual formation of seams, it is advisable to spray a little water on the surface, which will make the mixture pliable.
The working material is applied to the surface in sections of 2-3 m2
Preparation of the composition
Dry ready-made compositions for plaster require the independent preparation of a homogeneous solution. To mix the ingredients, it is better to use a wide container or a construction mixer. Afterwards, the composition is left for 10 minutes to polymerize, and then the procedure is performed again.
The prepared mixture is used immediately after preparation, so you should correctly calculate the required volume and time of application to the surface. The quality of the coating depends on compliance with this point. To obtain the deep texture of the stone, the composition must have a thick consistency, which will create a relief.
The treated surface acquires the properties of decorative plaster. This coating is characterized by high vapor permeability, which eliminates the formation of condensation, and is resistant to mechanical stress.
Main components of the plaster composition
You can get the texture of natural stone and achieve the effect of a relief surface using special mixtures. The working compositions are based on crumbs, which are obtained by crushing natural materials. Marble and granite are often used for manufacturing.
Cement, acrylic and silicone resins, silicate are used as a binding element; the plasticity of the composition is ensured by the addition of lime. Decorative properties are provided by sand, mica, and mineral pigments.
The composition of plaster solutions includes plasticizers - PVA, soap solution. To make it resistant to fungus and low temperatures, special glue is added.
How to prepare decorative compositions yourself
The finished material allows for high-quality surface finishing. Imitating stone from plaster with your own hands will allow you to save on expensive compounds. A simple option consists of sand and putty. If necessary, water is added to the working mass.
To perform external work and finishing work, working material is used, which includes:
- lime - 1 kg;
- cement - 1 kg;
- sand - 2 kg;
- water;
- liquid glass (5% by weight).
A mixture made from lime paste, water, marble sand, cement and manganese peroxide is durable. Self-preparing stone plaster requires following the recommendations.
In this case, the water temperature should be above +10℃, lime dough should be prepared from the dry component. Binders are used in combination, for example, gypsum, lime, cement.
How to make a decorative stone from gypsum in a homemade form
Another way to produce tiles is by casting from a gypsum mixture. Production is even cheaper and easier. The simplest form with sides is made from a piece of chipboard, cable duct and film. Stones and bricks are obtained with the correct geometry and texture, not inferior to purchased tiles.
What you will need
- Sample tile;
- gypsum;
- bucket;
- plastic bottle 5–6 liters;
- a piece of chipboard;
- oilcloth;
- fiberglass;
- dish sponge;
- cable channel 12 × 12 mm;
- screws with a press washer;
- plastic trowel;
- putty knife;
- roller;
- screwdriver
How to do
- First of all, make a mold. To do this, find a suitable piece of chipboard or plywood. Take a thick oilcloth and cut it to the size of the base.
- Remove the covers from the cable channels and attach the boxes around the perimeter of the piece of chipboard with screws, thus pressing the oilcloth.
- Cut the cable channel covers into pieces that will fit the size of the tiles. Place them in place and then cut boxes along them. Later, a spatula will be inserted into these cracks to separate the bricks.
- Mix gypsum with water in a cut plastic bottle until it becomes liquid sour cream and add fiberglass to give strength. Instead, you can tousle a polypropylene bag and simply cut threads from the fabric.
- Pour the plaster mixture into the mold and distribute it evenly. Tap the edges lightly to ensure there are no voids. When the casting has dried a little, stir it with a plastic trowel to give it a stone texture.
- Divide the not yet hardened plaster into tiles. To do this, insert a long spatula into the slots of the frame and press down. Use a dish sponge to blot the casting to form a porous structure.
- Remove the frame from either side and remove the tiles one at a time. Carefully pick them up with a spatula and, if necessary, trim them along the joints with a knife.
- Next, the finished stones are primed and painted. Then they are attached to the walls using tile adhesive.
How to cast stone from cement
To make a mortar, add one part cement to three parts sand. You can take less sand, then the stone will be stronger. Mix the sand and cement, then gradually begin adding water and dye, constantly stirring the solution. Its consistency should ultimately resemble very thick sour cream. To increase ductility, you can add glue.
If you need to make a cobblestone, then you don’t need a mold at all; in other cases it will be required. Before you start pouring the solution, you need to paint the mold - this way the dye will stick better. Little by little it will need to be added to the solution from the very beginning to the end of mixing - however, some people do the filling in two layers and do not add dye to the second. You need to take it from 3% to 7% of the weight of the mixture, it depends on the quality of the dye itself, the cement, and also how intensive staining is necessary.
When the filling is half done, you need to add synthetic mesh for reinforcement. Instead, fiber fibers can be poured into the solution. After reinforcement, pouring continues until the form is filled. Vibration is carried out all the time to compact the mass, so work must be done on a vibrating table. You need to make grooves on the surface of the mixture so that the stone will stick better.
12 hours after pouring, it can be removed and closed in a plastic bag, where the concrete will gain strength. After use, the mold should be washed with dish soap - this will help it stay in good condition longer. The surface of the stone should be covered with drying oil - this way dust will not stick to it and the dye will last longer.
Making artificial stone from gypsum with your own hands
As a rule, professional production of artificial stone from gypsum occurs in a factory. However, it is quite possible to make it yourself.
Some craftsmen have turned the interesting and exciting activity of making decorative stone into a quite profitable business. Moreover, without large investments and with minimal effort, its production pays off in a short time.
If certain rules are followed and high-quality raw materials are used, such activities are promising and quite profitable.
The use of natural gypsum in its pure form is not advisable, since the products have low strength and are short-lived. Modern technologies offer the production of compositions from modified gypsum that have high strength and retain the qualities of the natural material.
Not everyone can afford natural stone cladding, as it has a high cost. Therefore, it is more rational to use artificial stone made of gypsum or cement, which contains various color pigments, as well as polymer materials.
Required material and tools
- Plaster is white;
- A container, preferably made of plastic, for mixing components;
- Pallet;
- Table and polyethylene roll;
- Forms (matrices);
- Electric drill;
- Fluted glass;
- Any water-based dyes.
DIY gypsum stone
Preparation of the workplace
To produce stone, large working areas are not required. Two square meters is enough.
We will provide the workplace with a table in advance. There should be racks with shelves at hand where all the necessary elements and equipment will be placed.
Mold for making stone from gypsum
Preparing forms
Attention should be paid to the forms themselves (matrices). The most optimal are silicone molds. They are quite flexible and plastic. But forms made of metal, wood, and plastic are also allowed, although they do not so thoroughly convey the texture of plaster, which reflects the smallest details of the relief and its bends.
Preparation of materials for making stone from gypsum
Preparation of materials
After preparing the workplace and equipment, we prepare the material. For the gypsum test we need mineral gypsum, anhydride, and clean water. This will form the basis of the plaster test. Sand or similar filler is also prepared.
Molds for production
For artificial stone, molds are first prepared.
They are made of polyurethane or silicone. Polyurethane is universal. Not only gypsum forms are poured into them, but also cement ones. But they cost much more. For home production, it is best to use silicone ones.
note
If you have one or more ready-made tiles, then a sample silicone mold is poured over them. To do this, make a sealed bath, fix the tiles in it and fill it with silicone. To make the silicone easily come off the workpiece, coat the part with soapy water.
Sales channels
To grow profits, you need to take care of advertising your products and finding reliable points of sale. As soon as production starts, it’s time to launch advertising in the media and the Internet. There is no need to save money; the ad must be noticeable and effective. Additionally, you can distribute leaflets on the street or order mailings to mailboxes. If you work without intermediaries, directly with stores and customers, you will be able to keep prices at a competitive level.
Often, gypsum finishing stone is ordered by architects, designers, and developers for finishing finished projects. If production has already started flowing, it’s time to participate in exhibitions and events related to the construction industry. Acquaintances and promising connections are made there. Both large construction companies and private developers are in need of gypsum stone. In order to establish sales, you will have to actively and clearly present your products, find options for offers that differ from competitive ones in assortment, prices, special conditions for wholesale customers, etc.
Making gypsum mixture and pouring molds
When mixing, you should follow the instructions for the brand of material from which you plan to cast the tiles. The resulting mass should be more liquid than that used for finishing work. The optimal consistency resembles very thin sour cream - in this case, the solution will completely replicate the internal relief and the casting will be of high quality.
Proven recipes for pouring mixture:
- add 1 kg of dry powder to 0.7 l of water;
- 6 parts gypsum, 1 part slaked lime, water - approximately 70% by weight of the powder;
- in the dry mixture, half of the gypsum is replaced with cement, water is taken in the usual proportion;
- one fifth of the gypsum is replaced with finishing putty.
Prepare the solution in a clean plastic container. Instead of a bucket, it is convenient to take a large water bottle with the neck cut off. Thanks to the flexible walls, such a container is easy to clean from dried gypsum mixture and reuse. It can also be squeezed while pouring to produce a fine stream.
First, pour all the water into the bowl, then add the powder in portions, after which the solution is quickly mixed with a mixer. Then it is recommended to shake the container slightly with vibrating movements so that all air bubbles come out. The finished solution is poured into molding cells pre-lubricated with grease or soap solution.
If the structure includes a reinforcing mesh, then first the cells are filled not to the top, but halfway, then the mesh is applied and covered with a layer of mortar. The surface on which work is carried out must be strictly horizontal, which is checked using a level.
Suitable bases
Gypsum plaster can be laid on different substrates. Let's take a closer look at the features of each option.
Unplastered brick
If we are talking about such a surface, it is necessary to prepare it in advance for further work. Those elements that hold weakly are removed from the masonry. It is also necessary to get rid of excess amount of solution. It is necessary to wash and dry the surface, and also treat it with an antiseptic and fixative.
Gypsum tiles can be attached to such a surface using:
- a special adhesive composition on a polymer gypsum base is a means that will allow you to reliably fix the material on the surface without plaster. But it’s worth adding a little 10% PVA to the glue so that the water absorption properties become better;
- adhesive mastic - a solution that is very difficult to apply in a thin layer;
- cement mortar - they are very easy to prepare, and they dry for quite a long time.
Plastered surfaces
You can also attach the material to plaster. But cement mortar is not suitable for this. The solutions peel off, so their adhesion will be very weak. It is better to use a special tile adhesive, which will allow you to cope with the repair without unnecessary problems.
The plaster securely holds the gypsum tiles. That is why the structure will serve you for as long as possible, without deforming or losing its original appearance.
Wood
To attach gypsum tiles to wood you need to:
- remove the old coating, stripping the material down to clean fibers. It is also worth treating the surface with an antiseptic;
- new lumber is coated with products that eliminate the risk of fire.
It is better to use PVA glue to securely attach the material to wooden bases.
Plasterboard surfaces
Drywall requires the use of quick-drying compounds. There is no need to treat the surface with putty, thanks to which you can get rid of unnecessary problems.
It is better to use PVA glue, which has the following advantages:
- the composition dries very quickly;
- PVA is not subject to shrinkage processes;
- this is a fairly plastic adhesive composition;
- You can apply it in a thin layer;
- excess can be removed with a regular rag;
- the cost of the compositions is affordable.
You can choose the best option based on the features described above. Only in this case will you expect an effective result from your work.
How to coat gypsum decorative stone: final protection and additional decor
The final coating of gypsum tiles on the facade is carried out to protect the decorative gypsum stone from moisture. Therefore, you can choose both acrylic-based varnishes and primer coatings, special impregnations - this range of protective coatings provides the best option for any purpose. In any case, they are all easy to apply with your own hands - just follow the manufacturer’s instructions.
The final coating will protect the material from water and dust, ultraviolet radiation and dirt, and will also provide the necessary color, which will make the exterior of the house unique. The hydrophobic coating does not allow moisture to penetrate inside the decorative stone - water flows in droplets over the protective coating, washing away dust, which also remains on the surface without penetrating into the finish.
Most often, gypsum tiles are coated with paint to provide the necessary decorative effect. The paint can be applied in four different ways:
- Brush
- Adding pigment to the plaster mixture
- Spray gun
- The item is applied to the mold before pouring
The tiled wall must be treated with a special stone impregnation.
The most time-efficient option is to paint the stone during preparation. In this case, we dissolve the pigment in water, then add gypsum and make a solution - it is poured into the mold. This painting option eliminates fading and ensures a uniform color of the decorative stone. At the same time, for each batch you can take different amounts of pigment and get tiles of different colors, which allows you to lay out spectacular multi-colored masonry when installing the finish.
Another operational option is painting with a spray gun. In this case, it is also possible to obtain a decorative effect with different shade saturations depending on the amount of paint applied with a spray gun to the surface of the tile.
Painting with a brush is the most affordable option in terms of cost, but time-consuming. At the same time, you can also achieve a decorative effect using paints of different shades.
Briefly about the main thing
Gypsum for decorative stone is used in almost every modern design. This material is a budget and modernized version of conventional brick. It is lighter, easier to install and suitable for all types of surfaces
That is why when choosing an artificial surface, attention is paid to gypsum stone
A large assortment allows you to choose the material for each room. But the types are very different from each other, so it is worth studying in detail the properties of each and comparing them with the technical characteristics of the room
You can do the installation yourself, but it is important to follow all the rules and strictly follow the instructions. Only then will gypsum tiles become an excellent addition to the interior of the house