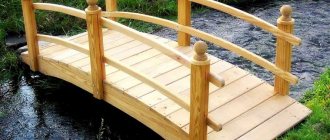
Traditional wooden wells are sources of water with amazing properties, which can be explained scientifically.
Water from wooden wells retains its original structure, unlike wells and water pipes. It is not subjected to pumping, pressure, and does not come into contact with synthetic or other foreign substances.
To build a well from wood, you need to choose the right place, dig a shaft and build a log house.
Pros and cons of wooden wells
Decorative structures made of wood look original on any part of the dacha or private yard. The owner is encouraged to make a structure with his own hands by a large number of advantages. However, these beautiful wells have some disadvantages.
The review should start with the pros:
- Wood is a popular building material. Boards, timber, round timber are affordable, and sometimes they are obtained completely free of charge after dismantling old buildings.
- The texture of the wood enhances the beauty of the well. The material allows you to display the Russian or rustic style of site design as closely as possible.
- Wood is an environmentally friendly natural material that lends itself well to processing.
Of the minuses, only one point is clearly expressed. All decorative wooden wells for the garden do not have a long service life. Being exposed to sun, rain, and snow all year round, wood quickly disappears. First, the well loses its attractive appearance. The wood turns black and cracks appear. The fungus destroys the material. Rotten and rotten areas appear. Over time, the well begins to collapse.
Advice! Protective impregnations for wood help extend the life of the well. For the winter, the decorative structure must be covered with film.
When should repairs be carried out?
The first “bell” indicating that something is wrong with the well is a deterioration in water quality. It acquires an unpleasant taste, smell, and becomes cloudy. It is not recommended to drink such water. And it is also unsuitable for household appliances and plumbing equipment: filter cartridges quickly “fly” and devices deteriorate.
The reasons for the appearance of contamination in a well can be very different:
- A large amount of silty natural deposits on the walls and bottom of the mine, which are a mixture of organic microparticles, bacteria and unicellular algae. The organic mixture decomposes, which gives the water an unpleasant taste and odor.
- Large contaminants accidentally found in the mine. This could be an animal that fell into a well, or leaves, debris, etc. that fell into the water.
- Organic matter and soil particles entering the mine through a lining that has lost its tightness.
To prevent cloudiness of the water and other troubles, the well owner needs to carry out all repair work promptly and competently.
Through the joints of concrete rings that have lost their sealing, groundwater and waste water seep into the well, which significantly deteriorates the quality of well water.
Well shaft repair activities are of two types:
- scheduled maintenance;
- unscheduled repair work.
The first ones are carried out regularly, after a certain period of time. Their goal is to maintain proper cleanliness in the well shaft and timely detection of minor damage that needs to be repaired immediately.
You must understand that any major breakdown or accident is always preceded by many minor faults. If you don't fight them, serious problems will arise.
During scheduled repair work, the filter is usually replaced or completely cleaned, deposits and build-ups are removed from the walls of the shaft, disinfection is carried out, minor defects and damage are eliminated, as well as water is pumped, which is necessary after repairs or long downtime.
Unscheduled repairs are carried out to eliminate major defects that appeared due to extraneous mechanical influences, improper operation, etc.
Working at great depths is very dangerous, so safety regulations must be strictly followed.
Features of making wooden wells
An ordinary well consists of an underground part - the shaft and an above-ground structure - the head. In the case of the decorative option, there is no need for a shaft. They construct only the head from wood with their own hands. The optimal height of the structure is 70-80 cm.
Since the well is decorative, the head can be designed classically or use imagination and create exclusive masterpieces. The log house is considered a classic. The building material used is logs peeled from bark. The design looks beautiful, but it is difficult to assemble it with your own hands without experience. The logs need to be cut perfectly, the connecting grooves must be cut out so that each crown fits snugly against each other. It is easier for an inexperienced person to assemble a log house from timber with his own hands. Workpieces with smooth walls fit tightly when joined. You just need to precisely adjust the connecting grooves to size.
If you want to move away from the classics, you can make a decorative well with your own hands from boards, wooden lining, slats, and thin bars. In other words, they use any lumber left over after construction work.
Before you create a well or even begin to think through its design, you need to decide for what purpose it is needed. Decorative structures are in demand to achieve the following goals:
- mask a damaged area of the hard surface of the yard, an unsightly corner of the garden;
- act as an integral element of landscape design;
- help decorate a well located in the yard;
- serve as a niche for storing garden tools, a hose;
- mask the sewer hatch in a visible area;
- act as the body of the original flower bed.
When the purpose of the well is clearly defined, sketches can be developed, since its design will depend on this nuance.
Important! The design of the well is thought through to the smallest detail. A decorative structure made of wood should not seem out of place on the site, be striking, and be harmoniously combined with the architectural ensemble.
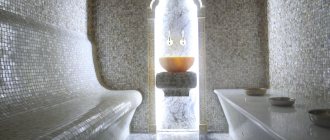
Decoration of a well in the oriental (Japanese-Chinese) style
Oriental styles are often found in summer cottages, because the harmony and minimalism of landscapes are very appealing to outdoor recreation. A rock garden, a dry stream, fountains and waterfalls, Chinese lanterns... Is there a place for a well in such an environment? There is, and in Eastern cultures the well plays an important role as a guardian of an energy source that feeds human strength with its purity and transparency.
Dragons and a peculiar roof are distinctive features of Chinese culture
The Japanese are very scrupulous about water, so a Japanese-style well necessarily includes a canopy that protects the life-giving moisture from dust, leaves and the “evil eye.” In the Chinese style, figures of mythical creatures who will guard the well are welcomed.
Materials in oriental styles are only natural: wood, large stones. The roof has a unique shape, raised at the edges, and is most often finished with soft tiles that follow the curves of the roofing structure.
Minimalism and the presence of large stones are mandatory attributes of the Japanese style.
Include plants in the design of your country well in an oriental style. They should be evergreen and mostly coniferous. A very good option is mountain pine, juniper, and different varieties of thuja.
The material on the use of coniferous compositions in garden landscape design will also be useful:
What kind of wood are wells made of?
How long the structure will last depends on the correctly chosen building material. Each type of wood has a certain resistance to destructive factors. For construction, only dry lumber is used that is not damaged by mold, insects, or rot. It is easier to make a log house with your own hands from logs with straight-layered wood, since they are easier to process. The main destructive factor of wood is moisture. For the construction, a variety with the maximum water resistance is selected.
There is a rule for creating wells that has been tested by masters. The underwater part of the mine is made of lumber 18 cm thick, and the above-water part is 22 cm thick. This difference is due to the fact that the wood that is constantly in the water disappears more slowly. The wood of the above-water part of the shaft and the head is subject to temporary exposure to moisture and constant exposure to oxygen. Under such conditions, destruction occurs faster. From the rule we can conclude that for a decorative structure it is better to take a beam or log with a thickness of at least 22 cm.
Another secret lies in the way the wood is processed. If a log house is made from logs, then it is advisable not to cut them, but to plan them. The first type of processing is performed with an ax. During cutting, many nicks and chips remain. Through these defects, moisture penetrates deeper into the wood faster. A fungus forms in the nicks and spreads throughout the tree.
When creating a decorative well from logs or other lumber with your own hands, it is optimal to give preference to the following types of wood:
- Oak is considered the best hardwood for making heads. The above-ground part will last from 20 to 25 years. The downside is the difficulty of processing wood with your own hands.
- Larch is a worthy competitor to oak. The wood is resistant to moisture due to the large amount of resin. A larch head will last at least 20 years.
- Pine is the most common building material. Soft wood is easy to process and has a wonderful pine aroma. The disadvantage is the short service life. The tree quickly changes its color, acquiring a gray-black hue. A pine head will last from 10 to 20 years, subject to annual treatment with an antiseptic and varnishing.
- Elm and alder are more suitable for making the underwater part of the mine. Wood will last 20 years in water. This is not the best material for a decorative head. The structure will last about 5 years. In rainy summers, rotten spots will begin to appear on the wood.
- Willow and willow are considered a popular building material for rural residents. Trees grow along the banks of rivers and reservoirs and love moist soil. However, the wood itself quickly disappears in damp conditions. Willow head
- Linden is a soft tree. The building material is used for lining bathhouses and making dishes. A linden well will not last long, about 5 years.
Each wood has its own unique texture. Here the owner needs to decide what he wants: the wooden lining of the well needs to look more beautiful or last longer.
Construction order
In order to comply with the construction technology, it is necessary to make markings in the designated place where we will build the shaft. We dig a hole up to 2 meters deep. We install a frame on top, the height of which should be three times greater than the dug hole.
To temporarily connect all the crowns inside, you need to use boards that we nail vertically. This is necessary in order to achieve maximum rigidity when we lower the structure down. In the process of lowering the log house, you need to do this very carefully so as not to touch the walls of the shaft, otherwise the rock will crumble.
After we lower the frame to the very bottom, we need to start deepening the hole. We do it this way: we dig 30 cm in the center of the walls, but do not touch the corners. We install wedges under the lower logs, and then select the rock from the corners. Then we remove the wedges, and the frame lowers down. When the structure goes down, we add logs on top. The process of deepening is done until we reach the desired depth and aquifer.
If we are dealing with loose soil, the structure may get stuck during the lowering process; in order to lower it down, you need to use a sledgehammer. If the log house still does not go down, then you need to build up the structure from below.
How to make a well from wood with your own hands
There are many options for creating wells. Do-it-yourself assembly technology differs from the choice of design, lumber, and design. The most difficult thing is to build a decorative well from timber or logs with your own hands. If the cuts are made incorrectly, the connections will be weak. The frame will become loose over time. Fungus will spread faster inside the cracks. It is easier and cheaper for a novice carpenter to assemble a well from lumber left over after construction work. Boards, bars, block house lining are suitable.
From boards
You can put together a decorative well at your dacha out of wood in a couple of hours if you have scraps of planed boards and timber. The workpieces are fixed with self-tapping screws and bolts. The joints are lubricated with wood glue for strength.
Advice! It is not necessary to make the well in full size. The decorative structure can be reduced in size. The main thing is that the design looks decent and fulfills its main role.
Assemble a wooden well with your own hands in the following sequence:
- A square is assembled from four boards. The product will play the role of one crown. You need to make several squares. The quantity depends on the width of the boards used, since the crowns stacked on top of each other form the total height of the head.
- When all the squares have been collected, they are placed in a stack. There is no need to connect the crowns to each other. They will be supported by the roof pillars. Two long pieces are cut from the board. The size is determined individually, to what height you want to raise the roof. One end of the boards is sawn at an angle, which in the future forms the ridge girder of a gable roof. The blanks are pressed with a clamp to the opposite sides of the box. Each crown with a stand is drilled through and connected with bolts.
- After fixing all the crowns to the posts, the clamps are removed. Start creating a roof with your own hands.
- The elements that serve as the base of the gable roof are fastened from bars or boards to the tops of the racks with self-tapping screws. For strength, they are reinforced with jibs. The roof is cut out of multi-layer waterproof plywood and secured to the base with self-tapping screws.
- 4 boards are attached flat to the end of the head, forming a decorative edge of the well.
- An imitation of a drum mechanism for lifting a bucket is made from pieces of round timber and a piece of board.
- The finished mechanism is attached to the well posts by drilling coaxial holes in them so that the round timber of the decorative drum can fit in.
The finished well is sanded with sandpaper. The smooth surface is safe from splinters, and the wood texture is more beautifully displayed. The head is opened with varnish with your own hands. You can use stain and drying oil. A rope is wound around the drum and a bucket is attached.
The video shows an example of making a well:
From block house and timber
If you really want a classic well made from a log house, but there are no logs or you don’t have the skills to work with such material, a block house will solve the problem. The lining is easy to attach, since it is a board. However, the rounded front side imitates a log as accurately as possible.
For this option of assembling a well made of wood, step-by-step instructions are as follows:
- The head is not assembled from crowns, as in the example with the board. First you need to put together a frame in the shape of a cube. To do this, two identical squares of the lower and upper frames are assembled from sections of timber. At the corners they are connected by racks.
- The next stage is framing the well with wood, that is, with a block house. The lining is cut to the required size and fixed with self-tapping screws to the bars of the cuboid frame. The blanks are placed only horizontally, otherwise it is impossible to achieve an imitation of a log house.
- Roof posts made from long bars are bolted to opposite elements of the upper and lower squares of the frame. Plywood triangles are fixed to the tops of the posts. They will act as stops for the gable roof frame. The frames of the slopes are bolted to the triangles and uprights, and they are sheathed with moisture-resistant plywood or ordinary flat paneling.
The bucket drum is attached to the racks with bolts or anchor pins. The element is made from a piece of log or two pieces of plywood are cut out and covered with planks. The finished well is polished, treated with an antiseptic, and opened with varnish, stain or drying oil.
The main stages of building a house
Having considered the design options, have you decided on the appropriate type of house and want to try your hand at building it? Using the example of a simple closed house with a door, let's take a look at the main stages of construction and the procedure for doing so.
Stage #1 - creating a drawing and selecting materials
You should start by creating a drawing on which you will indicate the dimensions of each structural element. Next, we give as an example a drawing of a gable roof made of beams and boards (lining).
When creating a drawing, you need to calculate what materials and in what quantities will be needed.
For such a small house you will need approximately the following set of materials:
wooden beam - for the manufacture of rafters, ridge, base and their fastening, as well as timber for support;
Currently reading
log - for making a gate (drum);
boards - for gables and roof slopes, and as a stand for placing a bucket;
metal rods - for making handles and securing the gate;
small consumables - metal bushings, washers, door hinges, handle; nails or screws;
bucket and rope or chain.
As for the amount of materials, in each specific case the consumption will depend on the size of the product and its shape.
Stage #2 - preparing tools and wood
Having collected the necessary materials and purchased the missing ones, it’s time to prepare the following tools:
chainsaw, jigsaw, circular saw or grinder + wood disc; drill or hammer drill; hammer, screwdriver; level, tape measure, pencil.
Also at this stage, you can prepare the wood - level, trim, treat with antiseptic and antifungal protective agents.
If you have never worked with a power tool and are going to cut wood with an angle grinder, in such a situation we recommend that you familiarize yourself with the rules for using an angle grinder.
Stage #3 - making the frame
First you need to measure the head of the well and, based on these measurements, create a drawing of the basic structure.
Next, mark the beams and boards into the required sections and cut them. Then assemble the frame of the future house and its base.
Stage #4 - fastening the gate
At this stage, a gate is made by processing the log and driving a metal rod into it on one side and a metal handle on the other. They attach it to the vertical posts with metal plates.
Stage #5 - cladding and decor
Now you need to assemble the doors from the boards and attach them. Then nail the boards/lining to the frame and cover it with a waterproofing layer.
How to do all this is clearly demonstrated in the following photo collection.
from The bars will need to be attached to the frame with self-tapping screws, onto which the doors will be nailed
Why is it important to determine the dimensions of the door and make the necessary markings with a pencil and ruler? Boards for door assembly are marked and sawn. Then a door is assembled from them using nails and beams
Fastening to the frame is carried out using metal loops
You also need to screw a handle onto the door. The slopes and gables of the future roof are lined with boards or clapboard. And a waterproofing layer is applied on top, for example, the now popular flexible tile - it is easily attached and can withstand natural disasters. The head of the well itself can also be lined with clapboard. Or use decorative brick, artificial stone, tile fragments, etc. The area next to the well can also be decorated - install a bench, plant flowers, place sculptures. Attaching bars for mounting the door. Assembling and fastening the door. Cladding with flexible tiles. Decorating the well.
Fastening to the frame is carried out using metal loops. You also need to screw a handle onto the door. The slopes and gables of the future roof are lined with boards or clapboard. And a waterproofing layer is applied on top, for example, the now popular flexible tile - it is easily attached and can withstand natural disasters. The head of the well itself can also be lined with clapboard. Or use decorative brick, artificial stone, tile fragments, etc. The area next to the well can also be decorated - install a bench, plant flowers, place sculptures. Attaching bars for mounting the door. Assembling and fastening the door. Cladding with flexible tiles. Decorating the well.
This completes the assembly of the simple house. Did this process seem complicated to you and you don’t know how to process wood at all? You can try to assemble a house from other materials - stainless steel or galvanized steel.
It is also important to take into account the climate characteristics of your region - if you have frosty winters, then when choosing a material for lining the head, you should immediately take care of insulating the well for the winter
Do-it-yourself lining of a well with wood
The basis of a decorative well can be a concrete ring. This option is preferable if the structure helps to hide the well. It is more convenient to place equipment inside the concrete ring; in addition, it is not destroyed by frequent contact with moisture. However, from the outside this design is unattractive. The ring will be made decorative by covering it with boards or clapboards.
To cover a well with wood with your own hands, a timber frame is knocked together around a concrete ring. The roof structure is immediately provided. For such a well, it is optimal to equip a full-fledged gable structure with gables. To service the well, a wide door is installed on one slope.
The boards are attached to the frame vertically or horizontally. It all depends on personal preference. The exception is the block house. The lining is placed horizontally to simulate a log house.
For the door, they knock together a shield from boards with their own hands. The element is attached to the roof slope frame with hinges. A handle is placed on the outside of the door. You can install hinges for a padlock to prevent unauthorized people from getting to the well.
Use of modern materials in decoration
If the dacha is decorated using siding, decorative plaster and other modern materials, then there is no point in creating an old well, because it will not fit into the overall landscape. In this case, bring modernity here too by covering the concrete ring of the head with tiles and making the roof from a polycarbonate sheet. The racks are made of iron, with hand-forged elements, and if there is no blacksmith nearby, then you can lay them out of red brick.
A polycarbonate roof will look harmonious against the background of a canopy or carport made of the same material
Photos of do-it-yourself wooden wells
↑ Safety precautions
When digging a well, the earth is lifted up with a bucket on a strong rope through a tripod with a block. The most important thing when lifting the earth and feeding various objects down is not to drop the load on the person working below, so these operations must be treated with the utmost caution.
The head of a person working in a well must be protected (a construction helmet, a motorcycle helmet), the rope needs to be very strong, and a small durable bucket must be securely fastened to the rope. In addition, before work, you should check the condition of the rope and bucket (bottom and arms). In general, this is one of the responsible operations.
During the descent and ascent into the well, a person must be secured with a rope. As the depth of the well increases, it is necessary to monitor the well-being of the worker, starting from a depth of 5-6 m to insure him. This precaution must be taken in case of gas contamination, which can occur even at shallow depths.
Therefore, if weakness, dizziness, nausea and suffocation appear, you should immediately go upstairs with the help of a belay partner. Subsequently, before starting work, it is necessary to ventilate the well trunk by supplying air through a hose or pipe from a fan or home vacuum cleaner to the very bottom of the well; at worst, pump air by waving a large sheet of plywood. Then, after airing (10-15 minutes), a burning candle is lowered onto a small stand at the bottom of the well and its flame is observed. If the candle flame burns calmly and does not go out, then you can go down, but during work it is advisable to periodically supply fresh air.
Usually the greatest difficulty arises when constructing a well, when they already reach the aquifer. At this time, the soil must be removed simultaneously with pumping out water with a pump or buckets in order to be able to both remove the soil and avoid collapse. Further digging of the well stops when the workers no longer have time to pump out the rising water. Typically, such an intensive flow of water occurs when the well is deepened into the aquifer 1-1.5 m below its level.