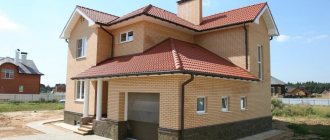
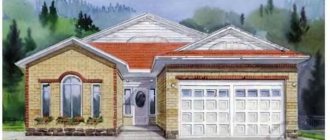
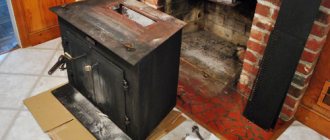
Brick is reliable and durable. This material looks attractive and presentable. But brick walls have one significant drawback: thermal conductivity. Even relatively warm ceramic material conducts heat well and does not sufficiently protect the building from the cold. In our climate, it will be necessary to build walls 64-90 cm thick to provide sufficient thermal resistance. A more rational option would be to make the external walls of the building from other materials with insulation and cladding. How to cover a house with facing bricks? It's not difficult if you know the technology and the nuances of the work.
The house, lined with brick, looks solid and presentable, it is protected from wind and other unpleasant weather phenomena. This finishing option is used for both lightweight concrete and wooden houses.
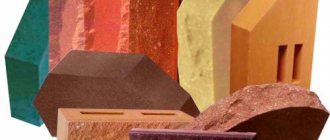
How to choose facing bricks for your home
Before you line your house with brick, you should carefully select the material. It is important to select cladding not only by cost, but also by technical characteristics and properties.
Ceramic bricks are most often used in construction. This material has fairly good (compared to other types) thermal insulation properties. The disadvantage in this case will be high hygroscopicity. The technology involves the use of both ordinary ordinary material and special facial material.
Ceramic brick is simple, durable and easy to use
In the first case, it is strongly recommended to treat the outer surface after installation with a hydrophobic composition. Facing brick does not need such treatment. The composition for treatment is selected with sufficient vapor permeability. This is especially important when finishing a wooden house with brick. It is required that the impregnation does not form a film on the surface that prevents the permeability of the walls to air and steam. Which brick to choose for frost resistance? The brand must be no lower than F35 according to the standards, and no lower than F50 according to the recommendations of the builders.
Another popular option is silicate material. It is the cheapest, but is not durable. Facing a house with this type of brick conducts heat well and absorbs moisture. Most often, silicate is heavier than ceramic. This option is not recommended when finishing a timber house (we also include a frame house and a log house).
Sand-lime brick is less durable than ceramic brick, but for 20-30 years you won’t have to worry about the problem
To decorate bricks with your own hands, you can use clinker material. It is specially designed for cladding a house, therefore it has low moisture permeability and high strength. Clinker finishing looks attractive, but this pleasure is not cheap: prices are on average 50-150% higher.
Undoubtedly, clinker brick is the best choice among all options. You can choose almost any color and shade
Features of the material
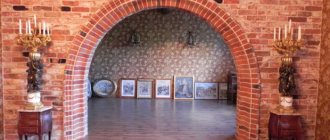
Brick decoration in the interior can bring a certain touch of brutality, a feeling of reliability and solidity, a spirit of freedom and rebellion, and create a natural and cozy atmosphere in the house.
Brick facing tiles were originally used to decorate building facades, but due to their excellent similarity to real brick, they began to be used in interior decoration. Among the positive qualities of this finish, the following can be noted:
- Visually, the material exactly imitates brickwork, thanks to its clear, even lines, neat design of the front layer, and a wide selection of colors.
- The advantage of the material is its light weight, which allows you to fix the products on any base.
- Tiles that imitate brick are easy to install.
- Regardless of the material and manufacturing method, the products are environmentally friendly and safe for human health.
- The products are strong, durable and easy to maintain, so this type of finish can often be found in the hallway or kitchen.
- The versatility of this finishing material allows it to be used in rooms of any purpose and style. This decoration is equally appropriate in country style in combination with wooden ceiling beams and in a modern loft, where a metal staircase to the second floor can be located against the background of a brick wall.
- The material is easy to process; therefore, in the process of laying products on the wall, a separate fragment can be easily filed, giving it the required shape.
- On internal and external corners, brick tiles look neat.
- A brick wall in the interior is one of the most effective ways to highlight a specific functional area. Such a surface immediately attracts attention and therefore serves as an excellent backdrop for works of art.
- Brick finishing allows you to mask the unevenness of the wall.
Excellent aesthetic qualities allow you to combine this finish with other materials. To create original combined solutions with brick tiles, you can use wallpaper, plaster, paint, wooden lining and decorative wall boards.
How to cover a wooden house with bricks
Brick and wood have very different characteristics, so certain difficulties may arise during the work process. When facing a wooden house with bricks, it is imperative to provide for sufficient ventilation of the main part of the wall. Otherwise, the wood will begin to rot or become moldy. Before covering the house with facing bricks, it is worth carefully examining the wall pie. Three-layer walls with brick cladding in this case will include:
- wooden supporting part;
- vapor barrier;
- insulation;
- waterproofing and wind protection;
- ventilation gap min. 50-60 mm;
- brick lining.
1 - ventilation layer;
2 - fastening the cladding to the wall; 3 - facing brick; 4 - additional insulation with windproof membrane; 5 - vapor barrier; 6 - finishing; 7 - thermal insulation; 9 - log wall It is important not to confuse vapor barrier and waterproofing. The latter must be permeable to steam so that it can easily escape from the insulation and brick into the ventilation gap. It is recommended to use modern vapor diffusion windproof membranes.
To ensure free movement of air, when clad with bricks on a wooden house, it is necessary to provide vents in the lower part and outlet openings in the upper part. It is recommended to use mineral wool as thermal insulation. It is characterized by low cost, ease of installation and good air permeability.
Before properly covering a wooden house with bricks, you must wait time for the walls to shrink. This process can take a couple of years, so it may be easiest to re-clad an older house.
Useful tips
You cannot lay out more than 6-7 rows at a time, as the masonry may become deformed under heavy load. Every 3-4 rows are checked with a level to achieve maximum verticality. You cannot fill the gap between the cladding and the wall of the building with anything; the air gap is necessary for ventilation of the surfaces, in addition, it also performs thermal insulation functions. Slope jointing can be done immediately after laying, so as not to rearrange the scaffolding twice.
Brick cladding
Prices for construction and facing bricks
Construction and facing bricks
Advantages and disadvantages
In construction it is very difficult to combine materials with different properties. In this case, nuances and negative aspects always appear. Finishing the facade with brick for a wooden building has three disadvantages:
- decreased ventilation, likelihood of moisture accumulation in the insulation;
- different shrinkage of parts of the wall, which does not allow rigid connection between the cladding and the main wall;
- the high mass of brick compared to wood (more than 3 times) forces the construction of more powerful and expensive foundations.
In general, we can say that it is better to decorate an old house with brick. For new construction, it is recommended to consider other more economical and efficient options.
But the technology has its advantages:
- improvement of thermal performance (especially when using ceramics);
- reducing the level of fire danger;
- reliable and durable protection of wood from negative weather conditions.
Final touches
Many people are tormented by the question: “how to make an imitation of brick on the wall with your own hands?” And it’s not the process itself that worries us, but the creation of naturalness. To do this, it is worth considering the main secrets:
- If the shadow near the bricks turns out to be too sharp, you can shade it with a toothbrush, which will first be soaked in the solution. The solution contains a mixture of white and sienna, diluted with water.
- The size of each brick, seams, edges should not be perfectly smooth, without the slightest feeling that the ends are visually “floating away”. In this way, you can create ceiling decor, and not just on the walls.
- When applying paint to brick, do not wait until it dries completely. It is better to use a sponge to create the effect of a rough surface. You can use umber and white for this.
Brickwork should not be monochromatic. To create a smooth gradient, next to the main solution, you need to keep a palette with different paints, which during the process can be smoothly applied to the wall.
Rough brick will add style and originality to even the most delicate bedroom interior.
Technology
Cladding the façade of a house with brick is done after treating the wood with an antiseptic. You should choose a special composition for impregnation - for outdoor work. It will protect the wall from mold, mildew and other dangerous microorganisms. Next, a vapor barrier is attached to the wall using a construction stapler. Installation is carried out with an overlap of at least 10 cm.
A vapor barrier located on the inside of the wall will prevent moisture vapor from entering the insulation from the room
Facing the facade with brick begins with the installation of the sheathing. The dimensions of the frame bars depend on the required thickness of the insulation. The thickness of the thermal insulation can be selected approximately based on the recommendations of neighbors or the Internet, but it is better to use a special calculation. Using the fairly simple Teremok program, even a non-professional can make thermal calculations. You only need to know the thickness of the wooden wall and its thermal conductivity, as well as the thermal conductivity of the selected insulation. The brick (and all layers after the ventilation gap) are not taken into account in the calculation.
The frame block is attached to the walls with screws or nails. Next, the house needs to be sheathed with insulation. Mineral wool is placed tightly between the sheathing. To do this, the distance between the bars should be 2-3 cm less than the width of the insulation.
Methods for attaching insulation to a wooden frame
Waterproofing and wind protection are fixed on top of the insulation. Fastening is carried out using a construction stapler. After such preparation, they proceed directly to lining the house with bricks.
The hydro-windproof membrane protects the insulation from wind and moisture, but does not prevent excess water vapor from escaping from the wall to the outside
The thickness of a brick verst is usually 120 mm. This is not enough to ensure stability, so the wall must be connected to the main part of the external structure.
This can be done in two ways:
- attaching a reinforcing mesh to the wall and inserting it into the facing layer by half the width (such a mesh is installed across the entire width of the wall with a certain vertical pitch);
Fastening the cladding using reinforcing mesh (steel or flexible) is only possible for new construction - separate special bindings that are nailed to the wall and inserted into the masonry.
The fastenings are located in the places where the supporting frame passes.
The finishing installation technology is also relevant for frame buildings. The only difference is that the connections between the wall and the external materials are attached to the frame posts. In all cases, cladding must take into account the ventilation gap.
Preparatory work before starting to create a brick wall
Preparation includes several main stages. Namely, the acquisition of the required tools, the determination of the material from which the decor will be made and the actual preparation of the walls.
Preparatory work is one of the most important stages in order to obtain a high-quality result.
Each simulation method involves a special type of surface preparation:
- When masonry is made of plaster or clinker tiles, the wall must first be leveled, putty is used, and then it is covered several times with a primer solution. In order to save time and effort, you can choose the method of using drywall.
- If the imitation is painted on the wall or made of plaster using a silicone mold, the wall is leveled, after complete drying it is sanded with fine-grained sandpaper, and then primed.
If the area of the room is small, you will have to level the surface, forgetting about the easiest option - drywall.
Once the surface is completely prepared, you can mark out the required brick pattern and begin implementing the stylish decor.
Reinforcement
To cover a building with brick, it is recommended to provide reinforcement for the finishing. To increase strength and rigidity, a wire mesh with a diameter of 3-4 mm and cells of 50x50 mm is used. The mesh is laid in the seams between the horizontal rows. The frequency depends on the brick:
- covering the building with a single brick (65 mm high) - every 5 rows;
- one and a half (88 mm high) - every 4 rows.
The dimensions of seams with and without reinforcement must be the same. To control, the mesh on one side is moved slightly beyond the masonry. This option increases reliability, but increases the cost and complexity of the work.
Expert advice
In order to imitate a brick wall as accurately as possible, you must adhere to the following tips:
- to create a believable imitation, it is necessary to respect the dimensions of natural bricks (250x120x65 mm) ;
- when caring for wallpaper or gypsum tiles, they should be wiped with a sponge or dusting brush, and decorative panels can be washed with soapy water, after which they are wiped dry;
- to get a nasty structure, use finishing plaster; such a wall will be a good background for creating various design styles;
- the color of the finish can be either traditional or other shades;
- if the walls of the room are decorated with brick, then it should have good lighting;
- You shouldn’t get too carried away with this type of decoration, if you have a low ceiling, it’s enough to make one wall or decorate part of it, otherwise the apartment will turn into a basement.
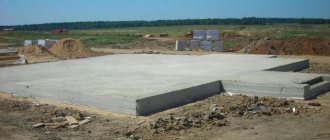
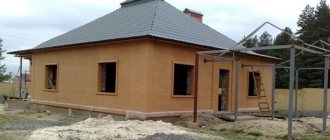
How to clad a house with lightweight concrete
In this case, a lined house can be built from aerated concrete, gas silicate, foam concrete, cinder blocks, and expanded clay concrete. A house made of facing bricks allows air to pass through worse than the listed materials. For this reason, just as in the previous case, it is necessary to provide a ventilation gap.
The installation method is very similar to a wooden house. The only difference is that you can use rigid connections between the wall and the cladding. The minimum number of connections is 3 pcs. per 1 sq.m. Ties are not allowed to be placed in the seams of the main wall; they are nailed to the surface.
When constructing a building from fragile cinder blocks, it is recommended to build a frame that will take the load from the floors and other building structures. In this case, the walls will be self-supporting. Finishing the house with facing bricks is attached to the cinder block very carefully.
Your own brick-lined house is beautiful and reliable. But when carrying out work, you must follow certain recommendations.
Types of masonry
Types of facing brick masonry
Based on the location of the bricks in a row, several types of masonry are distinguished:
- front (bed) - the brick is laid so that the widest side is visible;
- spoon - the long narrow side is visible from the outside;
- bonded - only the ends of the bricks are visible from the outside.
Types of masonry
In addition, masonry is divided into types according to decorativeness:
- “half-brick” masonry - the vertical seams of the spoon or bed masonry are shifted horizontally by half the length of the brick;
- stacked - vertical seams between bricks are located on the same line;
- Flemish - spoon and bonded masonry alternate in one row;
- “American” - spoon and butt masonry alternate in rows.
Decorative facing brick
If you have no experience, it is better to start with standard half-brick spoon masonry, and as your skill improves, you can try other methods. It should be noted that stacked masonry is the most unstable, therefore it is used exclusively for decorative purposes.
conclusions
Brick wall decoration is an ideal decorative tool of modern times. To use it correctly, you need to study this article. She will help you choose both the color and type of material. Real brick or its imitation - it all depends on your personal preferences and desires. Always listen to yourself, as well as to the advice of experts, take into account the features of the rooms and do not mix inappropriate styles together.
Did you like the article? Share with friends:
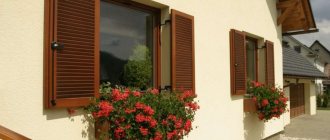
Slope finishing
The slopes are decorated with interlocking bricks, which creates an additional decorative effect and strengthens the perimeter of the opening. The material is installed in an even column, creating a dense edge of the masonry fabric and emphasizing the accuracy of the geometric lines.
For a more expressive design, you can use a brick of a different color, combining it with the main tone of the material. This option will decorate the slopes and make the facade more elegant.
Making at home
The technology for producing building materials from clay has been known for centuries. You don’t need machinery or equipment or the skills of a highly qualified specialist. Proven methods and new technical techniques are used, which allows us to obtain high-quality products at minimal cost.
To give the brick strength, it is fired in a kiln. If a lot is required, a permanent structure is built; for small volumes, even a metal barrel can be used. Modern additives improve quality characteristics: thermal insulation properties, resistance to frost, moisture, and cracking.
Preparation of raw materials
Not all clay is suitable for making bricks. Only high-quality material is used, which does not contain stones, pebbles, earth, or white inclusions. Strength, durability, resistance to low temperatures and water depend on this. It is first checked for fat content. A small amount is soaked, and when the material becomes homogeneous, roll into a ball with an approximate diameter of 5 cm.
It is left in the shade to dry thoroughly, then testing begins. If it bursts, the clay is oily, you should add 5 parts of fine river sand to it. But this is an approximate dosage; you will have to experiment to achieve a high-quality composition.
Cracks may not form. Then they take the ball and let it free fall from a meter height onto a hard surface. If it survives the impact, the strength is high, suitable for brick. When it breaks, the mixture is diluted with a fatty compound. It or sand is poured in small portions, checked each time until the desired composition is achieved.
Greater ductility facilitates manufacturing. To achieve this state, the crushed raw materials are placed in a wide box, water is added in several steps, mixing everything thoroughly. Leave in this form for at least three days until the composition becomes homogeneous. Cover the container with a moistened cloth or film.
Product molding
The finished solution is placed in wooden or metal boxes. They are calculated for one brick or more. The inside must have a smooth surface. Before filling, lubricate with oil or use whitewash (water and chalk). The forms can be collapsible or solid, as shown in the pictures.
When filling containers with clay, take into account that when it dries, and then when fired, it decreases in size. Therefore, each side is increased by 10 mm. For ease of use, the box is made without a bottom and with removable sides. It can be made to form one solid piece, which is then cut into pieces with a string or a metal plate soaked in water.
Fine sifted river sand or a little sawdust is poured onto the moistened sides and bottom. Lay the prepared mass and compact it. During the shrinking process, clay is added until it is even with the edges. The excess is cut off with a metal or wood strip or a large spatula. The surface is smoothed and the box is removed. The product is left to dry for 1–2 hours. Readiness is determined by pressing with your fingers - there should be no traces left. Rejected copies are allowed for processing.
To make bricks with your own hands in large quantities, you should take care of the equipment. A homemade screw press, which uses a jack for drive, will make the work easier. Hot water for preparing the solution speeds up the initial drying.
How to dry it properly
Quality largely depends on how moisture is removed. The more uniformly and longer the process lasts, the stronger the material becomes. If the temperature is not constant, overheating is allowed, then cooling, cracks and deformation appear. Usually the formed blanks are placed under a canopy.
In open areas, the top and sides are covered with fabric to protect from sunlight at midday, and in case of rain - with film. Don't forget to shoot when the weather is moderate and there is no precipitation. They make sure that the base is not wet - even on dry ground they spread a film or lay boards, and then put raw material on top.
The material laid out in one layer dries faster, but requires a lot of space. Therefore, they make vertical bags of 6–8 rows, each sprinkled with sawdust or sand. Lay them loosely, leaving a small space for air to pass through. When the bricks dry out from below, they build them up with freshly made bricks. Taking into account the fact that the process occurs faster from above, all products will be ready at approximately the same time. The outside air temperature must be at least 10°.
If clay brick is simply dried without firing, it will turn out raw. It has a faded brown color. In terms of performance, it is almost no different from red, but is more susceptible to deformation and less durable. If you use high-quality raw materials and dry them well, the characteristics are almost comparable.
The duration of the process depends on the weather. At normal temperatures without excessive humidity, bricks of small standard sizes dry in 10–15 days. Readiness is determined by testing. Take one raw material from the middle and break it in half. If there is no dark spot, which indicates moisture, the required quality has been achieved.
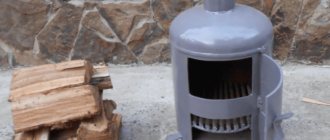
Firing technology
If a person is making building bricks for the first time, then he does not have a special oven. If something like this is not planned in the future, there is no point in building it. A metal container of 200 liters is used, holes are made in the bottom.
Choose an area where there are no underground communications. Dig a hole of a slightly smaller diameter, 0.5 m deep. Place stones 20 cm high on the sides, with a barrel on top of them. Raw material is placed inside - 35–40 pieces included. They are laid with gaps and closed at the top.
A fire is lit under the container. The firing process is long and tedious, lasting 20 hours. They start early in the morning, constantly maintaining a high temperature by adding fuel. When the required time has passed, leave it to burn out. It is impossible to simmer so that the barrel cools slowly, otherwise the baked clay will crack.
Better firing is obtained if you use a homemade oven, the design of which is shown in the figure below.
The properties of brick are determined by many process factors:
- time of temperature rise and its final indicators;
- holding at the achieved parameters;
- cooling rate.
The construction of the furnace begins with a foundation 0.5 m deep and 0.6 m wide. Then vertical walls half a meter thick are laid out. After reaching ⅔ of the height, they are gradually narrowed, forming a chimney, on which a pipe is placed to improve draft. Burnt brick or raw brick is used. To make the structure easy to disassemble when no longer needed, the masonry is done using thin mortar. A 10-centimeter layer of crumbs or small crushed stone is poured under the stove.
An opening is provided for loading, which then serves as a firebox. A well-fitted lid or door is installed on it. All external walls are coated with a thick layer of clay. After laying the raw material, the fuel is ignited. At first, only 150° is required; you should not increase it sharply - a lot of steam accumulates, which threatens destruction. Low-grade firewood is used.
After 48 hours, the temperature is gradually raised to 1000° and maintained for up to four days. The flame should be light orange. When they stop heating, seal the cracks that appear on the walls and leave until completely cooled. The quality of the bricks is checked by breaking one of them. Well fired has a uniform color and structure. If you fill it with water for several hours, the original appearance should not change.
Installation on the lathing
The mounting frame must be made of a metal profile or wood. Installation of slabs on the frame is carried out using clamps, clips or self-tapping screws. Fastening can be of two options: hidden (performed using anchors) or visible (performed using special fasteners) .
The slabs are fastened to the fastenings that are supplied with the material. It is important to maintain the horizontal and vertical position of the coating during installation.
You need to start attaching the slabs from the bottom corner (left). If this is a regular panel, then the tiles should be fastened together into locking elements with some force.
IMPORTANT!
If the plate is attached to clamps, attention should be paid to the quality of the fastenings: they must be made of galvanized metal, their thickness must be at least 0.004 cm.
A diamond blade should be used to cut tiles. If the fastening elements are cut off, then the hanging parts should be secured with self-tapping screws in the sheathing, and it is advisable to seal the holes for the screws with sealant and crumbs of the material being laid.
For openings, special angles are used, provided complete with the main material..
Differences from other types of facade tiles
Slabs for decorating the façade of a house can be made not only in the brickwork version. There are other types of facade slabs, but brickwork is universal: there are enough color options to realize any design idea .
If a brick is damaged, it can be replaced with a new one. In terms of performance characteristics, “brick” tiles are not inferior to natural bricks.
The range of color solutions for tiled brickwork is quite wide, which allows you to choose the material to suit the desired design.
Laying gypsum stone
You can lay tiles:
- for cement-based adhesives;
- for gypsum putties;
- for silicone sealant.
Before laying, the base is cleaned, leveled and primed. The glue is applied to the back surface of the tile, the excess is removed with a comb. The tile is applied to the base; you can use a rubber hammer to adjust the position.
Composition of blanks
Before making a fragment manually, you need to know what elements to include in the composition in order to improve the performance properties of the material. The main ingredient is clay, but depending on the purpose, the components of the building mixture include additional components. Based on their contents, the following types of bricks from scrap materials are distinguished:
- Silicate - consists of quartz sand and lime in a ratio of 90% to 10%.
- Red refractory brick - made from clay and plasticizer.
- Ceramic material can be prepared from a constantly used composition and clay admixtures of small fractions.
Before making bricks from cement or other material, you must consult with a specialist, because there are different subtleties in mixing, storing or calculating raw materials. Therefore, in order for the masonry to be durable and look professional, you need to know exactly how to use manual force. Homemade clay brick will be warmer if sawdust or plasticizer is added to it, and if the fragments are reinforced with cement, the installation will last longer.