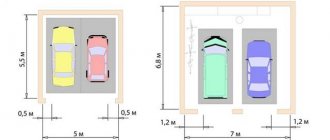
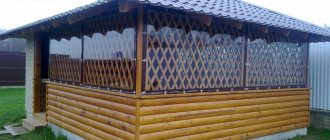
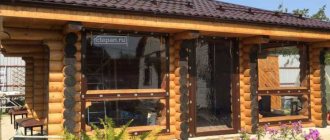
One of the most common structures that provide comfortable spending time in the fresh air near the house will be a small 3 by 4 gazebo. Functionally, this is a covered, flat, paved area on which several chairs or benches and a table can be permanently placed. The convenience is that there is no need to regularly bring in and remove furniture and you can relax outside regardless of the weather, since the roof and side cladding of the building protect from precipitation and wind.
Gazebo 4 by 3 meters, project selection and creation
Some tips before construction
A 3 by 4 gazebo is built with your own hands quite often, since such construction is quite simple from a technical point of view:
- The materials are lightweight, their installation does not require professional skills or the use of special tools and devices.
- When choosing a construction site where there will be a 3x4 gazebo, you need to take into account the location of trees and shrubs nearby in order to avoid the destructive influence due to their growth.
How to choose the right place for a gazebo
- It is advisable that tall trees be located on the south side, which will create the greatest natural shading necessary in the summer.
- Since the façade of the gazebo provides little protection from the sun's rays entering the interior, the structure should be oriented so that closed removable panels or awnings provide maximum protection from heating.
The correct and convenient passage to the house also depends on the choice of place for the gazebo.
Video – Hexagonal gazebo
The gazebo will consist of six identical elements, so you can only draw the roof and one of the wall elements. Do this with utmost precision, because any inaccuracy may cause the structure to fail to fold.
Note! If you are a person far from professional drawings, you can familiarize yourself with finished projects or sketch simple sketches indicating dimensions.
Next, calculate the amount of materials required and overall costs. As for wood, it is better to use pine or spruce - they are very durable and inexpensive. We also note that the construction process will not be particularly difficult, since the gazebo itself will consist of:
- grounds;
- six supports;
- railing;
- roof, which includes six triangles.
How to choose a standard project?
The appearance of the 4x3 gazebo should be in harmony with existing buildings and landscape.
Therefore, it is important to choose a 3x4 gazebo project with a suitable design and color scheme.
Variant of a standard summer gazebo design
Ready-made version of the finished design No. 2
Model No. 3
Model No. 4
Model No. 5 closed type
Model No. 6
How to choose the right standard project?
- It is advisable to choose one with specifications, technology and accompanying assembly instructions.
This will allow us to pre-fabricate all the components according to the submitted drawings, prepare the required fasteners, and strictly follow the construction sequence.
- Manufacturing parts according to finished drawings will eliminate possible errors, the possible occurrence of which will require corrections with the need for additional costs for new materials.
In addition, the fasteners included in the specifications are guaranteed to ensure the reliability and durability of the structure.
Create a drawing
Designing a structure can be done in several ways: either find ready-made drawings, calculations and specifications for a gazebo of the required size on the Internet, or carry out the planning yourself.
In the latter case, the stages of execution will occur as follows:
- A site plan with the main buildings is drawn onto paper.
- Choose the optimal location for the future gazebo. It is recommended to take into account that the entrance should be located on the leeward side.
- The diagram shows all load-bearing objects - walls and pillars. Using this information, as well as analyzing the topography of the site (taking into account the condition of the soil, the absence/presence of swampiness or differences/irregularities), the type of foundation is selected.
- Calculate the dimensions and required materials.
- Choose a rafter system and type of roofing material.
How to build a foundation for installing a structure?
The foundation for such lightweight structures as 3x4 gazebos for a summer residence is either piled or columnar. These are the simplest and least expensive types of load-bearing foundation, while fully ensuring the required reliability and durability for light buildings.
Types of piles for manual installation
Starting work with a load-bearing base
Assembling the foundation on which the light 3 by 4 gazebo will be fixed begins with marking for the piles:
- In the places where the four corner piles are installed, marks are made with a crowbar to a depth of about twenty centimeters at the required distance from each other.
- The distance is verified not only in length and width, but also diagonally, or preferably two.
Note. An error in measuring the diagonals leads to a diamond-shaped foundation, which is unacceptable during further construction, and correction will require reinstallation of almost all piles.
- To manually screw in piles, a crowbar is used, which is inserted into special holes in the upper part of the pile.
Two pipes with a length of at least two meters are put on it on both sides, acting as extensions.
Working with piles
The torque required to deepen the piles is quite large, so the force that will need to be applied for rotation depends on the length of the pipes:
Finished structure on stilts
Two workers need to rotate the pipes from opposite sides; this is the only way to avoid deviation of the pile from the vertical position, which is constantly checked with a regular level in two planes.
- The first thing you need to install is a pile located in the place that is most elevated on the 3x4 plot chosen for the construction of a gazebo for a summer house.
- The pile is deepened to a level of approximately ten centimeters from the top edge to the ground, this will create a guaranteed air gap under the flooring, necessary for ventilation.
- The remaining three piles are screwed in using a similar technology to a depth so that all upper edges are at the same level; a water level is used for this.
You can use any transparent hose at least five meters long and fill it with water. The edges of the water at different ends of the hose are always at the same level; it is very convenient to use them to measure the alignment of the edges of the piles.
- Then five more piles are screwed in, one in the middle of each of the four sides and one inside the perimeter where the diagonals intersect.
To install the steel plates (heels) to which the strapping will be attached, you need about one hundred kilograms of concrete prepared using fine gravel to fill the cavity of all the piles.
The plates have an anchor that is inserted into the liquid concrete and, after hardening, a strong platform is formed on each pile.
Necessary materials
To build a gazebo, readily available materials are often used, which usually include brick, wood, metal or polycarbonate. The finishing can be clapboard or planed boards (block house). The roof can also be different: the same polycarbonate, flexible tiles, colored slate, ondulin or corrugated sheets are acceptable. Based on the selected material, type of foundation, frame, roof and floor, a preliminary calculation is made that will help determine future costs.
Important! Calculations, even the most accurate ones, are not always able to reflect the real picture of construction, and therefore it is recommended to purchase all materials with a reserve.
For example, when using timber as the main material, you will need:
- with a cross-section of 10×10 cm, length 3 m - 3 pcs.;
- 10×10 cm, length 4 m - 3 pcs.;
- 10×10 cm, length 2.3 m - 4 pcs.;
- 10×10 cm, length 1 m - 5 pcs.;
- 5×10 cm, length 2 m - 8 pcs.;
- 5×10 cm, length 3 m - 7 pcs.;
- 5×10 cm, length 1 m - 2 pcs.;
- 5x10 cm, length 4.3 m - 2 pcs.
Additionally, in order to build a gazebo yourself, you must have: cement, bricks, roofing materials and facade finishing, as well as self-tapping screws.
You will also need the following tools:
- electric planer (used for surface treatment);
- tape measure or long ruler and pencil (for marking);
- circular and circular saws;
- screwdriver
Find out how to arrange and landscape the area around the cottage.
Start of frame construction
A bottom frame is installed from 100x100 mm timber, which will serve as the basis for the flooring and fastening the racks. The timber is pre-impregnated with an antiseptic and drying oil; this is necessary to resist rotting from the harmful effects of moisture.
Installing the bottom trim on the foundation
Before laying, a layer of waterproofing material such as roofing material is laid between the timber and the heels. To prevent the floor from bending during operation, another support is required in the middle part, for which additional beams are laid along the long sides supported on a pile inside the perimeter.
From a board 100x50mm. Additionally, three crossbars are installed on each side of the middle beam. Such a base is quite enough to ensure that the flooring made of 30mm boards of any profile does not sag.
The beams and crossbars are fastened together with two 100 mm nails at each joint, which are driven in at a slight angle.
Preparing for work
Selection of building material
At this stage you need to decide on the building material. The most popular options are wood and metal (profile pipe). In the case of wood, you can use a 100 by 100 mm beam, and with metal, a pipe with a cross section of 60 by 40 mm.
Made of wood
Made of metal
If you prefer reliable brick, then the entire construction technology will be noticeably different. It will be necessary to pour a reliable foundation (strip or monolithic type), and then do the brickwork. There are no special design features here; it will be enough to lay out the walls on six sides.
Made of brick and stone
Drawings with dimensions and explanations
If you do not fully understand the structure of a hexagonal gazebo, then I suggest studying the drawings below. They clearly show the dimensions of potential buildings, area, dimensions of the rafter system, connections at the joints, names of the components.
The above projects are enough to give you a definite opinion about this form. The pictures do not show the roof sheathing, which is made for laying soft tiles, we will talk about this later.
Load-bearing wall elements
The racks are leveled vertically, attached to the frame with wide corners and fixed with temporary transverse strips until the top frame, slopes and railings are secured.
Method of mounting racks
The main resistance to the lateral loads experienced by a 4x3 gazebo in strong winds will be created by the slopes and railings, so they must be tightly pressed and securely fastened.
When installing racks, it is necessary to use the railing bars as a template to accurately determine the installation location on the harness. With the railings secured with a slight tension, the 3x4 DIY gazebo will receive greater rigidity.
Final frame assembly
The most difficult stage of work, when building a 3x4 gazebo with your own hands, is that the frame on the upper level has not yet been finally secured. For the safety of work when assembling a 3x4 gazebo and the convenience of performing the necessary operations, you need to make two portable platforms about one meter high.
Bits and railings
Then it is possible to carry out the installation and fastening of the harness and other elements by two workers simultaneously from opposite sides.
After completing work on one side of the wall, it is convenient to move the platform to the other. The upper trim is assembled in the same way as the lower one and is attached to the posts with the same wide angles.
The middle beam is not provided in the upper frame, since only beams along the perimeter are sufficient to hold the roof. Then, two slopes are installed on each rack, which are secured with supports and overhead metal strips.
Construction of a gazebo with barbecue measuring 3 by 4 meters
The construction of a 3x4 gazebo with a barbecue involves a number of changes in certain stages of the work. So, if the structure of the barbecue is quite massive, an additional foundation element should be built under it. As a rule, the area under the kitchen appliance is simply concreted.
In addition, in most types of gazebos (unless it is an open type structure), it is necessary to provide a hole in the roof for the chimney. The advantage of 3x4 lean-to gazebo projects is that the pipe level does not need to be raised too high - normal traction is provided by the structure itself.
A slab foundation is considered the most convenient for placing a barbecue or barbecue. It should protrude 10 cm above the floor of the future gazebo.
Small-sized gazebos can significantly increase the functionality of a personal plot and add additional aesthetic flavor to its appearance. If all the rules for the construction of such structures are observed, almost every homeowner can build such a structure.
Installation of rafters and roof decking
The roof, by its appearance, conveys the greatest visual impression of the entire structure, so the 3x4 summerhouse is primarily compared with other roof structures.
Hip roof
The rafters must be assembled on the ground, directly on the top frame until it is raised onto the racks. This will eliminate the need to make a high platform that allows you to reach the roof ridge:
- Attaching the rafters with the stop heels cut out is quite simple.
- Drawings from the project play a major role in this operation; they indicate the exact dimensions, and most importantly the angles of bevels and inclinations.
These angles are different for all rafters; they determine the position of the contact planes, and it is almost impossible to select them without having calculated data.
Stage 7. Railing
Next, you need to install fences along the entire perimeter of the structure - the height of the railing should be approximately 90-100 cm. The vertical elements in this case can be ordinary boards, although if you wish, you can make them shaped - to do this, trim them with an electric jigsaw.
To make the railings look more decorative, apply two or three layers of varnish to them. Secure all the elements with self-tapping screws, then install a window sill board along the upper perimeter of the railing (it must be wide). Using special fastening angles, connect this board with the vertical elements. Now proceed to the final stage - the construction of the roof.
Fixing pads
The assembled rafters are lifted onto the top frame and secured with nails and steel plates. The advantage of hip roofs is that they and the entire 4 x 3 gazebo can withstand lateral loads without diagonal spandrels.
Rafter covers and slopes
All that remains is to cover the roof with metal tiles. You can use any other covering; for this you will need to cover the rafters with 30mm thick boards. Then soft tiles, they reduce noise during rain, but their price is slightly higher.
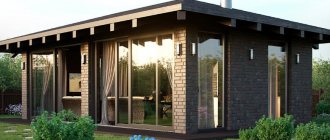
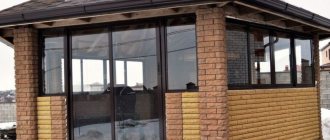
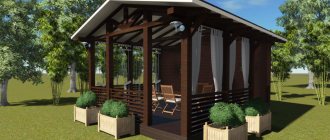
Photo selection of finished 3 by 4 design projects:
Interesting summer model made of wood
Modern rectangular model
3 by 4 gazebo model in country style
Polycarbonate - simple and beautiful
Garden summer model
Great solution for a small family
Before starting work, it is advisable to watch the video in this article and when assembling a 3 by 4 gazebo with your own hands, consistently carry out the technological process.
Alcove
Stage 6. Gender
Next, proceed to the floor. To do this, you will need logs, and, as you know, you can also make them yourself. Use 7x3 cm boards or 10x5 cm bars to create logs. Using nails or self-tapping screws, secure them to all posts. Then lay waterproofing - this can be any suitable material, for example, roofing felt covered with plastic film.
You can lay the floor directly on top of the insulation. Use boards or composite materials for this. Do not forget about mandatory treatment with antiseptic and other protective agents! Having prepared the floor, proceed to the partitions. It is worth noting that a hexagonal gazebo can have both solid partitions in the form of dense walls and meter-high railings.
Arrangement of the base
In the question of how to make a reliable substrate, you should seek help from the experience of specialists. Practice shows that to make the base of a hexagonal gazebo, it is more rational to use a columnar type of foundation, since it does not require lengthy preparation and is erected in a matter of hours.
To obtain it, you will need to dig holes with a depth of 50 to 100 cm at the designated 6 points along the perimeter of the circle and in its center, depending on the weight of the proposed structure. Each of the recesses is filled with a small layer of sand-crushed stone mixture and compacted with high quality. Then, 4 to 6 pieces of reinforcement bars are driven in around the perimeter of the pothole, and wooden formwork is installed.
After completing the steps described above, fill the prepared holes with concrete. After allowing the necessary time to dry, the formwork is dismantled.
To give greater strength, before pouring the foundation, we drive reinforcement bars into the center of each recess so that its upper edges protrude at least 20–25 cm above the formwork.
Stage 8. Roofing
The roofing structure in our case will rest only on the corner pillars; the one installed on it will not be accepted in this case. In other words, everything is the same as when building a floor. For more convenient work, as well as for the sake of neat connections, cut out a small flat hexagonal piece and install it in the center. All support bars will subsequently be attached to this part.
Note! To make it more convenient to work with structural elements, build the roof sheathing on the ground, and when finished, lift it up and install it in place.
Saw the bars on the roof into the end bars at an angle of approximately sixty degrees. To fasten all elements, use the same self-tapping screws.
For greater strength and rigidity of the structure, secure additional ones between the sheathing bars, one per “gap”. Sheathing can be done either with sheet-type composite materials or on the top using small slats. It is characteristic that almost any of the existing roofing materials can be laid on top of the sheathing.
Often, garden gazebos are covered with different types of tiles - both soft and ceramic. But do not forget that the roof sheathing will rest solely on the racks at the corners of the structure, and therefore when carrying out the work you need to use an extension ladder or stepladder. An ideal option would be a collection of scaffolding, because this kind of structure would not be out of place on a suburban area.
Planning
In order to understand the question of how to build a reliable and high-quality gazebo, you should first create a clear sketch of the future structure. Today, you can contact any construction and finishing company to draw up this important document, or you can complete it yourself, using the options suggested at the end of the article. Properly prepared drawings, combined with accurate measurements, will allow you to complete any work with minimal labor and time losses. At the planning stage, it is worth deciding on the dimensions of the building and the type of consumables.
It is most advisable to choose wood as the basis for the gazebo, since this material can be easily purchased and delivered to any point in the world. In addition, the pricing policy of wooden products is significantly lower than other analogues and replacement options. Timber and boards made of spruce or pine can easily cope with this task.