There are a large number of different shower trays available. They are quickly installed, affordable for the vast majority of users, and quite practical to use. But experienced plumbers do not recommend installing such devices in bathrooms.
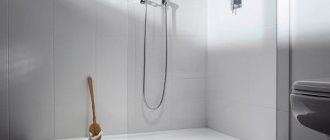
Shower cabin without tray
Cabin with pallet
Why?
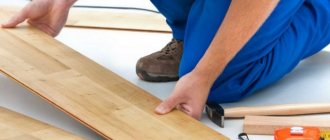
- Construction work is simplified and the amount of unproductive waste of expensive floor tiles is reduced. Marking is much faster; it is possible to completely match the tile joints on the walls and floor.
- Fewer tiles need to be cut. Due to this, construction time is reduced and, as a result, financial savings are achieved for the customer.
- The process of cleaning the room is carried out in one step simultaneously with washing the bathroom floors.
Most shower trays are made of plastic, which can react negatively with certain cleaning products. Shower cabin without tray on the floor - The operating time of the shower cabin increases. Over time, all plastics lose their initial ductility and the material becomes brittle. With minor mechanical forces, cracks appear that cannot be repaired. The plastic tray needs to be completely changed, and this is not only a big loss of time, but also money.
- The comfort and safety of using the shower increases.
The floor is located on the same level, there is no need to step over artificial obstacles, which is especially important for children and the elderly. Large shower without tray - Users can independently adjust the size of the shower.
Moreover, change this not just once, but as needed. The space for the shower can be fenced off with a curtain; rehanging it to a new place is no problem. Shower corner in the bathroom with glass partition
Shower cabins in the interior
Fashionable modern interiors are distinguished by ergonomics, lightness and free space. For this reason, designers have developed compact and stylish shower designs without a tray.
Thin, often transparent, enclosures of the cabin are mounted on the floor of the bathroom, where a drain is immediately installed, thanks to which the practical shower box plays the role of an integral element of the interior.
A shower box without a tray is used to organize a small bathroom and a spacious room. The variety of models allows you to embody creative design ideas in interior design.
Since the walls of the shower cabin are usually made of the thinnest transparent plastic, the design looks airy and light. An important advantage of a shower box without a tray is that its installation requires minimal space.
A shower without a tray will not only successfully cope with its intended purpose, but will also stylishly transform the interior of the bathroom
Manufacturers often use transparent or organic frosted glass as shower partitions. After taking a shower, no traces of water drops remain on the glass surface.
The nuances of choosing and installing glass for a shower are discussed in our other article.
Depending on the features of the bathroom interior, you can equip the shower stall with plastic panels, block walls, glass blocks, etc.
A shower box with partitions made of double durable glass, inside of which LEDs or lighting are mounted, will create an original interior.
A shower cabin with lighting is often used by modern designers. The original design can play the role of an accent element in the bathroom design
To make a shower stall look stylish, you need to choose the right materials, so it makes sense to turn to designers to create a project.
A non-standard floor covering will significantly improve the design of a shower box. The floor of the cabin is covered with ceramic tiles, which do not necessarily have to match the style of the walls and other surfaces of the bathroom.
The ceramic floor of the shower box, lined with contrasting mosaics, is an excellent solution for decorating a modern interior. Before starting facing work, it is necessary to perfectly level the surface
The floor looks original in the form of a mosaic, decorated with drawings or additional decorative elements.
pros
- Ideal for small bathrooms - creates the illusion of more space.
- Ideal for people with limited mobility - easier to use. You don't have to climb a step to get into the shower. Disabled persons can enter the cabin directly.
- Less complex design - does not require installation of a shower tray or sliding doors.
- More Durable Design – Thanks to its simplicity, a trayless shower is a more durable option that will last for many years.
- Ceramic tiles installed in shower stalls, the same as in the rest of the bathroom, improve the aesthetic impression of the interior and make it appear larger.
- The shape of the cabins can be adapted to the size of the bathroom.
Features of the design of shower cabins without a tray
The main distinguishing characteristic of a shower box of this design is the absence of a special tray with characteristic side edges. The cabin of any model is equipped with a shower drain that drains water from the shower head.
When you go looking for a shower box, you can choose the best option among a huge range of models. Modern cabins are divided into several main types and differ in the material used to make the elements and in the configuration.
Manufacturers of drains and shower trays
In a series of articles about shower design, I did not list popular manufacturers of shower drains and trays. I'm correcting myself.
Shower drains manufacturers import
- Magliezza
- Viega
- Tece
- Migliore
- AlcaPlast
- Aco
- Rug
- Radaway
Drainage channels (shower trays) manufacturers
- Pestan
- Tece
- Viega
- Alca Plast
- Aco
- Ravak
- Radaway
- Sanit
- Gllon
What not to do when installing a shower
Installing a drain hole in the floor is a permitted activity. When equipping it, you must adhere to strict rules established by law, as well as sanitary standards.
The Civil Code prohibits actions that result in load-bearing structures losing their strength and living conditions deteriorating. According to this document, any changes in the technical passport or in the BTI plan require the creation of a project and its approval by government authorities.
When is project approval needed?
- Combination of bathroom and corridor.
- Demolition of the partition between the bathroom and toilet, if it is marked on the plan.
- Installing special equipment can significantly increase energy consumption. It is possible that additional sockets and switches will appear.
- Relocating the riser is possible, but not advisable, since a zigzag cut will create an obstacle to the flow of water. In addition, during operation it will experience strong internal pressure. Excessive voltage will cause the riser to fail.
The creation of the project must be carried out by an engineering company that has the appropriate license.
If you need to make a shower without a tray without changing the boundaries of the room, you will need to coordinate the sketch. It shows the location of the plumbing fixtures. It is only necessary if the plumbing fixtures are indicated on the BTI plan. You can draw it yourself.
Pixabay
A number of restrictions are introduced by local legislation. In Moscow, Moscow Government Decree No. 508 is in force. It contains a complete list of activities that cannot be agreed upon.
What cannot be agreed upon
- Partial or complete demolition of the ventilation duct.
- Installation of fines in reinforced concrete slabs and interpanel joints. They should only be laid in the finishing layer.
- Expanding the boundaries of the bathroom to include living spaces. Corridor connection is allowed. According to clause 3.9 of SanPiN 2.1.2.2645-10, redevelopment is prohibited in which the entrance to the toilet or combined bathroom will be made from the kitchen or room.
Sustaining the filled pallet|screed
As a rule, the layers being poured are rather large and need to be reinforced with a metal mesh - this is all clear. However, it is equally important to allow the product to dry completely. And if we take into account that pouring is often done using “wet” technology, then the formation of cracks is very likely. Even if there are no cracks a week after pouring, this does not mean that they will not exist in a month! Therefore, ideally, you need to dry the pallet for a month, or as close as possible to this period.
You may be interested in: Installation of a shower tray with tile lining
Despite the fact that manufacturers of many waterproofing compounds claim that their products stretch when cracked, few people want to check this at the cost of their own repairs. It is better to wait for cracks to appear on the dried screed, cover them and only then carry out waterproofing. Moreover, no one guarantees you the absence of cracks during operation, movement of floor slabs and the like - this is where the ability of the insulation to stretch is realized.
What technical solutions are suitable for apartments
In a multi-storey building, it is better to place a standard tile corner near the riser. In typical bathrooms it is quite difficult to place a shower stall together with a bathtub. Custom-built buildings tend to have more space, but there are often choices to be made.
The drain should be located near a pipe connected to the sewer. The closer it is, the greater its slope. If you place it at a large distance, you will have to raise the floor, otherwise the water will not drain well. With low ceiling heights, a rise in the floor of a few centimeters will be noticeable. In addition, a heavy screed will create loads on the floor.
The drain hole can be located at floor level or on a podium made in the shape of a bowl.
The standard base size is 1x1 m. If space allows, it is better to expand the shower area.
Pixabay
Floor drain
A floor drain is suitable for apartments with high ceilings. To hide communications in a layer of concrete, its level will have to be raised by more than 15 cm. In old buildings, under the finishing there may be logs - a wooden frame filled with insulation and sound insulators. Over several decades of service, they have lost their properties, so it is better to replace them with modern analogues. The thickness of the layer, as a rule, takes more than 10 cm. There are known cases when materials that were unsuitable for construction and harmful to health were laid on the ceiling.
Pixabay
If there is already a ready-made concrete coating with the required thickness, channels for wiring are made in it using a hammer drill. It should be remembered that laying grooves in floor slabs is prohibited by law. Before starting work, it is necessary to compare the ceiling level indicated in the documents with the actual one. This is the easiest way to determine at what depth the ceiling is located.
Bowl-shaped podium
This option is suitable for any home. Its only drawback is that in a damp room it can be inconvenient to step over the threshold and climb onto the pedestal. If you are located at a significant distance from the sewer, you will have to hide the communications in a plasterboard box or under a screed.
Pixabay
It is much easier to equip such a tile shower without a tray in an apartment. There is no need to overload the ceiling. The screed will take the space reserved for the podium. Small tiles allow you to finish even complex wavy reliefs. If necessary, you can order sealed doors and guides of the required size from manufacturers.
Choosing a drain
Yes, yes, the quality of waterproofing begins with the drain! The drain ladder must have a flange for joining with the waterproofing. A flange is a 2-3 centimeter “skirt” around the drain, specially designed for connection with the waterproofing layer. By default, all expensive drains have a flange, which cannot be said about budget products - such a protrusion is not always found on them.
One of the weak points in the finished pallet is the junction of the waterproofing with the drain, so the presence of a flange is mandatory. There are several flange options: just a plastic border without additional components; the flange is equipped with self-adhesive tape for impregnation with waterproofing; The flange comes complete with an overlay for fastening the fabric, which is impregnated with a waterproofing mixture and overlaps the pallet structure.
Whatever the design of the flange, it is necessary to glue tape onto it (if it is not included, then tape for the corners will do) which in turn overlaps the screed. If non-self-adhesive tape is available, then it is glued to the waterproofing compound, which is used to treat the entire pallet. In this case, the plastic flange must be treated with coarse sandpaper for better adhesion.
Materials for installing a shower cabin without a tray
Before starting work, in addition to the project, you need to draw up an approximate estimate for the purchase of materials. What you may need:
- built-up roofing felt or rubber membrane;
- expanded polystyrene in sheets 50 mm thick;
- siphon;
- waterproofing mastic (consumption – 3 kg per 1 sq.m.);
- plastic pipes with connectors for installing sewer drains;
- waterproofing tape (10 cm wide);
- a mixture of cement and sand (consumption - 5 kg per 1 sq.m.);
- silicone sealant;
- fugue (special mass for grouting);
- tile adhesive (consumption – 5 kg per 1 sq.m.)
Laying roll insulation
To install material from a roll, you should do the following:
- The surface on the field is leveled with cement; the difference should not exceed 5 mm. At the junctions of the floor and wall, rounding is performed using a DSP.
- Cutting the canvases requires taking into account an overlap of 15-20 cm on each wall. After receiving the pieces, it is necessary to moisten the material with solar oil, which gives the material greater elasticity and high adhesion, and also helps eliminate excess quartz sand.
- Before laying, the canvas is laid on a flat surface for curing and leveling, the duration is 1 day.
- The surface is cleaned of all debris.
- Now they cover everything with a layer of bitumen, and sheet material is applied on top, and the sheet is rolled on top.
- After pasting (if it is self-adhesive) or melting the material with a gas lamp, the surface is left for a day.
- When the material hardens, a second layer is applied in the transverse direction from the previous material.
- The entire surface is treated with heated mastic.
Optimal shower sizes
The size of the shower depends on two factors: the size of the room in which the cabin will be installed and the height/weight of its visitors.
If the size of the room allows, the cabin can be fenced off by more than a meter in length and width. You can install two shower heads or a shower plus a sink there. It all depends on the needs and wishes.
For a large bathroom, you can install a shower cabin with several shower heads.
If the bathroom is small and the cabin is planned to be installed in place of the former bathtub, then there is not much choice here; they even install a glass corner cabin in order to save space.
A standard shower stall takes up little space.
In addition, in order to install a stack, you need to raise the floor in the shower area by at least 10 cm. At the same time, the cabin itself will rise, which is difficult in apartments with low ceilings.
The height of the cabin can be different - up to the ceiling or covering a person’s head.
The shower stall does not have to be up to the ceiling.
DIY penetrating waterproofing
Installation of a built-in ladder in the absence of a pallet
Penetrating waterproofing is a material that has recently gained popularity in the construction market. The advantage is ease of use, and the technology of the device is considered the simplest. The sequence of actions is as follows:
- The mixture is diluted with some warm water.
- Stir until smooth.
- Apply with a brush to a previously cleaned base.
In this case, more attention should be paid to the junction points of the pipes. Also, don't walk past walls. First, they need to be cleaned of sagging, old paint and other various contaminants, and then cracks, potholes or other defects must be sealed with an insulating compound.
It will be enough to apply coating waterproofing in one layer. But in places of increased danger, where moisture regularly enters, it is better to make an additional layer in order to avoid possible unpleasant consequences in the form of rotting of the surface of the floor, walls, and corrosion of pipes.
Material of walls and doors
There is not much choice in cabin wall materials. It is either glass or plastic.
The priority is glass, which can be frosted, transparent or a combination. Also, modern cabin doors can be tinted or any desired color, in accordance with the design of the entire bathroom.
For the shower stall, you can choose translucent matte doors.
Glass walls are installed framed and frameless. The frame is made of steel or aluminum and looks stylish and modern.
The frame shower cabin in gold color looks gorgeous.
Frameless cabins fit perfectly into any bathroom interior. Metal corners look stylish and modern.
Plastic is also not ignored; it gives an aesthetic appearance, transparency and lightness to the structure. In addition, it is easy to use and maintain, relatively inexpensive and durable.
In addition to the walls, if there is space in the bathroom, fences in the form of a niche are also installed, finishing them with tiles or stone. There is also a fence on the floor about 10 cm high from the same material. Such podiums with sides are relevant in the bathrooms of apartment buildings, where such a cabin is installed already during the process of living there. In a private house, fencing may not be required if the floor is sloped for such purposes.
A good solution would be to make a small side.
As for the doors, they are installed from the same material as the shower walls - glass or plastic.
Types of doors:
- Glass blocks. Allows you to separate the space of the shower stall in the bathroom.
- PVC curtains. The advantage of them is that they are relatively inexpensive and can be changed periodically depending on wear or mood. They are quite dense and do not allow water to pass through. The average size of such a curtain is 90*90 cm.
If there are no fences, you can put a special circular frame and hang a curtain on it; during the procedures, everything is tightly covered with it, and after that it simply moves, leaving one pallet.
An economical and unusual solution is a circular curtain.
There are options without fences at all, but the downside is that during the washing process the entire bathroom will be flooded and everything will be covered in soapy spray.
How to choose the right type of insulation
When choosing a material, the required height of the shower step and the intensity of use are taken into account. When there are 4 or more people in a family, the right option would be to use several types of insulation at the same time. If a low step is required, it is advisable to use polymer-cement compositions on which to glue the tiles. For higher lifts, mastics or rolled materials can be used, covered with an additional concrete screed.
One of the determining factors is price. Bitumen-polymer mastics cost on average 150-200 rubles. per kg, roll waterproofing 160-180 rubles. per 1 m², polymer-cement dry mixture - 150 rubles. for 1 kg.
How to ensure waterproofing?
The base must be clean, dry and without roughness on the surface. The cracks are puttied, only then waterproofing is carried out. After priming, the surface is covered with mastic. Not so popular was bitumen mastic, which is usually covered with roofing material on top. This method is cheaper than others, but over the years the bathroom may gradually leak.
Manufacturers offer a wide selection of waterproofing materials in dry and liquid form. It is recommended to apply mastic and glue the waterproofing membrane with overlapping material onto the wall. The overlap is 20 cm. If the waterproofing sheet has joints, they are treated with mastic and tape is applied. Builders advise taking a solid canvas.
Using plaster
The concrete or brick base is cleaned with a metal brush and vacuumed. Cracks wider than 1 mm are rubbed with a standard sand-cement mortar, which must dry for at least 28 days. It is not allowed to apply waterproofing plaster on loose coating, plaster, efflorescence, traces of paint, bitumen and oil stains.
If the planned layer is more than 1 cm, a galvanized or fiberglass mesh with a cross-section of 10 to 20 mm is attached using dowels in increments of up to 0.5 m. The prepared surface is moistened with water.
Initially, the solution is applied with a brush in unidirectional movements without returning to the treated areas. It is prepared in a ratio of 1 part water to 2.5 parts dry mixture. If there are 2 components, first the emulsion is poured into water. The dry composition is added to the constantly stirred substance. The resulting solution should stand for 5 minutes. It is then re-sewn.
After hardening, prepare a thicker solution in proportions 1:3. It is applied with a spatula (on the walls from bottom to top) with movements perpendicular to the direction of the brush. You can apply the third layer in the same way. The finishing surface is leveled according to the rule.
After a week, the coating is rubbed with a polyurethane or metal float.
Work is carried out at temperatures from +5 to +30ºС and humidity of about 60%.
Cabin options
An example of a shower cabin without a tray
A do-it-yourself shower cabin without a tray can be located anywhere, which is a definite advantage compared to standard cabins. In ordinary apartments, the best place for it would be a corner in the bathroom. After watching a video on how to make a shower stall without a tray, you can see that there are many options for its design.
- The booth area can be highlighted with a different color or mosaic. A dark color will look great against a light background.
- Visual space will be provided by a glass cabin, which is made in the same frame as the bathroom. It does not violate the integrity of the entire interior of the room.
- A vertically located frieze will visually expand the space.
- You can highlight the booth area using lighting. It can be placed on the walls or ceiling.
- The simplest and most elegant way to separate the shower area is also with a regular curtain.
Cabins without a pallet can be different, for example:
- frameless;
- without vertical profiles;
- with frame base;
- with profiles in gold, brass, copper or silver;
- glass in combination with plastic;
- with curtains;
- with sliding doors.
A shower cabin without a tray, as in the photo, will give the bathroom lightness and the illusion of large space. The size and design of this structure can be chosen to your liking, creating a unique project. An ordinary stall takes up a lot of space in the bathroom and its installation is not always possible in a city apartment. In addition, it becomes possible to leave the bathtub and install a shower cabin with your own hands, as in the video without a tray.
Alexander Viktorovich
How to make a tile shower without a tray
List of prohibited events
Technical solutions for city apartments
- Floor drain
- Podium
Drain system design
Installation work
- Tools and accessories
- Preparing the base
- Waterproofing
- Connecting the drain
- Foundation structure
- Installation of partitions and finishing
- Door installation
Another advantage is the ability to decorate the surface by creating a pattern on it or giving it a shade that matches the walls. Designers consider this technical solution the most interesting. In photographs of interiors, a mosaic or ornament that repeats the decor of the walls is often noticeable.
Common installation mistakes
As practice shows, installing a shower stall without a tray is often associated with a number of errors, among which several points can be highlighted:
- The first mistake is the incorrect implementation of the slope. If, after completion of the work, it is directed in the wrong direction, or if its size is not enough for normal drainage, then a self-made shower without a tray will be constantly filled with water. In particularly unpleasant cases, water will pour out of the cabin.
- Another common mistake is violation of the construction installation technology, especially at the stage of waterproofing the bathroom. Such errors can lead to flooding of the neighbors below, and if a heated floor is installed in the bathroom, then there is a high probability of a short circuit.
- Finally, very often inexperienced craftsmen install the shower siphon incorrectly. The consequence of this is always the entry of an unpleasant odor into the room - and due to the fact that the shower design without a tray does not imply the possibility of painless dismantling, it will not be easy to solve the problem. To avoid such problems, you need to purchase high-quality parts and carefully install the system.
Construction and design tips
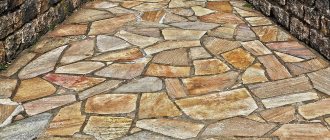
To create your own unique design, you can combine various materials, without forgetting about the practicality and safety of the future shower. For example, for the floor it is advisable to choose small embossed tiles or mosaics - there is less chance of slipping on a rough surface with frequent seams.
As a finishing material for the pallet, you can use multi-colored pebbles or other decor, filling the finishing layer with a transparent sealant.
If desired, you can equip your homemade design with hydromassage and other functions from the arsenal of a factory hydrobox, but for this you will have to install additional pipes and make special outlets
A few important nuances:
- To prevent water from building up in the pipes, an important rule must be observed: the entrance to the sewer must always be below floor level. The height of the pan with a built-in siphon or drain depends on this.
- Before installing the drainage system, pay attention to the drainage capacity: the larger it is, the faster the water will leave the pan. In some cases, for example, for a cabin with a rain shower function, a standard drain may not cope with the flow of water.
- It is best to lay whole tiles or mosaic sheets on a pallet. To do this, at the stage of marking the booth, you can make a dry layout. If you cannot do without undercuts, install end caps on the cut.
When creating the design of your future cabin, think about comfortable little things.
At the construction stage, it is easy to provide various shelves or niches for placing all kinds of shampoos, gels and other hygiene items, or build a small chair covered with tiles.
Preparing the floor and communications
In order for a shower stall without doors and a tray to function normally, you need to perform a number of actions aimed at preparing the floor. To ensure complete removal of used water, the floor covering must be positioned in such a way that there is a slight slope towards the receiving device.
When arranging a shower without a tray with your own hands, you need to decide on the nature of the slope, and the choice is very simple:
- For round and square drains located in the center, it is necessary to form a slope directed towards the point where the drain is located;
- When using tray structures, the slope is directed in their direction.
Once the shower drain is installed, you can start laying out the pipes. The sewer system pipeline, like the floor in the shower, must have a slope that ensures the natural movement of wastewater. The floor slope is usually about 1-2 degrees, and the sewage system must be equipped with the same indicator.
The concrete screed on which the shower enclosure without a tray will be located must first be cleaned and coated with a compound or material that performs the function of waterproofing. Typically, moisture-resistant mastic is used for this, which covers the floor of the bathroom and the walls of the room around the shower stall. Waterproofing allows you to protect the structural elements of the bathroom from moisture.