What is needed for bricklaying
Each builder will need the following tools for laying bricks with their own hands:
- trowel;
- mooring line;
- level;
- bucket-shovel;
- rule;
- jointing;
- hammer-pick;
- order.
Bricklaying tools.
The trowel is popularly called a trowel and is the main tool of a mason. It has the appearance of a steel blade and comes in various sizes and shapes. The trowel is used for grouting joints, and also for leveling the cement-sand mixture and removing its excess.
The mooring cord is pulled horizontally and is needed to mark the height of the masonry and check its horizontalness and straightness.
The level consists of a metal body in which several containers filled with a special non-freezing liquid are built in. The level allows you to control the evenness of the masonry in the horizontal and vertical directions using air bubbles located inside the containers. When installing a level on the surface being tested, if it is strictly horizontal or vertical, the air bubble will be located strictly in the center of the vessel. If there is a tilt, the bubble moves in one direction.
A shovel is used to apply the cement mixture to the bricks. This tool is needed when there is a large amount of solution.
The rule is a smooth steel strip that is used to check the surface and determine the evenness of the installation. It is especially often used to control external masonry.
Dimensions of the device for laying bricks.
Jointing is one of the most commonly used tools in construction, especially if bricks are used as a decoration element. Jointing is required to align the seams and give them a certain shape and texture. Joints come in different shapes and sizes.
A pick hammer is used to correct masonry errors or to obtain the required shape. It is used to break off excess parts and give the masonry the required appearance.
The order is attached to the first row of bricks and makes it possible to accurately set the location of the blocks, as well as the relative location of the rows of masonry. Ordering is required to create brick patterns on the outside of the masonry. In addition, ordering is often used to mark window and door openings, as well as design features of the building or structure being built. With its help, the cord is also secured and the masonry is leveled.
You can make some of these tools yourself. For example, you can use strong cord and nails to make a mooring line and a plumb line. Instead of nails, T-plates cut from sheet metal can be used to secure the mooring line. In this case, the edges of the plate are bent to the shape of a brick, and this allows you to fasten the cord without complex devices.
Bricklayer's cords in Balashikha
STAYER mason jointing for joints, flat, 8 mm 0840-08 at a competitive price
Pickup, Russian Post, Courier, Logistics company
STAYER mason jointing for joints, flat.
Length: 100000 mm; Type: thread/cord; White color
Pickup, Russian Post, Courier, Logistics company
Masonry cord STABILA 40467
Bison Master 2015 z01 mason's hammer-pick is a reliable tool that will be useful in the process of carrying out various construction works. This model is primarily
Pickup, Russian Post, Courier, Logistics company
Bricklayer's hammer Bison 2015-05_z01
Type: Mason's Trowel; Blade length: 180 mm; Handle material: wood; Blade material: steel
Pickup, Russian Post, Courier, Logistics company
Mason's trowel FIT 05028
Twisted. For marking and marking a guide when carrying out various construction and finishing works. Material: nylon
Pickup, Russian Post, Courier, Logistics company
Nylon marking cord 1.5 mm x 100 m, b.
Bricklayer's cord red-white STABILA 2.0 mm 100 m polypropylene 40468
Pickup, Russian Post, Courier, Logistics company
Mason's cord red-white 100m Stabila 4046.
Type: thread(cord); Length: 50000 mm; Case material: plastic; Cord material: polypropylene; Quick winding: no; Hook: no
Safety precautions
Long-term work with the solution requires the right attitude towards your own health, since there are many factors that can provoke its deterioration. The main danger is the mixture itself. After prolonged (constant) contact of the solution with the skin, a person experiences unpleasant symptoms: serious irritation appears on the hands.
To avoid these consequences, any master needs to protect himself with special gloves. Not simple ones, but rubberized ones - those that have internal hydrophobic impregnation on the palm side. The second potential threat is getting the composition into the eyes. This is especially dangerous when the solution contains lime and caustic chemical additives. In this case, any glasses are suitable - regular, carpenter's or sunglasses.
Masonry tools are mostly simple and straightforward, but they need to be handled correctly
In addition to the work itself, it is very important to prepare the perfect solution, to know absolutely all the nuances, and this is impossible without experience. Any theoretical preparation without a lot of practice is powerless if you do not have the necessary skills
Therefore, bricklaying is a type of activity that only a professional mason can handle brilliantly.
One of the useful designs for beginners can be seen in this video:
Cotton mason's cord. twist 3.0mm, 20m
We deliver goods directly from partners from all over Russia. These products are not presented in stores and are only available for ordering on the website.
Art. 11259376 In the shopping list In the shopping list In comparison In comparison
Characteristics
Prices and availability may vary. Please check the exact cost and availability of goods in stores.
Reviews
Test tools
- A plumb line is a heavy metal sleeve tied to a cord. The higher the height of the wall, the greater the mass of the plumb line used to reduce the error. The plumb line checks the corners, verticality of window and door openings, pillars and partitions;
- Wooden square. the sides of which measure 50 and 70 centimeters. A right angle is formed between the legs, allowing you to check the perpendicularity of the surfaces;
- The rule is a wooden or duralumin strip used to check the evenness of the wall. To do this, the tool is applied with its edge to the surface so that the guide is vertical. If the masonry is done with high quality, the edges of the slats fit tightly to the wall and do not move vertically;
- Ordering is a device made of corners or slats, with marked divisions measuring the rows of masonry vertically;
- The mooring cord is stretched between rows and beacons where strict control of the evenness and thickness of horizontal seams is needed;
- A building level is a tool that allows you to easily check the horizontal and vertical surfaces. Such a tool is useful not only when working as masons, but also when removing axles, checking foundation work, finishing rooms and other processes. The most commonly used tool is a bubble tool. The most accurate and easy to use laser level, but it is also the most expensive.
In addition to all this, metal buckets are used as additional devices in which the mortar is brought to the place of work of the mason, and flat metal containers for mixing it. To protect their hands, workers wear rough gloves.
Waterproofing
Waterproofing the top of the foundation can be done with double roofing material. Be sure to overlap the seams by at least 10 cm. The process can be carried out using different methods:
- Simply spread the roofing material over the surface of the foundation and press it with bricks to protect it from being blown away by the wind.
- Glue with bitumen mastic or hot bitumen.
- Heat the surface of the roofing material with a burner and press it, thereby gluing it.
The need for waterproofing is explained simply: it protects the brickwork from moisture. Because moisture gets onto the walls not only with precipitation, but also through the capillaries of the foundation from the ground. A house with a brick basement needs double waterproofing: under the basement and under the wall.
Making a template
The template can become a very useful and effective device for quickly laying bricks. You can do it yourself. Of course, you can purchase ready-made models at a hardware store. As a rule, such products have the ability to adjust all dimensional parameters. If you want to save money, then it is better to start making your own template.
First, you should focus on the basic geometric parameters of the masonry joint (meaning height and width). In this case, much depends on the material used in construction. Based on the laying technology and the blocks used, the dimensions of the template niche are determined.
To build the template you will need:
- a plastic box of appropriate size (or a sheet of plywood);
- pencil;
- level;
- ruler;
- drill (it is better to use an electric tool - working with it is more convenient and faster);
- fasteners;
- special steel corners;
- screwdriver;
- screwdriver;
- hammer.
If you were able to find a suitable plastic box, then making the template will be much easier
In addition, plastic itself is a more durable and strong material, but at the same time quite light, which is very important when carrying out masonry work. If you don’t have such a tank, then you can make a model of the required dimensions yourself from laminated chipboard sheets, plywood or slats
The design must consist of several main components.
- Frame with longitudinally arranged wooden walls. The space between the wooden planks should correspond to the thickness of the wall. Since these planks will have lower parts protruding forward, they will be convenient for aligning the bricks during laying.
- Handles for carrying. Thanks to these details, using the device will be much easier and more convenient.
- Cross parts. They are mainly made from special strip steel. This element makes it possible to control the linearity of the masonry.
Mason's corner in Balashikha
An “Online Consultant” is available on the seller’s website. To go to the site, click “Go to store”
“One-click ordering” is available on the seller’s website. To go to the site, click “Go to store”
An “Online Consultant” is available on the seller’s website. To go to the site, click “Go to store”
“One-click ordering” is available on the seller’s website. To go to the site, click “Go to store”
An “Online Consultant” is available on the seller’s website. To go to the site, click “Go to store”
“One-click ordering” is available on the seller’s website. To go to the site, click “Go to store”
An “Online Consultant” is available on the seller’s website. To go to the site, click “Go to store”
“One-click ordering” is available on the seller’s website. To go to the site, click “Go to store”
An “Online Consultant” is available on the seller’s website. To go to the site, click “Go to store”
“One-click ordering” is available on the seller’s website. To go to the site, click “Go to store”
An “Online Consultant” is available on the seller’s website. To go to the site, click “Go to store”
“One-click ordering” is available on the seller’s website. To go to the site, click “Go to store”
An “Online Consultant” is available on the seller’s website. To go to the site, click “Go to store”
“One-click ordering” is available on the seller’s website. To go to the site, click “Go to store”
An “Online Consultant” is available on the seller’s website. To go to the site, click “Go to store”
“One-click ordering” is available on the seller’s website. To go to the site, click “Go to store”
An “Online Consultant” is available on the seller’s website. To go to the site, click “Go to store”
“One-click ordering” is available on the seller’s website. To go to the site, click “Go to store”
An “Online Consultant” is available on the seller’s website. To go to the site, click “Go to store”
“One-click ordering” is available on the seller’s website. To go to the site, click “Go to store”
An “Online Consultant” is available on the seller’s website. To go to the site, click “Go to store”
“One-click ordering” is available on the seller’s website. To go to the site, click “Go to store”
An “Online Consultant” is available on the seller’s website. To go to the site, click “Go to store”
“One-click ordering” is available on the seller’s website. To go to the site, click “Go to store”
An “Online Consultant” is available on the seller’s website. To go to the site, click “Go to store”
“One-click ordering” is available on the seller’s website. To go to the site, click “Go to store”
An “Online Consultant” is available on the seller’s website. To go to the site, click “Go to store”
A toll-free number 8-800 is available on the seller's website. To go to the site, click “Go to store”
An “Online Consultant” is available on the seller’s website. To go to the site, click “Go to store”
“One-click ordering” is available on the seller’s website. To go to the site, click “Go to store”
An “Online Consultant” is available on the seller’s website. To go to the site, click “Go to store”
“One-click ordering” is available on the seller’s website. To go to the site, click “Go to store”
An “Online Consultant” is available on the seller’s website. To go to the site, click “Go to store”
“One-click ordering” is available on the seller’s website. To go to the site, click “Go to store”
An “Online Consultant” is available on the seller’s website. To go to the site, click “Go to store”
“One-click ordering” is available on the seller’s website. To go to the site, click “Go to store”
An “Online Consultant” is available on the seller’s website. To go to the site, click “Go to store”
“One-click ordering” is available on the seller’s website. To go to the site, click “Go to store”
An “Online Consultant” is available on the seller’s website. To go to the site, click “Go to store”
“One-click ordering” is available on the seller’s website. To go to the site, click “Go to store”
An “Online Consultant” is available on the seller’s website. To go to the site, click “Go to store”
“One-click ordering” is available on the seller’s website. To go to the site, click “Go to store”
An “Online Consultant” is available on the seller’s website. To go to the site, click “Go to store”
A toll-free number 8-800 is available on the seller's website. To go to the site, click “Go to store”
“One-click ordering” is available on the seller’s website. To go to the site, click “Go to store”
How to make corners correctly?
Scheme of correct laying of corners.
The masonry sequence at this stage will be as follows:
- You will need to lay and level the construction mixture.
- In the required place, you will need to lower the brick vertically.
- A building level is included.
- Use a mallet to tap the brick to level it to a horizontal plane.
- During the construction of the next row, the verticality of the masonry can be checked with a plumb line.
- If it is not possible to install the brick strictly horizontally, you will need to dismantle it, clean the ribs from the building mixture and repeat the work from the beginning.
- The delamination of the masonry and the correct distribution of the load will be prevented by the correct dressing of the seams. That is why, in the process of constructing corners, it will be necessary to take into account the ligation: the upper brick must be installed on several lower ones, so that it is possible to ensure the strength of the masonry and tie together the bricks that are installed below.
- The correctness of the angle can be checked with a special triangle-shaped template, which you can make yourself.
- When two corners of one wall are removed, you will need to fasten nails into the seam under the top bricks, between which a thread is stretched. It allows you to maintain the vertical while laying the walls.
- Until the construction mixture hardens, the corner can be leveled. To do this, you need to knock the bricks in the required direction.
In the process of single-row ligation of seams, the stitched and spoon rows must be alternated; in the multi-row process, the spooned sutures must be tied with stitched ones every 4-5 rows in height.
In the process of building a wall, the main thing is to correctly lay the first row of bricks. Laying out such material is not difficult if you know all the existing nuances and follow the correct sequence of laying.
Preparatory work
Cement mortar has a short shelf life; it should be used as quickly as possible, but not more than three hours. By this time it will begin to set. It is better to complete all preparatory activities in advance:
- Bring the brick to the foundation and stack it in piles from which it is convenient to take it. The most important thing is that it does not interfere with the masonry process.
- Bring and check all instruments.
It is recommended to moisten red solid brick with water in advance. To do this, it is immersed in water for a few seconds. The length of time a brick remains in water causes controversy even among masons with extensive experience. The wetted brick will not set longer and will make the seam stronger.
Properties, sizes and types of bricks used for cladding
Material used for cladding
To decorate the interior or facade, you need to pay great attention to how to lay facing bricks. If we compare, for example, with a working solid brick
then it must have a high-quality front side of various shades and colors.
In addition to the commonly found standard colors (yellow and red), you can choose bricks in other colors. The front part can be smooth or decorative.
But the main difference between the cladding material and the simple one is the ideal dimensions, ends and right angles. The front side should not have various chips or deformations.
Main assumptions in dimensional deviation, in mm:
There are simple and clinker bricks for cladding; they are also distinguished by durability and quality. Simple water absorption is much higher, which is due to the large number of pores. Double sand-lime brick M 150 is often used.
- ordinary - 250 X 120 X 65;
- narrow - 250 X 60 X 65;
- thickened - 250 X 120 X 88; 250 X 107 X 65; 230 X 107 X 65.
Design and principle of operation of the device
Construction of masonry equipment
1
The device consists of two strips fixed at a certain distance from each other using a threaded connection of variable length.
A threaded connection consists of two studs spaced apart from each other at a distance equal to the length of two bricks
2
The thickness of the brick can be adjusted using wing nuts.
Adjustable brick thickness
3
The solution is laid evenly thanks to two parallel horizontal strips.
Laying the mortar
4
The mortar is placed between these two planks and leveled using a trowel.
The solution is laid using a trowel
5
After the mortar has been laid over the entire row, bricks are laid on top of it. With this laying method, leveling a row of bricks will not be a particular problem, since the mortar layer along the entire length will have the same thickness.
After filling one area, the entire structure is shifted and the solution is applied to a new place
Design Features
The side rails for attaching the studs are about 100 mm long
1
All dimensions of this device one way or another depend on the size of the bricks that the builder will have to deal with. For example, the height of the slats for hairpins is selected in such a way that it is possible to level the device according to the level marked with thread.
Special bolts with washers that allow you to change the depth of the seam
2
In addition, the design contains a mechanism that allows you to change the depth of the seam. Typically, the mortar is laid over the entire width of the brick, and then the unnecessary part of the mortar is removed from the joints by hand.
It is recommended to use bolts with wide heads (at least 20 mm)
3
In this case, strips of different widths are used.
The bar located opposite the caps has a minimal protrusion (about 5-7 mm)
4
The width of the plank on this side should be minimal so that the plank clings slightly to the brick.
The bar located on the side of the caps is obviously larger (10-15 mm)
5
Depending on the number of washers, the distance from the wall to the vertical bar will change. And since the vertical and horizontal strips are securely connected to each other, the width of the seam will also change.
The seam depth is adjusted using washers placed under the caps.
6
And since the vertical and horizontal strips are securely connected to each other, the width of the seam will also change.
Seam width with one additional washer under the head
Recommendations for manufacturing
Laying cinder block with a device
Since this product will come into contact with wet solution, if it is made of wood, it may absorb moisture and swell. In this case, its geometry will change. To avoid this, it is recommended to varnish the device.
It is better to use glued beams, since it is difficult to find ordinary wooden beams so that they are perfectly straight. In addition, the product is assembled not using self-tapping screws, but using finishing nails 40 mm long. This will avoid cracking of the structure during assembly.
Brick laying device
DIY brick laying device: a simple life hack
10 Total Score
How to lay bricks straight
Did our article help you?
10
Customer ratings: Be the first!
Bricklaying devices
Having available materials, for example, polymer materials, plastic, steel, you can create devices for smooth masonry with your own hands. The main difference from factory-produced products will be the method of fastening the parts, as well as the durability of the product.
DIY dispenser
Laying bricks with a dispenser is easier
One of the most common devices is a dispenser, which allows you to accurately apply a binder for building materials. Depending on the dimensions and weight of this material, the thickness of the seam, and therefore the volume of the extruded mixture, varies.
The width of the mortar strip corresponds to the geometry of the future wall and is limited by the front planks. The lower level of stops corresponds to the thickness of the seam. An elementary device is a limiter made of plywood - to make it, you just need to buy material up to 25mm thick. We assemble the body according to the specified data; wooden blocks or pieces of plywood and metal corners are installed as front limits and stops.
Control devices
Laying bricks with a template is easier - it allows you to dose the volume of mortar to be laid
The template for laying bricks is a special frame with two parallel sides, a handle and steel crossbars. The internal width of the frame is equal to the width of the wall - it can be 1-1.5 or more bricks. At the bottom of the device, there are special protrusions on both sides that align the block in the wall and at the same time capture the previous row of bricks. The material for the device is plywood or wood slats. In industrial production, metal or plastic can also be used.
To make such a structure, an old box is most often used - we fix the bars of the lower support and the wooden frame with self-tapping screws, when calculating the wall thickness, we take into account the standard seam thickness within 10-12 mm.
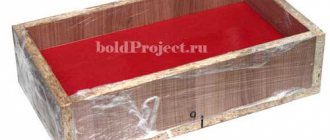
Homemade device for laying bricks
DIY device for laying bricks
A homemade device allows you to dose the solution and apply a perfectly even strip of binder to the brick. The device is not complicated - to prepare such a tool you will need a metal sheet, the thickness of which will correspond to the required thickness of the seams. We cut a rectangular hole in the sheet, the width of which corresponds to the width of the brick. You can purchase a factory-made dispenser.
The algorithm for its use is as follows: placing a sheet with a hole on the laying surface, fill the form with the solution, and then level its surface with a trowel, removing excess. As a result, a strip of mortar 10 mm high is obtained on the bed - the wall will exactly correspond to the required dimensions indicated on the drawings.
Adviсe
- When making a template, it is advisable to immediately lay down a seam thickness of 10 mm. One is ideal for laying walls of one or one and a half bricks.
- To ensure that a wooden or plastic template lasts as long as possible, its most worn surfaces can be protected with wear-resistant parquet varnish. The composition is applied in several layers on the surface of the dispenser.
- After completing the work, all tools must be regularly cleaned of the construction mixture, otherwise they will very quickly become unusable.
Important: the time or money you spend on making auxiliary tools is more than compensated by the quality and speed of masonry work.
vote
Article rating
DIY brickwork
Work can be carried out using grippers or in a circular manner. For ease of installation during design, the dimensions of the walls should be taken “brick by brick”, that is, 120, 250, 380, 510 millimeters, and so on in increments of 130. In this case, you will not have to cut artificial stones.
To ensure the strength of the structure, it is performed with dressing, avoiding long continuous vertical seams. The masonry is divided according to the type of dressing:
- single-row, when there is an alternation of spoon and butt rows;
- multi-row, when there is one tying row for several spoon rows.
A spoon row of masonry is a row of bricks that faces the facade with a spoon, that is, a long edge. The butt row is formed by bricks that come out with a short edge.
Work order:
- installation of waterproofing along the edge of the foundation;
- laying corners to a height of 3-5 rows of stone;
- checking the horizontal, vertical and perpendicularity of the laid masonry;
- pulling the cord to indicate the first row. If the thickness of the masonry is more than 25 centimeters, the rope is pulled from both the inside and the outside;
- laying out the mixture in place of the masonry and leveling it;
- laying the stone and checking the alignment of the top edge with the mooring cord;
- removing excess solution from the front side;
- if further plastering of the wall is not planned, before the mortar dries, the seams are given an aesthetic appearance using jointing;
- raising the mooring cord by one row;
- checking the verticality of the laid wall.
Steps 5 to 9 are repeated until the desired height is reached.
Cost of factory products
If we are talking about large volumes of work, it is better to buy devices manufactured at the factory. Most often they are sold as a set, for example, the “Brick” or “Bricklayer” set includes the following elements:
- Templates for laying out the mixture on the bed;
- Trowel;
- The shape of the wall is one and a half bricks – 88 mm;
- The shape of the wall is one brick – 65 mm;
- Angle – allows you to check the angular parameters of the wall; the mooring is attached to it;
- Operating instructions, most often in video version.
The “Brick” set is used for laying the mixture on a horizontal row
On average, such a complex will cost about 1500-1900 rubles per set. The main advantage of such kits is high-strength plastic, which is designed for long-term use.
The finances spent on the purchase of factory devices or your own time and costs for materials, inevitable in the manual production of additional devices, are always justified by speeding up work, increasing quality and saving on binding materials.
Existing types of brick installation: masonry sequence
- Zabutka (cut, half-butt).
- Press it in.
- Suck it.
When choosing a bricklaying method, it is important to take into account the season, the plasticity of the building mixture, as well as the degree of moisture of the material
Features of the butt method
Lightweight brickwork scheme.
In this case, the building mixture is distributed evenly. You will need to leave a small mass on the sides of the structure. A similar mass of building mixture is used to fill the seams that will form during the masonry process.
When applying the mixture for the spoon row, you must maintain the distance to the wall - the maximum distance is 2.5 cm. The layout should not be more than 8 cm.
When forming a back-to-back row, the mass of the mixture must be applied with a layout that does not exceed 22 cm. The thickness of the layer in this case should be less than 3 cm. Back-to-back masonry involves the use of several bricks, which are placed at a distance of 10 cm from the previously located materials. The brick is laid at an angle, flat. The bricks will need to be slowly rotated and brought closer to those already laid. After this, a building mixture should be applied, which will gradually fill the vertical and horizontal joints.
Features of the pressing method
Scheme of single-row chain ligation of bricks.
Using this method, you can lay bonded and spoon rows. The mass of the building mixture in this case should be quite rigid. It will need to be leveled instantly for 5 bond bricks and 3 spoon bricks. The distance from the laid material does not need to be more than 15 cm. The masonry sequence in this case will be as follows:
- You need to take a brick in one hand, and use the other brick to level the mass of the building mixture.
- Using a trowel, you need to rake the mass of the mixture to the side wall of the laid bricks.
- Next, new bricks are laid and approached to the side of the laid material.
- At the next stage, the excess building mixture is eliminated.
This process is difficult, but the result will be a durable structure.
Features of brickwork with trimming
In this case, a hard mixture is used.
The masonry sequence will be as follows:
- Masonry using this method involves completely filling the joints.
- At the next stage, jointing is carried out.
- The mass of the building mixture is applied, as in the case of using the pressing method. In this case, the indentation should be less than 15 cm.
- Brick laying is done in the same way as in the case of using the end-to-end method.
- After completing the brickwork, you will need to remove the excess mortar.
- It will be quite difficult to remove the plastic mass during laying, so experts recommend preparing a hard mixture.
Features of the half-squat method
Scheme of multi-row ligation of bricks.
The masonry sequence is as follows:
- A mass of construction mixture must be applied between the inner and outer mileposts.
- Next, the mass is leveled.
- After this, the styling is carried out in a messy manner.
- In this case, it means placing several bricks.
- The distance between the laid material should not be more than 8 cm.
- Next, you will need to take the building mixture and press the brick close to the laid material.
- If the vertical joints have not been completely filled, then the mortar must be applied during the next laying.
- Transverse seams must be filled completely.
To maintain the straightness and horizontality of the masonry, you will need to use a mooring cord. It needs to be tightened after every 5 m. To secure the mooring, staples should be used. To attach the cord to the outer wall, you need to use orders. The mooring must be secured so that it does not sag.
https://youtube.com/watch?v=0uGpI_F9Rso
Today, multi-row and single-row laying of mooring cords is popular in construction. You should know the following nuances:
- With single-row installation, the first step is to build the outer wall, then the inner one.
- When laying in multiple rows, mixed and stepwise methods should be used.
During the laying process, bricks and mortar must be at the workplace. In this case, the speed of work will increase and productivity will increase.
How to properly lay facing material
One of the options for how to correctly lay facing bricks together with insulation
If you want to do the masonry yourself, we would like to emphasize that such masonry is considered very labor-intensive and difficult, requiring special attention and precision. If there is a large amount of work, you will need a partner. And in this case, the price of masonry will increase.
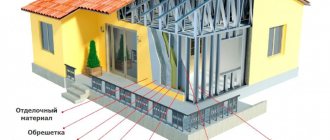
Typically, facade material is laid simultaneously with the construction of the house, and the wall and facing masonry are connected with a special masonry mesh, and insulated inside as desired.
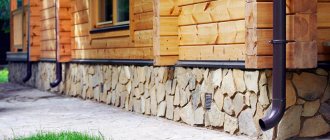
We will consider the option of masonry for cladding after the construction of a building for which building bricks were used. We especially note that the base is made to protrude beyond the wall by no less than 12.0 cm. This distance will make it possible to make a good stop for the wall under construction. In this case, you will have to strengthen and expand the base.
You need to decide on the tools you will need:
- concrete mixer;
- trowels;
- buckets;
- forests;
- threads;
- hammer;
- plumb line;
- a twig 80 cm long with a square section of 10X10 mm;
- round rod for sewing seams with a diameter of 10 cm.
Step-by-step instructions for laying:
Note! Clean the surface immediately to remove any dirt. You can use a damp sponge
Do not allow the solution to dry.
First, we level the base horizontally with a mortar using a level or building code. Then we lay out the brick dry. This is done to correctly determine where to cut it, and where it is better to place the seams for a better connection in the corners.
In places where there are openings for windows and doors, the rows should not be interrupted, otherwise in the future a similar layout will appear above the door or window. Here the brick is cut.
Next we lay the facing material. The corners are started first. Laying begins from the corners of the building at a height of 4-6 rows. Then the thread is pulled and the lining is done under the cord or thread.
For such work, it is better to use a solution in a ratio of 1:4. If possible, take fine sand from a quarry containing some clay. If you have an assistant, mix the mixture in a concrete mixer; you can also mix it in small portions using a mixer
It is very important to maintain proportions at all times.
The twig must be placed on the edge of the brick, then the mortar is placed just above the twig, which is used as a template for laying facing bricks, and we install it by hitting it with a hammer or the handle of a trowel so that it touches the twig.
When the brick is large and touches the cord, then the twig is removed and placed to the level of the thread. This is the method used to achieve identical seams. If the front side is dirty, clean it with a dry cloth before the solution dries.
It is very important to make the correct connection to the wall. If the wall does not have twigs and mesh for plaster protruding from the wall
Therefore, we attach it to the wall using dowels and a well-bending knitting wire.
- a 6-piece dowel is driven into the wall;
- a wire is screwed to the cap, the length of which should be equal to the width of the brick;
- the ends of the wire should be inside the masonry and not stick out;
- The height is knitted in 4 rows, and the width is 60-70 cm.
Linking can be done in various ways. The main thing is a good connection between the wall and the cladding.
The space between the wall and the cladding cannot be filled with mortar. Be sure to make a gap that contributes to good thermal insulation of the building.
Required clearance for thermal insulation of a building
Openings for doors and windows are made with a column, laying brick on the narrow side. For slopes, if desired, you can use a material of a different color. The seams are unstitched when doing the masonry so that the scaffolding does not move again.
Then the seams are filled with mortar and rubbed using a round rod. At the end of the jointing, wipe the finished surface with a dry cloth. That's it, the masonry is finished.
In our article, we talked about laying facade bricks, in particular, how to lay facing bricks under a rod. In the video presented in this article you will find additional information on this topic (also find out how to choose clay bricks).
House cladding process