A milling cutter is a cutting tool with which a manual milling machine or a stationary unit processes the surface of various materials (wood, plastic, metal). Since the equipment is designed for rotational movement, its basic shape will be disc-shaped or cylindrical. At the same time, the cutting edges of the tool can have a rather intricate shape. Hand milling cutters are divided into several types. The most common among them are for wood processing. At the same time, wood cutters also have their own classification. Let's look at what types of cutters are designed for processing wooden surfaces, and how to choose them correctly.
Slot cutters
If you need to select a groove of any depth and width, then a groove cutter is ideal for this purpose. Its design allows this operation to be performed both on the face (face) of the part and on its edge. A groove cutter is mainly used when joining parts into a tenon. Also, using attachments for a wood router that follow a ruler, you can cut even grooves of any width.
Shaped
They allow you to give the groove certain shapes, similar to curly braces. The tool not only selects grooves inside the workpiece, but also changes the shape of the edge ribs. When making a complex pattern on the surface of a workpiece, a straight cutter (groove) is first passed through it. In the future, this simplifies the alignment of the shaped equipment.
The following pictures show the main types of slotted router bits.
Structural
After processing the workpiece with this equipment, a groove is obtained that looks like a trapezoid (dovetail) or an inverted letter “T”.
This method of connecting parts is considered one of the most reliable, since the tenons are pushed into grooves of the same shape, and they cannot be separated by any other method.
V-shaped fillets
Although the word “fillet” refers to a semicircular notch or groove, V-cutters also fall into this category. The tool allows you to select not only vertical grooves, but also grooves at a certain angle. Also, a fillet cutter is often used for decorative carvings and changing the geometry of edges in furniture production.
Fillet
They have a rounded cutting part. If you look at the groove after it has passed through the section, it will resemble the letter “U”.
The cutter is used for decorative finishing of the edges and ends of wood products, creating complex patterns on the face of the workpiece or various fillet recesses (grooves) on the face of the product and on its edges.
Direct
This is the simplest tool, shaped like a cylinder. The groove obtained in the workpiece has a rectangular cross-section.
The equipment is most often used with plunge routers.
Straight groove (finger) cutters are used if you need to select a rectangular groove with a clean bottom, for example, for inserting door locks and hinges.
Edge cutters
In most cases, edge cutters have a thrust bearing. Thanks to it, it becomes possible to guide the tool along the template, processing the edges and edges of the workpiece.
Half-rod
The tool creates semicircular protrusions on the edges of workpieces.
If you use a half-rod cutter in combination with a molding or fillet cutter, you can make hinged joints. Half-rod tools are also used to produce round rods. In this case, the workpiece is processed on both sides.
Curly
These shaped cutters are also called multi-profile cutters. Depending on the tasks, the master can use part of the equipment profile or use it completely. In the second case, you will need to install the tool in a unit that has a power of at least 1600 W.
Fillet
Designed to give the workpiece ribs an internal radius or to make grooves with a circular cross-section.
Fillet cutters are equipped with one or two bearings, eliminating tool distortion.
Conical
Using cone cutters you can:
- chamfer the edge of the workpiece;
- decorate the edge of the tabletop;
- create an angular cut on the edges of the workpiece before gluing them (polygonal-shaped products can be obtained).
Also included in this category is an edge cutter with a blade angle of 45 degrees.
Folded
Used for cutting quarters and grooves of rectangular section. Thanks to the thrust bearing, the rebate cutter can be used on both straight and curved workpieces.
To adjust the groove depth, thrust bearings of different diameters are used.
The slotted disc cutter also falls into this category. With its help, a groove is cut in the workpiece for installing a T-shaped PVC edge.
Mouldings
Moulder cutters allow you to obtain an arched, straight, or shaped edge on a workpiece. Working with any part of the same equipment, you can:
- round the edge of the part;
- get a rebated edge;
- make a semi-rod protrusion;
- get edge with sponge;
- make decorative processing of the ribs, for example, making window frames.
You can also use molding cutters to create complex shaped ornaments on the edges and ends of a wooden part.
The equipment in this series can also be double, as shown in the following figure.
On a double cutter, the distance between the elements can be changed in accordance with the thickness of the workpiece. Thanks to two elements, the workpiece is processed in one pass, simultaneously on both sides.
Direct
A straight edge (overrunning or end) cutter is used for finishing the ends of a workpiece or creating an ideal 90 angle between the face of a part and its edge (end). The bearing can be installed at the top or bottom of the tool.
With the lower position of the bearing, the template is fixed under the workpiece, and with the upper position - above the workpiece.
In addition to the facing function, the equipment with the upper bearing can be used as a groove tool and cut a rectangular groove on the workpiece face, of course, using a template of a certain height. The diameter of the bearing is usually equal to the diameter of the tool, meaning it is flush with the cutting edge. But in some cases it is changed to a smaller or larger diameter in order to expand the capabilities of the equipment.
Milling cutter “corn”
The corn cutter is also an edging cutter. Its main purpose is to grind and align the edges of the workpiece according to the template. Thanks to the special arrangement of the knives (in a spiral), easy chip removal and smooth operation of the tool are ensured.
Types of cutters for processing wooden workpieces
By purpose they are as follows:
So, we have decided that it is most convenient to use a rebate cutter to select a quarter. It has a cylindrical shape and is equipped with a bearing. The diameter of its cylinder is larger than the diameter of the bearing, which allows you to select a quarter of the desired depth in several passes of the cutting tool.
It is convenient to use a template when milling. The bearing, rolling along the template, forms the exact direction of movement of the tool, simplifies the work and makes the result neat and even.
Combination cutters
Splicing workpieces is considered most effective if combined equipment is used. These types of cutters consist of both tenon and groove elements: thanks to this design, the equipment produces both profiles in one pass . As a result, the area of the edge intended for gluing increases, which has a positive effect on the strength of the connection.
Framework
Frame cutters are compound tools. All cutting elements are installed on the base, and the master can place them in the desired order. Set cutters have the following components:
- base;
- cutting elements;
- bearing;
- washer;
- fixing nut.
When changing the location of the cutting elements, it is not necessary to remove the shank from the collet of the unit. It is enough just to unscrew the fasteners located at the bottom of the equipment, and all its elements are removed. Thanks to the dismountable design of the equipment, the tool overhang remains the same, and re-adjustment is not required.
Tongue-and-mortise
The kit contains 2 cutters, one for making a groove, and the second for a tenon.
Tongue-and-mortise cutters have a mirror-identical profile of the cutting elements, thanks to which the processed parts are joined as accurately as possible.
The only disadvantage of this equipment is that the grooves and tenons are made with different cutters, which have to be changed and again their offset relative to the base of the unit must be adjusted.
For the manufacture of lining
In their operating principle, cutters for making lining are similar to a tongue-and-groove tool, but the only difference is that when connecting the parts, a V-shaped groove is formed between them to imitate timber. To make the connection, a set of 2 elements is also required.
Universal
After passing the tool, 2 planes are obtained, completely compatible with each other, having a groove and a tenon. Both of the latter are located at an angle to each other.
A microtenon cutter is also used to splice parts.
The equipment can be used both for longitudinal splicing of workpieces (in the manufacture of panels) and for end splicing of parts.
For corner jointing of wood, equipment from a series of combined ones is also used, which allows you to prepare joints at an angle of 45 degrees.
It should be noted that the same combination cutter is used to process workpieces that need to be joined. The original design of the equipment makes it possible to achieve maximum quality of joining of parts, and also significantly saves time, since there is no need to change the tool.
Quarter cutters (READING)
Such cutters differ from cylindrical slot cutters by the presence of thrust pins or bearings that guide the cutter along the edge, thereby ensuring the same width of the selected quarter. If it is necessary to select a narrower or wider quarter, replace the thrust bearing with another of the appropriate diameter or use a different cutter.
Read also: How to saw concrete with a grinder
If the cutter and its thrust bearing are of the same diameter, then such a cutter is considered as a fitting cutter (sometimes called “overrunning”), which is used to process edge overlays, veneers, etc. flush with the workpiece.
If the cutter has a thrust pin that rotates with the tool, traces from this pin remain on the processed base surface, which you have to put up with. Thrust bearings do not leave such marks behind them.
In addition, they produce prefabricated cutters and sets of cutters for various purposes (for example, for the production and subsequent connection of parts with a complex profile).
Figurine cutters
The tool is used in the manufacture of panels, namely for decorative processing of the edges of parts. All equipment has a thrust bearing fixed at the bottom. A cutter with a bearing can process not only rectangular workpieces, but also shaped ones. You should know that paneling tools have a diameter of 50 to 70 m, so in order to use them effectively, you must have a device with a power of at least 1500 W. For a household router, processing panels with this type of equipment will be an impossible task.
To make doors using a manual milling cutter (meaning kitchen facades), you will need to purchase a special set consisting of three elements.
The set contains the following facade cutters: one panel cutter and two accessories for furniture trim (profile-counter-profile).
Horizontal
Used for pre-treatment of panels. To form a tenon for insertion into the frame groove, additional processing of the edge will be required.
Vertical
Most often, vertical figurine cutters are used to make baseboards.
Horizontal double-sided
This type of equipment significantly simplifies the production process, since in one pass of the tool a connecting tenon and part of a panel of a certain configuration appears on the edge.
In addition to the above types of equipment, many craftsmen also use homemade cutters. They are usually standard plumbing drills, sharpened in a special way. You can learn how this is done at home from the video.
What technical characteristics must be taken into account when choosing a router?
Power
The capabilities of a router are largely determined by the power of the electric motor with which it is equipped. The greater the power consumption of the unit, the greater the maximum permissible diameter and length of the cutter that can be installed on it, the longer it can operate continuously without overload.
It would seem that if you do not take into account the financial side of the issue, then the best router should be considered the most powerful. However, in reality it is not so simple. An increase in power entails a significant increase in the weight and dimensions of the engine, and therefore the entire tool.
According to this parameter, milling cutters are divided into:
Lightweight (power up to 750 W, weight 2-3 kg).
Medium (power 750–1500 W, weight 3-5 kg).
Heavy (power 1500–2300 W, weight 5-6 kg or more).
For regular milling work, experts recommend a tool with a power of at least 1500 W. A powerful milling cutter, of course, can easily cope with any professional tasks. However, when performing a number of delicate jobs, for example, when processing edges, it will not be so easy to cope with a heavy and bulky machine, especially for a beginner.
Your task at the stage of choosing a tool is to analyze the intensity and nature of the work that is supposed to be performed with the help of a milling cutter, and to find that very golden mean - a tool whose power will not be excessively large, but sufficient to solve the assigned tasks, long-term work without break, processing of hardwood.
Spindle speed
The significance of such technical characteristics of a milling cutter as spindle rotation speed is understandable even to the most technically untrained users. The higher the rotation speed of the cutter, the higher the quality of the machined surface. If high accuracy is required, it makes sense to work at lower speeds. A low rotation speed is also needed when processing plastic, otherwise the working area will overheat and, as a consequence, the material will melt.
The spindle speed of most milling machines ranges from 20 to 30 thousand rpm, but there are both slower (10–20 thousand rpm) and faster (up to 35 thousand rpm) operating units. It should be taken into account that the larger the diameter of the cutter used, the lower the angular speed of rotation should be, since the linear speed of movement of a point on the periphery of the circle will still be quite high, and if you “accelerate” the cutter even more, the wood begins to burn.
Since the optimal spindle speed depends on the size of the cutter currently being used, the depth of cut, and the density of the workpiece material, it is very useful to be able to adjust the speed, which determines the functionality of the router. The adjustment can be smooth or stepwise (up to 8 positions). The optimal milling mode for given conditions is chosen by the operator himself, based on his practical experience, however, manufacturers often indicate recommended values in the tool data sheets or on the cutters.
Cutting stroke
The working stroke of the cutter, i.e. the maximum possible milling depth is one of the most important parameters demonstrating the functionality of the tool. For light milling machines for household use, this figure, as a rule, lies in the range of 20–50 mm; for powerful professional models it can reach 70–80 mm. The longer the cutter stroke, the deeper it can dive into the material being processed, the thicker the parts can be processed.
A groove of full depth is usually not cut at one time - this can ruin the workpiece and damage the tool. Moreover, the harder the material being processed, the smaller the depth of a single pass. But in general, it is impossible to make a groove with a depth greater than the working stroke of the cutter. Many models of milling cutters are equipped with a regulator for fine-tuning the immersion depth; the accuracy of setting this parameter is usually 0.1 mm.
Additional functions
Constant electronics . As the density of the material being processed or the speed of moving the tool along the workpiece increases, the speed begins to fall. A constant electronics system that controls the power of the electric motor in order to stabilize the spindle speed will help maintain them at a given level. The need for this function usually arises when there is heavy load on the tool, so it is found, as a rule, only in professional milling cutters.
Contact electronics allows maintaining consistently high quality of material processing.
Smooth start . Powerful professional milling cutters are often equipped with a “soft start” system. Thanks to this function, the engine picks up speed gradually, which eliminates a sharp jerk of the equipment when turned on. Such a tool will serve you longer, since its components do not experience periodic short-term overloads, it is safer to work with it, and the chance of damaging the workpiece at the very beginning of work is minimized.
Overload protection system . If the temperature of the motor winding exceeds a critical level, the overload protection system will come into play. For different models, this function can be implemented in different ways - from a simple light indication to automatic power off.
You can find a milling cutter with an overload protection system only among professional models, since they are the ones that are used for prolonged intensive work, which means they are more likely to begin to overheat as a result of increased loads.
Protection against unintentional start-up . On the body of most modern milling cutters, regardless of their price category, there is an additional button, without pressing which simultaneously with the main start button, voltage will not be supplied to the motor windings.
Its main purpose is to prevent unintentional starting of the router. This button, as a rule, also performs one more function - it allows you to block the trigger in the on position. When using a router stationary (milling table), you cannot do without such an option.
Criteria for choosing a cutting tool for wood
When choosing wood cutters for a manual unit, you should pay attention to the following equipment parameters.
Shank diameter and size
It should be taken into account that some foreign manufacturers of cutters may indicate the shank diameter in inches. In most cases, if a collet clamp is installed on the unit, then there will be no problems with installing the equipment, of course, provided that the diameter of the collet matches the diameter of the shank.
It is important to know that the collet of a hand-held unit is not a drill chuck into which you can clamp tools of different diameters . The inner diameter of the collet must strictly correspond to the diameter of the tool shank. Difficulties may arise if you buy equipment with a 1/2ʺ (12.7 mm) shank and try to insert it into a collet with a 12 mm diameter. At the same time, a shank with a diameter of 6 mm will be clamped in a collet at 1.4 inches (6.35 mm) without any problems.
Before purchasing a cutter, especially an expensive one, read the instructions for the unit and find out which collet is installed on it.
The length of the tool shank is also of great importance. Not all of them have elongated shanks, and sometimes their size is not enough to use the tool, for example, when expanding deep grooves. Also, long shanks of the equipment may be needed when securing the unit under the table. In this case, it is customary to use a cutter extension, which is clamped in the collet of the unit.
Blade material
This is an important criterion when choosing equipment. The product can be made of high-speed steel (HSS) or carbide (HM). High-speed steel blades easily cope with soft wood of low density. But these cutters are not suitable for processing hard wood. In this case, they can be replaced with equipment with carbide blades.
Location of cutting elements
The blades on the tool can be positioned vertically, that is, parallel to the axis of the shank, or at a certain angle to it. Vertically positioned blades work like a plane and cut wood more than they cut it. Therefore, if the blades are a little dull, they will leave marks on the surface they treated, which will have to be sanded.
Blades located at an angle to the axis of the tool work much cleaner and do not chip.
Design features that must be considered when choosing a router
Sole
The support platform of the router, called the sole by users, is one of the most important structural elements of the tool, so special attention should be paid to its quality. The sole can be made of either cast or stamped metal. The cast platform, thanks to its clear geometry and good fit to the surface of the workpiece, guarantees high quality work. It is not surprising that it is considered a sign of a high-class instrument.
The stamped sole is cheaper to produce, so it is usually installed on inexpensive milling cutters for household use.
The lower plane of the platform, i.e. the sole itself, must be covered with a special overlay. This element is usually made of plastic. For most routers, the plastic pad is removable, which makes it easy to replace it with a new one when worn.
When choosing a router, you should pay attention not only to the quality of the sole, but also to the size of the hole in it - the opening. It limits the maximum permissible size of the equipment: you simply will not be able to install a large-diameter cutter on a unit with a small opening in the support platform.
Rod mechanism
The milling cutter head moves along two vertically located guide rods. The ease of use of the tool and work productivity largely depend on how easy and smooth its movement is. The presence of backlashes and distortions, as well as excessive resistance to movement of the unit in the vertical direction, is considered a serious drawback, since it makes it difficult to use the router.
The depth of immersion of the cutter into the material being processed is limited by a vertical stop. This metal rod rests against a special area on the platform, preventing the head of the instrument from falling lower. When setting the milling depth, you simply move the stop rod up or down. This can be done using a special screw.
In addition to this, advanced units also have an adjusting screw for fine-tuning the depth with a micrometer scale. The more accurate the adjustment and the wider its range, the more high-quality and functional the tool you hold in your hands.
A multi-stage turret stop will help you make several passes with a gradual increase in the processing depth up to the specified one. Essentially, this is a special platform on a platform with several steps of different heights, into which a vertical rod rests, limiting the depth of milling. Sometimes the turret stop is made in the form of several bolts screwed into the platform; in this case, the height of the steps can be adjusted by screwing or unscrewing the bolts.
Equipment fastening unit
The hand router equipment is secured to the spindle using a collet chuck. It is a special nut with a collet located inside, screwed onto the spindle and clamping the shank of the inserted cutter. Lightweight milling cutters are designed for cutters with a shank diameter of 6–8 mm; powerful ones, as a rule, are equipped with collets with a diameter of 10–12 mm. The latter is easily explained: the larger the cutter, the thicker its shank and, at the same time, the higher the requirements for the power characteristics of the tool.
The diameter of the cutter must match the diameter of the collet. However, it is still possible to install a cutter with a thinner shank into a seat with a larger diameter. To do this, you will have to use a replaceable collet (or, in extreme cases, a special adapter sleeve). Even if it is not included in the tool kit, it can always be purchased separately.
When “replacing” a cutter like this, you should carefully ensure that the recommended rotation speed for it coincides with the parameters of the tool, otherwise the thin shank may not withstand excessive load.
A high-quality collet reliably fixes the shank strictly along the axis of the spindle, which eliminates the occurrence of vibrations that negatively affect both the quality of material processing and the condition of the tool. Collet clamps with a large number of clamping blades are preferable, as they better center the cutter.
Stone cutters
To process artificial stone with a milling cutter (manual), you can use traditional types of cutters designed for wood, but only with carbide blades . There is one nuance here: artificial stone is a composite material containing tiny abrasive particles. Therefore, no matter what carbide material the cutter is made from, it will only be enough to process no more than 10 linear meters of stone workpiece. Further, dull blades will not provide the required cleanliness, for example, of the surfaces being glued, which will affect the quality of the joint.
Therefore, professionals advise using the best cutters from well-known manufacturers such as Festool, Leuco, Titman, Leitz, Dimar. The service life of cutting tools manufactured by these enterprises is 5-10 times higher than that of conventional carbide tools. With “branded” equipment it is already possible to process from 60 to 100 meters of composite.
Cutters for wood and stone are similar in appearance and even have the same names. Some of them are very often used for stone cutting operations. But there are cutters specifically designed for processing composite products.
Anti-overflow cutter
Using this stone cutter, you can create molding edges on kitchen (toilet) sinks and composite countertops. Typically, complete bead formation occurs in 2 passes of the tool.
There is also a modification of the cutter “anti-overflow”, which has a thrust bearing.
Wave cutter
This tool is designed to prepare surfaces before splicing. The cutting part of the equipment has a wavy profile.
Groove for inlay
Using the equipment, a groove is selected, which is subsequently intended for inlaying with composite materials.
Stone repair kit
This set is used to repair damage to the surface of artificial stone products. The set contains 2 elements. One makes the cork, and the second makes a hole for it.
You can also use cutters from CERATIZIT for processing composites.
These are diamond cutters that are distinguished by their wear resistance. They are made by sintering several layers of diamond chips. The multi-layer coating allows you to extend the service life of the tool, since during its operation new layers of abrasive appear to replace worn-out layers.
Metal cutters
There is no specially created metal equipment for a hand router. Typically, craftsmen use equipment designed for machine tools with a suitable shank diameter. Most often, end mills are used on hand-held units to create grooves. But you should know that the router is a high-speed machine, which is not very suitable for end cutters. Therefore, the metal must be removed in minimal layers, a few tenths of a mm thick, and in several passes. The following photo shows a spiral cutter for metal.
Also, milling cutters can be equipped with burrs of various configurations, which can easily cope with steel, cast iron, stainless steel, brass and even titanium. But since they most often have a small shank diameter (6 mm), an adapter will be required for installation in an eight-mm collet.
Burrs for metal come in the following types.
- Disk. You can make all kinds of cuts and process grooves.
- Conical (60°). Used for countersinking holes.
- Conical with reverse taper. The equipment is used for grinding grooves, processing sharp corners of the workpiece, removing welds in the corners of the product, and processing hard-to-reach holes.
- Conical with rounding. Used for processing joints, cleaning welds, and processing planes.
- Conical pointed. The tool can handle sharp corners, joints of parts, and also perform milling in hard-to-reach places.
- Oval. They process and expand holes, and also align welds in the corners of parts.
- Flame-shaped. Thanks to its universal shape, the tool is used for creating fillets, as well as for processing them.
- Spherical. The tooling can be used for machining holes, creating semicircular mates and machining grooves.
- Spheroconic pointed. You can process honey with planes connected at an acute angle.
- Spheroconic rounded. Mates with internal radii are processed.
- Spherocylindrical. You can process edges, profiles, welds, radius grooves. This equipment also removes chamfers and burrs and prepares the surface for welding.
- Cylindrical with a smooth end. Used for processing contours, seams after welding, edges, for chamfering and deburring.
- Cylindrical with teeth. Equipment with teeth on the end is used for the same purposes as equipment with a smooth end. Only this type of tool can work simultaneously in two planes at right angles.
Is it possible to do it yourself?
Despite their apparent simplicity, the production of these products requires advanced, high-precision and high-tech equipment. The cutter should be:
- ideally balanced in weight so that there are no eccentric beats at high speeds;
- the profiles of the knives and their location must repeat each other with high accuracy, up to hundredths of a mm;
- cutting edges (knives) must be made of hard alloys, which can only be profiled and sharpened with an even more durable tool.
For these reasons, it is almost impossible to make a cutter yourself without equipment. The exception is simple straight knives on equipment with replaceable blades. In theory, you can cut the desired size from, for example, planer knives. But even here there are problems with balancing the weight and drilling holes for fastenings in solid metal.
In a home workshop you can sharpen some types of profiles. This is done from the back side of the cutting edge, since it is impossible to do this on a curved profile from the side of the tip, sharpened at an angle.
Sharpening is carried out with a flat diamond file. But it’s more effective on a sharpening machine, a thin or bowl-shaped wheel that fits into the niche of the cutter and reaches the surface to be sharpened.
Severe overheating during sharpening is unacceptable, as this will change the factory characteristics of hardening (heat treatment) of the metal. Sharpening is carried out until a small chamfer appears on the reverse side. Then the chamfer is carefully removed with zero-grit sandpaper, using light movements so as not to dull the tip.
Accessories for hand router
The main task performed by various devices for this unit is to expand the functionality of the device. Some of the accessories are included with the device, but other attachments for the router must be purchased separately or made by yourself.
Rip fence
This device is included as standard with any router.
The stop allows you to make straight cuts on workpieces. The edge of the workpiece or the guide rail is used as a basic guide.
Guide rail
The tire acts as a guide along which the device stop moves. Using this device, straight-line milling of workpieces is performed.
Compass
This device is attached to the base of the unit and allows radial milling and cutting of circles.
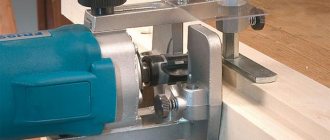
Grooving
To select grooves of a certain width, use the milling device shown in the following figure.
The width of the groove is adjusted by one platform. In this case, a straight groove cutter with an upper bearing is used.
Copier
To transfer any complex ornament or pattern onto a workpiece, special devices are used - copiers (pantographs).
The copier works as follows:
- the workpiece is placed under the unit installed in the pantograph;
- the ornament or pattern that needs to be copied is placed at the required distance from the copier;
- The pantograph pointer is set to the initial position, after which the unit engine is turned on;
- all movements of the pointer along the pattern are accurately transmitted to the router, and it cuts out a copy of the required pattern on the workpiece.
Copy rings and template
The copy sleeve is needed, first of all, to protect the template from the impact of tool blades. In addition, the copying ring, moving along the edge of the template, transfers all its shapes to the cutter, which processes the part located under the fixture.
If the hole in the template exceeds the dimensions of the sole of the device, then it can be installed on a platform of suitable dimensions.
Processing bodies of revolution
This simple device allows you to cut transverse and longitudinal grooves in cylindrical workpieces (turned table legs, pillars, balusters).
Tenoning device
To make tenons for box joints, straight or dovetail, use a tenoning device.
The use of this attachment allows you to produce tenons with equal distances between them, so that the parts are connected in an ideal way.
Tenon-groove device
The tongue and groove connection is the most common in carpentry.
To make this connection, there are special devices called pantorouters.
Despite the apparent complexity of the design, this machine can be easily made with your own hands according to drawings, which are abundant on the Internet.
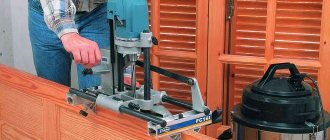
Router table
By installing a manual unit in a table, you get a stationary mini-machine. With its help, it is convenient to process small and long parts that cannot be clamped with clamps. There are ready-made milling tables on sale that are specifically designed for mounting hand-held milling machines. Below is a table produced by the Corvette company.
But as practice shows, most craftsmen prefer to make milling tables with their own hands, since their design is not complicated. The table for the router can be made from thick plywood or chipboard with a thickness of 16 mm or more.
Device for panels
If you cut an isosceles triangle, for example, from plywood, and attach it to the sole of the router, as shown in the following figure, you will get a simple device for processing door panels.
This overlay allows for additional decoration of already finished doors without disassembling them, without the use of templates.
Seam using an electric plane: step-by-step instructions
Step #1
First, the workpiece is placed on a carpentry bench and secured as tightly as possible with clamps. The fastener should be on the opposite side of the processing area.
Step #2
After this, the instrument is prepared. Set the angle stop at the required distance from the part. This way it will provide the required planing width and a 90° angle between the tool and the edge of the part.
Read also: How to connect the motor from an automatic washing machine
Step #3
A depth stop is screwed onto the right side of the power tool.
Step #4
The cutting tool of the device should be installed as close as possible to the right edge of the sole.
Step #5
When everything is ready, turn on the electric planer and select the fold, pass by pass. Setting the maximum planing depth in one pass is not advisable. This point must be coordinated with the recommendations of the tool manufacturer.
Step #6
After the depth stop rests on the wood, work is stopped. The fold is ready.
If necessary, chamfer the edges of the part. This will help prevent the edges of the corner surfaces from splitting. For ease of chamfering, slots of different sizes are provided on the base of the power tool.
How to sharpen a cutter at home
Sharpening of a cutter should be carried out only after complete removal of carbon deposits and contaminants from its body and cutting elements . For these purposes, it is better to use a special cleaning liquid (shown in the figure below).
Apply the product to the cutting parts of the equipment and wait a few minutes for it to dissolve the carbon deposits. Then you should take a regular toothbrush and thoroughly clean the blades of any remaining dirt. After cleaning, you can begin the sharpening process itself. To carry out this operation at home, you will first need to purchase a set of diamond stones that differ in grain size.
For rough sharpening, bars with larger grains are used. But the process of straightening blades should always be completed by polishing with the finest abrasive.
To sharpen a cutter, follow these steps:
- Place the block on the edge of the table and moisten it with water. If necessary, fix the device;
- lay the equipment on the block so that its cutting edge is in contact with the block along its entire length;
- move the cutter along the emery with smooth movements with equal pressure, periodically wetting it with water;
- Make the same number of movements for each blade of the rig so that the edges are stitched evenly.
If the equipment prepared for sharpening has a thrust bearing, then it must be removed before starting the process.
Of course, if there is such an opportunity, it is better to take the cutter to a specialized workshop for sharpening, where it will be restored using precision equipment. This procedure is inexpensive when compared to the cost of diamond stones.
How to use a router to select a quarter in a workpiece
We place the workpiece on the surface of the work table and securely fix it so that it does not move during operation. Then we attach the template. We install the tool so that the bearing on the cutter moves along the template, and its cutting part moves along the workpiece. We install it in the working position and clamp it. We advance the router until the cutting edge touches the workpiece.
We lower the depth stop to the lower level, then set the required depth for removing the quarter. If the wood is very dense or the depth is large, several passes of the tool should be made until the desired result is obtained. After the first pass, you need to inspect the surface and, if necessary, adjust the tool settings.
The router can be pulled or pushed away from you, whichever is more convenient for you. There are two types of movement - passing and counter. Concurrent movement, when the direction of movement of the device coincides with the direction of rotation of the cutter, is undesirable; in this case, chips appear on the surface being processed.
When working with long boards, do not remove the entire depth of the quarter at one time. This is a large load on the router, overheating, the quarter is not always smooth. It is better to do this in 3-4 passes.
Working with a router is a rather complex process that requires skill and some experience. This kind of work should be taken seriously. But with some effort, you can learn to work with it. These will be very useful skills for a home owner.
Source