If the water supply system of a suburban area cannot be connected to the public network, there is a need to install an individual source. To provide a beloved estate with drinking or technical water, a well is most often dug.
This is the most affordable development that does not require the use of an excavator or drilling rig for development.
Understanding construction technology, it is quite possible to build a well with your own hands and provide your home with drinking water. Agree, before starting work, it is necessary to study the theoretical aspect of the issue.
We will help you determine the optimal place to dig a well, and we will tell you in detail about geological surveys that you can carry out yourself. In addition, we will offer several options for arranging water intake points and describe step-by-step technologies for their implementation.
Stage one. Choosing a place for a well
First, let's consider the basic requirements for the location of the well.
- It should be as close to the house as possible, but not close to the walls.
- Also important is the maximum distance from all possible sources of pollution - cesspools, landfills, etc.
- In the chosen location there should be no high water (they are found in swampy areas) that could pollute the water in the well.
Choosing a place for a well
Despite the mentioned low cost of building a well, certain costs and efforts are still required. Therefore, it is so important to choose the right location so that this well provides a constant water supply in the required volumes.
There are many methods for finding a place for a well - using aluminum frames, willow vines, glass jars, by observing natural phenomena or animal behavior. But one of the most effective and at the same time accessible ways is to study the features of the landscape. We definitely won’t find water (or we will, but in an insignificant amount) in those areas that:
- have significant elevations of relief;
- located near wells or other water intake points;
- located near the steep shore of a reservoir;
- densely planted with acacia or pine.
Note! There are also places where the well will produce low quality water. Such places include low coastlines and dried swamps - the water here often contains large amounts of manganese and iron.
Various recesses and depressions are our areas of search. Some kind of indicators of the presence of underground aquifers are plants such as willow, lingonberry, birch, etc. A specific place for digging should be selected where the crowns of these plants lean. Finally, if the fruits of a recently planted apple tree are rotting and the tree itself is sick, it means that groundwater lies nearby, since this garden tree is susceptible to moisture-saturated soil.
How to find water for a well
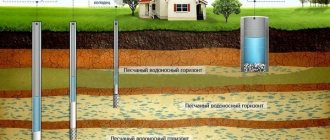
From the diagram below you can familiarize yourself with the types of plants, as well as the depth of their corresponding groundwater.
Note! Fog can be another effective indicator. In hot summers, in the evening or morning, fog spreads where the water is very close to the surface. The density of the latter is directly related to the proximity of the aquifer. It is characteristic that observation of fog makes it possible to calculate the location for building a well with an accuracy of up to 75%.
Where does water come from?
Types of wells
At the bottom of the constructed well, water begins to accumulate (it comes from the aquifer, which is also called the horizon) with an area ranging from several tens of meters to several square kilometers. The horizon, the “thickness” of which is sufficient to fill the well, usually lies at a depth of 4 to 20 m. If at around 20 m the aquifer is still not detected, then further digging of the well is unprofitable - it is easier to equip the well.
Where to install a water supply facility
Choosing a location for an individual water supply source is not very easy, especially if a small area is already occupied by impressive residential and commercial buildings.
Even if you want to save meters, when planning a place to build a personal well with your own hands, it is recommended to adhere to the following rules:
- A drinking well should not be located near manure heaps, latrines, bathhouses, cesspools, barnyards and similar objects. There should be at least 20-25 m between the well and the source of probable contamination.
- There is no need to build a well on the slopes of river banks or ravines. Due to the decreasing flow of underground water, the flow rate will be significantly reduced.
- The minimum distance between the well and the foundation of a house or utility block must be at least 5 m. Water currents will be directed into the well, like into a reservoir formed in the ground, washing away the soil from under the foundations, particle by particle. The corner of the building located nearby will certainly sag.
Ponds with standing water are considered an undesirable neighborhood. Water will certainly infiltrate through permeable rocks, which is extremely dangerous for the drinking category.
According to sanitary standards, the distance from the well to the specified objects should be at least 20 m, ideally 50 m (+)
It is prohibited to locate a well near sources of biological and chemical pollution, as well as on slopes, near ravines and on river banks.
Stage two. We prepare everything you need
Water supply from a wooden well
The procedure for constructing wells is not regulated by any government regulations or standards. The classical device was formed for more than one century until it acquired its modern form.
To make a well with your own hands, you need to prepare:
- a tripod made of metal corners or wooden poles;
- winch;
- rope ladder;
- shovel;
- scrap;
- material for strengthening the mine.
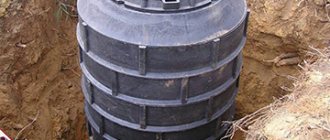
A well made of concrete rings
Regarding the last point, the most promising material is concrete rings. They are strong (reinforced with steel rods ø1 cm or more), durable (service life is 50 years), frost-resistant and waterproof.
| product name | Height x Wall thickness, cm | Internal diameter, cm | Weight, kg |
| KS-7−1 | 10x8 | 70 | 46 |
| KS-7−1.5 | 15x8 | 70 | 68 |
| KS-7−3 | 35x8 | 70 | 140 |
| KS-7−5 | 50x8 | 70 | 230 |
| KS-7−9 | 90x8 | 70 | 410 |
| KS-7−10 | 100x8 | 70 | 457 |
| KS-10-5 | 50x8 | 100 | 320 |
| KS-10-6 | 60x8 | 100 | 340 |
| KS-10-9 | 90x8 | 100 | 640 |
| KS-12-10 | 100x8 | 120 | 1050 |
| KS-15-6 | 60x9 | 150 | 900 |
| KS-15-9 | 90x9 | 150 | 1350 |
| KS-20-6 | 60x10 | 200 | 1550 |
| KS-20-9 | 90x10 | 200 | 2300 |
| KO-6 | 7x12 | 58 | 60 |
| KS-7-6 | 60x10 | 70 | 250 |
Concrete rings can be:
- wall (abbreviation - KS), which are used to arrange the neck and are suitable for all types of wells;
- additional - used in cases where standard options are not suitable, because these have non-standard sizes;
- Reinforced concrete rings - used for drainage and sewer wells, communication systems, gas and water supply.
Well ring
There are other types - with a covering slab, with a bottom, prefabricated, etc. To avoid displacement of the rings after installation, they are equipped with special grooves that prevent the moment of displacement.
Note! For a well in a suburban area, it is best to use wall products KS-10 or KS-15 (the numbers are the internal diameter in decimeters).
After choosing a location and preparing everything necessary, we can begin construction.
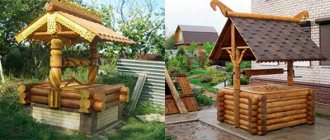
What can you make with your own hands?
For example, a structure made from car tires will look original. The choice of one building material or another depends on what end result you want to see. You can also consider the following points:
- The color and design of the structure can match the style of the entire house.
- The choice of material is limited by the shape of the product. For example, a round well can be made of stone; wood will not help here.
- If you like the classic option - a rectangular or square shape, then use a log, a wooden beam, a brick, etc.
In the classic design of the house, wood is often used. The basis is used log material, log house, beams and other lumber. If the structure has a complex polygonal shape, then a board is used to form the roof. You can cut completely different variations from it.
If the structure is round in shape, then you can use:
- River stone.
- Tires from car or tractor tires.
- Reinforced concrete ring.
- Brick.
When using a concrete ring, a facing material is additionally used, for example artificial or natural stone, tiles, mosaics, and the like.
When building a roof, it is better not to use expensive material to form the rafters and the entire slope. You can make a frame (from timber) that can be easily sheathed, for example fibreboard, chipboard and the like. The surface is covered with bitumen shingles or other roofing sheets.
Stage three. Well construction
Construction of a well
Let's say right away that we can't do it alone - we need at least one more person.
- One of the workers (let’s call him a “miner”) begins digging the earth in a selected location along the diameter of the ring. To destroy heavy soil, he uses a crowbar, and stones that come across the path are also removed.
Digging a well
Construction (digging) - At this time, the second person is located near the mouth of the mine and lifts the selected stones and soil to the surface using a tripod, winch and bucket.
Tripod from which a hand chain hoist is suspended - It is recommended to acquire a third assistant who will replace the “slaughterman”, say, every half hour.
- It is important that the slaughterer be provided with the most comfortable working environment possible. To do this, the mine must be ventilated - with a mechanized pumping device or with an ordinary umbrella.
We perform all actions in this sequence.
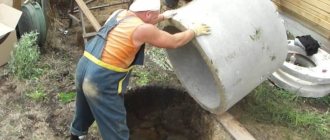
Step 1. Lay the first concrete ring in place of the future shaft. The “cutter” digs through the walls of the ring, and as it gets deeper, it sinks deeper and deeper. It is advisable to use a product with pins or cone-shaped points for the first ring to facilitate downward movement.
Installation of concrete rings
Step 2. After the top edge of the ring reaches the same level with the ground, place another one on top and continue working. The weight of each ring is approximately 600-700 kg.
Step 3. Two people are enough to roll the ring to the place of work. But if it is possible to use a crane, then it is better not to neglect it, because with the help of such special equipment you can more accurately lower the ring into the seat.
If the soil is dry and strong, then you can go deep 2-3 meters, and after that, use a crane to install several rings in a row.
Digging a well
Digging a well
Digging a well
Step 4. We continue the procedure in a similar way until the aquifer is reached. As practice shows, in a standard work shift (8 hours) 3 concrete rings can be laid.
Note! The proximity of the aquifer can be seen by the small springs gushing from the walls and the rapidly decreasing temperature.
After the fontanelles appear, we go deeper a few meters, after which we cover the bottom with a “cushion” of crushed stone (it will serve as a water filter).
Step 5. The mine is pumped with a submersible drainage pump. The more water is pumped out of the well, the greater its debit will be.
Well drainage pump
Well drainage pump
How to make a log house
It is best to make wooden wells square. Its side can be within 0.7 - 1.5 meters. To install a log house, you need to use rectangular plates, but you can also use cylinders. They need to be cut from logs that have a diameter of 18 to 22 cm. The structure must be assembled even before the hole is made. Each crown needs to be marked - this will greatly facilitate the process of future assembly.
To assemble the above-ground part, you can use any type of connection. But the underground part must be assembled in such a way that there are no protruding parts. You can use assembly technologies “in the paw”, “in the bowl” or without any residue. The crowns must be connected using dowels. Their length should be approximately 10 cm. To make the fastening reliable, you can additionally sew adjacent rows using steel staples.
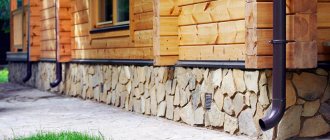
Stage four. We protect the structure from surface water
To keep your well clean, it must be properly protected. Water should enter the shaft only from below, and therefore the walls must be reliably insulated. To do this, we firmly connect the rings to each other, resorting to one of two possible methods.
Well
- We drill the walls of the rings and fix them with metal brackets mounted on bolts.
- We twist the rings with steel wire, catching it on the loading eyes. To twist the wire we use a metal rod, for example, a crowbar.
Pay attention to the waterproofing of the seams between the rings! If water leaks through the seams, this will lead to contamination of the well. To seal the seams, you should use a substance that will not affect the quality of the water.
External and internal sealing of concrete rings with traditional bitumen materials
We strengthen the seams according to the following scheme.
Step 1. Place pieces of linen rope in the voids between the rings (an excellent material - natural and environmentally friendly).
Step 2. Cover the ropes with a solution of sand, cement and liquid glass. By doing this we will achieve reliable waterproofing, which will also be completely neutral when in contact with water.
Step 3. On top of the upper rings, dig a meter-deep pit.
Step 4. Waterproof the outer surface of the rings using liquid bitumen mastic.
Step 5. Place a thermal insulation layer around the upper rings (we can use any foamed polymer, for example, polystyrene foam).
Step 6. Fill the pit around the well with clay. This is called a "clay castle".
Clay well castle
Clay well castle
Video – Clay castle
Required tools and materials
The minimum set of tools required when constructing a well is as follows:
- devices for digging a well channel (bayonet and shovel shovels, pickaxe);
- steel scrap for breaking large stones or layers of rock;
- containers for excavating soil and pumping out liquid mud;
- a winch with a rigid base for lifting and lowering loads into the trunk;
- electric submersible pump that allows you to pump out water;
- circular saw for cutting workpieces (use of a chainsaw is allowed);
- a set of tools for marking workpieces;
- construction level (hydraulic or laser);
- axe;
- hacksaws for wood.
Tools for creating a wooden well.
In addition to a set of blanks for the frame and the head, it is necessary to prepare a set of fasteners (depending on the method of connecting the parts) and gravel for arranging the filter. Since the work is carried out in water or mud, it is necessary to use rubber boots or a wetsuit. Additionally, you will need to purchase insulated clothing.
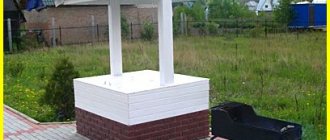
Stage five. Setting up a well
But the construction of a well is not limited to drilling a mine and strengthening it. To do this, we arrange the upper part of the structure - the head.
Insulation of the well head
We will equip a blind area around the well - a small platform made of concrete or carefully compacted crushed stone. The blind area must extend at least 1 m from the shaft on each side and, importantly, is constructed a certain time after completion of construction, when the soil settles.
Blind area around the well
Scheme of structural layers of the blind area
Blind area made of a mixture of crushed clay and crushed stone
Insulation of the blind area
We also build a canopy over the structure to prevent precipitation from entering the mine. If a pump is used to supply water, it is better to close the shaft completely, leaving a small hole for the hose and cable.
How to stain oak
One of the most common materials used in the installation of wooden wells is oak logs. This is due to the fact that they can last for many years, especially if properly prepared. But there is one serious drawback here.
Oak gives water a bitter taste. Over time, the taste disappears, but for this you need to wait several years. This can be corrected, but it is necessary to carry out the procedure of staining the wood. There is a staining technology, which we will now introduce.
First you need to remove the bark and knots. The logs are cut to the required sizes, taking into account the future dimensions of the well. After this, it is necessary to adjust the log house, each log is numbered, which in the future will greatly facilitate the process of arranging the well.
After this, it is necessary to lower the workpieces into the water, this can be done in a lake or other body of water, but a prerequisite is that the water be running. They stay here for 2 years, after which we take out the logs and dry them under a canopy.
When the material is completely dry, we move on to the next stage - digging and installing the shaft. Despite the fact that the staining procedure requires quite a lot of time, it is worth it, since the water from such a well will not have a bitter taste, and the structure itself can last much longer.
Construction of an observation structure
To create storm drains of modern models, high-quality polyethylene or polypropylene is used.
These materials are used to make double-walled pipes with a rigid surface.
The use of these pipes makes it possible to cope with various loads associated with displacement or freezing of the soil, and the movement of groundwater.
The structures of inspection and service wells are equipped with a hatch.
They provide for a neck having a width of 630-800 mm. GOST requires the installation of round wells, the working part of which includes reinforced concrete rings, which represent a reservoir for the pipeline.
To create structural elements of a manhole, elements are used that are manufactured in accordance with GOST 8020-68 in the factory.
The working part can consist of CS or wall rings with the following dimensions of internal and external diameters (DvxDn):
- 700x840 mm;
- 1000x1100 mm;
- 1500x1680 mm;
- 2000x2200 mm.
The height of the rings is usually:
- 290 mm;
- 590 mm;
- 890 mm.
A flat floor slab (PP) of a well with a thickness of 100 mm can have the following diameter dimensions:
- 1100 mm;
- 1680 mm;
- 2200 mm.
The bottom plate (PD), having a thickness of 100 mm, has a diameter equal to:
- 1500 mm;
- 2000 mm;
- 2500 mm.
The inner and outer diameters of the support rings (OK) are 660 mm and 840 mm, respectively. The thickness of the concrete adjustment stones is 65 mm. The height of the hatch installed above the neck is 175 mm. It is laid flush with the road surface.
Adviсe
- The process of building mines is very labor-intensive and requires certain skills and knowledge, so their construction must be approached with the utmost care and seriousness.
- Safety comes first , so do not neglect it when digging a mine for water.
- The upper house can have a wide variety of shapes and sizes. The main thing is that it is convenient to pull water out of it. As for his appearance, this is a matter of taste for each person.
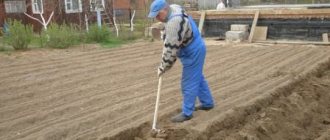
Independent hydrogeological surveys
To find out the level of groundwater in a site, the most reliable, but labor-intensive and expensive method is test drilling. In private construction it is rarely used, because the cost of services of professionals using special devices is high.
If there are wells in neighboring areas, you can ask how deep they are, whether the water in them is suitable for drinking, and whether they dry up in the summer. You can find out the composition of the soil and assess the reality of doing excavation work on your own (it is difficult or impossible to dig a mine in hard and medium soils). Sometimes, after a survey, it turns out that in order to ensure an autonomous water supply, it is necessary to drill a well to artesian waters.
If it was not possible to obtain information about the level and quality of groundwater from neighbors, then you have to carry out independent research. You can try traditional methods (a frame made of a willow branch, determination by vegetation on the site, etc.).
conclusions
As you can see, you can dig a well on your own, without resorting to the help of specialized teams. If you take into account all the tips given here, you will end up with a fairly high-quality and durable structure that will provide water not only for you, but also for your children and even grandchildren for up to a hundred years, or even more.
1. MGBU (https://samobur.ru/) - A drilling rig store for professionals and beginners, sells products at manufacturer prices. Advantages: delivery to all regions of the Russian Federation, free educational materials. 2. Buragregat (https://buragregat.rf) is an enterprise that sells drilling units of joint Italian-Russian production. Extended 3-year warranty on all equipment under a special program. 3. Transnkomplektservice (https://www.tks-water.ru/) - a store that sells not only drilling units, but also other equipment for the construction of sewer, drainage and other systems. 4. TN Tekhnolog (https://www.burenie-vsem.ru) - A store of drilling rigs for professionals and beginners - a wide range of equipment at affordable prices. 5. Mosburservice enterprise (https://burmashprom.ru/) - sells wide-purpose drilling equipment. Advantages - long-term warranty on the offered equipment, training in working with it.
Filters for absorption structures
The difference between filter absorption wells is the absence of a sealed bottom. At the bottom of the working chamber of the structure, a bottom filter is equipped, consisting of the following types of materials that differ in fraction:
- River sand. Backfill with a high content of quartz, which has a fine fraction, is mined in river quarries and includes silt, clay and other impurities in the smallest quantities.
- Gravel. Loose backfill of the middle fraction, which is a sedimentary rock capable of absorbing various substances, which makes it possible to use it as an adsorbent.
- Pebbles. Pebbles measuring 1-15 cm, having a rounded shape, obtained when they collide with each other at the bottom or on the shore of reservoirs, need to be washed before backfilling.
- Crushed stone. Pebbles of medium and large size, formed as a result of crushing boulders, various rocks or waste from the metallurgical industry, therefore, when purchasing material, a certificate must be checked, which confirms the safe level of natural radioactivity.
- Jade. The backfill of the coarse fraction, which is sodium-aluminum silicate, resembling greenish jade, is chemically inert when interacting with water.
- Shungite. A rock formed from ancient bottom organic sediments, used as an adsorbent, requiring periodic replacement in the same way as gravel.
When choosing the mineral shungite, you must be careful, since unscrupulous sellers tend to sell not shungite, but shungizite, which superficially resembles it, but does not have such useful properties.
The filter filling, created using the listed materials, represents the working part of the well. It must have a total height of up to 1 m.
Dimensions of inspection wells
The inspection well must be quite large in size so that it is easy for an adult to go down into the shaft of the structure, carry out an inspection, and clean the drainage pipes.
A shaft with an appropriate cross-section allows for timely maintenance of the sewerage system.
According to regulations, the height of the working part of the well must be determined taking into account human height, so on average this parameter is 1.8 m. Inspection wells can have the following dimensions:
- Rotary. These are small structures with a diameter of 315-460 mm.
- Nodal. These structures have a diameter of 36-560 mm.
- Auditing. These are quite large structures with a maximum transverse diameter of 800-1500 mm.
The parameters of nodal and rotary wells should be selected depending on the expected volume of groundwater and storm water. If liquid enters the system in large quantities, then the diameter of the drainage structure must be appropriate. This is most relevant to the starting points of the piping system.
According to SNiP 2.04.03-85, it is necessary to take the dimensions of the diameters of storm sewer system wells on pipelines with a diameter of:
- up to 600 mm - 1000 mm;
- 700 mm - more than 1000 mm.
Their width must correspond to the largest diameter of the pipeline. The working part of wells with a pipeline with a diameter of 700-1400 mm must have a height taken into account from the pipe tray with a larger diameter.
Working parts should not be provided on pipelines with a diameter of 1500 mm or more.