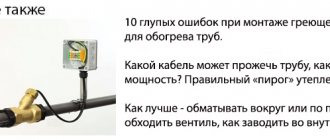
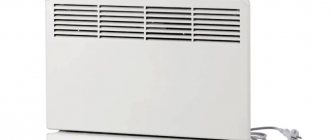
Low ambient temperature significantly reduces labor productivity and living comfort. Therefore, heating domestic and industrial premises performs an important function that requires significant financial costs for the purchase of special equipment. To save money on heating appliances, you can assemble a heater yourself. Which is especially important for those rooms and locations where there is no need to care about its aesthetic appearance and design.
How does a heating cable work?
It is clearly not possible to make a heater from ordinary copper or aluminum wire. A standard cable of two to five cores has negligible electrical resistance, so even with a very strong electric current, the sheath heats up, followed by melting of the insulation and a fire.
Alternatively, you can make your own heater from a heating cable. This is a type of heating device made in the form of a long flexible cord. In this case, heat is generated at the surface due to the dissipation of electrical energy on a high resistance conductor or graphite matrix imprinted between two copper or aluminum strands.
Many models can be directly plugged into an outlet
These cable heaters have several significant differences:
- The presence of a soft heat-resistant shell; usually a conductor heater made of thermal cable can withstand heating up to 200°C;
- The kit uses a temperature sensor and a current or amount of heat generated regulator;
- Inside the heating conductor-heater there is additional insulation that protects from moisture, a reinforcing mesh or a layer that absorbs mechanical load.
Important! As with any heating device, the cable heater regulator has a system of contacts for supplying voltage, grounding and temperature control. These are mandatory attributes for the safe operation of a cable heater.
You can, of course, make a homemade heater from a heating cable, as they say, “by eye,” without calculations, and connect it to the network without automation. In theory, an experienced electrician will be able to make such a homemade product, but in practice, this option either quickly burns out from overload or heats up very poorly.
In any case, using a heating cable for a home heater is a modern approach to the problem. The efficiency and safety of such a device is an order of magnitude higher than that of a nichrome spiral or expensive and unsafe halogen lamps. Therefore, making a homemade homemade heater from a heating cable will be the cheapest and safest option.
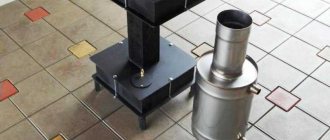
Idea No. 4 – Oil device
Another device model that is recommended to be assembled for heating a garage or other outbuildings in the country. All you need is an old battery, a tubular heater, oil and a plug. You will also need a welding machine, welding skills and some free time. The photo below shows one of the options for a homemade oil heater.
A tubular heater is installed at the bottom left, and a plug for draining/filling oil at the top. A simple design of an electric heater, which will be enough to heat a small room.
The video below clearly shows how to make an oil heater with your own hands:
Types of heating cables
Heating systems using low-temperature heaters are widely used in the installation of heated floors, equipment for local heating of satellite dishes, and of course, for protected heating systems for industrial equipment, gutters and drains, water supply and sewerage pipes.
There are four main types of cable heaters:
- Semiconductor self-regulating cable. Used for heating drainpipes and gutters of any structures in contact with moisture;
- Resistive cables are used for direct heating, most often in the installation of heated floors, heating of parts that require a large amount of heat;
- Inductive cable heaters, the simplest and most effective, heat transfer to the environment occurs due to electromagnetic waves and industrial frequency fields, the efficiency is quite high, but in order to generate heat, a conductive medium is required, for example, water or metal;
- Carbon cable heaters. A relatively new technology that uses graphite and carbon fiber to conduct current.
For a homemade tile heater, you can use almost any of the above. The best option depends on the power of the future heater, its location and method of use.
Idea N1: Making a local mini-heater
For this design, you will need two rectangular pieces of glass, metal foil, a paraffin or stearin candle, a wooden block (or a block of other dielectric material), an electrical cord with a plug, and sheet metal for contacts.
The manufacturing procedure for such a mini heater is as follows:
Fold the edges of the foil under the glass to one side.
- Attach metal contacts to a wooden block and solder the ends of the electrical wires with a plug to them. Place the glass on the block - the heater is ready.
Rice. 3: Fix the contacts on a wooden block
It should be noted that the maximum temperature of such a heater should be about 40ºC. Naturally, you won’t be able to heat a house, cottage, or garage with such a homemade heater; it is suitable for heating tents, a work area in front of a workbench, or other space directly in front of the work surface. If the device gets too hot, you will need to reduce the resistance of the conductive elements; for this you can use thicker foil or increase the thickness of the soot.
Heating cable device
The ceramic heater tile itself is needed only to remove and dissipate heat and protect the heating circuit from mechanical damage. Of course, not all of the listed types of heating cables are equally convenient for making a homemade heater based on ceramic tiles. First of all, due to different power inputs and different operating temperature ranges. Therefore, it makes sense to look in more detail at how cable heaters are designed.
Self-regulating heater can be easily recognized by its flat structure
Thermal cable with self-regulating effect
The heater consists of two copper or aluminum conductors with a nickel coating, located at a short distance from each other. A conductive mass is pressed into the spaces between the cores and around the conductors.
Self-regulating wire device
An important advantage of such a circuit is the presence of a self-regulation effect, that is, the resistance of the filler changes depending on the ambient temperature. The higher the heater temperature, the higher the matrix resistance and the lower the current.
As a result, the heater generates a lot of heat at low temperatures ranging from -10°C to +5°C. The heating cable approximately halves heat generation at air temperatures above 5 degrees, and practically does not heat once it reaches 60-80°C.
The heating cable device was developed primarily for maintenance-free structures installed on the roof, in gutters, pipes, closed boxes, and underground utilities.
Sewer heating
Important! In theory, such a heater can be placed in any unsuitable place, connected to the regulator and not even be interested in its condition; electricity losses will amount to 100-150 W per day at positive air temperatures.
With the onset of frost, the heat release of the heater will increase several times and amount to at least 30 W per meter of length. If you follow the rules for laying on tiles, the cable heater turns out to be quite durable and safe, the risk of a short circuit is practically reduced to zero.
Another important advantage of the matrix self-regulating heater is the unlimited cable length. The supply voltage is supplied to the contacts of each of the cores. Therefore, you can cut the required length of wire, roll it into a spiral or wave and lay it on tiles or porcelain tiles.
A significant disadvantage of self-regulating heating cables is their high cost. On average, the price per meter of wire is 3-4 times higher than for other types of conductor heaters.
Alloy cable heaters
Structurally, the conductor heater consists of two wires, separated by a heat-resistant insert and packaged in one silicone shell. One wire is made of copper or aluminum, the second is made of a special high-strength alloy like nichrome.
Structure of resistive heating cable
This design ensures very high reliability and performance of the heater, and there is no need to extend additional electrical wiring lines in order to connect the contact of the nichrome conductor from the opposite end.
The simplest resistive heating cables are simply a thin nichrome spiral wrapped in a silicone sheath. Such a heater is placed permanently on metal and conductive structures. Otherwise, you have to lay an additional cable or core to connect to the network. Despite the cheapness and simplicity of the device, this is not the best option for making a homemade heater from a heating cable and ceramic tiles.
Inductive systems
Heating systems using an alternating electromagnetic field are made of thin copper wire, wound like a transformer coil on an elastic and durable core. When an electric current passes around the heater, a magnetic field is created, which easily heats up ice, water, and snow in contact with the shell. This scheme is ideal for arranging heated porch steps.
To make a heater from a heating cable and porcelain stoneware, you will need to cover the surface of the tile with a conductive layer of varnish, foil, and electroplated nickel. The heater will be very reliable and efficient, but the technological process itself turns out to be quite difficult to reproduce at home.
Carbon cable heaters
A relatively new type of heating wire. Essentially, these are several conductive carbon or carbon fiber strands packaged in a sheath of heat-resistant silicone. The internal contents of such a device are similar to the filling of a self-regulating cable, the only difference is that inside there is not a pair of metal conductors, but a carbon base.
The material is very light, plastic, according to the manufacturers, one wire can withstand 10,000 bends without breaking the insulation and heating core.
For your information! A linear meter of a carbon heater has a resistance of 33 ohms. This makes it very easy to calculate the required length of thermal cable to design a heater of a specific power.
Carbon heated walls
Idea No. 5 – Automotive electric oven
Well, the last version of a homemade heater is a device that runs on 12 Volts from the car’s on-board network, which can be used to heat the interior of your own car. For assembly you will need the following materials:
- case from an old computer power supply;
- nichrome wire;
- remnants of ceramic floor tiles;
- fasteners: bolts, angles, plates.
Making an electric car heater yourself is not that difficult. It is recommended to view the assembly process in the master class in photo examples:
The disadvantage of such a heater is the increased risk of fire in the car, because nichrome wire is practically not protected. In addition, you need to correctly calculate the power of the device so as not to damage the car’s wiring. Ohm's law will help you with this.
That's all the ideas for assembling a homemade electric heater. As you can see, a simple electrical device can be easily made from various available materials, if desired. If you liked the master classes, share the recording with your friends so that they too know how to make a heater with their own hands for your home, garage or car!
It will be interesting to read:
Advantages of using a cable heater
At first glance, a homemade product made from a heating cable and porcelain tiles looks quite primitive and unconvincing. In fact, such a solution is very convenient for those who are primarily concerned with the reliability and efficiency of heating. The advantages of a homemade cable heater include the following:
- Ease of manufacture; you can assemble the simplest heaters at home, as they say, on your knees;
- High heating efficiency. One tile is able to produce at least 200 W of thermal energy, which is comparable to the heat output of industrial ceramic, wall and ceiling heaters;
- Easy repair and maintenance. In order to repair a cable heater, you just need to determine the location of the damage, cut and splice the contacts.
But the most important advantage can be considered the very high reliability of the heating cable. The absence of contact of the heating surface with air oxygen and water ensures a long service life of the heater. And even in the event of an emergency, for example, a tile is dropped or broken, nothing catastrophic will happen.
It will be possible to simply transfer the heating cable to a new ceramic base.
[Your opinion] Concrete battery with heating element inside
Infrared and straw are not compatible things. These lamps do not heat the air, but the body in front of them.
A dry heating element of low power was placed in the concrete. Click to expand.
Nothing difficult to make.
Should the ends of the heating element be filled with concrete or should they be released outside? Click to expand.
There are enough contact ends and everything will work, if you release it with a reserve - there is an option to get a heated surface that is not protected, or to fence the casing.
The concrete will be damp and will conduct current. Click to expand. It won’t stay damp forever, it usually dries out, and also has shadows inside))) I don’t see anything wrong with removing all the connections in the slab and bringing out only the wire, provided the installation is reliable. Moreover, replacing an element in this design is not possible.
DIY heater made from a self-regulating heating cable
The easiest way is to make a homemade ceramic heater from carbon wire. The price of a carbon fiber cable heater is approximately $1.2-1.5 per meter; this is much cheaper than self-regulating cable “warmers,” the price of which reaches $8-10 per meter.
In addition, a carbon heater has a huge advantage over other types - the coefficient of thermal expansion is several times lower than that of metal heaters - thermal cables.
This means that a cord with a diameter of 3 mm can easily be laid in a snake on the back of the ceramic tile and filled with epoxy compound or even ordinary alabaster.
Carbon cord laying option
In order to make a homemade heater, first of all you need to know the mains voltage, usually it is 220-230V. Accordingly, the heat release of one linear meter will be 145-150 W. In order to make a 200 W tile, it is enough to cut off 140-150 cm, which will cost almost pennies.
At low network voltage, heat transfer decreases
For comparison, a meter of self-regulating thermal cable emits 25-30 W. This means that a tile with a power of 200 watts will require at least 8-9 m of wire. This entire mass will need to be placed on the back side of the ceramic and fixed with heat-resistant silicone. Such ceramic tiles will cost more, but the main thing is that they will heat less efficiently, although they will save a certain amount of electricity. Especially if you leave the tile heater on for a long period of time.
Idea No. 1 – Compact model for local heating
The simplest way to make an electric heater is this one. To get started, prepare the following materials:
- 2 identical rectangular pieces of glass, each with an area of about 25 cm2 (for example, dimensions 4 * 6 cm);
- a piece of aluminum foil, the width of which is no greater than the width of the glass;
- cable for connecting an electric heater (copper, two-wire, with plug);
- paraffin candle;
- epoxy adhesive;
- sharp scissors;
- pliers;
- wooden block;
- sealant;
- several ear sticks;
- clean cloth.
As you can see, the materials for assembling a homemade electric heater are not at all scarce and can be at hand for everyone. So, you can make a small electric heater with your own hands using the following step-by-step instructions:
- Wipe the glass thoroughly with a cloth to remove dirt and dust.
- Using pliers, carefully grab the glass by the edge and burn one side with a candle. The soot should evenly cover the entire surface. Similarly, you need to burn one of the sides of the second glass. It is necessary to first gradually warm up all the glass so that it does not burst due to a sharp temperature change.
- After the glass pieces have cooled, carefully use ear sticks to clean their edges no more than 5 mm around the entire perimeter.
- Cut two strips of foil, the width exactly corresponding to the width of the smoked area on the glass.
- Carefully apply glue to the glass over the entire burned surface (it is conductive), being careful not to damage the soot layer.
- Place the pieces of foil as shown in the photo below. Then apply glue to the other half and connect them.
- Then seal all joints.
- Using a tester, measure the resistance of your homemade heater yourself. We talked about how to use a multimeter in the corresponding article. After this, calculate the power of the element using the formula: P=U 2 /R. If the power does not exceed the permissible values, proceed to complete the assembly. If the power does not suit you, you need to redo the heating element - make the soot layer thinner or thinner (the resistance will become less if it becomes thicker and vice versa).
- Glue the ends of the foil to one of the sides.
- Make a stand from a block, installing contact pads connected to an electrical plug on it.
Using this technology you can make an electric mini heater with your own hands. The maximum heating temperature will be about 40 o, which will be quite enough for local heating. However, such a homemade product will, of course, not be enough to heat a room, so below we will provide more powerful options for homemade electric heaters.
Serial connection of light bulbs
Very easy. Simply connect two light bulbs of the same wattage in series and the voltage across each will be cut in half.
They will of course shine dimmer.
How will the power consumption of such a combination of light sources change? Measurements can be taken with a multimeter.
Let, for example, at a constant voltage of 240V, for two 100-watt light bulbs the current is 290mA.
Based on the formula for calculating power, we find that:
P=I*U=0.29A*240V=69.6W
As you can see, consumption has dropped. But at the same time, the heat dissipated per watt of power has increased.