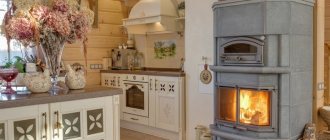
A furnace is an effective way to heat your home. At the same time, it not only heats, but also creates a special comfort that cannot be compared with what an electric heater provides. In addition, this structure does not have to be large. The traditional Russian stove is certainly good, but the mini-stove also has many advantages .
The fuel for such a structure can be either firewood or other solid fuel, such as coal. A Russian mini-oven will create a comfortable temperature throughout the entire house, using fuel economically.
While developing a rational design for the “Housekeeper” stove without a stove bench, we modified its base. The result was a different version of the structure from the previous one: both fireboxes were arranged in a new way - the main one and the additional one. The use of a cooking chamber, which is closed with a damper when necessary, remains commonplace.
Features of the mini-stove
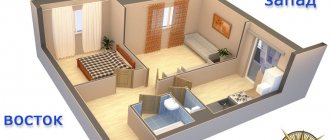
It is very convenient to cook on this stove because it has a separate firebox with a hob. The versatility of its design allows the housewife to prepare a huge number of dishes: porridge, pies, poultry, bread, pizza and much more. A few hours after the end of the fire, you can still fry, steam or cook on it. At the same time, it can be installed even in the smallest houses, because the size of a mini Russian stove is 100 by 130 centimeters. The owner of the house can build it with his own hands, because the design is simple and does not require special knowledge in the field of engineering.
The design of the fireboxes also has its own characteristics . The main large one is located on the front side, and the additional small one is located on the right wall of the stove. A cast-iron stove is placed on them, designed for preparing a wide variety of food, which has two burners of different sizes. The larger one covers the main firebox.
Fuel tanks have different functions.
The main one is used for heating when cold weather sets in, and without restrictions - for baking traditional Russian dishes. At the same time, it is possible to burn fuel in the cooking chamber itself. An additional firebox is used in the warm season mainly for cooking. It burns well a small amount of waste and fuel, including raw fuel. With the onset of cold weather, this firebox is also used for cooking, but only if the entire stove array is heated.
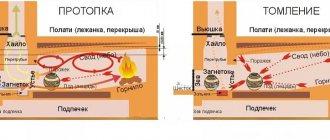
A Russian stove without a stove bench has its own peculiarities in the structure of the channels for removing hot gas and smoke. When the stove is lit, first all volatile combustion products flow from the main firebox into the first section of the heating chamber. Then, in the second, through the folds and, bypassing the gap in the hearth, they approach the rear wall of the cooking chamber, heating it. After which the smoke enters the front block of the cooking chamber, on the upper part of the roof of which there are four holes. Volatile substances enter the collection channel through these holes, and from the channel directly into the chimney. Smoke from a small firebox does not have its own exit system. It enters from there into the main firebox and from there, according to the above-described scheme, is discharged outside.
The design of the Russian mini-stove provides a channel for ventilation . If necessary, it can be closed with a valve.
Design
There are a lot of design options for a summer kitchen. It is better to give preference to a simple rustic or Scandinavian style. Furnishings made from natural materials look good. If the kitchen has a lot of space, and there are several areas inside for relaxation and work, they can be beautifully divided. The easiest way is to use different materials for paving each area. Wood and tile or stone go well.
The summer kitchen can be given a modern style. A bar counter with high chairs will look beautiful. It is made integral with the food preparation area or separated by lifting it onto a podium. Here you can still play with lighting. The area near the stove is well lit, and at the bar counter there is soft lighting with spotlights.
Recommendations for use
The stove does not require maintenance. To avoid undesirable consequences, you must follow the rules for using a mini-oven :
- You cannot fire two fireboxes at the same time. In this case, the ash and combustion doors of the unused firebox must be tightly closed;
- Do not use flammable liquids such as gasoline or kerosene for kindling;
- keep the heater damper closed. If there is a need to open it, then first you need to open the ventilation duct valve;
- monitor the amount of ash. Remove it in a timely manner, otherwise there will be no fuel savings, because it will absorb heat and the heating of the rooms will deteriorate. It is better to do this procedure at least twice a week;
- you need to let the fuel warm up well for ten minutes, and only then start cooking food in the oven;
- It is not very practical to use paper for kindling - it burns quickly. It’s better to put wood chips or birch bark in the oven;
- Check periodically for any cracks in your stove. If any are found, they need to be repaired. If the damage is significant, then major repairs will have to be made. A clear indicator of a problem is a decrease in the heating temperature produced by the stove. The house has become colder - inspect the stove;
- It is preferable to carry out repairs in the warm season, when the stove is not used for heating;
- Before burning fuel, you need to close the doors of the ash pit and fireboxes;
- you need to clean the chimney in a timely manner;
- It’s better to start heating the stove during the day, then by the evening the whole room will warm up;
- It is preferable that the fuel be dry. And to ensure that it is not exposed to moisture and water and does not become damp, store it in a specially designated place. It should be dry and closed;
- It is desirable that the logs are approximately the same thickness and length. This is necessary because thin ones burn too quickly, and thick ones, on the contrary. The house will not be heated well enough in this way;
- stack the logs not randomly, but in a certain order. First, rake the coals with a poker closer to the door. Place a log across it. Then thinner firewood is laid obliquely, and thicker firewood is laid on top of it.
Riddles about delicious things-2
Text:
I was green and small, Then I became scarlet. In the sun I turned black, And now I am ripe.
Answer: Cherry
* * *
The green house is a bit cramped: narrow, long, smooth. Round kids are sitting side by side in the house. In the fall, trouble came - the smooth house cracked, the round kids galloped in all directions.
Answer: Peas
* * *
In the hot sun the dried out leaves burst from the pods...
Answer: Peas
* * *
The cramped house split into two halves, and beads and pellets fell into the palms.
Answer: Peas
* * *
In the green tent, the Koloboks sleep sweetly. There are a lot of round crumbs! What is this?
Answer: Peas
* * *
Small stove with red coals.
Answer: Garnet
* * *
The berry tastes good, But go ahead and pick it: The bush with thorns is like a hedgehog, That’s what it’s called...
Answer: Blackberry
* * *
It shakes on the table, And it’s called….
Answer: Jelly
* * *
There are a lot of thin stems in the sun on the stumps. Each thin stem holds a scarlet light. Unbend the stems - Collect the lights.
Answer: Strawberry
* * *
In a forest clearing Tatyanka is showing off - Scarlet sundress, White specks.
Answer: Strawberry
* * *
I am a drop of summer on a thin leg, They weave boxes and baskets for me.
Answer: strawberries
* * *
Red, juicy, fragrant, Grows low, close to the ground.
Answer: strawberries
* * *
Egorka stands in a red skullcap, and whoever passes by will bend down.
Answer: Strawberry
* * *
I am a drop of summer on a thin leg. They weave boxes and baskets for me. Whoever loves me is happy to bow. And my native land gave me a name.
Answer: Strawberry
* * *
In haymaking it is bitter, And in frost it is sweet, What kind of berry?
Answer: Kalina
* * *
What kind of trotter is this? Fell on its side? Well-fed, lettuce-like. That's right, kids...
Answer: Zucchini
* * *
The green fat woman put on a lot of skirts. She stands like a ballerina, a cape made of leaves.
Answer: Cabbage
* * *
The lady is scattered in the garden, dressed in noisy silks. We are preparing tubs for her and half a bag of coarse salt.
Answer: Cabbage
* * *
What's that squeak? What kind of crunch is this? What kind of bush is this? How can I be without a crunch, If I...
Answer: Cabbage
* * *
Not sewn, not cut, But all in scars. Seventy clothes, And all without fasteners.
Answer: Cabbage
* * *
2
Rating:
Interesting
| Eighth month The child distinguishes between light and dark. He responds better to low sounds—to daddy's voice. The ability to focus your gaze appears. The skin is almost completely formed, and the layer of subcutaneous fat is becoming thicker. The amount of cheese-like lubricant is reduced. Vellus hair (lanugo) on the body disappears. Sun… |
Riddles for children
- Riddles about nature
- Riddles about animals
- Riddles about plants
- Riddles about time/seasons
- Riddles about school
- Riddles about the house
- Riddles about work/hobbies
- Riddles about man
- Riddles about delicious things
- Riddles about the road
- Riddles about toys
- Riddles about fairy tales
- Riddles about technology
- Riddles about transport
- Riddles about color
- Other riddles
Poems for children
- Poems about kindergarten
- Poems about school
- Educational poems
- Instructive poems.
- Poems about family
- Poems about animals
- Poems about friendship
- Poems about nature.
- Riddles in verse
- Poems for the holidays
- Happy Birthday Poems
- funny poems
- Agniya Barto. Children's poems.
- Korney Chukovsky. Children's poems
- K. Avdeenko. Children's poems
Construction of the stove
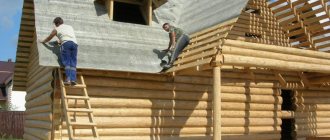
If you want to buy a mini Russian stove, you can order an individual project specifically tailored to your needs. To build a Russian stove “Ekonomka”, you can hire a master, or you can do it on your own. Keep in mind that you will spend significantly less money if you build a mini Russian stove with your own hands. The stove will serve you for many years, provided, of course, that you take care of its condition.
If you are an experienced builder or simply confident in your abilities, you can work without using drawings. However, it is better to have on hand a ready-made drawing of a Russian mini-stove, developed by a good craftsman. And remember that the structure must be installed on a solid foundation - made of stone, wood, concrete or brick. It is not always possible to get by with just reinforcing the floor. So before starting work, thoroughly study the basics of building the unit.
Materials and tools
If you have finally decided that you can do it yourself, then first of all you need to purchase red brick. 750 pieces will be required.
You also need sand, asbestos or felt, clay.
Construction cannot be done without roofing felt for waterproofing.
Separately, you need to purchase valves for the stove, two grates, combustion and blower doors, a cast-iron stove made for two burners, a valve for the ventilation duct and a damper.
You will also need consumables. These are steel products - wire, sheets, angles. You will need nuts, washers, nails.
Don’t forget about the tools: spatula, trowel, drill with mixer. Additionally, have buckets or tanks and a sieve on hand. To ensure the oven is level, use a level.
The next stage is the actual work on laying out the mini-stove.
You can make a stove or without a water heating box Having prepared the necessary materials and tools, strengthened the floor or made a good solid foundation, you can begin construction.
The oven should be laid out in rows.
Arranging a mini Russian stove without a water-heating box
The very first row includes the laying of the unit wall. The stitches need to be re-tied. This stage must be carried out using whole bricks, and the middle can be laid out in halves.
The next rows from the second to the fifth are the vent for both fireboxes. The doors are installed at the same time. You also need to lay out the columns. Lay a brick partition on them. Its thickness should be half a brick.
The sixth row of the design includes grates in both fireboxes. Above the additional firebox grate, the front and rear bricks are pressed together into a cone.
The seventh and eighth rows - the doors of the main and additional fuel chambers are installed. The masonry of the main firebox expands towards the partition.
The ninth row is a narrowing of the channel masonry from the main firebox. Dilation of the septum.
The tenth row is characterized by the construction of the hearth. A channel is left near the back wall along the cooking chamber, approximately 8 cm wide.
The eleventh row is the second row of the hearth. The doors of the main and additional fireboxes must be closed. On the front side we secure the masonry with steel corners.
In the twelfth row, the channel is blocked by a cast-iron stove with two burners.
The thirteenth and fourteenth rows are placed according to the drawing.
Fifteenth row - strip steel connections are installed between the side walls and secured with washers and nuts. If the brow is not covered by an arch, it is covered with a strip of steel 4x1x85 cm. The back and side walls of the cooking chamber are laid out brick thick with the lower part beveled to a cone.
The sixteenth row is the overlap of the forehead, the continuation of the connections along the width. The wall thickness of the cooking chamber is the size of a brick.
The seventeenth row - installation of connections along the side walls (as in the 15th row). A base for the cross-pipe made of strip steel is installed on the front and sides. Grooves are made in the brick for the steel strips. A supporting metal stand is installed in the corner.
The eighteenth row is the first row of the masonry of the cooking chamber, which has the shape of a vault. The vault rests on the bricks of the 16th row, inclined inward; pieces of bricks in clay mortar are placed under them. The pole is overlapped, and steel strips are placed at the base of the overtube. Four holes measuring 7 x 12 cm are left in the front part of the arch.
Nuances of arranging a summer kitchen
Only the owner, or, more precisely, the hostess, decides how best to arrange a summer kitchen for himself. She is the one who will have to stand at the stove for hours while cooking. What can you recommend in this regard? Let's start with the open veranda. It's nice to eat outdoors, but the sun or wind can be a hindrance. If you cover the openings of the open veranda with curtains that have been used in the house, various hangings, and ropes, you will get good decor and protection.
The next question concerns the owner. If a gas stove is installed for cooking, it is usually connected to a propane-butane cylinder. It is important to worry about safety here. It is advisable to take the cylinder outside the summer building. You can make a beautiful box for it, decorate it with decorative elements, or weld a frame around it from twigs, along which the vines will weave.
The interior design of a summer kitchen should be comfortable for the hostess. It is important to provide many convenient and durable shelves. They are useful for dishes and canning. There is nothing to do in the kitchen without a sink. There is no need to buy expensive ceramics. You can get by with a budget stainless steel sink. Water is supplied to the sink from a water supply or a storage tank is installed. Sewage is carried out with plastic pipes outside the kitchen. There will be a lot of dirty water, so you will have to build a cesspool.
Advice! It is advisable to remove the cesspool at least 15 m from the open summer kitchen or terrace. Otherwise, all the unpleasant odors will fill the place of rest and cooking.
If the summer kitchen is part of a single complex with a dining room, shower, terrace and other buildings, the entire area is decorated with greenery. You can even fence off your resting place with a hedge.
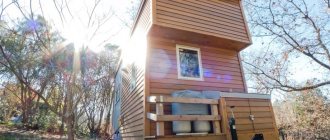
If the summer kitchen is supposed to be located under a canopy, then its floor and the surrounding area should be paved using paved area technology. The flooring can also be boards, but only smooth ones, not wood cuts. A wooden floor is installed in the kitchen, and a stone covering is laid outside.
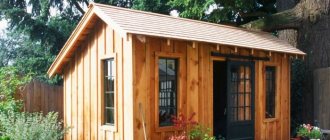
As for the canopy, it is provided in larger dimensions than for conventional recreation areas. It should completely cover the kitchen equipment from precipitation. It is better to make a simple pitched or gable roof for a canopy without cladding the gables. Moreover, the height of the building itself should not be greater than that of a residential building. A summer kitchen sunk below the garden level looks ideal on the site.
Important! If a barbecue or grill is to be installed, the room is divided into zones with partitions, paved areas or furniture.
Some rules for making a stove
To ensure that the stove turns out well and lasts a long time, before building it, consider:
- the materials you use must be of high quality. By skimping on high-quality components, you risk providing yourself with long and frequent repairs;
- However, it is better to use the instructions for making the stove. The experience of the master will protect you from mistakes and unnecessary expenses during construction;
- the first time after construction, be especially careful - you might not keep track of something during the work. Other problems may only become apparent during operation;
- follow safety precautions. You can get injured during construction. Be careful and don't take risks.
In general, the stove is quite safe for the home and its inhabitants. Spontaneous combustion from a spark or fallen coals is virtually impossible, even if the stove is used incorrectly. And even a beginner can handle the kindling - the stove is very simple.
Material selection
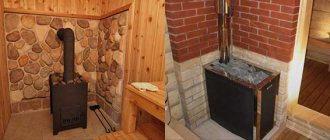
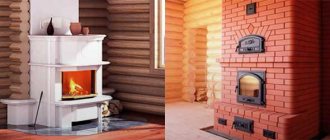
At the very beginning of construction, it is necessary to decide which material is best to choose for the future structure.
There are two options here - aerated concrete blocks or refractory bricks. They do not burn out, can withstand exposure to high temperatures for a long time, and retain heat.
Aerated concrete for a summer stove will cost less. However, outwardly it looks worse and after construction the stove necessarily requires cladding (plaster, tiles, etc.). This is necessary not just for an aesthetic appearance, but also to minimize heat loss and protect the concrete from moisture.
First you need to choose the material
At the same time, brick will be the more preferable material, despite its high cost. It is moisture resistant, does not require additional cladding, and has a longer service life.
In order to accurately determine the future scope of work and correctly calculate the amount of materials required, it is necessary to develop a construction project.
General Tips
Construction of a furnace is a labor-intensive process with many nuances. Here are the main ones:
- if the foundation is poured in excessively hot weather, then it must be moistened from time to time so that the screed does not crack;
- the first row is laid out dry, so it needs to be formed from even bricks that can be tightly fitted to one another;
- to achieve the desired plane surface of the brick, it can be trimmed with a grinder;
- hewn or chipped bricks cannot be placed with the damaged surface inside the furnace, since on this side the material is less refractory;
- Any cast iron elements cannot be installed flush with the masonry, so that it does not collapse; make a layer of mortar or clay.
If you follow these rules, they will help you create a durable structure that will last for many years.
Baking in a summer kitchen is not only convenient, but also delicious. With a barbecue you can easily cook meat over coals, and a cauldron will help you prepare wonderful soups or porridges over a live fire. And it always adds piquancy to any dish.
Pouring the foundation
The stove requires a solid foundation, since the total weight of the structure will be large - more than 750 kg. Before starting to lay the foundation, it is necessary to calculate that the dimensions of the foundation will be 100–150 mm larger than the dimensions of the building itself.
The foundation itself is poured like this:
- At the site of the future foundation, we dig a pit 40–50 cm deep.
- A sand substrate 10–20 cm thick is placed in the resulting recess. The substrate is well compacted until a dense structure is formed.
- We lay crushed stone on top of the sand base. The thickness of the crushed stone cushion should be at least 3 cm. But you can save on crushed stone if you first lay 2 cm of broken brick on the sand, and add crushed stone on top of the remaining 1 cm.
- After laying the crushed stone cushion, you can proceed to pouring the foundation. To do this, mix the cement mortar and pour it into the pit. The surface of the poured solution should completely cover the pit and extend to the floor level.
Now you need to let the base dry and harden.
Main advantages of the design
- Small dimensions (total area - 40 square cm), because of which the design has gained immense popularity among owners of country houses.
- The possibility of using exclusively red brick during the work process, if in the future ordinary firewood will be used as fuel (neither silicate nor ordinary brick is suitable, since it is susceptible to high temperatures).
- In the case of the most primitive stove design, the work can be done with your own hands, using improvised means. Heating channels are not provided here, since their function will be performed by the fuel cap. Moreover, the baby can be installed in the wall, which will significantly save free space.
- Thanks to the efficiency of the stove, you will not need to prepare large volumes of firewood for the winter.
- There is no need for a foundation, because a DIY baby oven weighs little.
- However, the device is capable of heating a room up to 25-35 square meters. In autumn or spring, when the temperature is above zero, you need to heat it only once a day, in winter - twice.
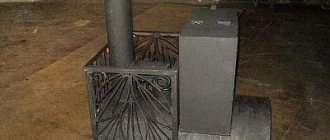
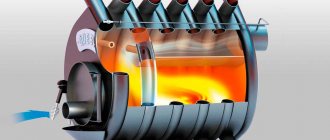
Video - Factory small metal stove (Feringer)
Stove in a summer cottage - purchase or DIY
The market for summer cottage accessories and services for equipping summer cottages today allows us to satisfy the most demanding requests. The only question is how reasonable it is to order from professionals what you can do yourself. In order to build a stove for a summer kitchen, it is not necessary to have an engineering education. Yes, and a project with an orderly plan for laying bricks can be found on the Internet or developed independently, picking up a ruler and pencil.
In ready-made summer kitchen projects, a lot of attention is paid to the external arrangement. Here we offer both open options with one or two blank walls, as well as options with closed stationary or mobile walls of the room. When ordering a ready-made project, usually the foundation, walls and roof make up the lion's share of the price, while the fireplace itself with a chimney and additional work surfaces will cost a third of the cost of the entire complex.