Having made an Abyssinian well with your own hands, it will be possible to extract water from the soil layer closest to the surface - sand. In most cases, the water passing through the porous structure is of sufficiently high quality (this parameter must be tested in a laboratory), so there is no need to drill deeper and, accordingly, pay more.
Before drilling, you can ask your neighbors about the quality of water, and after the well is installed, its suitability for drinking and cooking is determined in a laboratory. At the same time, the Abyssinian well (needle well) has structural differences and certain advantages when compared with a classic well, which, in accordance with its depth (to the sand layer), is called a sand well.
To determine which is best for you, an Abyssinian well or a sand well, pay attention to the following:
- One of the main differences should be considered the size of the well . The diameter of the casing pipe of an Abyssinian well is much smaller - most often 1 inch. Due to this, it is also called a needle hole.
- The principle of pumping water is also different - liquid enters the “needle” according to the principle of suction and is often under pressure. At the same time, water flows into a large-diameter well according to the principle of inflow.
Main technical characteristics of the Abyssinian well:
- The depth of the well is usually no more than 8-10 meters, although in certain cases it can reach 12-20 meters. But if the water level in it is below 8-9 meters , there will be problems with water supply using a surface pump,
- productivity – 0.5-3 m3/hour.
Construction of an Abyssinian well
The needle well design is quite simple. For ease of immersion, the casing pipe consists of sections connected by couplings. The submersible end is equipped with a cone with a slot for water intake and a filter in its upper part.
Well components parameters:
- pipe diameter for the Abyssinian well – from 2.5 to 7.5 cm,
- the length of each segment is about 2 m,
- length of the cone-shaped tip – 20-30 cm,
- the cone diameter is selected 1-1.5 cm larger than the corresponding casing pipe parameter.
The photo shows a diagram of the arrangement of an Abyssinian well.
The pump for an Abyssinian well can be an external electric one, and in some cases (for periodic use, for example, only for watering a small garden), it is practiced to install a cheaper hand pump.
How to determine where the formation lies
After we have figured out what kind of device this is - an Abyssinian well, it is worth learning how to check how deep the water mirror is.
The easiest way to get this information is to ask your neighbors. If they are open to dialogue and are willing to show how deep the moisture is in their well, then this will greatly simplify the task. But it is worth considering that this is very approximate information. You won't necessarily be at the same level.
It is also important to remember that the layer that is too high to the surface will definitely be polluted by rain, sewage, other chemicals and household waste.
If the liquid comes from a sandy level, which is about 12-15 m deep, then it is often well-filtered moisture that will be a stable source throughout the year. All that remains is to install a pumping station for this.
What to look for when searching for a suitable point:
- early in the morning or in spring and summer you can see fog that hovers over a certain part of the territory, the thicker it is, the closer the groundwater is;
- dogs in hot weather try to lie down in a cool place, and the horse will kick with its hoof where the liquid is closest;
- Lingonberries and bird cherry climb where they have enough food;
- bury three-liter jars with the neck down at night, where there will be large perspiration in the morning, there is a source.
Advantages and disadvantages of needle well
Abyssinian wells have a number of advantages, which have led to their widespread use.
- With a smaller diameter, the Abyssinian well, made by hand, is not inferior to its larger counterparts.
- The source is equipped with surface pumps (more convenient for inspection and repair than submersible models).
- Thanks to its features, an Abyssinian well installed with your own hands can become a practical and convenient option where using a conventional well is impractical or completely impossible.
- With a small thickness of the sandy aquifer, it is easier to “catch” it with a thin casing pipe (in some cases, a do-it-yourself needle well is the only option).
- The construction of an Abyssinian well does not require much space, so it is often done right in the house, in the basement.
- The immersion of the casing pipe of an Abyssinian well with a large thickness of the aquifer is arbitrary, while a classic well must be drilled to the aquitard - the clay layer located after the sand. This eliminates the possibility of water being drawn from the lower part of the sand layer, which often contains a large amount of impurities, including dissolved iron. Thus, the mineral composition of water in an Abyssinian well, built according to all the rules, is usually better than in a large-diameter well.
- An igloo well, built and equipped with your own hands, silts up less, including due to the presence of pressure and intense water flow. In addition, it is easier to clean the “needle” casing.
Diagram of water intake layers for various types of wells
For any owner of a house or cottage, the low cost of an Abyssinian well and the ability to drill and equip an “igloo” in one day are important.
You will learn more about the types of hand pumps for wells by reading our separate article. The depth from which it can lift water also depends on the type of pump.
What an artesian well is and the features of its design are described in this material.
The main disadvantage of the Abyssinian well should be considered the possibility of contaminants entering the water from the surface due to the shallow depth of the intake. Because of this, you should carefully choose the location for installing the needle well, ensuring maximum distance from landfills, latrines, cesspools and septic tanks, drainage ditches, showers, in which water goes directly into the soil under the booth, etc.).
Unfortunately, the Abyssinian well cannot be built on any soil, since hard rocky layers will be difficult to penetrate, and aquifers on a loam rather than a sandy layer will not provide water for such a design.
The Abyssinian well is being built on a sandy aquifer
Where to drill
The first question about how to drill an Abyssinian well is how to choose a place for this. It is important to find a location where the aquifer is not too deep.
MBFT-75 Membrane for 75GPD
SF-mix Clack up to 0.8 m3/h
SF-mix Runxin up to 0.8 m3/h
Almost always the soil on the site has at least 2-5 layers, which lie one on top of the other. It is necessary to figure out where this level will be closest to the surface of the earth.
If it so happens that the equipment runs into quicksand, then you will have to retreat to the other side of the territory. It won't be possible to break through it.
All possible types are divided into:
- Bulk. They do not hold their shape and can float if there is a lot of liquid in them.
- Plastic. Skip the tip of the well.
- Solid rock. These include sandstones, dolomites, limestone and marls. It is impossible to break through them without special equipment.
Such a well can only be built where the first and second types are. You won't be able to deal with the third one.
It is also advisable to avoid uneven areas such as cliffs or ravines.
Ways to create an Abyssinian well yourself
The services of specialized companies performing water drilling and even renting special equipment are quite expensive. At the same time, there are several ways to make an Abyssinian well with your own hands.
Drilling
This method is often used to pass the soil to the quicksand, as a sandy layer saturated with water is called, which, due to its looseness, can crumble immediately after the drill moves through it. To avoid this, drilling a well is combined with immersing the casing.
Drills for the production of Abassinian needles can be welded in a home workshop. It is optimal to use two modifications:
- frame drill, which is a U-shaped structure, and is used to pass through a dense clay layer,
- a frame drill with a cylinder, which is installed inside the frame and serves to collect and subsequently evacuate soil from the canal.
The width of any type of drill must correspond to the diameter of the casing pipe.
The drilling technology is quite simple - the passage of soil layers is carried out sequentially, with a gradual increase in the working part using rods. At the stage of drilling with a drill with a cylinder, it is better to use a winch (purchased or assembled independently from a starter and cable, equipped with limit washers and installed on a stand). Such a device will make it easy to remove the drill, rods and soil accumulated in the cylinder from the channel, which together add up to considerable weight.
Hammering with a headstock and a headstock
The headstock is a cone-shaped element fixed to the rod using a thrust washer. The simple design allows for maximum efficiency.
The headstock sliding along the bar, falling after lifting, transfers energy to the headstock, due to which the bar enters the ground. In order to avoid destruction, the headstock cone must be made of a stronger material than the headstock. The thrust washer prevents the cone from flying off the bar even with very strong impacts. On the contrary, at this time it “sits down” even more firmly.
Plugging an Abyssinian well using a headstock and a backstock
Headstock driving with plug
To implement this method, they use an end headstock rather than a sliding one on the rod. To protect the threads of the rod, a plug is installed in the upper part. It is recommended to use headstocks of 30 kg or more.
Barbell hammering
Equipment for driving with rods are hexagonal rods, the diameter of which allows them to be placed in the column. Each of them is equipped with a thread for increasing the length (internal on one side and external on the other). For reliable fastening, the length of the threaded sections must be at least 2 cm. The process of driving a casing pipe immersed in a drilled well involves throwing a rod into the cavity of the rod.
Driving the needle hole with a rod
What it is?
This is a compact source that allows you to provide water to a country house with a minimum budget and effort. To manufacture it, there is no need to rent large special equipment. Plus, the Abyssinian water well will provide you with the necessary volume all year round.
Let's consider the reasons for its manufacture:
- You will be able to receive water from a shallow depth (up to 20 m).
- The device is placed in a relatively small area.
- It is possible to drill in a garage, inside a residential building and similar premises.
- Financial investments are minimal.
Necessary equipment
To independently build an Abyssinian well, you will need tools and materials, which in most cases are available to most home craftsmen. What you need is easy to acquire.
Electrical equipment for the Abyssinian well:
- welding machine,
- Bulgarian,
- drill.
Hand tools:
- gas keys,
- sledgehammer,
- hammer.
This category also includes devices for hammering using the chosen method (iron rods, headstocks, etc.)
Materials:
- casing pipe in sections of 1-2 meters,
- steel couplings for connecting them,
- wire with a diameter of 0.2-0.3 mm and stainless steel galloon mesh for making a filter,
- FUM tape or other material for sealing threaded connections.
Well equipment:
- check valve,
- manual or electric pump.
May be useful:
- discs for rods up to 40 kg as an alternative to the driving headstock,
- car clamps,
- nuts and bolts,
- thrust washer (when using a headstock).
Construction options
There are several options for organizing an Abyssinian well. They are determined by immersing equipment in the soil.
Hammering with a steel "woman"
A voluminous load with emptiness inside is used as a “woman”. It provides the necessary impact on the crimp coupling, fixed with wedges.
Using bulk cargo.
With a rod
In this case, metal rods are used. With their help, blows are applied to the tip until the aquifer is drilled.
Hammering with a rod.
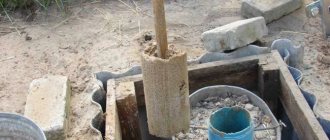
Making a tip with a filter
Filter for an Abyssinian well with a tip
The filter for an Abyssinian well is made quite simply with your own hands. A piece of pipe (approximately 80 cm) with a cone-shaped tip is perforated - thin cuts are made or round holes are drilled. After this, wire is wound around the perforated area and a braided mesh made of stainless material is applied. The latter is fixed with clamps or soldered using special non-toxic tin solder.
DIY arrangement process: technology and stages
The technology for organizing a well is determined by the conditions in which the work will be carried out, since the pumping station cannot be placed in any convenient place on the street. The equipment should be carefully hidden from negative factors such as precipitation or mechanical influences.
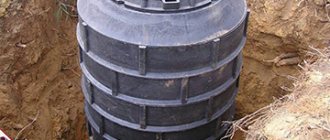
A caisson for autonomous water supply is created from plastic blanks 50 cm high and 80 cm in diameter.
The well construction process consists of the following steps:
- A site is selected away from sewage and cesspools.
- Markings are applied.
- A durable steel tip is fixed to the pipe, and holes of 6-10 mm are drilled from below. In total, 30-40 such openings will be required through which liquid will flow.
- Taking into account the characteristics of the soil, a mesh filter is installed on the suction openings.
- A plastic piece with a tip is placed in the right place.
- Then the drilling or driving of a massive hammer begins.
- If necessary, pipe sections are screwed on in order to increase the optimal length.
- The product is deepened until it penetrates the aquifer by at least 50 cm.
The work is completed after the water level reaches 1 m. A thread is cut on top for screwing on a hand-held pneumatic pump. To eliminate the risk of air leakage, the threaded condition must be sealed with sealant. The area near the well should be filled with concrete or landscaped in any other suitable way.
Well in the garden.
Sequence of work
In general, the construction of an Abyssinian borehole type well is carried out in the following sequence:
- A hole is dug out.
- The well is clogged.
- The required depth is determined by sound (in clay soils, advancement occurs silently, in coarse sand a grinding sound is heard, in fine sand a rustling sound is heard).
- After the sound appears, a control check is carried out - water is poured into the pipe, if it leaves quickly, then the depth is optimal, if it is slow, then the pipe must be immersed another 0.5 meters.
- A manual or electric pump is installed in the well.
- The well is pumped until clean water appears (if the characteristics of the electric pump do not allow it to be used for dirty water, pumping is performed using a manual or drainage unit).
All work can easily be completed in part-time work, so, having started creating a well in the morning, by the evening you can enjoy clean and tasty water.
There is information on our website about what kind of mesh there is for a well filter, its types and materials of manufacture.
You can read about the technology for drilling another type of well, in sand, here. Necessary equipment and sequence of work.
Various water supply schemes for private houses are given here https://okanalizacii.ru/vodosnabzhenie/shema-vodosnabzheniya-chastnogo-doma.html
What conditions are recommended to be taken into account?
Before you even start drilling, you should understand whether the equipment is suitable for the site. To construct an Abyssinian well with a pumping station, it is first better to determine how low the aquifer is. For example, in certain areas of Moscow this figure varies from 0 to 250 m. It is also worth considering the type of soil that is on the territory.
When choosing a source for water supply, we advise you to pay attention to what facilities your neighbors have. If they were able to find moisture at a depth of about 10 m, then in areas nearby this value will not differ significantly.
If no one has tried to drill the land nearby or you are not familiar with their owners, then you can start exploratory drilling or try to clarify the relevant maps with the settlement administration.
Hammering techniques
Sketch of the correct driving of a metal pipe into the ground
Before starting work, you should outline where the posts of the future fence will be located. Please note that the distance between the supports should be 2-3 m.
Drilling is carried out using three methods:
- Using a sledgehammer.
- Installation using a headstock.
- Installation using a pile driver.
Regardless of the driving method, the following conditions must be observed:
- the lower part should be buried 1.2–1.4 m into the ground;
- you need to start installation with the corner support elements, then stretch the cord between them to set the height level of subsequent supports;
- When driving, try not to hit the top of the pipe too hard so that it does not go into the ground more than required and become deformed. Raising an excessively hammered pole to the required height will be much more difficult than hitting it again;
- Before installing the supports, it is recommended to cover the part that will be underground with bitumen or an anti-corrosion compound. You can also just paint it.
The hammering method is used to create lightweight structures. This can be a fence made of chain-link mesh, profiled sheet or picket fence. When installing a fence made of corrugated sheets, it is also necessary to take into account the windage, and bury the pipes at least 1.5 m.
Hammering the post with the headstock
Having installed the pole in a certain place, you need to put the headstock on top. Lift the structure by the handles about half a meter, and then forcefully lower it down. The heaviness of the tool will allow you to drive the post strictly vertically. The pipe will slide along the pole, and the blow will be directed strictly along the axis.
To make it easier to lift the headstock, you can place a tripod that will rise above the top point of the post. You need to hang a block on the top, and weld a strong hook to the headstock. Using a strong chain or rope, tie it to the hook and then pass it through the pulley. Pull the other end, lifting the headstock, and then release. Hammering posts with this device is very easy, and the process does not take much time.