When designing a foundation for a barn or large outbuilding, the main aspect is reducing the construction budget and ensuring the maximum possible resource. Therefore, floating slabs and MZLF tapes are rarely used; pile and columnar grillages are implemented. However, on complex soils, with high groundwater level and steep slopes, it is necessary to take into account SP standards and ensure the protection of underground power structures with waterproofing materials and insulation materials from moisture and swelling, respectively.
Types of sheds and soils
Before considering the types of foundations for a barn, you should decide on the type of structure itself. The following types of country sheds are distinguished:
- With a pitched roof. The roof is entirely flat and slightly inclined in relation to the rear wall. It is for this reason that when building such a shed, the area is somewhat limited. Most of these buildings have one window and doors. For this type of shed, a shallow strip foundation is suitable.
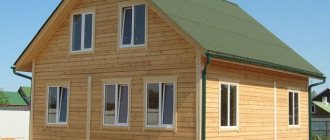
- With a gable roof. One of the popular types of construction among summer residents. The floor is made of tongue and groove boards, and the door hangs on three hinges. There can be one or several windows. Absolutely any type of foundation is suitable for such a building.
- Chest. Very light and squat. As a rule, garden tools are stored in it. The area of such a room is minimal. The foundation for such buildings is built in the most common and simple way.
Drawing of a barn type Chest - Combined greenhouse. It is built exclusively in cases where there may simply not be enough space for a barn. Such premises are perfect for germinating seeds of all kinds of plants and for growing indoor plants in pots. Here you can use a strip or column foundation.
- Temporary. In fact, this is full-fledged housing with practically no amenities. In winter, garden tools and tools or other equipment are often stored here. In summer, the temporary shelter is, in principle, suitable for habitation. For greater comfort, there is a summer shower, electricity and other benefits of civilization. The best type of foundation for a temporary structure is a strip foundation.
The type of foundation being built directly depends not only on the strength of the future building, but also on the type of soil on which it is built.
- In the case of sandy soil, which can float in wet conditions, does not compress and freezes up to half a meter, a screw, monolithic or strip foundation is suitable.
An example of a strip foundation for a barn - On sandy and loamy soil, freezing to two meters and below, prone to quicksand, only a strip base is erected. It is also suitable for clay soil, which can exert high pressure on the foundation.
- The gravel soil does not erode or undergo compression; its freezing is no more than half a meter. The simplest and most inexpensive thing in this case will be the installation of a columnar base.
- It is best to have rocky soil for construction. It is devoid of all the above disadvantages, but has its own: hardness. It can work with any type of foundation, excluding screw ones.
Let's look at the types of foundations for a barn that you can build with your own hands.
Roof installation options
The same materials are used for the roof truss system as for the frame.
The sheathing is made from inch boards. You need to make sure that there is no wane, otherwise the tree will quickly rot. Most often, the barn is covered:
- A pitched roof, where the slope is supported on opposite walls of different heights. Suitable for span widths up to 6 m.
Gable, in which the walls are the same in height, and the slopes meet at the highest point - the ridge. Span width from 6 m.
The angle of inclination of the roof depends on the intensity of wind and snow loads:
- the stronger the wind in the region, the smaller the angle of inclination should be;
- for snow loads the relationship is the opposite - to quickly melt away a large mass of snow, the slope needs to be made larger.
In addition to the loads, the recommendations of the roofing material manufacturer are taken into account, determining the angle of inclination and pitch of the sheathing for a particular type.
Shed with pitched roof
As a rule, the span in barns is small, so a lean-to structure is the most rational. When installing the frame, you need to ensure the minimum permissible angle of inclination for the purchased roofing material:
slate 20-35°; soft roof 5°; corrugated sheet 8°; piece material, metal tiles 25°.
To support the rafters in buildings made of blocks, a support beam - a mauerlat - is installed on opposite walls. In frame buildings, the role of the mauerlat is played by the timber of the upper frame.
Starting from opposite walls, lay rafter boards on edge. The pitch depends on the cross-section of the lumber and its length. To increase the load-bearing capacity, the elements are connected in pairs. They are secured to the support beam with a tie-in and metal plates.
If insulation is not intended, steam and waterproofing is not used, since its function is to protect the insulation from condensation coming from the lower surface of the roofing sheet. Lathing from inch boards is laid along the rafters in increments of 30-50 cm (follow the manufacturer’s recommendations). They are nailed to the rafters or screwed with self-tapping screws.
The last stage of building a lean-to shed with your own hands is the installation of roofing material:
- Slate is fastened with nails in the upper wave, metal tiles - with roofing screws in the lower one.
- To seal the joints, EPDM rubber gaskets are used.
- The sheets are laid with longitudinal and transverse overlap.
- The minimum roof overhang for thin sheet materials is 100 mm, for slate 50 mm.
Barn with gable roof
Installation of a rafter system of 2 slopes involves the installation of a ridge unit. It is performed in various ways:
- with an overlay at the apex of the corner;
with escutcheon and spacer bolt;
- with the rafters resting on the ridge girder;
adjacent to the ridge beam.
The roofing materials in the ridge are not joined tightly. The gap is necessary for air circulation in the under-roof space. To prevent precipitation from penetrating into the gap, metal ridge elements are installed.
A gable roof is more difficult to install, but it resists wind loads better. Another plus is the ability to use the space under the roof for various needs.
Poured foundation
Before laying a poured foundation for the shed, it is necessary to make a bedding that will serve as an elevation above the ground by about 100–200 mm.
Formwork for installation of a poured foundation
Then a monolithic slab is installed: it will be the floor for the building. Such a floor will ideally cope with any loads and protect the structure from all kinds of rodents.
How does the type of foundation depend on the type of building?
Determining the type of foundation depends on the design of the future barn. The purpose of the economic unit is taken into account. Cattle will be kept, the premises will be a workshop. For lightweight structures, a base is not required. Bulky brick structures require the construction of a reliable, solid foundation.
Light building materials are considered wood and lining, heavy ones are stone, brick, aerated concrete blocks.
Standard timber construction allows the use of a columnar, screw foundation. Affordable, simple. Although you can focus on any option. Heavy brick sheds require a strong strip foundation.
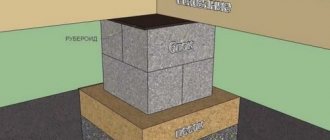
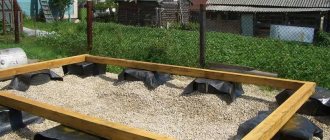
Columnar foundation
A column foundation is an ideal and simple option for constructing lightweight buildings. On such a foundation, you can make a building from foam blocks, but before you start construction, you need to examine the soil composition: if it is homogeneous and compacted, then it is possible to make a foundation from bricks or foam blocks.
It must be remembered that building a foundation with your own hands requires patience. It is best to make a columnar foundation using poured foundations or using brick or concrete blocks, simply installing them in the corners and in places where the corner elements of the walls are located.
To build a columnar foundation, you will need to do the following:
- The work begins with marking the proposed structure. Then remove the layer of turf to a depth of about half a centimeter;
- Dig holes at the locations of the pillars. The depth of each is at least 15 cm from the soil freezing level;
- Fill the bottom of each hole with sand and gravel. The resulting embankment must be compacted;
- In the case of installing poured columns, make wooden formwork with reinforcement. There are two methods of reinforcement. In the first, ready-made meshes of reinforcement are simply laid, and in the second, the rods are laid out at intervals of 200 x 200 mm and fastened with wire at the intersection. To install brick columns, this material is laid out one and a half bricks thick with mandatory suture ligation for structural strength. If you plan to build a powerful barn, then you can use concrete blocks for the pillars. For columns it is also possible to use small foam blocks;
- Prepare a concrete mixture and pour it. A cubic meter of concrete mixture is enough for approximately 10 m2 of pillars.
To make a concrete solution, it is important to maintain the correct proportions. For this purpose you will need: crushed stone or gravel - 6 parts; - sand - 3 parts;
- cement - 1 part;
- water - 1 part.
Plate
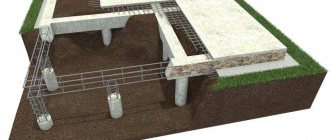
So, let's look at how to properly pour a slab for building a shed. Usually it is erected on moving soils with minimal immersion in the soil.
Moreover, such a foundation can be laid under a shed made of blocks, bricks, under a frame structure, and so on.
In this regard, there are no restrictions, because the bearing capacity of the structure will mainly depend on the thickness of the slab foundation being poured. Therefore, under non-heavy structures, you can pour concrete mortar with a thickness of 20 cm, and under heavy structures, at least 30 cm.
- Dig a pit up to 30 cm deep exactly according to the linear dimensions of the future barn.
- A cushion of crushed stone 15 cm thick is poured into it. It is leveled and compacted.
- Fill a layer of sand to the level of the soil surface. It is also compacted with water and leveled.
- If the depth of the pit allows it, that is, the cushion was not filled to the brim, and besides, the soil in the area is clayey, then the reinforcing frame is laid in the pit on supports. If the foundation pit was not dug deep, then formwork made of boards no more than 15 cm high is installed around the perimeter of the barn. It is at this level that the frame is installed. It can be assembled from steel reinforcement, or it can be a mesh, for example, a chain-link.
- The concrete solution is poured and air is removed from its mass using a vibrator or available materials.
As for the load-bearing capacity, it all depends on the thickness of the concrete being poured and the number of levels of reinforcing mesh. For example, if a foundation is being poured for a shed made of foam blocks, and this is a small load, then the thickness of the poured layer can be a maximum of 20 cm, and one lattice of the reinforcing frame is laid in it.
If a shed is being built from cinder block, concrete block or brick, then the thickness of the screed should not be less than 30 cm, and a reinforced frame of two or more gratings installed one above the other must be placed in it.
In this case, it is very important to take into account the fact that the frame should extend 10 cm from the edges of the slab. And this is on each side.
The slab is considered the most expensive option for a foundation structure, so it is used very rarely for sheds. The main reason for the construction is mobile, heaving soils, which make, for example, columnar options unsuitable.
Block foundation
A foam block foundation is the best option for outbuildings. It is the most common because it is easy to use, suitable for installing a base for all types of buildings, and can be installed quickly.
Ready foundation for a block shed
The not very high cost of a foam block foundation makes this building material even more popular. Moreover, it is quite lightweight compared to other materials.
To make a foam block base correctly, you first need to mark the area. Next, drive in the stakes and stretch the cord between them. Then start digging a pit approximately 600 mm deep.
When calculating, you should take into account the width of the foam blocks themselves, increasing the width of the trench by 200 mm.
Pour crushed stone and sand bedding onto the bottom of the trench, install formwork, and fill everything with concrete mortar 200 mm high. Then, after waiting for the concrete to dry completely, you can install the required number of foam blocks and continue work.
Do it yourself
The barn itself is an easy construction, because it is most often erected as a frame structure, which means it does not bear large loads on the foundation.
A frame barn consists of four load-bearing beams installed vertically at the corners of the building, tied with timber at the top and bottom. This means that it is better to build a columnar foundation for such a structure, but screw piles can also be used. In this case, the pillars are erected precisely at the corners of the building. If you need to build a large house, then, based on the length of the span of the walls, intermediate pillars are poured in increments of 2 - 3 m between the corner support foundations. By the way, the fastest way to build foundation pillars is to use ready-made concrete blocks rather than concrete mortar.
The construction of a foundation for a barn made of blocks is not inferior in load-bearing capacity to either metal piles or a monolith. It is important what sizes the blocks are purchased. Their main purpose is to create a strong and reliable support, so the main thing in this matter is to accurately determine the dimensions of the foundation pillars, both in height and in cross-sectional size. From which it follows that first of all it is necessary to determine the pressure that will act on the foundation from the side of the building.
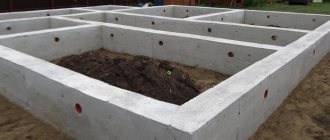
Strip foundation for a barn
When building sheds, strip foundations are no less popular, as they can withstand different loads, are cheap, stable and allow you to build a basement inside.
Scheme for building a strip foundation for a barn
This type of base is used on any soil and for any buildings.
- A trench needs to be dug along the entire perimeter of the shed: it should have a depth of 150 mm below the level of soil freezing in order to avoid loads during its deformation in winter. The width of the trench is made 30 cm larger than the planned width of the foundation.
- First, a bedding of a 10-centimeter layer of crushed stone is poured onto the bottom, and then a 5-centimeter layer of sand. Each layer is carefully compacted.
- Make formwork from the boards about 300 mm high above the ground. This way, the raised base of the building will be protected from getting wet.
- To strengthen the foundation, insert a reinforcing mesh with a cell size of 300 mm or a reinforcing rod with a diameter of two or more centimeters into the formwork.
- Fill the base with concrete, and after it hardens, remove the frame and fill the gaps between the walls of the ditch and the foundation with earth.
- Cover the base with a waterproofing layer on top.
Preparation for work activities
Before starting construction of the foundation, it is necessary to carefully calculate the work plan. It is important to determine the location of the facility, the area and orientation of the technological points. An approximate layout of the barn will allow for the correct positioning of the supporting platform, regardless of what technology it will be used. To ensure that the foundation for the shed lasts longer and is not damaged during the first stages of operation due to defects in the ground surface, it is important to clear the soil. The layer of vegetation must be eliminated and, if possible, the rough coating must be made not only even, but also hard. This may also require removing loose soil or using a tamping tool. The method of achieving the desired characteristics of the base surface will depend on the quality of the soil itself.
Screw foundation
Although the construction of a screw-type foundation is a relatively new technology, it has managed to gain popularity in low-rise construction. Such a foundation is affordable and durable on almost any soil.
Rapid construction technology includes:
- Vertical installation of piles at marked points - the vertical is measured with a level. If the pile is deflected even by two degrees, it must be unscrewed and installed correctly in another place, since the density of the soil has already been lost in this area;
- The piles are driven to the calculated depth using a crowbar or pipe in the corners and under the walls of the building. This will not cause many problems: the screw piles are equipped with a sharp end and thread, which make it possible to perfectly cut through any soil except rocky soil;
- All piles need to be measured and brought to the same height using a grinder;
- For strength from the inside, the pile is filled with concrete mixture. The foundation is ready, you can lay the slab.
Warning of possible errors
Very often, when building foundations on their own, inexperienced builders make a number of mistakes that are subsequently very difficult, and sometimes impossible, to correct.
The most common ones are described below:
- An incompletely removed plant layer of soil from under the base of the future foundation threatens uneven subsidence of the latter. The roots and stems of plants, dying, will create additional pores in the soil, the location of which will be random and unequal.
- The sand cushion is not compacted enough, which also threatens uneven settlement of the foundation.
- The formwork is poorly secured. It may fall apart under the pressure of the concrete mixture.
- The reinforcement in the corners is connected “crosswise”, without providing sufficient contact between the bars. In case of high tensile stresses, the foundation in the corners may break and vertical cracks will appear.
- The installation of a protective layer of concrete is not provided. The fittings interact with air and begin to rust. Corrosion, spreading inward along the rod, destroys it and reduces its strength.
- The concrete being placed is too liquid. Often, when preparing water yourself, more than the prescribed amount is added to improve the workability of the mixture. As a result, the concrete delaminates - the coarse aggregate settles down, the fine aggregate “floats” up. It is necessary to carefully compact the concrete mixture poured into the formwork.
- It is not allowed to “dry” concrete to speed up hardening. Once it dries, it will dry out, but this will lose a significant part of its strength. On hot days, concrete is covered with film, tarpaulin or other similar materials. If necessary, water the structure with water to create the required temperature and humidity conditions.
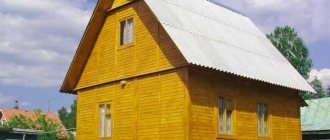
Shed at the dacha
As a rule, auxiliary buildings and structures on the site are built with your own hands. This does not require knowledge of the same level as for the construction of a residential building with utility networks and communications. Therefore, it is quite justified to do the foundation yourself, without resorting to the services of third-party organizations. This will help reduce the cost of landscaping the site, and buildings made independently are easier to operate and maintain.
Cinder block foundation
Cinder block is a cheap material that consists of slag, crushed stone, sand, cement and other components. As a foundation, it is perfect for small-sized buildings.
But a cinder block foundation has its drawbacks:
- Hygroscopic due to the porosity of the structure;
- Has high thermal conductivity;
- Not resistant to frost.
The construction scheme for a cinder block foundation includes the following steps:
- Level the soil at the construction site;
- Dig a ditch for a cinder block strip base;
- Arrange a cushion at the bottom of the trench: it is necessary to pour out a layer of sand, gravel or limestone screenings and compact it;
- Spread the roofing material - it will form the basis for waterproofing;
- A reinforced concrete block can be installed on the roofing material layer or a reinforced cushion can be poured;
- Lay the first row of cinder blocks.
The next one needs to be laid in a run, that is, from the corners to the center. The rows of blocks are connected by a centimeter layer of concrete mortar; - For strength, the solution can also be poured into cinder block cavities;
- When the foundation reaches the design height, the grillage must be reinforced with a reinforcing belt;
- The walls of a cinder block foundation can be covered with mastic, onto which thermal insulation is attached. Panels made of polystyrene foam are used for it. The foundation pit should be filled in and laying of the walls should begin.
Important! To ensure that the foundation lies evenly, reinforcement is installed in the corners and a rope is pulled over it. In the future, masonry is carried out at this level.
Immediate progress of construction
And now we provide you with step-by-step instructions for the construction of a columnar foundation.
- In all places that were marked earlier, an embankment should be made of a mixture of sand and gravel, which should not exceed 15 cm in height - this embankment must be thoroughly moistened and compacted.
- The construction of a homemade columnar foundation begins, strange and paradoxical as it may seem, with bricks (preferably burnt, red - they are of better quality) or concrete blocks, which are also carefully laid on cement.
- If there is a very strong and irresistible desire to install a monolithic base of a columnar foundation, then you can do it differently: first, formwork is placed into which a frame of reinforcement is inserted. The formwork itself is made from ordinary wooden boards or slabs - but if you wish, you can also purchase special ready-made formwork with insulation. In any case, they must be strong and dense, so that there are no cracks in them, and there are no gaps between the installed boards. Otherwise, the concrete will leak out, which will lead to inevitable weakening of the entire structure. A weakening foundation leads to a weakening and unreliability of the building itself, no matter how light or temporary it may be.
- It is also necessary to choose the right fittings: you need to purchase a special one, the diameter of which does not exceed 7 mm.
Before soldering the reinforcement frame, it is necessary to tightly tie it with wire for reliability, although in principle, you can get by with just one thing. Soldering occurs in 10 cm increments
It is also important that there must be a certain distance between the reinforcement frame itself and the formwork walls, at least 5 cm, which is poured with concrete and forms a kind of protective layer that prevents corrosion and the formation of rust on the reinforcement. It is important to note that this entire complex reinforcement structure should not move or shift from its place, therefore, at the time of concreting, it can and even needs to be balanced with concrete, brick or even ordinary foam plastic. It doesn’t matter what the foundation will be made of: from blocks, from bricks or from a monolithic base made of reinforced concrete, it is necessary to carry out additional waterproofing upon completion of the installation of the main structures: special pieces of roofing material are placed on top of the base, on which a layer of bonded beams is then laid . These beams hold together certain corners that are used in construction when it comes to wooden structures. Usually such corners are metal, and they are much more reliable than all sorts of cuttings and notches in the boards themselves. After all this, the beams must be covered with a layer of a special solution that will prevent rotting
Plus, it can also be treated with a solution that will prevent the formation of various colonies of microorganisms or parasites living in wooden structures.
Tire foundation
Recently, among summer residents, foundations built from used material have become widespread. Sleepers or tires can be used for this.
Example of a tire foundation for a barn
Advantages of a tire foundation:
- Saving on materials;
- Rubber provides excellent waterproofing;
- Tires are a strong and durable material;
- Tires can serve as a “cushion” in areas of seismic activity;
- Easy to manufacture.
An important nuance is that the tires must be located at the same level to avoid misalignment. The foundation of tires can be erected as either a strip or a columnar type. To build it, you need to clear the area, level the soil, lay the tires in two layers - the best way would be to use truck tires. Then soil is poured into the column to the extent of 80% of the tire volume.
Roofing felt should be laid on top to ensure a smooth surface and waterproofing. After which the concrete can be poured. To increase the strength of the structure, you can use concrete instead of backfilled soil.
In addition to this, it is possible to use tire reinforcement for the foundation.
Preparation of concrete solution
When constructing foundations for barns and other light buildings, a concrete solution is used, one of the components of which is high-quality Portland cement M400. Concrete mortar has a wide range of applications and has excellent characteristics :
- tolerates temperature changes well ;
- excellent resistance to aggressive environments and moisture;
- has high frost resistance ;
- provides high strength of the building.
Tips/Tricks
Before pouring the supporting structure, it is necessary to prepare a good, tenacious mortar from a mixture of cement, water, sand and gravel. The following rules will help you do this correctly:
When purchasing dry cement or building mixture, you should definitely pay attention to the production date. Regular Portland cement will work here. To save cement, you should choose gravel of different diameters with large and small stones
In this case, the fine gravel will serve as a connecting link for the coarse gravel and less cement will be needed. Crushed stone should not contain debris or various impurities. Clean water should also be used, preferably drinking water. The sand must be free of clay and silt. The classic recipe for mortar: 3 parts sand, 5 parts crushed stone, 1 part cement - pour everything with water, mix until a thick, homogeneous mass is obtained.
Waterproofing
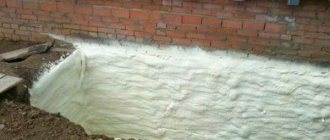
All considered options, except for the columnar one, require a blind area around the structure. The blind area will prevent water from getting under the foundation . Work on the manufacture of the blind area will not take much time during production, but will save resources during the subsequent operation of the structure.
The design of the blind area resembles a pedestrian path. A trough is dug around the building, the bottom of which is made with a slight slope away from the building. Next, the bottom is compacted and covered with a water-repellent compound, which can be used as ordinary clay. A layer of sand is poured above, on which the coating is laid. Cement mortar, paving slabs, and shaped paving elements are suitable. The top layer should have a slope away from the building . The width of the blind area is usually seventy centimeters.
Return to content