Why does the gap occur and what is the danger?
A gap between the bathtub and the wall is formed in two cases: littered walls (there is no right angle at the junction of the walls) or the finishing sequence is broken.
The classic version defines the following sequence:
- Floors.
- Bathroom installation.
- Walls.
- Ceiling.
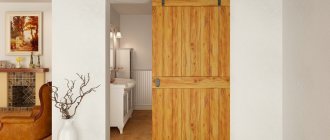
The right combination of colors in the interior - designer's advice
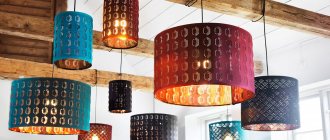
Making a fashionable wall lamp from a plastic pipe [with your own hands]
With this sequence, tiles, mosaics (or other material used for wall decoration) will lie on the side of the bathroom. And this ensures that there is no gap.
But in some cases, it may be necessary to replace the bathtub after finishing the walls, and then cracks appear.
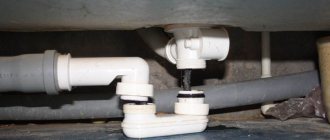
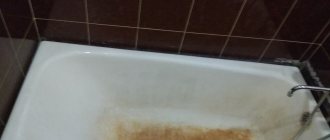
The ventilation under the bathroom is extremely poor. Stagnation causes mold fungi to begin to develop in a favorable microclimate. Mold in the gap between the bathtub and the wall not only spoils the appearance with its blackness, but also spoils the air in the room. A dark and slimy coating will not be immediately noticeable to the eye, but the smell of dampness and decay, even with forced ventilation, will be constantly felt. Especially when the temperature in the room rises. And besides the smell, the mold spores themselves can enter the body and cause an infectious disease.
This explanation should be sufficient, but there is also an aesthetic factor. A gap without decor around the perimeter of the bathroom, like a fly in the ointment, spoils the entire impression of a beautiful renovation.
According to decorative properties
It is important not only to install reliable and durable corner fixtures, but also to give the bathroom an appropriate appearance. The corners should match the color and design style of the interior of one room.
Otherwise, the whole composition will look inferior and even slightly ridiculous. There are many different corner designs, you will definitely be able to find a suitable copy.
- If you are a fan of experiments, various chrome-plated, matte models are produced especially for this.
- Also, do not ignore various gold-plated and platinum pieces.
- In general, the main thing is to choose for yourself and build on your preferences.
In matters of appearance, the only criterion is your own opinion.
Choosing a bath border
Yes, the old fashioned way, such a gap can simply be covered with cement mortar. And after it dries, paint it in the dominant color. But it is so ugly that no one questions the advisability of using a curb.
The choice among the many proposals should be dictated not only by the desire for beauty and sophistication, but also by the admissibility of a combination of wall materials and the border itself. For example, if the walls are decorated with plastic lining, then even an exceptionally beautiful and elegant granite border will look like a saddle on a cow.
Therefore, it is first necessary to gradate all types of borders. At the same time, the most objective assessment will be the division according to the material of the border itself. And so, they are all divided into two large categories:
- Based on mineral raw materials:
- Ceramic baseboard for the bathroom.
- Granite.
- Marble.
- Based on PVC polymers:
- Plastic corners.
- Plastic curbs for bathtubs.
- Foam borders (ceiling plinth).
- Tape borders.
Rubber and stainless steel (stainless steel) curbs stand apart. Their installation is not fundamentally different from other types of profiles, so it will not be discussed in detail.
A common property of all curbs is their extremely low water absorption . Separately, it can be said that mineral types of borders do not have flexibility, but polymer ones can be bent at any angle. To do this, you just need to heat them in boiling water.
By the way, the question of choosing a border for a specific bathroom is determined solely by aesthetic compatibility and the size of the gap between the wall and the bathroom. The issue of compatibility of different materials in terms of fixing the curb to the base is not considered. You can glue anything to what you need. Therefore, we will consider each type of border separately.
Methods for sealing gaps
Depending on the size of the gap, there are several different ways to seal the gap.
- A gap less than 3 mm wide is first filled with silicone sealant, and after it dries, you can decorate this place with a border.
- A gap of up to 25 mm should be immediately covered with a curb. But at the same time, when choosing a bathtub curb, remember: the width of the bathtub curb should be three times larger than the width of the gap! This rule ensures that 2/3 of the curb will be on the edge around the bathtub. This arrangement will ensure reliable fixation.
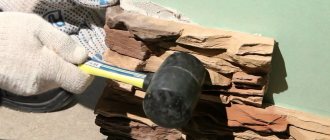
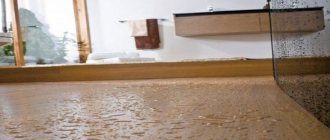
- A gap of more than 3 cm is, in principle, no longer a gap. It must be eliminated by filling with solution. To do this, a miniature formwork is made under the bathtub and the solution is poured into the resulting recess. In this case, it is best to use a solution based on epoxy resins. They have a number of properties that distinguish them favorably from cement-gypsum mixtures. And after this solution has dried, you can lay the border.
There is one nuance in this work - at what angle to the horizon is the curb placed? It seems obvious that a clear angle of 45° will emphasize the severity of the composition and contribute to better drainage of water. But if the gap is large enough, then the laid decorative border can serve as a shelf for sanitary and hygienic supplies. And on such a steep surface nothing will stick. Therefore, by maintaining an angle of no more than 5°, you can “kill two birds with one stone.” Firstly, this angle is enough for water droplets to roll off, and secondly, this angle will not be enough for hygiene items to slide off. You can get a clearer idea of the technology by watching the video.
Classification of corners for tiles
Corners have been produced for quite a long time and during this time a clear classification of these materials has been established.
Basically, they are divided according to the following criteria:
- Purpose
- Material
- Decorative properties
- Functional
It would be more advisable to dwell on each section in more detail so that the picture of understanding is broader and deeper. This will make the final choice of corner mounting for bathroom tiles much easier and faster.
Ceramic borders
The properties of ceramic, marble and granite borders are similar. But for convenience, we will consider the most common one - tiled.
Ceramic borders have two prevailing properties. The first is durability and the second is fragility. And all this at a relatively high price. Although, the price range in this segment of finishing materials is incredibly wide! Thus, borders from domestic manufacturers, measuring 6 by 30-35 cm, can be purchased for 30 rubles/piece. And the same Italian-made part will cost 24,000(!) rubles/piece. Ceramic profile Corda Platinum bead costs about 180 rubles / piece.
To install a ceramic border you will need:
- Ceramic border (can be 35x35 mm in size, if space allows).
- Glue.
- Clean rag.
- White Spirit.
- Rubber spatula.
- Laser level.
- Miter box.
- Tile cutter (or grinder with cutting disc).
There is indeed an opportunity to lay a homemade, surrogate ceramic or tiled border. You can make these yourself, from the tiles that line the walls in the bathroom. But to do this, you need to have a sufficient amount of tiles and a tile cutter (grinder with a cutting wheel), a ruler, a pencil and sandpaper.
In order to lay a bathroom border with your own hands, you need to mark the required distance on the tile, draw a line and cut off the required part. The edge of the cut needs to be sanded.
If you have everything ready, then you can start. First you need to install the laser level directly into the bath. Adjust the horizontal beam so that the edge of the curb adjacent to the wall is raised by 5 mm. With a border width of 5-6 cm , this will be an angle of 5-8°. Now we coat the border with glue and carefully place it in place. A vertical laser beam will help maintain the level. After installing the first tile, we do the same with the second and subsequent ones. Separately, it should be said about the corner tiles. If the elements you need are not on sale, but you can get around the corner in the bathroom: make a corner border element with your own hands. To do this, you need to mark the tiles and cut them at an angle of 45° with a grinder using a miter box.
After the glue has dried, you can begin grouting the joints. This should be done in the same way as grouting joints between tiles. But when buying a grout, try to choose a latex-based mixture. It has excellent water-repellent properties and excellent adhesion.
Using your imagination, you can frame the mirrors, creating a single composition in the bathroom.
repair - what to do with the rounded joint between the wall and the ceiling (photo in the topic)
Renovations are pending. I was racking my brains about what design to choose, what wallpaper, and in general what to do, if the whole apartment is filled with bends like these (they’re called pads, as I understand it). I looked all over the Internet, but I couldn’t find any options for exactly how we did it. I don’t consider stretch ceilings at all, if that’s the case.
In the photo on the left - this is a room, and one wall is rounded like this, and then also with a transition to a right angle, it goes into the ceiling. Now there is wallpaper there and everything looks harmonious. After the renovation, this wall (it is long) is planned to be empty, that is, the maximum that will be placed along it is a chest of drawers. That is, the wall will be bare and you need to beat it somehow. I wanted to mix it up with wallpaper with floral patterns, but you can’t stick it to the ceiling with a curve, it’s ugly.
In the photo on the right there is a corridor - everything there is generally twisted, and even if you allow a suspended ceiling or a plasterboard structure there, it will steal 50 centimeters, and it will turn out to be such a long trailer.
Anyone with imagination, please suggest something, collectively we think it’s better, otherwise there’s no one to even consult with, the whole family said - think for yourself.
Plastic borders
Being a cheaper finishing material, plastic bath borders have a wider range. In particular they are:
- Internal (mounted together with tiles).
- External (installed after the tiles).
- Consisting of two parts (two-part profile).
Each of these borders can be self-adhesive. The width of the product varies, up to 30-50 mm. There is no uniform length standard for these products. The set may contain borders 1.8 m long or long, up to 3 m. The height of this element is also different, depending on the height of the bathtub. Therefore, when purchasing one, pay close attention to the total length of the slats. The situation is similar with prices. The minimum cost of such a bathroom set, which includes, in addition to the border itself, plugs and corner elements, starts from 250 rubles, with the simplest appearance. This category also includes the “swallow” profile, the convenience and beauty of which is appreciated by many craftsmen. Particularly popular are the profiles of the companies progress plast, profiles and kolpa san, makroplast.
For installation you will need:
- Plastic border for the bathroom.
- Silicone sealant.
- A hacksaw for metal (it has fine teeth).
- Miter box.
- Pencil.
- Roulette.
- Acetone (solvent).
If you look at the reviews, it turns out that gluing such borders is extremely simple. First you need to wipe the work area dry from dust and moisture and degrease the surface. Then, you need to measure the required length, set it on a plastic border and saw it off on a miter box at an angle of 45°. Regardless of whether your border is self-adhesive or not, we recommend additionally using silicone sealant. It will increase the strength of the connection and serve as an additional guarantee of water resistance. After this, you can apply silicone sealant to the bathtub curb and place it on the gap.
Components and borders can be purchased at any store that sells building materials. If you purchased a set of plastic borders with corners, then install these elements at the junction of the planks. If they are not there, then the joint between the two planks is additionally sealed with silicone sealant. In the latter case, the failed element can only be remade if the sealant has not set.
Flexible sealing self-adhesive tapes
This is the cheapest and easiest way to seal the gap between the bathtub and the wall. This sealed sticker is made of high-density polyethylene, with a thickness of 150 microns. On the reverse side of these tapes, the manufacturer applied butyl glue. The shelf life of the border tape is 2 years. This is very little compared to a ceramic border, but this is more than compensated for by the low price. The cost of such tapes starts from 100 rubles per roll 3.5 m long.
To glue flexible sealing self-adhesive tape, you will need:
- The tape itself.
- Silicone sealant.
- Acetone (or any solvent).
- Clean rag.
- Construction knife.
- Pencil.
Before gluing, it is necessary to prepare the workplace. The surface to which the curb tape will adhere is thoroughly cleaned and degreased with a solvent. Then you need to draw a horizontal line to maintain the strictness of the line. Use silicone sealant along the crack and fill all the cavities. Only after this can you start gluing the border tape.
The backing should be torn off from the adhesive layer by no more than 15 cm. Begin gluing from the edge of the bathtub. Press the tape very tightly on one side and squeeze out any air bubbles (if any appear). Important: do not stretch the tape! When you reach the corner of the bathroom, carefully bend the tape and continue sticking further. Once you reach the edge of the tub, cut the tape and seal the edges with silicone sealant.
A fold should appear in the corners. It must be cut with a construction knife. Lubricate the cut area with a thin layer of sealant, and cut off a strip of tape 2 cm wide and close this seam.
After completing the work, give the butyl glue a day to gain strength.
This material can also be used for sinks. A serious advantage in this case is the ability to independently glue the detached element
Round corners
Tile countertop, tiled countertop
There is a need to tile the countertop. This option was supposed to be (criticism, advice?) 1. Take a standard tabletop (23 mm chipboard). A tabletop, but not plywood or just chipboard, simply because tabletops are sold at hand, but everything else still needs to be brought. Plus, the standard tabletop fits perfectly, no need to trim anything. 2 On top of the liquid nails we glue one layer of moisture-resistant gypsum plasterboard, plus we fasten the gypsum plasterboard with self-tapping screws. GVL, but not DSP already because GVL is available. 4. Glue 10x10 porcelain tiles onto Flexleber on top. 5. Grout it with LITOCHROM STARLIKE epoxy grout. This option was assumed and it remains in force for now (therefore criticism and advice are welcome). However. The other day they brought me kitchen furniture and the company seems to have collapsed. Along with the furniture they brought a tabletop, which I did not order and did not pay for at all. At the same time, the freight forwarders even forgot to take a receipt stating that the goods were delivered. Well, I modestly remained silent. Well, I think the company will not become poor, because when ordering furniture, after calculating the price, we subtracted the cost of the tabletop from the price, it turned out to be minus 7,000 (SEVEN) thousand, despite the fact that prices for tabletops of this size (3 meters with kopecks) start from 900 rubles. (23 mm) up to 1800 r (38 mm). So, they brought tabletops 38 mm thick. If you put GVL (10 mm) on top of all this, plus tiles (another 10 mm), then you get a tabletop 60 mm thick, which seems a bit thick. Or not, does anyone have any experience or thoughts? Kitchen in the so-called “Castle style”, a version of a similar kitchen below. And so. What if you don’t bother with GVL, but just glue the tiles onto this laminated countertop with liquid nails? The grout is the same. Do you think it will hold up?
Multi-level ceiling with a bend, a niche and a cornice
Hello to all specialists. Here I found in the wilds of the Internet one ceiling option that I’m crazy about. Here he is:
I made a tentative drawing based on my room dimensions:
in a circle looking down M1-M3 - lamps in a semicircle looking down P1-P3 - lamps in a line looking down. 1) Because According to the drawing, on the left there will be a niche of 15 cm, and the center of the main circle is located in the center of the room, then to eliminate antisymmetry, I made another linear level on the right of 16 cm. How correct will this be from a design point of view? 2) Red, blue and green colors the lines show the trajectories on which the lamps will lie. 3) The dotted black trajectory of the circle shows the eaves side. - And here is the main question:
Foam skirting boards
Although foam baseboards are not specifically designed for sealing the gap between the bathtub and the wall, they successfully cope with this task. Their advantage is:
- Low price (from 15 r/m.p.).
- Widely available.
- Ease of work.
Of course, foam corners also have negative qualities:
- Fragile.
- They do not withstand shock and crash loads (compression).
But with all this, they are easy to replace, so if you wish, you can put them in the gap between the bathtub and the wall.
For work you will need:
- Foam corner.
- Silicone sealant.
- Construction knife.
- Miter box.
- Pencil.
- Roulette.
- Acetone (solvent).
- Clean rag.
Before starting work, the surface of the bathtub and wall to be treated is cleaned of dust, moisture and degreased with acetone. Then you need to measure the required length of the plank and cut it with a construction knife. If you start gluing from the edge of the bathtub, then in the corner of the room, the cut should be at an angle of 45°. You can cope with this task using a miter box. Attention: before gluing the first element, be sure to prepare the second one. File it down and check that the connection is correct.
Now you should spread the sealant onto the foam bathtub curb and apply it to the seat. Press gently but firmly and remove any excess sealant with a clean rag.
All elements are glued in a similar way. After finishing the work, give time for the sealant to gain strength. TIP: After the sealant has dried, you can paint the foam border with latex paint. This will give the entire decorating structure a uniform coating.
By purpose
According to their application, corners are divided into several main groups. The most common of them is the section of corners used for floor mounting.
Instances of this type are often confused with baseboards.
- Yes, you can use floor corners as a continuation of the baseboard, but from the point of view of design and manufacturing technology, these are completely different things.
- The advantage of this type of corners is their versatility and low cost.
- Corner floor mounts are produced in huge quantities by a large number of companies around the world.
- Finding them won’t be difficult, even if your city doesn’t really have hardware stores with a wide selection of goods.
- The material from which such corners are made is most often high-quality plastic with the addition of wood.
In addition to this type, there are also corners made to look like borders. They are less functional than the previous type of similar mounts, but from a decorative point of view they are much better. They really look very attractive, especially if they match and fit well into the overall interior of the bathroom.