Drilling a water well is a rather labor-intensive process that requires certain knowledge and skills. The article provides information that will not make you a professional driller, but will fill some knowledge gaps and help you drill a well yourself.
If you are going to drill on your own, without using special drilling equipment, then you will have access to a maximum drilling depth of about 40 meters. It will be quite difficult to drill deeper. Therefore, you have the choice of drilling a regular deep well or an Abyssinian one. It is impossible to drill an artesian well manually, since such wells are approximately 100 m deep or more.
Types of drill for hydraulic drilling of wells
Drilling rigs may differ based on drilling technique. An impact drill operates through mechanical action using weights. The rotating structure is more complex in structure, but the work is done many times faster.
Types of drilling rigs:
- Shock-rope. The structure of the structure consists of a frame with a pyramidal base and a cable with a projectile.
- Auger. A rotating auger penetrates the ground, drilling a hole. Feature: the well is not flushed.
- Rotors. Hydraulic technology is followed.
- Rotary type manual device. A distinctive feature is the absence of a motor. All work is done by hand, which is a rather labor-intensive process. That is why the popularity of such equipment is quite low.
Screw installations are almost impossible to make yourself. This requires special skills and tools. But creating a DIY setup has many benefits. It is much cheaper, the equipment is compact in size. This can result in a high-quality design that is easy to work with.
Types of designs
Depending on the depth, wells are:
- Sandy. Their design is simple. At its core, it is just a pipe with a diameter of 1 m, buried 20 m. A special mesh is attached to the bottom, which acts as a filter. The service life reaches 15 years. Drilling sand wells for water can be done with your own hands;
- Artesian (on limestone). Work on the construction of this type of well is labor-intensive. Due to the great depth of drilling, it is necessary to use special equipment and hire a group of workers. But the service life of such a well reaches half a century (provided that the technology for its construction is strictly followed);
- An ordinary well consisting of concrete rings can also be equipped. It is filled with groundwater naturally. More details about the installation of such a well can be seen in the video on the Internet.
Features of casing pipe installation
After flushing the well, the drill rods are carefully removed. It must be taken into account that if the parts are difficult to lift, it means that the washing was insufficient. Now you can install the casing pipes. They can be metal, asbestos-cement or plastic. The last option is the most widespread because it is very durable and does not corrode or deform. Most often, pipes with a diameter of 125 mm are installed; for shallow wells, a 116 mm option is suitable. Sufficient wall thickness of the parts is 5-7 mm.
To improve the quality of the supplied water and further purify it from dirt, filters are used: sprayed, slotted or homemade. In the latter case, the simplest option can be considered this: using a grinder, cracks are made across the entire casing. To make a filter of higher purity, many holes are drilled in the pipe, then the part is wrapped in a special mesh or geofabric for better filtration, everything is secured with clamps. A casing pipe with a filter at the end is lowered into the well.
A well filter of this type can easily be made independently. To do this, holes are drilled in the casing pipe, which are best covered on top with a layer of geotextile or a special mesh
If installation is complicated by the presence of a strong water carrier that quickly “washes out” the wells, you can try the following. Slots are cut or holes are drilled in the tip screwed onto the filter. A head is placed on the pipe, to which the pressure hose from the pump is attached. Then the most powerful water pressure is turned on. After these manipulations, the casing should easily enter the aquifer. After installing the casing pipe, you can pour half a bucket of gravel inside the column as an additional filter.
The next step is another flushing of the well. This is necessary to wash out the aquifer that has become saturated with drilling fluid during drilling. The operation is performed as follows. The head is put on the pipe, the hose from the motor pump is secured, and clean water is supplied into the well. After washing, the column is evenly and densely filled with gravel. Now you can lower the pump on the cable and use the well. A small nuance: the mechanism cannot be lowered to the very bottom, otherwise it will fail very quickly. The optimal depth is just below the level of the water column.
The process of hydrodrilling a water well is quite simple and quite accessible for independent implementation. However, before starting work, you need to carefully study the instructions, and best of all, take part in drilling under the guidance of specialists. Despite its apparent simplicity, there are many nuances known only to professionals. If you don’t have the experience or desire, you can invite specialists who will quickly drill a well and equip it at an affordable cost. The owner can only rejoice at the appearance of an autonomous water supply system in his home.
- https://vodasovet.ru/scvazhina/gidroburenie-skvazhiny-svoimi-rukami
- https://mr-build.ru/newsanteh/oborudovanie-dla-gidroburenia.html
- https://vodatyt.ru/burenie/gidroburenie-svoimi-rukami.html
- https://scvazina.ru/gidroburenie-skvazhin-na-vodu-svoimi-rukami
- https://aqua-rmnt.com/vodosnab/kolod-skvaj/gidrobureniya-skvazhiny-svoimi-rukami.html
Preparation
One of the important stages of hydrodrilling is searching for water in order to determine the depth of the groundwater level.
If this is not done, subsequently it will not be possible to drill an effective well to provide the house with the required amount of liquid.
In this case, it is not at all necessary to use special equipment; the approximate location of the aquifer can be determined. If the area in which the site is located is well developed, you can check with your neighbors or the company involved in geotechnical surveys.
The process itself is carried out using a small-sized installation. Many will be surprised by the compact size of the equipment, which can be installed in almost any area, regardless of its size.
Do-it-yourself manual hydraulic drilling of water wells
First you need to identify the aquifer. The number of casing pipes and the complexity of drilling a well depend on its depth. Land authorities will help you find out the soil characteristics. Preparatory work includes determining the source of water and the supply of liquid for work.
Manual hydraulic drilling includes the following steps:
- Pouring water into the pit and mixing it with clay.
- Turning on the motor pump. The flushing fluid flows through the hoses to the drilling rig. Then the liquid flows into the first pit. There the water is filtered. The pure substance is sent to other pits.
- To reach the aquifer, additional rods are used.
- Next, you need to remove the rods and install casing pipes.
For this purpose, casing pipes with a thickness of 6 mm are used. Pipe material may vary. Plastic, steel, asbestos cement are used.
Casing pipes should be equipped with filter units. Then the water will be cleaner and of higher quality. Next, you need to flush the well again.
It also provides for washing when the float passes, so that the well does not collapse and is covered with sand. For this purpose, CMC wallpaper glue is used. But if you pump the water until it is clean, you can put a mesh on the filter pipe.
Operating procedure
General algorithm of actions. The specific list of activities is determined individually, taking into account local specifics.
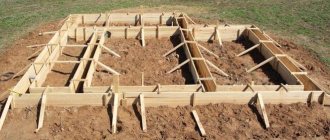
Preparation of the drilling site
It consists of cleaning and leveling the soil for further installation of the MDU and placement of containers for flushing liquid.
Assembly and leveling of the installation
The last one is very important. If the tool goes into the ground at even a slight angle, then under such drilling conditions it will not withstand drilling for long, and the installation of casing elbows will be significantly more complicated.
Placement of technological containers
If it is possible to replenish water supplies (for example, from a water supply system), then this is taken into account when choosing a location. The length of the connecting sleeve “tank - trunk” is also taken into account.
Feature - you need to take into account that the liquid coming from the barrel must go somewhere. When the well is pumped up (but this will happen later, after drilling and installation of casing pipes are completed), it is simply withdrawn. In this case, the water enters the same place - into the container (“pit”), that is, it circulates in a circle. Therefore, the first reservoir after the MDU performs the function of a filter, that is, it purifies the process fluid from large fractions. It is periodically cleaned during the drilling process.
How to make a drill for auger drilling: materials and instructions
You can make your own spiral drill of 2 types for rotary drilling of wells: with a spiral cutting element, with a hemispherical disk knife. For work you will need:
- A metal rod or strong pipe is the base, a hollow pipe of larger diameter is for the container on the rod of the spoon.
- Couplings for connecting rods, metal handle - a piece of reinforcement, rod, up to 40 - 50 cm long.
- Metal sheet if a spiral knife is planned.
- Steel discs with teeth from an electric saw.
- Welding machine.
Spiral simple and two-stage drill: drawings
How to make a classic drill with a spiral band knife for a sand well? It is difficult to make such a tool with your own hands without special machines for working with metal. The difficulty lies in the preliminary hardening and bending of the metal strip. It is necessary to select steel with a thickness of 1.5 - 2 mm. Next, the hot strip is bent on a machine, giving the strip a spiral shape.
Only after this is the tape welded to the base. During the connection, symmetry is monitored: the turns must be positioned strictly parallel to each other and at a certain angle to the horizontal line. The edge of the tape is sharpened and the surface is painted.
In a home workshop, it is much easier to make a drill with your own hands that is identical in functionality, but easier to assemble, for wells of different diameters with circular knives instead of a spiral.
Starting from the simplest design, you can improve the tool and make a drill that is suitable for drilling shallow wells of different diameters.
For production, take 3 disks of the same thickness with different diameters. Each is cut into 2 halves, one edge (bottom) is sharpened. Holes are drilled in all parts to connect the petals.
A circle of smaller diameter is welded to the base so that the edges of the two halves form an angle of 30°. Larger diameter knives are attached to the upper one using nuts and bolts.
The rod is formed with thread cutting or a coupling with finished thread is welded to the upper edge: in this case, there is no need to install protection against unwinding during operation.
Spoon: drill for working in loose rocks
When setting up a source in dry soil, you need a tool with a projectile that holds the dug soil inside. A spoon drill like the one in the drawing for drilling sand wells can also be made with your own hands from a thick-walled gas or water pipe.
The pipe section is capped with a plate along the upper edge, leaving a hole for the rod in the center. An old large-diameter drill is welded to the rod. The rod is welded in the center of the pipe. A rectangular window is formed on one side of the pipe for excavating soil. The lower edge is cut in the form of petals, bending the edges outward for a larger cutting diameter and gripping the soil. The lower edges are sharpened.
An old metal cylinder can also be used as a reservoir for waste soil in a spoon drill. With this type of drill, assembled with your own hands, large-diameter wells are drilled.
Video description
For a clear overview of rotary well drilling, watch the video:
Drilling a needle hole
If the question is how to drill a well for water, which is supposed to be used for drinking, but after cleaning, it is better to choose an Abyssinian well. If layers of water are located in close proximity to the surface, you can make such a well using simple available tools in just a few hours.
The drilling process is carried out according to the following algorithm:
- First of all, it is necessary to drill a hole in the soil layers, the diameter of which should not exceed 8 cm. Drilling must be carried out until the quicksand passes. For this, narrow screws are used, which need to be expanded as needed.
- Next, a labor is installed in the finished shaft, additionally equipped with a pointed tip.
- Using a pipe, the soil is driven in until it reaches the aquifer.
Needle well - a simplified method of water extraction Source vodaklep.ru
How to make a drilling tool at home ↑
To make your own hand-held earth auger, select the design of the tool and the type of blade. Usually a T-shaped profile is made from two metal rods, and cutting elements are attached to the vertical one.
The disk drilling device is the easiest to manufacture. You will need a grinder with cutting wheels, a welding machine, a hammer, sandpaper and pliers.
Diagram of a drill with a disc blade
Necessary materials:
- a metal pipe or fittings 1.5 m long for the rod - the vertical part of the drill;
- fittings 40 cm long for the handle;
- circular saw blade 2-3 mm thick for blades;
- drill with a diameter of 15 mm for a pointed tip.
Disc blade drawing
How to make a disk type drill:
- Take a circular saw blade and use a grinder to cut it in half. Select the diameter of the disc depending on the desired size of the hole - on average, 15 cm. Grind the blades to zero so as not to cut yourself during work.
- Weld two pieces of reinforcement - a handle and a rod, so that you get a T-shaped profile. Weld a drill to the end of the rod, and weld the blades 5 cm above. Make sure that the angle between them is 25 degrees.
- Sharpen the blades with an grinder's abrasive wheel. You can carefully “walk” along the drill.
Circular saw - basis
You can make a disc tool with removable blades if necessary. To do this, instead of the blades themselves, weld metal pads to the rod at the desired angle, and secure the cutting elements with bolts. When necessary, you can replace them with blades of a different diameter.
A screw tool is more difficult to use than a disk tool due to the larger number of turns that create significant resistance. But narrow holes can be dug manually only with its help. To make an auger drill with your own hands, prepare the materials:
- fittings for the rod - 1.5 m long (can be adjusted according to height);
- profile pipe for handle 40-50 cm long;
- several metal disks of the same thickness (about 2 mm) and diameter - the number of disks is equal to the number of turns of the screw.
Discs welded together
How to make a homemade drill for poles:
- In the center of each disk, cut a hole with a diameter equal to the diameter of the rod.
- Take the first disk and cut out a small sector from the resulting circle. Repeat on all disks.
- Weld the disks together to form a spiral spring - an auger. Weld rings to the ends of the auger.
- Place the rod rod inside the central hole of the “spring” and use the rings to stretch it lengthwise.
- Weld the top and bottom edges of the auger to the rod.
- Boil the auger along its entire length.
- Attach the handle to the rod by welding or bolting.
- Sharpen the lower part of the reinforcement with an abrasive wheel at an angle of 25 degrees.
Auger stretched around a rod
If you plan to loosen soft and loose soil, make a drill from an ordinary shovel. Sequencing:
- Take a high-quality steel shovel and make markings on the canvas in accordance with the drawing.
- Cut the bottom of the blade according to the markings and bend the edges in different directions: one forward and the other backward.
- Bend the petals of the fabric remaining below upward - also in different directions.
Marking drawing on a shovel
The drilling device is ready, it can be used for planting plants in the garden or garden beds.
If you want to make a garden drill with your own hands, drawings and photos can give you an interesting idea. The materials are often what’s lying around in the barn or garage. Study several models and choose the one that is easier to manufacture or most suitable for the task.
If your own experience is not enough, you can always show the drawing to a more experienced neighbor and get to work together.
A homemade drill can be modified to work more efficiently. Possible improvements:
- Replaceable cutters or blades. To drill holes of different diameters with one tool, make a base with mounting pads welded to the rod at an angle of 25 degrees. Drill two holes in them for the bolts with which you will attach the blades. Install the bolts with the threads facing up so that they do not interfere with drilling.
- A pointed tip of a drill. Cut a plate measuring 10x2 cm from a sheet of metal. On one side, grind it to a cone-shaped state with a grinder and weld it to the end of the rod instead of a drill.
- Small blades between the tip of the drill and the large ones. Add them by welding 8x3cm metal plates immediately after the tip.
- A curved circular saw blade instead of halves. Take one disk and cut it radially to the middle. Bend the metal in different directions and weld it like a screw.
Result of manual drilling
Some tips
Some recommendations will help you make a high-quality drilling device. When working, you should consider the following:
- It is necessary to correctly calculate the diameter of the screw. The fact is that during operation the hole will differ slightly from the size of the cutting part. For example, a 200 ml element will provide a well of 240-250 ml.
- You can replace the grinder discs with regular sheet steel, the thickness of which will be about 2 mm. But it will have to be further bent and sharpened to give it the ideal shape.
- When working with the disk, you must follow safety precautions. It should be carefully and securely secured in a special vice, and cut only with safety glasses.
- To calculate the auger feather, you can use the special program “Compass-3 D”. She will do everything necessary, just enter the initial data and wait for the finished drawing. All this will significantly save time.
To extend the service life of a homemade auger, you need to clean it after each job. Remove soil from metal parts, adjust blades and sharpen them if necessary. In addition, for storage, choose rooms with low humidity.
Hydro drill drawing
I was guided by the fact that the device should be easily repeatable and could be made by anyone who was interested in this topic. You will need 2 corners, 75 mm wide on one side, wall thickness 8 mm and 30 cm long. And 2 corners 65 mm long, wall thickness 5 mm. A pipe with a diameter of 32 mm is also required.
The cutting part of the drill will be under a 2 cm cone. We cut it and sharpen it to a cone. On the cutting edge we make a marking of 17 mm from each edge. It is necessary to cut it so that the pipe does not reach the cutting edge by about 10 cm. To make the holes for the water jet larger, all that remains is to use a grinder to cut out the inside of the corner a little, and at the same time we will make a chamfer on each edge and on the outside of the corner. To prevent the drill from clinging with sharp edges, when we pull it out, the sharp edges of the corners must be cut off. Next, we wind a millimeter rope around the pipe to ensure a millimeter gap and intercept it by welding. For more thorough welding, remove the pipe.
Now we need 20 pieces of inch metal pipe, 2 meters each. The ends must be chamfered so that threads can be cut. Except for one, because this one edge will be welded to our drill. On the one hand, we will cut the threads to half the length of the coupling, immediately screw them on and secure them a little with welding to prevent unwinding during the drilling process. On the other hand, we will cut the threads a little larger, approximately the entire length of the coupling, and screw on the nuts that protect the pipe from unwinding. !!! Regarding thread cutting, I recommend going to a turner. since this is a difficult task for such a pipe diameter.
On the pipe that did not have a thread, we put our drill on it, set the same gap everywhere and scald it as shown in the photo.
Let's prepare the ribs for centering the drill. Corner 65 by 65 mm, two pieces of 15 cm. To avoid clinging, cut 3 cm on each side. Now we need to weld it to our drill on different sides, about 30-50 centimeters from the edge.
Final stages of drilling
When the well is ready, it is necessary to dismantle the drilling rig and put it into operation.
In narrow workings, the drill string together with the drill serves as a casing string with a filter. There is no need to remove them from the barrel, because Water will be pumped out from the water intake point through the same channels through which the drilling suspension circulated.
The hydraulic drilling process is distinguished by accessible technology that does not require special theoretical knowledge. Compliance with the main stages of the process in conjunction with high-quality equipment will certainly give good results and delight you with clean underground water.
Number of blocks: 12 | Total number of characters: 19467 Number of donors used: 5 Information on each donor:
- https://GidPoVode.ru/skvazhina/gidroburenie-skvazhin-na-vodu.html: 2 blocks out of 6 used, number of characters 2484 (13%)
- https://remstrdom.ru/652-gidroburenie-skvazhin-svoimi-rukami-skhema-razrabotki-na-vodu.html: 5 blocks out of 7 were used, number of characters 8960 (46%)
- https://vodatyt.ru/burenie/gidroburenie-svoimi-rukami.html: 2 blocks out of 5 used, number of characters 1795 (9%)
- https://aqua-rmnt.com/vodosnab/kolod-skvaj/gidrobureniya-skvazhiny-svoimi-rukami.html: 1 blocks out of 5 used, number of characters 2925 (15%)
- https://masterim.guru/zagorodnye-doma/texnologiya-gidrobureniya-skvazhiny-na-vodu/: 2 blocks out of 5 were used, number of characters 3303 (17%)
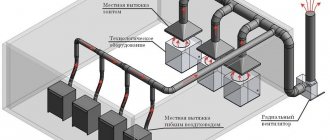
MBU device
The drilling rig is a small collapsible structure consisting of:
- a supporting part with an installed reversible motor with a mechanism for creating torque;
- systems of drills and drill rods;
- a winch, through which the equipment is raised and lowered to extend the working column with rods;
- motor pumps;
- swivels;
- hoses;
- a flap or exploratory cone drill, used to pass through a compacted part of the soil and center the equipment;
- control unit.
The MDR allows you to go 50 meters into the ground.
Homemade MGBU
This diagram shows the main working units of the MGBU, which you can manufacture according to our drawings.
Drilling rig drawing
Assembly of the drilling rig begins with the frame. The frame stands for the drilling rig are made from DN40 pipe, wall thickness 4mm. “Wings” for the slider carriage are made of DN50, thickness 4mm. If not with a 4mm wall, take 3.5mm.
You can download drawings for a small-sized drilling rig using the links below:
- Upper frame: chertyozh_1_verhnyaya_rama
- Bottom frame: chertyozh_2_nizhnyaya_rama
- Drilling ram: chertyozh_3_polzun
- Slider sleeve: chertyozh_4_gilza_polzun
- Frame assembly: chertyozh_5_rama_v_sbore
- Engine and slider: chertyozh_6_dvigatel_i_polzun
- Node A MGBU: chertyozh_7_uzel_a
Drilling swivel, rods and locks
At first, we recommend purchasing ready-made drill swivels and drill rods. In the manufacture of these parts, processing accuracy is very important, since the loads on these units are large.
We do not recommend making a swivel from improvised means. One slightest inaccuracy and it will fail.
If you decide to order a swivel, you will need to find a turner with a CNC machine.
For the swivel and locks you will need steel:
- Locks – 45 steel.
- Swivel – 40X.
You can download a drawing of a homemade drill swivel here: DIY swivel for drilling swivel
You can save money by purchasing ready-made units, but it will take a lot of time to find a specialist. But it's worth it - homemade parts are much cheaper than purchased ones. To get started, purchase parts for samples. Turners work better when they have drawings and templates on hand.
If you have factory samples, it will be much easier to check the quality of work. For example, if a turner made drill rods and locks, then you take factory-made and home-made parts and screw them to each other - check the quality of the thread. The match must be 100%!
Do not buy spare parts by delivery. This is necessary so as not to buy a marriage - this, unfortunately, happens. And most importantly, if you order delivery from afar, you can wait more than one month.
DIY drawings of locks at Moscow State Budgetary Institution
We recommend making threads on drill rods in a trapezoid - it is no worse than a conical one. But if you then order it from a turner, it will be more difficult to make a tapered thread. If you make or buy locks for drill rods separately, then take simple suture pipes for the rods if you are drilling no deeper than 30 meters (3.5 mm thick and an internal diameter of at least 40 mm). But a welder must weld the locks to the pipes! In vertical drilling, the loads are high.
To drill deeper than 30 meters, you need to take only thick-walled pipes with a wall of 5-6 mm. Thin rods are not suitable for great depths - they will tear.
- Download bar lock No. 1: chertyozh_zamok_na_shtangu_1
- Bar lock 2: chertyozh_zamok_na_shtangu_2
Drill head
It’s not difficult to make a simple drill yourself. The drill is made from ordinary steel. If you decide to make it from alloy, then keep in mind that it is difficult to weld! Need a welder.
Drill head drawing for download: chertyozh_bur
If there are a lot of stones at the drilling site, then buy drills from companies that are adapted for strong soils. The higher the price, the harder the alloys on the drills and the stronger the drills themselves.
Homemade winch and gear motor
When manufacturing a mini drilling rig, a “RA-1000” winch is used. You can take another one, but preferably one with a carrying capacity of at least 1 ton (or better yet, more). Some drillers install two winches, one electric and the other mechanical. In the case of a drill string wedge, it is very helpful.
To make the work easier, it is better to buy and connect two remote controls: one for reverse and engine speed, the other for the winch. This will save a lot of effort.
A motor-gearbox for drilling wells for a homemade mini drilling rig will require 60-70 revolutions per minute, with a power of 2.2 kW. Weaker will not do.
If you use a more powerful one, you will need a generator, since it will not be possible to connect to a voltage of 220 Volts. If you make a hydraulic drill with your own hands, take a motor-gearbox of the following models: 3MP 31.5/3MP 40/3MP 50.
Necessary equipment for work
The standard type of hydraulic drilling work is carried out using small-sized installations. For your own plot, this is a great solution and the best way to get water on your own.
It is necessary to supply working fluid into the wellbore with significant pressure, and for this a pump or motor pump for contaminated liquids is needed.
Sometimes, to increase the breakdown force, shot or coarse sand is added to the working solution. To crush large pebbles that may be found in sandy layers, roller-cone and cutter bits are useful.
If, when drilling wells or constructing wells, boulders or large pebbles were encountered in neighboring areas, the starting rod must be equipped with a reinforced drill bit. The tool must be secured to the rod so that it does not interfere with the supply of water to the barrel
Special small-sized MDU installations are most in demand among consumers for hydraulic drilling purposes. This is a unit with a height of 3 m and a diameter of 1 m.
This prefabricated structure includes:
- collapsible metal frame;
- drilling tool;
- winch;
- a motor that transmits force to the drill;
- swivel, part of the circuit for sliding fastening of parts;
- water motor pump to ensure pressure in the system;
- exploration or flap drill;
- drill rods for forming a column;
- hoses for supplying water to the swivel from the motor pump;
- Control block.
Among the necessary equipment, it is also desirable to have a current converter. It is needed to ensure that the energy supply to the process is stable. You also definitely need a winch for raising/lowering casing and set-up pipes.
When choosing a motor pump, it is better to choose a more powerful device, since heavy loads are expected. For hydraulic drilling, you will also need such plumbing tools as a pipe wrench, a hand clamp, and a transfer fork.
From the very beginning to the end of the work, the hydraulic drilling process involves a constant circulation of the working fluid. With the help of a pump, an aqueous suspension with eroded soil comes out of the well, enters directly into the pit and, after sedimentation of the suspension, is again supplied to the well.
In addition to this procedure, it is possible to carry out hydraulic drilling of shallow wells for water without using a pit. This method does not require a recess to settle the working solution, saves time and makes it possible to drill a well even in garages and basements.
If there is an abandoned pond near the site, then you can also do without installing sumps - pits. There are no special requirements for the quality of water supplied to the well.
For hydraulic drilling, a motor pump is selected that is capable of pumping heavily contaminated water. It is advisable to buy a unit with a head of 26 m, a pressure of 2.6 atm and a productivity of 20 m3/h.
A more powerful pump guarantees fast, trouble-free drilling and better flushing of the well. For quality drilling, it is important that there is always a good flow of water from the well.