Depending on the type of soil located on the construction site, you have to choose the right type of foundation structure. If the soil is soft, mobile, with flooding or with a high level of groundwater, then a columnar foundation cannot be avoided. Despite the apparent simplicity of installation work, the process of constructing a columnar structure requires an accurate calculation of the load-bearing capacity of each support post.
But among all types of foundations for a house, this is the cheapest in terms of material consumption, especially since it is possible to use various building materials for it. Let's look at step-by-step instructions for building a columnar foundation with your own hands.
In what cases is a columnar foundation installed?
Columnar foundations are used in the construction of lightweight buildings: gazebos, sheds, terraces, verandas, wooden baths. It is suitable for buildings with a volumetric weight of up to 1000 kg/m³. When constructing lightweight structures, it is chosen due to a number of advantages:
- easy installation;
- can be installed on almost any soil;
- there is no need to prepare the landscape;
- there is no need to carry out complex waterproofing work;
- production speed: 1-2 weeks;
- low cost;
- strength and durability: service life can exceed 50-100 years if the work is carried out in compliance with all standards.
The last reason may be a reason to turn to specialists - professional installation will extend the life of the building. However, if you learn how to properly make a columnar foundation with your own hands and follow the installation technology, you can create a solid foundation for the building yourself.
A columnar foundation has not only a number of advantages, but also limitations. It is not placed under heavy structures, and it is also impossible to create a basement with it.
Number of pillars
The technology for installing a columnar foundation involves installing pillars at the corners of the building and in the middle of each wall. The best option is a post every 1.5 - 2.5 meters in all directions. The heavier the future structure, the lower this figure.
Self-construction of a columnar foundation while maintaining high performance characteristics is a very real process. Compliance with all technologies and subtleties of production stages is the main condition for obtaining a reliable and durable base.
Approximate drawing of a columnar foundation
Types of columnar foundation: which one to choose
Depending on the material, there are several types of columnar foundations.
Types of columnar foundation Source postroysia.ru
Each of them has its own installation features.
- Monolithic reinforced concrete foundation . Durable, able to withstand heavy weight (for example, a two-story wooden house). Suitable for difficult soil.
- Brick columnar foundation . The strongest base with the longest service life is if you choose a solid fired brick with a minimum moisture absorption coefficient.
- Concrete foundation . Its durability will depend on the quality of the material chosen.
- Columnar foundation made of rubble stone . It is not stable on moving soil, so it can be installed on a relatively flat surface.
- The columnar rubble concrete foundation is reliable and can be laid in different ways.
- Wooden foundation . If the logs are covered with fire-bioprotective and then waterproofing material, then the foundation made from them can last a long time under gazebos, terraces, and verandas.
- Asbestos foundation . It is made of asbestos pipes, which play the role of a kind of permanent formwork. Withstands massive timber construction.
- Columnar foundation made of metal piles . They are screwed deep into the soil, anchored in the densest layers.
Monolithic and prefabricated foundations Source userapi.com
The choice of foundation depends on the soil and the structure being constructed. The material depends on what the future building will be made of and how much it will weigh. The depth also depends on the weight and quality of the soil.
Depending on the depth of the foundation, three types are distinguished. It is important to choose the type that is suitable for the specific terrain and weight, because it will ensure the stability of the support:
- Unburdened . It is installed almost on top of the soil; you just need to remove its fertile layer. Suitable for non-heaving soil. It is used in the construction of small baths and small outbuildings. A shallow foundation is best made of concrete or brick.
- Shallow . It is mounted at a depth of 40-70 cm. In its manufacture, pipes made of asbestos, plastic or metal are most often used. Suitable for building gazebos, verandas or terraces on slightly heaving soil.
- Recessed . Mounted below the freezing point of the soil. Usually installed on clay and water-saturated soil.
Design of a buried and non-buried foundation Source housechief.ru
The strength of the structure and its service life depend on how to make a columnar foundation: if the foundation is chosen incorrectly for the structure, the walls may warp, cracks will appear, or the house will simply sag.
What it is?
A columnar foundation (PF) is a system of support pillars buried in the ground to the required depth and interconnected by a grillage to evenly distribute loads.
The supports are installed at corners, at the junction of walls, in the most loaded areas, and are also distributed along load-bearing walls with a certain spacing. A unified system makes it possible to ensure the bearing capacity of the foundation, resistance to overturning, deformation and displacement of individual pillars.
Selection and calculation of material
Before you start building, you need to decide on the choice of material and its quantity. When choosing a material, it is better to pay attention to the weight of the structure and select the type of foundation that corresponds to its reliability. The required amount of materials can be calculated using specialized programs or applications. You can also find online calculators for calculations.
There is a lot of data that needs to be taken into account when building a foundation. Different calculators perform calculations differently and require different amounts of input data. However, none of them is able to take into account all the features of the construction site and the future structure.
Example of a program interface for foundation calculations Source 900igr.net
Professionals who work in the region probably know the characteristics of the area and will be able to make more accurate calculations. This is done by special architectural organizations that make calculations taking into account all factors. But if you still want to make a columnar foundation with your own hands, then you will have to make calculations using calculators. After preparing all the necessary materials, you can begin construction.
Advantages and disadvantages of a columnar base
Each type of foundation was originally created with the expectation of use in a specific situation:
- strip base is the best option for erecting structures on moving soil;
- monolithic construction is used in the construction of multi-storey buildings with heavy weight;
- The support-column base is suitable for the construction of small residential buildings.
Therefore, some of the disadvantages can be considered minor when constructing the target structures.
Main disadvantages:
- Fragility of the structure. Initially, the base of supporting parts was intended for the construction of a structure in frozen soil. Application in moving soil or loosening the soil independently may result in a decrease in the stability of the pillars.
- Low load-bearing capacity. The supports cannot support multi-story buildings with significant weight.
- In the future it will not be possible to build a cellar or basement. The distance between the supports will not allow digging a wide ditch that could be used as an underground structure.
If you construct a building taking into account these restrictions, then it will be possible to make maximum use of all the advantages. The main ones are the following:
- Low cost. If you do not count the costs of renting auxiliary equipment, the costs will be 2 times lower than when constructing a strip foundation. The price ratio between monolithic and columnar structures is 10:1.
- You don't need to have any special skills to build a columnar base with your own hands.
- High speed of construction of the structure.
- There is no need to carry out preparatory work related to hydro- and thermal insulation.
- Can be used to construct buildings on frozen soil.
- The service life of the foundation, if used correctly, is 90–95 years.
A columnar foundation is easy to repair, and the process does not require a lot of money and time.
Foundation installation
The installation technology will vary depending on the type of foundation. But the general diagram of how to properly make a columnar foundation looks like this:
- Preparatory work, drawing construction.
- Carrying out earthworks: marking, digging holes and trenches.
- Filling cavities or laying blocks.
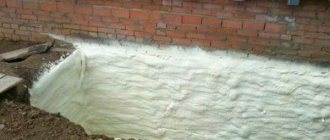
- Removing formwork and adding sand. Insulation of the base, waterproofing and installation of the fence.
This is the most general scheme, which varies depending on the type and depth of the foundation. However, the first stages of work are the same for everyone.
Preparatory work
Before starting construction of the foundation, it is necessary to draw up drawings.
Example of a foundation drawing Source 2mdom.ru
The drawings indicate the layout of the pillars. They are usually installed in places of heavy loads: in the corners of the building, at the intersection of load-bearing walls, under load-bearing partitions.
In addition to the drawing, it is useful to have a diagram of the foundation itself.
Example of a foundation diagram Source prezentacii.org
See also: Catalog of companies that specialize in foundation repair
When you have all the necessary materials and drawings on hand, you can begin preparing the area for the future building. First of all, the area is cleared of debris. Then two meters are counted from the perimeter of the future building and this area is marked with a cord or sand. This is the boundary from which the top layer of soil must be removed to prevent plants from sprouting. You need to remove approximately 30 cm of soil. A layer of sand or gravel is poured into the dug pit.
Then they move on to the marking stage. The drawing is transferred to a plot of land. The corners of the building are marked with posts with wooden strips nailed to them.
The correctness of the angles must be checked by measuring the diagonals. A rope is attached to the planks, which outlines the boundaries of the building and the location of the supports.
Marking the foundation Source sazhaemvsadu.ru
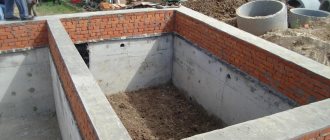
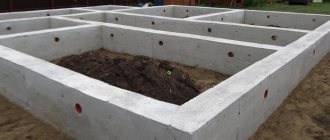
Pit preparation
Holes are dug in the places marked for the posts. You can do this yourself, using an excavator or mechanical drill. The width and depth are dug with reserve for formwork and bedding.
Foundation pits Source banyagid.com
If the holes are deeper than 1 m, then they may begin to crumble. To prevent this from happening, it should be dug with slopes and spacers made of boards should be installed. After this, you can lay the pillow.
Installation of foundation pillars
Once the holes are dug, you can begin to install the posts. First, a drainage pad is laid. It consists of a layer of sand (10-20 cm) and crushed stone (5 cm).
Pillow for the foundation Source 1landscapedesign.ru
To avoid sagging, the pillow must be compacted well.
Further installation technology depends on the type of foundation.
Construction of houses
0 votes
+
Vote for!
—
Vote against!
The foundation is the support of the entire house; the durability of the entire building depends on its design and strength. When choosing the type of foundation for country houses, our compatriots play it safe and lay a strip foundation. You can easily verify this by taking a tour of the gardens. But such measures are completely unnecessary. For light buildings, such as wooden, frame, frame-panel houses, a column-type foundation is more suitable. In addition, indications for its use are soils supersaturated with moisture, sandy soils, peat, swampy soils and those where frost heaving forces can push out or damage the strip foundation. You can build a columnar foundation with your own hands in an extremely short time, without involving heavy equipment and a team of workers.
- Construction of a columnar foundation
- Columnar foundation: drawing, calculation and diagram
- DIY columnar strip foundation
- Excavation
- Arrangement of pillars
- Arrangement of a lightweight strip foundation
- DIY columnar foundation
- Excavation
- Construction of a columnar foundation
- Do-it-yourself columnar foundation: video instructions
Construction of a columnar foundation
A columnar foundation consists of pillars - supports buried in the ground and protruding outward. The top level of the pillars must be the same. A grillage is installed on top of the pillars to connect the supports and distribute the load evenly. The pillars must be placed at each corner of the building, as well as at the intersection of walls and in places where the maximum load is applied.
The material for the pillars can be wood, brick, concrete, concrete blocks, asbestos-cement or metal pipes, as well as rubble stone.
Wooden poles are used extremely rarely today, as they are short-lived. But under light wooden buildings or terraces it is quite acceptable to install a columnar foundation made of wooden posts. The diameter of such pillars should be 0.15 - 0.2 m. Before deepening, they must be treated with special preparations and impregnations that prevent rotting and prevent combustion. Bitumen mastics can be used as a waterproofing material.
Iron ore brick , fired in a kiln, is used for shallow or non-buried columnar foundations. The width of the pillar must be at least 0.38 m.
Concrete reinforced pillars are the most common and reliable option for a columnar foundation. They can be either monolithic or constructed from ready-made concrete blocks. The width of the pillars should be 0.4 m.
Asbestos-cement or metal pipes are used to construct pillars as permanent formwork, since reinforcement is inserted inside them and concrete is poured.
The depth of the columnar foundation is calculated depending on the structure of the soil, the level of groundwater and the level of soil freezing. A foundation buried 0.4 m into the soil is considered shallow. Recessed - immersed 0.15 - 0.5 m below the freezing level.
Very often, a columnar foundation is installed in areas where the soil freezes 1.5 - 2 meters deep, since the construction of a strip foundation in this case is simply unprofitable. The lower level of the column is buried 15–25 cm below the soil freezing level.
The distance between the pillars can be from 1 to 2.5 m, but spacing more than 3 m is not recommended.
as a grillage . If the structure is wooden, then it will act as a mortgage crown. But monolithic concrete grillage poured into wooden formwork is gaining more and more popularity.
The grillage of a columnar foundation can be high (above 35 - 75 cm above ground level) and low (lying on the ground).
A very important design feature of columnar foundations is that it is impossible to install a basement in the house. Sometimes, to enclose the space between the pillars, a fence is formed, which is smoothed out of brick or stone, but is not connected to the foundation pillars, so as not to disrupt its integrity in case of movement. It is very important to arrange ventilation in the enclosure to ventilate the underground space. But collection is not always done. In frequently flooded areas, columnar foundations are erected to a high height above ground level, which can range from 1 to 2 m. In this case, the house remains completely “hanging” in the air on pillars.
Columnar foundation: drawing, calculation and diagram
Before starting any work related to the construction of the foundation, it is imperative to stock up on design documentation. It is better to entrust the creation of this documentation for the house to special architectural companies.
The columnar foundation diagram looks something like this:
The first step is to calculate the columnar foundation to determine the number of pillars, their material, laying depth, arrangement locations, width, and more. Calculations will require soil characteristics, groundwater level, frost heaving forces, soil freezing level, building material, its height and number of storeys, type of floors, roofing material, loads at each key point of the building, and more. For independent calculations, there are corresponding online calculators on the Internet for calculating columnar foundations.
All dimensions obtained for a columnar foundation are entered into the design documentation, where all characteristics, material and much more are indicated.
DIY columnar strip foundation
Recently, the so-called lightweight foundation for modern one- and two-story cottages has become popular, which consists of pillars buried below the freezing level of the soil, and a non-buried strip foundation connecting these pillars. It won’t be easy to make such a foundation yourself; it’s better to call friends for help and order a ready-mixed concrete mixer to make the structure durable.
Excavation
Before making a columnar foundation, it is necessary to prepare the site for construction. To do this, remove excess soil and eliminate unevenness. If the top soil is clayey, you will have to remove most of it and fill it with sand.
Next, you need to mark the area. Using construction thread, we mark the site according to the attached drawing. We stretch the thread in two lines parallel to each other, with a distance equal to the thickness of the future strip foundation. We control the angle of intersection of the threads and the angles of the future structure; they should be equal to 90 °. We mark the places of intersection and junction of walls, as well as the corners of the building, places with the greatest load.
Throughout the marked area, we remove 30–40 cm of soil where the strip foundation will be. We make the width 7–10 cm larger so that there is room for the formwork.
According to the drawing of the columnar foundation, using a hand drill we make holes where the pillars will be. The diameter of the hand drill is 150 mm, 200, 250, 400 mm. If the depth of the pillars does not exceed 1 m, then additional fixation of the walls from crumbling is not necessary. If the depth is greater, then you will have to form supports from boards so that the soil does not crumble.
We fill the bottom of the wells with sand, a layer of 10 cm.
For the last time, we check the location of the wells along the axes and the evenness of the future foundation.
Arrangement of pillars
We will use concrete to construct the pillars, but to waterproof it, we will use a little trick.
From roofing felt, twisted in two layers, we form a pipe of the required diameter. We glue the connections with tape, and also tape the pipe around the circumference. We insert the structure into the well until it touches the ground.
We knit and weld a reinforcing frame from a reinforcing rod 10–14 mm in diameter and 6 mm wire. We insert it into the well. The top of the rods should protrude from the well by at least 15 - 25 cm.
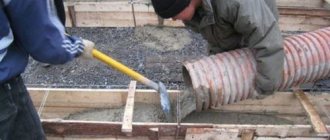
We begin to fill the pillars with concrete. To do this, first pour 20 - 25 cm inside the well and lift the roofing felt pipe so that the concrete below spreads and forms a base. Then we fill the hole completely with concrete, forming a pillar. Using an electric deep vibrator, we shake the concrete so that there are no air bubbles or voids left in it.
While the concrete in the pillars dries, let's work on the strip foundation.
Arrangement of a lightweight strip foundation
We weld and knit a frame from reinforcing rod and wire to reinforce the strip foundation. Be sure to weld it and screw it to the rods sticking out of the pillars.
The rods will be located along the foundation strip, and the wire will be reinforced in the transverse direction, forming horizontal jumpers.
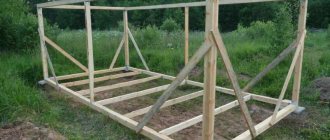
We install the formwork for the strip foundation. To do this, we use boards 10–15 cm wide and 4 cm thick. Instead of boards, you can take chipboard, plywood or iron sheets. When the formwork is knocked down, we lay waterproofing material inside. It is best to use modern membranes or polyethylene film, which will also be needed to ensure that concrete does not spill out of the formwork through the cracks.
We fill the strip foundation with concrete. For simplicity, it is better to order a mixer machine to fill such a large space. We also shake the concrete with a vibrator. When the concrete gains its strength, after 20 - 28 days, the formwork can be removed and all the necessary work on waterproofing the foundation can be carried out. Then we fill the remaining trenches with soil.
For more information about how such a strip-column foundation is made, video:
Important! Many experts are extremely negative towards columnar-strip foundations, insisting that the foundation should be either columnar or strip. Only in this case will it fully perform its functions and not interfere with movements in the ground. Despite this, many construction companies continue to equip a combined foundation. So it's up to you to choose.
DIY columnar foundation
For comparison, let’s consider the option of arranging a purely columnar foundation with a high grillage. Its arrangement is advisable for light buildings on sandy soils.
Excavation
We mark the site, as in the first option. Then we remove fertile soil from the site by 15 - 25 cm. In the corners and places where walls intersect, we drill wells 0.6 m deep. Better yet, we dig square-shaped pits in the place of future pillars by hand.
We pour a 10-15 cm layer of concrete at the bottom of each pit under the pillars. It will serve as a cushion for us. When the concrete has dried, you can begin to form the support pillars.
Construction of a columnar foundation
For the pillars we will use iron ore brick, carefully baked in a kiln. We lay out a support pillar with brickwork, 38 cm wide and 35–45 cm high above ground level. The bricks can be placed in a closed loop, leaving free space inside. Inside the empty space we form a reinforcement frame, tie at least 1-3 rods and insert them. Then fill it with concrete.
We check that the pillars are at the same level. Once the concrete has dried, the pillars can be waterproofed.
We fill the trenches with soil. We arrange a grillage on top of the pillars. It can be done using wooden rand beams. The edges of the beams must necessarily rest on the pillars and be connected to each other with a tongue-and-groove joint.
The grillage can be made of concrete. Then it is necessary to install formwork from wooden boards, weld a frame made of reinforcement inside and fill everything with concrete.
The columnar foundation technology allows the pillars to be made from asbestos-cement pipes. They are lowered into the well, then concrete is poured inside. Raise the pipe so that the concrete spreads, and then add concrete further, not reaching 10 - 15 cm from the top of the pipe. When the mortgage crowns of the house are connected to the foundation, they will need to be secured to the pipes using anchors and corner joints.
The construction of a columnar foundation allows you to significantly save on materials and a team of workers, since all work can be completed independently in a matter of days. Such a foundation can be safely built for wooden houses, bathhouses, technical buildings, terraces, verandas, gazebos, garages and other buildings whose weight is not enough to load the strip foundation. By the way, if you built a columnar foundation in the fall, it is not advisable to leave it unloaded for the winter. Therefore, concrete slabs are installed on top or they try to build the entire building before the onset of frost. Otherwise, during the winter, the forces of frost heaving may push the pillars out of the ground, and their location will no longer be even. It will be easier to dig them up and make a new foundation than to correct the consequences.
Do-it-yourself columnar foundation: video instructions
Monolithic columnar foundation
A monolithic base is a system of supports, the distance between which is filled with sand, crushed stone, and then filled with concrete.
The formwork supports expand towards the bottom, so the diagram of how to make a columnar foundation with your own hands changes in the case of a monolithic foundation. When constructing small areas, it is more advisable to dig a single pit instead of holes.
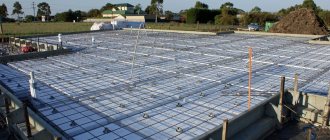
The drainage pad for it is made according to the standard scheme: compacted layers of sand and crushed stone. The reinforcement system goes a little deeper into it. Since it is more difficult to lay bars in vertical formwork, the reinforcement structure is installed first.
Foundation reinforcement Source profundamenti.ru
For the “boot”, which serves as a support, formwork is made: panels are made of chipboard or OSB, as well as jibs from the walls or the bottom of the pit. There are no problems with pouring concrete in one layer.
After the ledges become strong enough, the installation of formwork begins. Shields are installed and interconnected. For the installation of small structures, a pair of jibs are usually enough.
Installation of formwork Source userapi.com
Block foundation technology
The key to the durability and reliability of any structure is proper design. To perform calculations for a columnar base, several factors must be taken into account:
- Since the base made of blocks is of the prefabricated type, its characteristics are significantly inferior to those of a monolithic one.
- It is necessary to take into account the effect of heaving forces, especially if the penetration is carried out above the freezing depth level.
- Low support area compared to a strip or slab base.
Most problems can be minimized. For example, all the pillars are connected into a single structure by constructing a grillage. To do this, the heads are tied with corners with a section of 40×40 mm. Then the structure is attached to a beam or channel. Can be embedded into a monolithic grillage.
Timber strapping Source nasha-besedka.ru
You can reduce the impact of heaving forces by taking the following steps:
- deepening the support below the level of soil freezing, due to which the degree of influence of extrusion forces is reduced;
- It is advisable to use backfilling of the depressions with sand, which will eliminate pulling out forces;
- Often an additional drainage system is installed around the entire perimeter of the future building.
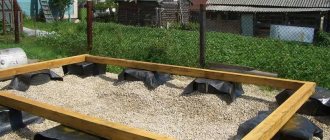
Prefabricated column foundation
A prefabricated columnar foundation is a system of piece supports that are arranged in a certain order. The posts are manufactured separately and mounted during installation.
Prefabricated columnar foundation Source dm-st.ru
After laying the drainage layer, roofing material rolled into two layers is installed in the pits. It plays the role of a kind of formwork and waterproofing material. To make the structure more durable, it can be laid in a light metal mesh. This is done so that the structure can then be shaken and the accumulated air bubbles released.
Then a reinforcement structure is constructed from metal rods. They should be 12-15 cm shorter than the pole to avoid corrosion processes. If a grillage is installed on top of the pillars, then the rods, on the contrary, should protrude from the structure. This is necessary in order to connect the reinforcement structures of the foundation and the grillage.
Video description
Video about installing formwork and reinforcement:
If you are thinking about how to pour cabinets under a house, then the technology is the same as in the previous version. Concrete is poured into the pits layer by layer and compacted.
On a note! But we must remember that a columnar foundation is intended for lightweight structures and can only be used for a house if a lot of circumstances arise.
Pouring concrete Source stroikraft.ru
After hardening, it is covered with roofing felt in 2-3 layers.
Now you can begin laying the material to the desired support height. The pillar can be made entirely of brick or lined with a hollow inside and filled with concrete.
Now you can begin laying bricks, small concrete blocks or other material to the desired support height. The pillar can be made entirely of brick or lined with a hollow inside and filled with concrete.
Application area
The design in question has proven its performance in the following cases:
- foundation for light buildings (wooden, panel and frame houses);
- support of heavy structures and their individual elements, when a strip foundation becomes economically unprofitable due to the need to go deeper than 2-2.2 m;
- construction on soils with high heaving;
- construction of outbuildings and ancillary structures in order to save money.
It is not recommended to use a columnar foundation in the following cases:
- on slopes with a height difference of more than 1.8-2 m;
- with an increased risk of formation displacement;
- on loose sandstones, peat bogs and other unstable soils.
Based on economic feasibility, it is not recommended to build a SF with a depth of more than 3.5 m. In these cases, it is better to use a pile-type foundation.
Asbestos cement pipes
Asbestos pipes will help to significantly reduce the cost of building a foundation. Plus, it's quite easy to make. The pipes are installed on a concrete pad, just like brick ones, but the concrete is poured in a slightly different way.
Two holes are made in the lower part of the pipe, which is installed in the pit. A piece of metal rod is passed through them. After this, install the pipe in the pit and cover it outside with crushed stone.
Now let’s talk about how to fill the pillars under the foundation if they are made of asbestos pipes. About 1⁄3 of concrete is poured into them. While the concrete has not hardened, reinforcement assembled from several metal rods is installed in it. Now the concrete can be poured to the very top and then leveled.
Foundation made of asbestos pipes Source koffkindom.ru
The concrete will harden in 7-10 days. At this time, any construction work (except for digging trenches) is excluded.
Metal piles
In order to make a foundation from metal piles, you do not need to dig pits and make drainage. They are either screwed into holes created with a hand drill, or directly into the ground, and go deep into the ground.
Metal pile foundation Source zwsoft.ru
At least two people are required to screw in the piles, as this is a rather labor-intensive process.
To strengthen and protect the inside of the piles, concrete is poured into them. First, the piles are screwed in to the required depth, making sure that they enter the soil strictly vertically. At the same time, rope markings are made in advance, which will show how to fill the columnar foundation level. To properly fill a columnar foundation made of metal piles, special funnels are used - as in the picture below.
Funnel for pouring concrete Source limtrade.nl
A special funnel is installed in the pipe, which facilitates the filling process. Once the pipes are filled with concrete, it will take some time to set. Then it will be possible to weld the platforms for installing the grillage.
Conditions for installing a support-column structure for a future home
The use of strip concrete foundations carries an impressive financial burden on the total estimated cost of construction. The installation of a support-column foundation allows you to save money.
Its construction is possible under certain conditions:
- The calculated resistance of the soil foundation (R0) must be equal to or less than that of the point support. This will prevent the house from sagging under its own weight.
- It is advisable to install poles on rocky, coarse soils. Such a foundation is not built on heaving and swampy soils.
- The heel of the point support must be below or above the groundwater level.
- The foundation material must withstand the load and have a safety margin of + 10%.
- The bottom of the foundation should be below the freezing depth of the soil.
Assessment of soil bearing capacity
Before proceeding with the design of the foundation, it is necessary to examine the conditions and physical characteristics of the soil to a depth of at least 2 meters from the surface . You can do this yourself by taking soil samples using a hand auger.
To avoid making mistakes in assessing soil characteristics, you can order a soil analysis from a geological exploration service. Another option is to contact your local land management department for a copy of the vertical survey linked to the construction site.
Non-buried foundation
There are several technologies for creating a foundation of varying degrees of depth.
On non-heaving or slightly heaving soils, a shallow foundation can be laid. It is usually built from concrete, rubble concrete or brick.
Option for a non-buried foundation Source strojudacha.ru
The general technology for all materials looks like this:
- Preparatory work: building a diagram, leveling the ground and marking the site.
- Removing the top layer of soil and laying a sand cushion.
- Laying pillars. The supports are installed in at least 2 rows of 4 blocks and connected to each other.
- Treatment with fire-bioprotective material and installation of waterproofing.
This is the simplest technology that will allow you to easily create a foundation for terraces, verandas or small baths.
Shallow foundation
On more complex soil prone to heaving, a shallow foundation can be installed. It is even suitable for rocky or sandy areas. It is made from asbestos, plastic or metal pipes. The material does not play a significant role, because the main load will fall on the reinforced concrete pillar.
The diameter of the pipes must be selected taking into account the loads. For small gazebos and terraces, you can use pipes with a cross-section of 100 mm, but for heavier buildings it is better to take a diameter of 250-300 mm.
Scheme of a shallow foundation Source atlantmasters.ru
Making a shallow foundation is more complex:
- Preparatory work, marking. Removing the top layer of soil and leveling it.
- Drilling holes.
- Creating a sand cushion.
- Waterproofing.
- Installation of pipes in dug pits.
- Reinforcement: corrugated reinforcement is installed vertically and tied together with small rods.
- Pouring concrete. A diagram of how to pour pillars under the foundation with your own hands: first, concrete is poured halfway. The pipe is raised 30-40 cm up, creating a base that will resist heaving. Then the pipe is concreted to the end.
This technology provides greater strength, although it is more difficult and expensive to install.
Blocks
The most common masonry material for the load-bearing elements of a columnar prefabricated foundation is building blocks . You can use almost any variety, but the best option would be blocks made of heavy concrete with an expanded clay component. They have the following characteristics:
- The standard size is 20 × 20 × 40 cm. This allows you to get by with less. Up to 10 blocks are needed per pillar.
- High strength.
- They are not afraid of groundwater and temperature changes.
- Can withstand buildings of greater mass.
- Durable.
How to install a grillage
In order to evenly distribute the load across all supporting elements and the ground, a grillage is needed. A grillage is a horizontal frame of mounted supports.
Grillage on top of a columnar foundation Source stroy-dom.by
They begin to install it after the foundation has dried. Its height is measured, and if it is not enough, then leveling is necessary. Level the height using a cement-sand mixture.
After it dries, a prefabricated or single belt is constructed:
If a prefabricated belt is being made, then the structural elements must be well connected with scraps of reinforcement. The trimmings are connected with mounting loops using welding or wire twists.
Then they install formwork, a frame made of reinforcement and fill everything with concrete. After the concrete has hardened, waterproofing is carried out, and the sinuses of the holes are filled with soil.
It is important that there is at least 10 cm from the ground to the grillage. This will compensate for heaving of the soil.
Briefly about the main thing
Building a foundation is an important task, because improper installation will lead to subsidence of the building, skewed walls and other troubles. In general, the order of work is as follows: first, select the material, then draw up a diagram and transfer it to the site. The top layer of soil is removed, a cushion of sand and crushed stone, formwork and reinforcement are installed. Then the pillars are installed, which can be made of concrete or brick, asbestos pipes or metal piles.
Depending on the material, the technology of how to pour a columnar foundation with your own hands has its own characteristics. Often a grillage is installed above the foundation. The structure must be waterproofed with roofing material or bitumen mastic. After the concrete and grillage have hardened, construction of the main structure can begin.
Ratings 0