[contents]
Roof installation options
The same materials are used for the roof truss system as for the frame.
The sheathing is made from inch boards. You need to make sure that there is no wane, otherwise the tree will quickly rot. Most often, the barn is covered:
- A pitched roof, where the slope is supported on opposite walls of different heights. Suitable for span widths up to 6 m.
Gable, in which the walls are the same in height, and the slopes meet at the highest point - the ridge. Span width from 6 m.
The angle of inclination of the roof depends on the intensity of wind and snow loads:
- the stronger the wind in the region, the smaller the angle of inclination should be;
- for snow loads the relationship is the opposite - to quickly melt away a large mass of snow, the slope needs to be made larger.
In addition to the loads, the recommendations of the roofing material manufacturer are taken into account, determining the angle of inclination and pitch of the sheathing for a particular type.
Shed with pitched roof
As a rule, the span in barns is small, so a lean-to structure is the most rational. When installing the frame, you need to ensure the minimum permissible angle of inclination for the purchased roofing material:
slate 20-35°; soft roof 5°; corrugated sheet 8°; piece material, metal tiles 25°.
To support the rafters in buildings made of blocks, a support beam - a mauerlat - is installed on opposite walls. In frame buildings, the role of the mauerlat is played by the timber of the upper frame.
Starting from opposite walls, lay rafter boards on edge. The pitch depends on the cross-section of the lumber and its length. To increase the load-bearing capacity, the elements are connected in pairs. They are secured to the support beam with a tie-in and metal plates.
If insulation is not intended, steam and waterproofing is not used, since its function is to protect the insulation from condensation coming from the lower surface of the roofing sheet. Lathing from inch boards is laid along the rafters in increments of 30-50 cm (follow the manufacturer’s recommendations). They are nailed to the rafters or screwed with self-tapping screws.
The last stage of building a lean-to shed with your own hands is the installation of roofing material:
- Slate is fastened with nails in the upper wave, metal tiles - with roofing screws in the lower one.
- To seal the joints, EPDM rubber gaskets are used.
- The sheets are laid with longitudinal and transverse overlap.
- The minimum roof overhang for thin sheet materials is 100 mm, for slate 50 mm.
Barn with gable roof
Installation of a rafter system of 2 slopes involves the installation of a ridge unit. It is performed in various ways:
- with an overlay at the apex of the corner;
with escutcheon and spacer bolt;
- with the rafters resting on the ridge girder;
adjacent to the ridge beam.
The roofing materials in the ridge are not joined tightly. The gap is necessary for air circulation in the under-roof space. To prevent precipitation from penetrating into the gap, metal ridge elements are installed.
A gable roof is more difficult to install, but it resists wind loads better. Another plus is the ability to use the space under the roof for various needs.
Making the roof of a frame house with your own hands
The roof of a frame house consists of rafters, which are made from 5×15 timber. The edges of the beams are joined using an end connection at an angle of 50-55 degrees and nailed together. The structure is reinforced with a horizontal board and resembles the letter “A”. The rafters can be assembled on the ground and then secured to the frame using miters and 200mm nails.
Sheathing boards are attached to the rafters every 10 cm. The boards should extend beyond the outer rafters by 20-25 cm. Roofing felt is spread onto the sheathing, after which roofing material, metal tiles or ordinary slate are screwed on.
Advantages of frame houses
Today's building materials and techniques are gradually pushing traditional construction methods into the background. Northern Europe has been building houses using frame technology for a long time. Now many Russian developers are doing the same. What's so good about these houses?
The base of a one- or two-story building will be a wooden or metal frame. But we prefer the first. Walls are attached to it. On the walls - floors and roofing. The resulting structure is monolithic and reliable. Then comes insulation, finishing work and the house is ready. Let's look at the advantages of frame houses:
- Low cost. Currently, this is the most affordable method of building houses.
- High speed. On average, a team of qualified workers of 3 people will build a two-story house in 2–3 months.
- Low operating costs. The building is considered multi-layered, so it is warm in winter and cool in summer. In addition to creating a comfortable living environment, you save on heating and cooling costs.
- Low heat capacity of enclosing structures. If you leave the house for a long time, you can quickly warm it up to the desired temperature.
- Lightweight foundation. The frame itself and the walls are not so heavy, so you don’t need a powerful foundation for them. You save a lot of money and reduce construction time. As a result, you get a monolithic frame building.
- No shrinkage. Construction of houses using this method makes it possible, after installing the parts, to immediately begin finishing work.
- Lack of technology. House assembly does not involve heavy structures, so lifting mechanisms are not needed.
- Quick dismantling and installation of the same elements in a new location.
- All communications can be easily hidden in the walls, as can be seen in the video.
Unfortunately, we have not yet come up with such a building material or method that would be ideal. If there are advantages, then there will definitely be disadvantages:
- The hollowness of wooden structures. The small mass of the structure does not sufficiently dampen significant vibrations.
- A properly designed project and appropriate tools are required.
Which foundation for a house will cost less?
When considering how to properly build a foundation for a private house and not spend more than necessary, you should take into account the type of soil, the weight of the structure and a lot of other characteristics, then you will be able to choose the ideal option.
- The lowest cost and time required are inherent in a columnar foundation. But it has two significant limitations: installation only on low-moving or stationary soils and the low weight of the structure. As a result, it is categorically unsuitable for a residential building or heavy construction.
- In second place are piles, but here everything depends on their type. Screw ones are the most inexpensive of all but are suitable for light buildings, bored ones are for brick and concrete, and driven ones provide a high level of stability, but are very expensive.
- Strip foundation. The non-recessed and shallow-depth type will not cost much more than the columnar type, and the deep-laying tape has the highest price due to the increased volume of work and the use of a large number of materials.
- A monolithic slab is the most expensive type of foundation, but provides maximum reliability on heaving soils. In some cases, such a foundation is the only option suitable for the soil.
Preparation and marking of the site for the construction of a frame house with your own hands
Preparing and marking the site is one of the most important actions during construction, so this should be approached with all responsibility. The first step is to clear the area of various debris, remove snags, stumps, demolish old structures that are not necessary or if they will interfere with construction. Next, we provide free delivery of building materials. It is also worth considering where to turn the vehicle if it is not possible for it to reverse. It is better to equip places for future storage of building materials with a canopy.
If necessary, the area must be leveled. A good-quality fence will not hurt, it will ensure the safety of materials and prevent their theft. Often, before starting construction work, owners install a module or trailer in which they themselves live during construction.
The better the site is prepared, the easier construction will be.
The marking begins with the fact that, according to the diagram, the outline of the future house and the internal walls are transferred to the area, marked with pegs with ropes. Angles must be measured carefully. If the angle deviates even a few degrees from the required 90°, the loads will be distributed incorrectly. This will lead to curvature of the walls and fragility of the structure.
Remember that the more carefully the preparation and marking are done, the easier it will be to carry out the work. By the way, the quality of the final version directly depends on this. As for the project, for frame houses it is allowed to carry it out by hand, in the form of a sketch. It can be provided to the administration after the frame house is completed on a turnkey basis, before it is put into operation. However, it is necessary to have an approximate project for yourself with communications marked on it.
A frame house project can also be done on a computer using 3D modeling
Construction of walls of a frame house
Before installing walls, you need to carefully inspect the base; it must be perfectly level. If there are unevenness on the base, this will negatively affect the structure of the house as a whole, and distortions may appear.
When building a house using Canadian technology, it is best to use SIP panels for the construction of walls. Their installation is not very difficult and does not require much time, and the finished house will be warm.
So, first you need to complete the bottom trim; then SIP panels will be installed on it. The piping must be carried out in full accordance with the drawings of the future housing. The fixing of the trim boards is carried out throughout the house and around the perimeter so that they fully comply with the existing wall structure
It is very important that the width of the boards allows the panel to fit freely into it, because the construction of walls is carried out using the tongue-and-groove method. Now you will need to securely fix the strapping to the base; for this it is recommended to use self-tapping screws, but in order to place it correctly, they usually use a template made from trimmed SIP panels. To ensure a higher level of reliability, you will need to make a small hole in the base all the way to the foundation and secure everything
Anchor bolts are used for fastening. Experts advise installing walls starting from the corners of the house. It is necessary to install the first SIP panel according to the level and fix it to the beam using self-tapping screws and foam. The junction is foamed and the next panel is mounted so that it forms a corner of the house. At the corner, the sip panels are connected to each other using self-tapping screws two hundred and twenty millimeters long. Next, following the drawings, we build the structure in the same way as we previously installed the floor in the house.
To fix the slabs one to another, use a beam, this will be a tenon. The tenon is inserted into the groove of the plate. As soon as the frame is made, you need to foam the grooves of the panels with foam and then carefully insert the strapping board into them. The next step is to create the overlap. Simple boards can be used to construct it.
If you plan to build a wooden house on two floors, then after installing the floor, the construction of the walls is carried out in exactly the same way as the construction of the walls of the first floor.
Tape: calculation algorithm
This issue is given great importance at FORUMHOUSE.
al185MODERATOR FORUMHOUSE
I beg you not to prescribe a foundation design based on “people’s experience” and the advice of various advisors who “have always built this way.”
A member of our portal with the nickname MaximGvozdev created the LentaOnline v calculator. 1.0, which will help with the construction of this type of foundation. The tool can calculate the resistance of the foundation soil, the width and length of the designed tape, reinforcement and concrete, concrete composition, and the number of concrete batches in a concrete mixer.
For beginners, the FORUMHOUSE moderator with the nickname al185 recommends first deciding on the soil conditions (soil composition, groundwater level, topography) to design a strip foundation and resort to the following methods:
- Ideally, order a project from an adequate designer who can get good recommendations on FORUMHOUSE.
- You can borrow an already calculated analogue foundation design for similar soil conditions and a similar building.
- Master design for amateurs: an algorithm for designing a strip foundation for dummies.
Next, you need to compare the cost of the options received and choose the appropriate one.
Spacer for openings
Depending on the type of timber or log, a do-it-yourself wooden house shrinks by 6–9% on average; house made of laminated veneer lumber – up to 3%. This must be taken into account when planning to install windows and doors. To avoid skewing and cracking of frames and door frames, it is worth installing frames on window and door openings after construction is completed.
They are T-shaped plates. The brackets are installed as follows:
- 1. Grooves are cut out at the ends of the adjacent crowns.
- 2. Wooden blocks are hammered into them.
- 3. Stuff the pigtails on top along the entire perimeter of the openings.
- 4. The gaps between the pigtails and the ends of the crowns are filled with tow.
In the future, the walls must be given time to “fall” into place. During this time, the openings maintain a rectangular or quadrangular shape and do not warp, since the ostriches hold them securely. When the main shrinkage is complete, window frames and door frames can be mounted on top of the frames.
Experienced carpenters know how to install frames on window and door openings of complex configurations. And it’s better to entrust even simple work to them. With minimal experience, cracking of the crown often occurs at the end, breaking of the frames during shrinkage of the crowns.
So, you now know how to make a wooden house with your own hands. Happy construction to you.
Windows and doors for frame houses: types, pros and cons
For frame houses, 2 types of windows and doors are used - wooden or plastic (PVC). Of course, there is another material from which such products are made - aluminum. However, it has too high thermal conductivity, so it is used extremely rarely.
There is a lot of debate around the question of which windows are best to install. Some say that wood is more environmentally friendly, others say that PVC is more durable. And there are quite a lot of such “stumbling blocks”. Of course, everyone must decide for themselves, however, in the opinion of the Homius.ru editors, it is better to go with the PVC option, and now we will explain why. In our case, we are considering the independent construction of a frame house, and wooden windows and doors are quite difficult to install, compared to plastic ones. In addition, PVC is not susceptible to pests, which is very useful in the case of a wooden house.
Windows and doors of frame houses are installed before interior finishing begins.
Pros and cons of a non-buried strip base.
Advantages of non-buried tape:
- Non-recessed belt type is an economical solution. Compared to the recessed type of base, it is 2 times cheaper.
- The ability to create a foundation with your own hands thanks to a smaller scope of work.
- A non-buried foundation allows you to make a small basement under the house; moreover, the heaving phenomena of the soil in this case are hardly noticeable.
- This type is good only when laid on slightly intumescent soils and provided that the groundwater level is as low as possible. In other cases, it is better to use a pile foundation.
- The strip can crack if it is erected on unstable or unevenly rising soil in winter.
- On such a foundation it is possible to build only light houses. Two-story brick houses can only be built on non-heaving soil.
To make this look with your own hands, no special skills are required. The main thing is that the structure being built and the type of soil are suitable for this foundation.
Recommendation: This is just an overview article, from it you will learn the general concepts of a shallow foundation on a sand bed. In reality, in order not to lose your money and not seem like an unreasonable developer or builder in the eyes of other people, I recommend that you carefully make all the calculations specifically for your case, and only then make any decisions. Better yet, turn to professionals.
Functions of the foundation for construction
Lightweight buildings without any pretense of durability can be erected without a foundation.
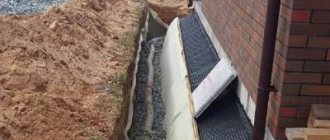
The foundation must be stable, not deform from loads and evenly transfer forces to the ground under the sole. The type of foundation is determined by the weight of the building, and the type of soil also influences it. Sandy and rocky soils that do not retain moisture and do not swell in frost are considered a strong base, while clay requires the installation of a drainage system.
The foundation is isolated from the soil and the wall of the house with moisture-resistant membranes to protect the structure from dampness. Insulating the base makes it possible to maintain a comfortable microclimate in first-level rooms and the basement. A foundation in the form of a strip foundation or on stilts protects the frame house from distortions, tilts and subsidence, and ensures a stationary position.
Building a base of stones with your own hands
If you can get a lot of rock fragments, you can save a lot of money on the construction of such a foundation.
A foundation made of boulders is not much inferior to a concrete monolith, so a wooden or frame house, bathhouse or outbuilding made of timber will last for many years.
To build a foundation from boulders with your own hands you will need:
- Draw the outline of the foundation on the construction site,
- Set aside the largest stones separately (they will be used to outline the base), and sort the remaining stones by size,
- Dig a channel and place large boulders on its bottom. Place smaller stones on top of large boulders and fill them with cement mortar or compact them with sand and clay,
- Place the beams that will be used for the structure’s frame on top of the largest stones.
Review of alternative technologies
The house can be placed on the ground if the soil is not heaving
The construction market offers standard solutions for construction without a foundation, which include advice on the weight of the structure and dimensions. Experts provide recommendations on the choice of materials and construction technologies. The customer turns to the designers to create his own project; specialists will calculate not only the foundation, but also the entire private house.
Main technologies:
- on the ground;
- stone base;
- tire foundation;
- brickwork;
- sand and crushed stone cushion;
- soil-cement blocks.
During baseless construction, attention is paid to the creation of a bulk slab and the location of communications under the building. They are taken outside the building or isolated under the house to reduce the cost of repairs and regular maintenance.
Not all soil types are suitable for foundationless construction. Lands with stable characteristics are suitable, these include rocks, black soil, sandy and sandy loam soils. The density of the layers is 12 – 15 kg/cm², so the layer will withstand a house without a reinforcing layer. The disadvantage of soil foundation is that it cannot be done on heaving soils.
Work order:
- The plant layer of soil is removed and a pit is dug around the perimeter to a depth of 20–25 cm.
- The bottom is cleaned, formwork is placed and a layer of clay is poured to the surface level.
The compacted clay layer takes on the weight of the house. Before laying the lower beams, 3 layers of roofing material are laid on bitumen mastic or melted resin and polystyrene foam and polystyrene foam are laid. The insulation must be moisture resistant.
Boulder base
Fragments of mine workings in the form of large stones are used. It is advantageous to build such foundations on hills where natural material is available.
Scheme for building a house without a foundation:
- They make markings on the ground, sort and store the stones in order to make a piping along the contour from large elements.
- They dig trenches under the walls of the house and place large stones first, then move on to smaller boulders.
- To fasten the elements, concrete with fine-sized filler or clay mortar is used.
- The beams of the house rest on the largest stones, which are placed in the corners and at the intersections of the walls.
The foundation made from boulders is strong, its reliability is comparable to a monolithic foundation. Gaps in the masonry serve for ventilation; natural materials are not afraid of moisture.
Tire foundation
Such houses last a long time, despite the unusual foundation. The laying in the form of a sand and gravel cushion dampens vibrations and shifts of the soil, and the waterproofing layer prevents rotting of wooden parts.
Work order:
- A pit is dug according to the size of the building.
- A layer of sand and crushed stone 20 and 15 cm thick, respectively, is poured successively onto the bottom, spilled with water and compacted.
- Roofing felt is laid in 2 – 3 layers.
- Tires of the same size in height are placed on the top layer so as to fill the entire area under the building.
Moist sand, cleared of debris, is poured inside the tires and in the spaces between them. The unique foundation has sufficient load-bearing capacity to support a country house without a foundation.
Brickwork for a frame house
The foundation is suitable for one-story frame-type buildings on a wooden frame made of bars or logs. The construction of such a support is a labor-intensive process, because small elements are used that are connected in series on a solution.
Red burnt brick is used, which is water resistant. White silicate material is not used, because very hygroscopic. The masonry is carried out with ligation of horizontal and vertical seams, the height of such a base is 0.4 - 0.6 meters.
Sand and gravel base
The construction of such a foundation is reminiscent of construction on the ground with a layer of clay, but instead of it, a backfill is made of a sand and gravel composition, which is stronger. A pit is dug in the ground with a depth of 0.6 - 0.1 m, depending on the weight of the building. Drainage is installed to remove moisture from the base and reduce soil heaving.
The gravel is laid in a thick layer to a height of 5–9 meters. Each layer is moistened with a hose and compacted with hand tools. The bedding has good strength properties. The top is covered with sand, which is laid until it stops spilling inside. The top of the bulk base is sealed with a layer of lean concrete, having previously installed waterproofing.
Soil blocks
The elements are made from sand, clay and cement. Blocks are a common material for supporting lightweight structures. The solution is poured into removable molds and kept until dry. Organic impurities in the soil significantly reduce the strength characteristics of the elements, but the resulting properties are sufficient for the construction of a small foundation for a suburban building.
A backfill of gravel or crushed stone is made to strengthen the ground surface, and poured with cement laitance. Along the perimeter of the walls, blocks are laid on mortar with bandaging of the seams to a height of about 0.5 meters. The top of the masonry is insulated with a waterproof membrane to protect the walls from dampness.
DIY frame house: step-by-step instructions with photos
In any case, it is more convenient to work when the lower level is ready. You don’t need to use ladders or stepladders every time you drive a nail, so after laying the bottom trim (bed), as a rule, the rough flooring or floors are installed. Lumber that will be located close to the ground must be impregnated with antiseptics to prevent rot.
Laying the bottom trim
Previously, the surface of the foundation is covered with cut-off waterproofing - a layer of hot bitumen and 2 rows of roofing material or waterproofing. This measure will prevent capillary moisture from leaking out of the concrete.
A beam with a section of 100x150 mm or 2 boards of 50x150 mm is used as the bottom trim. They must first be treated with antiseptics and the holes in the places where the studs will be installed must be prepared.
It is recommended to wall the studs in advance in the foundation, securing the lower end to the reinforcement frame. If this is not done immediately, you can screw anchor dowels with a thread for a nut into the hardened concrete. The length of the fastener is 150-200 mm, the diameter is 12-16 mm, the depth of immersion in the foundation is at least 100 mm. The installation step of studs or anchors is no more than 2400 mm.
Installing studs is a responsible operation. They must be strictly vertical, minimal deviations are allowed. Installation begins from the corners, then the mooring (cord) is pulled, and the rest of the anchors are attached to it. To avoid splashing the thread when concreting, paper, film or similar materials are wound onto it.
To mark the holes on the bottom trim, it is recommended to place a board or timber on top of the foundation directly on top of the studs and lightly hit the wood with a hammer. There will be fingerprints on the back side, which can be used for precise drilling. The harness must be positioned strictly horizontally and the nuts must be tightened.
In the corners, the beams are joined into a “foot” along the length with an oblique or straight lock with additional reinforcement with an overlay. When installing the strapping on a pile foundation, the connection must be located exactly above the support.
Installation of logs
Joists are horizontal purlins that serve as the basis for laying flooring, as well as lower sheathing and insulation. They are made from boards 50x150-80x220 mm, placed on edge, I-beams or composite beams. The section is selected based on the distance between the supports. The larger it is, the more powerful the beams should be.
The logs are attached in the following ways:
- metal corners or brackets butted to the bed;
resting on the bottom trim, from the outside the ends are covered with a façade board.
The logs are joined only on the runs. They are nailed to the beam obliquely using nails, and screwed to the facade board with 2-3 self-tapping screws.
If the span is more than 2.5 m, spacers are installed between the beams to provide rigidity and prevent deflections. They are fastened with nails nailed obliquely to the joists.
Floor construction
A flooring made of boards, cement-bonded, particle-boarded or gypsum-fiber waterproof boards, and moisture-resistant plywood is laid on the finished base. The thickness is determined by the overlapped span:
- 400 mm - 30 mm GVL and 16 mm other materials;
- 500 mm - plywood, 16 mm chipboard, chipboard, 19 mm lumber, 36 mm gypsum fiber board;
- 600 mm - plywood 18 mm, DSP 26 mm, chipboard 19 mm, boards 36 mm.
In areas where the floor may become wet during use (bathrooms, bathrooms, kitchens, etc.), water-repellent treatment of the surface and edges of wood materials is carried out.
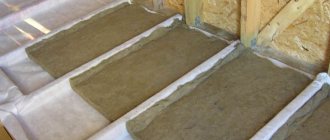
At this stage, insulation can be carried out, since the frame of the partitions is subsequently attached to the subfloor and dismantling the top covering will be difficult.
The following are used as thermal insulation:
- backfill materials - expanded clay, vermiculite, perlite, etc.;
- fibrous - basalt wool, glass wool, etc.;
- polymer foam - extruded polystyrene foam, polystyrene foam, foam rubber;
- sprayed - polyurethane, ecowool.
Skull blocks are nailed onto the logs at the bottom, and sheets of OSB and moisture-resistant plywood are attached to them. This is the basis for laying thermal insulation.
The further sequence depends on the type of material:
- Mineral wool is the most capricious. It needs to be protected from the ingress of water and steam, therefore steam and waterproofing membranes are laid both below and above.
- Expanded polystyrene is not afraid of moisture, but mice love it very much. In places where their penetration is possible, it is worth putting metal mesh with a fine mesh - 5-8 mm.
Backfill is more often used in floors on the ground. The backfill thickness is at least 20 cm. Sprayed types are applied with professional equipment. Quite a high pressure is created, so the lower casing must be very strong.
After laying the thermal insulation, the rough floor covering is installed. It serves as a horizontal base for the preparation of structures, as well as further installation of partitions.
Frame-panel houses
The corresponding structures have a rigid frame that can withstand significant loads for decades.
The walls of a frame house of this type serve as shield fencing. They are made of OSB (oriented strand board). The advantages of using thematic boards are obvious:
- Consistent and operational installation;
- Possibility of detailed dismantling;
- Suitable for filling gaps between the inner and outer skins with polystyrene foam for thermal insulation;
- Low loads on the foundation and supporting frame.
In the finished structure, you can immediately carry out interior decoration, installation of doors and windows, because its frame and walls do not shrink.
Non-buried foundation - features of its design.
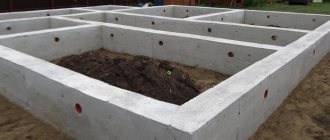
Unburdened foundation. Scheme of the structure of a non-buried (shallow) foundation. At the moment, the most common and popular foundations are strip, columnar, columnar with reinforcement, and slab. Strip foundations can be found in the construction of large and small private houses, industrial and administrative facilities. It is also popular for another reason - you can do it yourself without using mechanized equipment.
The peculiarity of such a foundation is that it strictly follows the contours of all load-bearing walls, so the mass of the structure is evenly distributed over the entire area of the base. A non-buried foundation can be made from concrete or reinforced concrete blocks, rubble stone, or less often brickwork.
Similar topics
DIY country toilet | Toilet for the cottage
Any summer cottage must be equipped with a toilet. This auxiliary, but so necessary in human life, building can be erected with your own hands. In order to build a country toilet you may need the following tools and materials
Children's holiday at the dacha: workshop for children, fun tasks
It’s great if your dacha has a workshop or just a set of tools - children, regardless of gender, love to hammer, plan, screw and saw things
Wooden gazebos
Today, the manufacture of gazebos is possible from almost any building materials. There are also no restrictions on the shape and finishing in the manufacture of gazebos. It all depends on desire
DIY brick grill | Brazier for a summer house, country house
Before building a brick barbecue with your own hands, you need to choose the right site for it. In this case, you should take into account not only the availability of a free corner, but also the wind rose in your area
Do-it-yourself greenhouse made of PVC pipes - instructions, photos, videos
In this article we will look at making a greenhouse from PVC pipes. Due to the fact that when making a greenhouse you do not need any complex tools, assembling this structure is similar to assembling a LEGO set
Construction of a children's house in the country with your own hands
To ensure your child a happy childhood at the dacha, it is not at all necessary to have a large territory and install any purchased bulky structures made of plastic and iron
Building a house with your own hands
A small frame house is a prefabricated and lightweight structure. Therefore, anyone can build it independently without using a foundation. But let's look at detailed instructions that will allow you to build a house with your own hands:
First you need to decide what kind of foundation the building will have. It is recommended to place the house on a hill. And it is imperative to develop a drainage system that will remove precipitation from the house. All structural elements - floor, walls, can be made of the same material. For the construction of walls, you can use 150x25 mm edged boards. If you plan to make thin walls, keep in mind that they will not be able to retain heat in the room. Therefore, it is necessary to provide for insulation. The main part of the prefabricated structure is a lightweight wooden frame. It must be made of vertical and horizontal strapping; all voids must be filled with insulation having a low degree of thermal conductivity. The base platform of a frame structure is its floor. First you need to use an unedged board, as it is very cheap. With its help you make the so-called subfloor. The next stage is laying the transverse joists. The space between them also needs to be filled with insulation. After all the work has been completed, floorboards will be laid on these joists. This is exactly how the foundation of a house is built without a basement. It is necessary to lay roofing material below the timber, and treat all the wood with impregnations that prevent the absorption of moisture. Mark the exact location of the walls relative to the floor. Secure the beams with anchor bolts 2 meters apart. Use a level to correctly align the geometry of the entire structure. It is not allowed to skew the corners diagonally by more than 10 mm. Now you assemble the frame of the future wall. Assembly should be carried out on a flat and dry surface to prevent distortion. First you need to prepare the boards; they must be the same size. It is the size of these boards that will influence the height of the ceilings. As a rule, for private houses the height is approximately 2.75 m
Please note that you do not need to make ceilings less than 2.4 m. In this case, it will put pressure on you, as a result of which you will feel discomfort. If you decide to arrange a second floor or attic, you need to make slanted ceilings
In addition, you will have to install windows in the roof. They will be able to give the room a sufficient amount of light, as well as visually increase the space. The assembly of the frame can begin with the manufacture of vertical partitions. There should be a distance of 40-60 cm between the beams. The width between the boards should be selected based on what material will be used for the cladding. If siding is used, then it is necessary to maintain a distance between the boards of 20-30 cm. When using chipboard or pseudo-timber, the distance should be 35-60 cm. It is worth noting that the siding that is used for cladding buildings is durable and practical. During operation, there is no need to treat it with impregnations or varnishes, as is the case with wood.
To give the building a personalized appearance, you can clad it with various finishing materials that can be found on the market. When assembling walls, be sure to provide windows
Please note that they should occupy more than 18% of the wall area. Only in this case will you be able to ensure maximum comfort in your home.
It is recommended to use double glazing for windows.
It is advisable to cover all walls from the inside with plasterboard. This is a universal material that allows you to make walls even. Any coating can be applied to it. But all communications must be laid inside the walls. Therefore, first you carry out the work on laying communications, and then you can line the inner surfaces. And the last stage is laying the roofing material. To make the roof lighter, it can be made of tiles or ondulin.
Methods of construction without a foundation
The question of how to build a house without a foundation is not as difficult as it seems at first. There are many ways to place a building without using a classic complex foundation, which are less reliable, but not so reliable that they cannot be used. Moreover, alternative types of foundations are usually used not for residential buildings; foundations made, for example, from:
- tires;
- soil;
- bricks;
- mixtures of sand and gravel;
- fragments of stones, etc.
The most popular methods, their advantages and disadvantages are described in more detail below.
Tires instead of foundation
The construction of a house is possible on a foundation consisting of tires. This material can last a long time and can also withstand heavy loads.
But it’s not enough to just lay the tires on the ground and then start building directly on them; they will also need additional reinforcement. So, after the tires are placed according to the shape of the future building, you need to pour sand inside them, then carefully compact it inside. This is done by gradually pouring sand and adding it additionally. Because of the water, the sand will sink, its level will decrease, so it will need to be constantly added, and then spilled again. This must be done until a quarter of the free space remains in the tire.
This quarter is filled with gravel. Afterwards, you can place the wooden beam of the lower frame of the house.
Thanks to reinforcement with sand and gravel, such a foundation will be well depreciated and the building will be protected from shrinkage. Additional, but not unimportant, advantages will be ease of installation and cost-effectiveness.
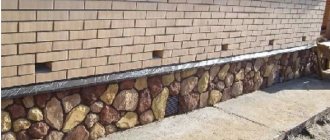
Boulder base
If the area is rocky and full of boulders, you can also use them and make a house on rocks instead of a foundation.
You can assemble such a base according to the following instructions:
- The largest boulders are placed under the corners of the house, as well as under load-bearing walls.
- The pile is made from wooden boards.
- The pile is filled with soil, sand, and small stones.
You can also use another principle of action:
- A large channel is created, like under a strip foundation.
- Large boulders are placed in the channel first, followed by medium and small ones.
- All this is compacted and strengthened with sand and clay.
- The last step is to fill such a structure with concrete. You can use it immediately, without sand and clay.
Such a base will serve for years, easily protecting the house from the negative effects of water in the soil.
On brick supports
Brick is an excellent material for building houses, and it is also suitable for foundations. True, it can only be used if groundwater and clay are located deep from the surface.
The bricks used are of the highest quality, from which a masonry of 140 cm in size will be assembled, and on the bottom trim it will be halved.
Such a foundation is located under all load-bearing walls. To help him, pillars made of the same brickwork are often placed.
Construction on the ground
If the soil has a high density (above 12–15 kg/cm2), then the house can be placed directly on it. Almost no preparatory work will be required, you will only need to remove from the territory marked for construction a layer of soil with a depth of 20 to 25 cm, no more.
This entire area is filled with clay, which will provide waterproofing. A wooden base can be placed directly on the clay layer. Additionally, roofing felt and other materials can be laid on the clay to protect the house from freezing of the soil.
Construction on sand and gravel base
This method will be the most reliable and is a simplified version of the classic foundation design.
Here, constructing a building without a foundation involves performing the following sequence of steps:
- Dig a pit of suitable width and length, at least 1 meter deep.
- A system for draining water is created at the bottom of the dug pit.
- A sand cushion is created, which will occupy at least 50 cm. Coarse river sand is taken and poured onto the bottom of the dug pit. It must be constantly moistened, compacted and added until a dense sand cushion takes up the required amount of space.
- Next, gravel is poured, at least 30 cm.
- New layer, waterproofing.
- Place a 20 cm layer of large stones or bricks, and then fill it with cement. The layer is leveled.
How to build a house without a foundation with your own hands: technology, video, photo
Basic functionality of the foundation.
Let's look at the main functions of a concrete floor:
- ensures uniform pressure of the building on the ground;
- ventilation of the basement;
- reduces the likelihood of building destruction;
- stabilizes ground movements (oscillations).
So, we see that a house without a foundation is still possible. What tasks do we face when choosing an alternative foundation replacement? One of the main things is to prevent the building from becoming distorted. Also, the load of the building on the ground must be uniform. An example of such a house without a foundation could be an extension, a gazebo, a change house or a country house.
Bottom rail and floor
To protect the piping from moisture from below, roofing material or waterproofing is laid on the foundation. You can use bitumen mastic, but it will be more expensive than roll material. Sometimes materials are combined: once the foundation is covered with mastic, and waterproofing is laid on top.
The assembly of a frame house begins with strapping. For it, boards with a section of 15x5 cm or timber 15x15 cm are used. The boards are laid around the perimeter and aligned along the outer edge of the foundation. Holes for the studs are drilled in the required places. The second layer of boards is laid in such a way as to cover the bottom joints of the boards. This gives the structure additional strength. Installation of timber is easier and faster, but its price is higher than that of boards. In addition, the overall load-bearing capacity of a double board will be higher than that of a single beam.
This is what fixed logs look likeSource goroddomov.ruA 20x5 cm board is installed on the edge on the harness. It is also aligned along the outer edge of the foundation and secured with self-tapping screws. The logs are mounted from boards of the same section. Fastened with self-tapping screws or special corners. Installation step – 30–60 cm.
The next stage is insulation
It is important to choose high-quality insulation here.
Joints with joists must be sealed with sealing materials Source 9dach.ru
To install the subfloor, a 10x2.5 cm edged board is used. Plywood 0.5–0.6 cm thick is laid on top of it. Sheets of plywood can be laid immediately without a flooring of boards. In this case, the thickness of the sheets should be at least 1.5 cm. This option is faster, but in some cases more expensive. Like brickwork, plywood is laid in staggered patterns. A gap of a few centimeters between the sheets compensates for expansion when air humidity increases.
Common mistakes when building without a project
The most common mistakes when constructing buildings without drawings relate to planting a house on a site, supplying communications, structures, external walls, layouts, and life support systems.
General plan
When determining the location of the house on the site, an inexperienced builder faces difficulties:
- Violation of the red line - the building must be located at a certain distance from the official building line along public roads; if this parameter is violated, demolition is threatened.
- Going beyond the border of the plot - on lands without land surveying, when the boundaries of the plot are not fixed by boundary signs, there is the possibility of planting a house close to the border of a neighboring plot or on the land of another owner. If you do not agree with your neighbor on the purchase of the disputed piece, the result will be a lawsuit and demolition at the expense of the violator.
- The supply of communications to the building requires special precision: the general plan diagram shows the coordinates of the connection points for electricity, gas, heat, water supply and sewerage. The places where the networks pass through the foundation must correspond to these coordinates.
Without geodetic surveying, it is impossible to accurately place the house on the general plan and connect it to networks. Any mistake of a few centimeters can lead to the dismantling of an expensive foundation.
Constructive decisions
For the longevity of a building, a proper foundation is necessary. Its design and depth are determined by: the geological composition of the soil, the depth of groundwater, the material of the walls, roof and the number of storeys of the house. If at least one of these factors is not taken into account, the entire structure may collapse:
- on weak subsidence soils, uneven settlement will lead to the appearance of cracks;
- the spring rise in water level will undermine the weak foundation;
- brickwork is heavy, and a foundation not designed for it threatens to lose stability;
- a one-story house can be placed on a shallow foundation; for a 3-story mansion, a different type of more powerful foundation is needed;
- the roof protects the walls and interior from precipitation, saves up to 30% of heat; poor design of the roof or drain will lead to rapid failure of thermal insulation, snow melting in winter, and wet walls in spring and autumn.
Interfloor ceilings, load-bearing and enclosing roof structures, walls or frames also require calculations and drawings. This guarantees the selection of the optimal thickness of the elements, eliminates waste of materials - the construction will become more economical.
The consequences of an incorrectly designed foundation, walls, and roof pose a threat to the stability of the entire building. But having a drawing in hand, you can make a claim to the developer. Without a project, all costs are at the expense of the owner.
Space-planning solutions
Regulatory documents have their own requirements for planning decisions of individual residential buildings. They concern:
- placement of boiler rooms, furnaces;
- width of escape routes;
- the angle of inclination of the stairs and the size of the steps;
- heights and sizes of living rooms.
It is difficult, and sometimes impossible, for a non-specialist to find the right solution that combines the requirements of the lifestyle, the number of family members and building regulations. An inconvenient layout, too steep a staircase can sometimes even aggravate family relationships.
Due to rising prices for coolants, energy saving becomes relevant. Up to 30% of heating costs can be saved with the correct design of the fence: walls, roof, windows and doors. The thickness of the wall or the method of insulation is determined by thermal engineering calculations, and not by the “diagnosis” of the shabashnik - for this wall 5 cm of polystyrene foam is enough. The choice of insulation system and material affects the appearance of the building and also requires a professional approach.
Engineering systems
Do you want to live in comfortable conditions? This means that it is necessary to build in such a way that the house is warm, light, dry and safe. In private cottages, complex control and life support systems are often installed. This includes autonomous heating and hot water supply, own power plants - solar panels or geothermal, and smart home systems. The creation and installation of all this equipment requires knowledge and qualifications. The most common mistakes of amateur builders in this part:
- Electrical network – the load is incorrectly determined, resulting in a power outage when a set of home appliances is operating.
- Heating – the number of appliances is not able to create a comfortable temperature in cold weather.
- Water supply is wasteful and often of poor quality.
- Ventilation – the appearance of fungus, mold, drafts and unpleasant odors.
An amateur approach to resolving any issue leads to property damage and high operating and repair costs.
Using a pit
This is a rather unique way of building a house without using the classic type of foundation. It is necessary to dig a pit approximately 1 m deep. After this, fill it with crushed stone and stones of as large a fraction as possible. You can also add river sand diluted in water. At the top of the pit it is necessary to lay bricks or stones to a height of 20 cm from the top of the soil.
After this, fill everything with cement mortar. A frame house can be installed on top of the masonry. Houses that are installed on a foundation pit do not develop cracks or shrink, even if several decades have passed since construction.
Columnar foundation for light outbuildings
When building any foundation, the weight of the building must be taken into account. Lightweight outbuildings do not require a monumental foundation, so columnar foundations are most widely used for them. Their choice is due to the following qualities:
- speed of installation;
- low cost;
- ability to provide reliable support.
The columnar foundation is installed on a cushion of sand or fine gravel; in the upper part, the pillars are connected by beams, on which the base will be installed in the future. It is important to take into account the depth of soil freezing and the degree of heaving. This type of foundation is suitable for low-moving soil, otherwise the structure may shift.
Columnar foundation Source nauka-i-religia.ru
See also: Catalog of companies that specialize in foundation repair and design.