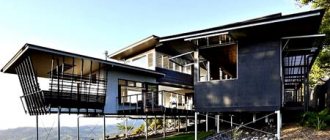
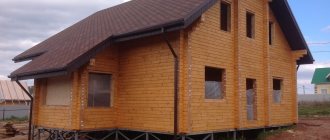
The issue of expanding the living space is often solved by constructing an additional extension, which, depending on the wishes of the owners of the house, can be a living room, an open veranda, a summer terrace, a boiler room or a bathroom. When arranging such premises, homeowners prefer frame structures that are easy to install and light in weight. In this case, the easiest way is to install such an extension to the house on screw piles. In addition, the homeowner is attracted to the cost savings when using this technology.
Requirements for piles
Welding pipes for the veranda must meet certain requirements:
- Since the completion is quite easy, rods with a cross section of 58-59 mm are quite suitable. They can handle loads of up to 3 tons. For small buildings and outbuildings, manufacturers recommend a pipe diameter of 76–89 mm. If you are planning a large and closed veranda, then it makes sense to take rods with a diameter of 108 mm, which have a load-bearing capacity of up to 7 tons.
- The length of the pile rod is selected depending on the soil. So, if the soil on the site is mobile (sandy, swampy), then you should purchase large pipes. The most commonly used rods are 2.5 m long. Products with lengths of 0.5–11.5 m are also available on sale.
When choosing the size of welding pipes, the following factors must be taken into account:
- Soil on the site for construction. Sometimes, in order to determine the stability of the soil, owners of household territories turn to specialists to conduct geological research and analyze the composition of the soil in laboratory conditions.
- Depth of ground freezing. For the central region of Russia, the Urals and the Volga region, it is 2.5 m, and in Siberia the soil freezes deeper, so pipe options from 3 m should be used there.
- The terrain of the site and the degree of slope.
- Features of the foundation and its elements.
Preliminary work
In order to determine the type and dimensions of the building’s foundation, a pit of 100×150 cm or 100×100 cm is dug near any wall. The strip foundation is measured in width and height. For columnar, the parameters of the pillars and the depth of their laying are important
This issue should be given sufficient attention, since marking the foundation is one of the most important stages
The size of the base is measured using a steel rod, the end of which is bent 90°. The rod is placed under the sole, placing the bent part strictly horizontally. By turning it, they detect the moment when the curved edge rests against the wall from the inside, and put a mark on the metal. The distance from the bend to the mark, measured after removing the rod, will correspond to the width of the tape.
At the time of pit development, the type of soil on the site is also determined. The data obtained will determine which foundation to choose.
If you have a design for an old house, no preliminary measurements are required. But you should definitely find out the geological characteristics. Careful planning at the initial stage of work, taking into account all the features of the area, will allow you to avoid mistakes.
After the analysis, you should decide what design the future foundation should have. There are several types of them:
- columnar;
- strip reinforced concrete;
- pile and pile-screw.
With rare exceptions, the extension has the same type of foundation as the house. This ensures the reliability of the entire structure.
What is a pile-screw foundation
The veranda is a lightweight structure, under which there is no need to build a powerful strip or slab foundation. Pile and columnar foundations can handle the load equally well. In terms of production time and ease of installation, among others, there is no equal to the pile-screw version. What it is?
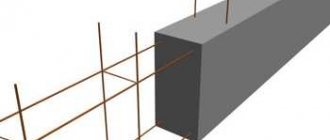
It is made from special metal piles, pointed at the end and having an Archimedes screw on it.
Advantages and disadvantages of this design
It is not difficult to guess that thanks to this addition, the products are screwed into the ground, practically without disturbing its natural density. This feature allows further construction work to be carried out immediately after installation, while the same concrete must gain strength within 28 days. Thanks to this, the construction time for the veranda is reduced to a minimum.
Screwing in piles is done both by machine and by hand. The second option takes a little longer to implement, but will not require the cost of hiring equipment. Only two people are required to operate.
Piles are perfect for areas with uneven terrain, easily compensating for height differences with sufficient length. Already from the factory, screw piles are covered with layers of dense moisture- and ultraviolet-resistant paint, which reliably protects them during operation. The products are made of thick-walled rolled steel, due to which they have a high load-bearing capacity and are able to withstand even a large frame house, not to mention a veranda.
When installing a pile manually, it is not easy to accurately determine the vertical level, which can be considered an indirect disadvantage. You can also mention that the appearance is too simple, but if desired, the ground part can be hidden behind an imitation base. Otherwise, screw piles have no equal among competitors as a foundation for verandas and other lightweight structures. The installation will be described in detail later in the corresponding chapter.
Advantages and disadvantages of pile construction
Installation of piles can be carried out manually.
An extension to a house on piles has a number of significant advantages over similar structures based on other types of foundations.
- Construction of the extension can be carried out at any time of the year.
- When arranging pile structures, there is no need for excavation work.
- The construction of pile extensions is carried out in a very short time.
- Extensions on stilts can be built on almost all types of soil. The only exceptions are rocky and coarse soils, as well as soil densely saturated with stones (crushed stone, pebbles, gravel).
- Precise adherence to the technology of laying a pile foundation ensures long-term and trouble-free operation of the extension.
The disadvantages of the design of a pile extension include the need to install an insulated base and the possibility of corrosion of metal pile supports.
Construction Guide
Calculations
Before starting construction of an extension to a building, it must be formally legalized by a special authority, regardless of its purpose. Carrying out calculations, making an estimate of the necessary materials and finding out the cost of the future structure are the initial tasks. For these purposes, you can contact specialists or calculate everything yourself. To calculate the material, it is necessary to calculate the quadrature of the extension.
The calculation is made using the following formula: (perimeter) x (height) = total square footage of the room.
But if windows and doors are planned for the extension, then they need to be subtracted from the total quadrature, namely: (total quadrature of the room) - ((window opening height x width) x by quantity + (doorway height x width) x quantity) = quadrature to calculate the amount of building materials.
Choosing a type of structure
There are a number of well-known types of extensions. According to statistics, the most common extensions are the following:
- side extension with connected or separate roof;
- superstructure in the form of an attic;
- second floor.
How to build?
To make an extension to a brick house, you should adhere to the following algorithm of actions:
Construction should begin by marking the territory. For this purpose, the top layer of soil is removed, the area is leveled and markings are made; then mark the boundaries of the extension in accordance with the plan. Pegs are driven into the corners of the future building and the cord is pulled; every building requires a solid foundation of the house
It is not recommended to combine the foundation for construction with the main building, since they have different levels of shrinkage; a distance of about 5 cm should be maintained between the foundation of the building and the extension; When building the foundation, you need to take into account the intended weight of the structure and the properties of the soil. When built on soft ground, the base of the house is likely to shift, which can lead to separation of the extension from the walls of the building
A lightweight foundation cannot withstand the weight of brick walls; for this reason, it is not recommended to build a brick extension on such a foundation. It is preferable to choose a strip base for the extension;
- before pouring concrete, they dig a trench, the scale of which is selected depending on the characteristics of the structure being built;
- Formwork of a suitable design is laid in the ditch, which is made from boards knocked together;
- concrete is prepared from three components of sand, one component of cement and six components of crushed stone;
- the foundation for the extension is flooded in layers. The top of the extension is smoothed with a trowel and left until completely hardened;
- if you need to build an extension in a short time, you can choose a frame system that is easily assembled and folded from a wooden frame and panels;
- finishing can be carried out immediately after construction. If necessary, the extension can be converted.
A brick extension is the most difficult to implement, but you can build it with your own hands by following the following algorithm:
- Before starting the construction of walls, it is necessary to check the evenness of the surface of the base of the house. If it is not very smooth, the walls may be damaged during shrinkage;
- tying the extension to the wall of the house is done using holes made every 3 rows. A metal frame is placed in them;
- when building a brick extension to a building, the reinforcement will be held in the masonry seams;
- to maintain the distance between the bricks, reinforcement is used, but it should not be of very large diameter;
- After the walls have been kicked out, their top is secured with a concrete belt. After the solution has hardened, construction of the floors begins.
The quality factor of the extension depends on the chosen project and the materials used. An extension to a brick house can be made of mounting panels, wood or brick. Anyone with a minimum of construction skills can build it with their own hands, and most importantly, secure the structure correctly.
For more information on how to do this work yourself, see the following video.
Possible mistakes
Completing and redesigning an existing structure is always more difficult than building from scratch, so it is worth once again paying attention to possible errors in the process of constructing a frame extension. The first and main thing is that many inexperienced builders rely on factory processing of all lumber
However, this is incorrect; before assembly, all frame elements must be thoroughly dried and treated with fire-retardant impregnations. Window frames and doors must be installed strictly level and secured to already installed vertical posts, that is, the dimensions of all openings must be specified
Pouring the foundation
In order to minimize risks, the main attention should be paid to the foundation. It should not differ from the foundation under the main building
That is, to be exactly the same in width, depth and content
It should not be different from the foundation under the main building. That is, to be exactly the same in width, depth and content.
The foundation for the extension must be proportional to the loads, identical to the main foundation.
It is not recommended to connect the new foundation to the main foundation, as any connection will break. The extension will certainly settle and break the connection.
Therefore, when pouring a new foundation, it is recommended to make a small indentation from the old one. That is, in places of contact, lay roofing material, tarred (pine) board or a thin sheet of foam plastic between the foundations.
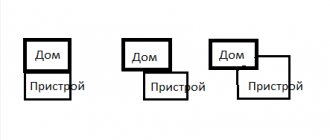
The foundation is poured either in the letter P or along a circular closed contour. See the picture below.
One more little trick from practitioners. If the foundation located parallel to the main building is made wider than the rest of the foundation, then when it settles, the extension will not move away from the building, but will move even closer to it.
For example, the main foundation is 50 centimeters wide, increasing the parallel trench by 10 centimeters, and this side will settle slightly less than the rest of the walls.
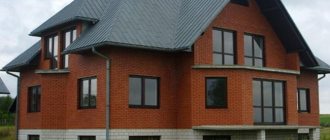
Brick extension to a brick house
The foundation and formwork are ready, now the question arises, how to properly attach the brick to the wall? This applies not only to brick extensions. The same recommendations apply to extensions made of foam blocks or gas silicate blocks.
Just like the foundation, it is not advisable to make a bunch of walls. Of course, it is impossible to give one recommendation for everyone. Much depends on the quality of the soil under the building.
Another important factor is the size of the extension. If the extension is large, then there is concern about how stable it will be without securing it on one side.
Therefore, it is better to make large extensions as a separate building, which is built close to the old building.
In this case, there will be a circular, closed foundation, all 4 load-bearing walls and a separate roof not connected to the main building.
If the extension is small, then it can be made in the form of the letter P, without being tied to the house.
In any case, you should consult a specialist, indicating:
- soil characteristics,
- extension dimensions,
- wall thickness,
- the material from which the extension is being built.
How to connect an extension to a house
If you still decide to connect the extension with the house, then you should start with the foundation.
This work is very difficult and expensive. You will need to drill holes in the old foundation into which the reinforcement will be glued. Please note that do not hammer the reinforcement, but rather glue it with special glue.
The same operation is done with the walls. To join the walls, they also drill holes into which the reinforcement is glued.
Then the mesh is laid in the seams, through several rows of masonry. The roof and roof are made common.
However, even with such a tight connection, there will still be cracks or breaks.
Frame extension to a brick house
Sometimes the following is added to a brick house:
- Frame extension;
- Wooden extension;
- An extension made of timber and other lightweight material.
In this case, it is not necessary to fill the strip foundation. It is quite possible to build an extension on a columnar foundation.
Then, a wooden frame is assembled on a strip or columnar foundation. One side of the frame is attached to the main building. For example, as shown in the photo:
Or this way, photo:
Then, the frame is sheathed with the main material: timber, boards, panels, and so on.
The small gap that forms between the brick wall and the frame is filled with foam.
Also common in our country is the method of connecting a wooden extension to a brick house by chipping the wall. In this case, the wooden frame is partially recessed into the wall and screwed with mounting brackets.
We recommend reading:
- How can you use old brick in your dacha?
- How to properly fire a new brick stove.
- Expanding a window in a brick house, expert advice.
- How to make a homemade brick machine.
- Which house is better made of timber or brick, video review.
- DIY brick fireplace.
Adviсe
Many owners of summer cottages and private houses who have encountered the process of doing a frame extension with their own hands leave their reviews, share secrets and give useful advice.
Pay attention to the correspondence of materials with the overall structure. If the house is wooden, then it is advisable to also construct the extension from wood
If the house is brick, then when finishing it is better to make brick cladding. Thus, the building will look harmonious. Consult with professionals or summer residents with extensive experience in construction to calculate the future extension. Don't skimp on materials.
From all of the above, it is clear that the construction of a frame extension is possible with your own hands without the involvement of specialists. The main thing is to have basic carpentry skills and a great desire to build.
Timber extension to a wooden house
You can attach the external (and internal) walls of the extension to a wooden house made of timber in the following ways:
- On a block. A block is filled to the flat surface of the wall or onto the evenly cut ends of the log house, having previously laid a tape inter-crown insulation along the connection line. At the ends of the extension beam, a groove is cut to the size of the beam. They connect both walls (old and new) with a tongue-and-groove lock, covering it with another layer of inter-crown insulation.
- On a groove cut in a wooden facade. If you need to attach the wall of an extension to a log house in the middle of the facade, then there is no point in filling the embedded block - there will be large gaps between it and the “wavy” wall. In this case, a groove is cut on the facade along the width of the beam and they are connected through tape insulation.
In both cases, next to the connection node, the timber must be connected to each other with dowels - so that the wall settles equally in height, and the crowns do not diverge due to the difference in friction force in different parts of the node.
Video description
And the next video shows the first part of the work on the reconstruction of the same house, which talks about the preparation - laying the foundation. The interesting thing here is that the extension is larger than the main building:
There is a third way - connecting the facade and the wall of the extension with brackets. To thermally insulate the joint, tape insulation is placed in it and covered with a flashing. After the end of the active phase of shrinkage (at least a year), the stripping and staples are removed, the joint is caulked again, the staples are driven in again and again covered with the stripping.
How to attach the stand and bottom trim
Work on the construction of the veranda frame begins after the foundation concrete (if used) has gained some strength. 50% of the calculated value is enough, and this at a temperature of +20° C will happen in 4-5 days. Then, on top of the concrete, in those places where the posts or trim will be attached, two layers of waterproofing are laid. It can be roofing felt, roofing felt, folded in half. You can coat it twice with bitumen mastic or use other modern materials.
Then there are two ways:
- secure the racks and then the harness;
- first the strapping, there are stands for them.
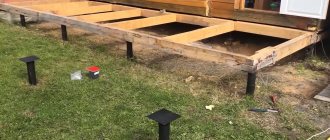
If the first option is chosen, special holders are inserted into the foundation when pouring. These can be different devices (see photo), but the most convenient is a metal plate in the form of an inverted letter “P”, to the bottom of which a pin is welded, which is walled up in the foundation. A stand is inserted into this plate (the end must be treated with an antiseptic), its level is checked, and secured with bolts or nails.
How to attach posts to the foundation
After all the posts have been positioned and secured, the framing bars are nailed between them.
With the second option, the situation is different: the racks will have to be attached to the harness. The strapping beam is attached first. It is more convenient to do this if studs are embedded into the concrete at some intervals. Then holes are made in the beam in the right places, it is put on studs and secured with bolts. Then, using one of the methods suggested in the photo, the racks are installed.
Options for attaching racks to strapping beams
Any of these methods does not exclude the use of metal corners. They make the fastening more reliable, which is very important in this case. After all, the racks will support the roof, as well as the walls or fence.
Extension to a brick house
Most often, the timber wall of an extension is attached to a facade made of bricks or building blocks through an additional beam with a cut groove. In essence, the method is similar to the principle of connecting to a wooden wall “in a groove”. In principle, you can use installation on a block, but it is more difficult to secure it directly to the facade with anchors, and if you use corners, they will interfere with the “sliding” of the wall made of timber during shrinkage.
The groove connection is effective in any case - both in terms of tightness and strength of engagement. And the thermal insulation of the junction of the timber extension to the brick house is provided with the same inter-crown insulation.
The groove in the brick facade is made from profiled wooden beamsSource kayabaparts.ru
Installing window frames: step-by-step instructions
Diagram of a window on the veranda.
On the veranda, the window sill board is installed at a height of about 50 cm from the floor - this is lower than in a residential building. The space that remains between the window sill and the bottom trim must be covered with wood panels or covered with clapboard. The veranda is sheathed on the outside.
2dfcd3f0d66561831d540b84a561ddeb.jpe
025357c09ffa5921a295cba794212ab9.jpe
Window frames are installed between the window sill board and the top trim. The space that remains between the door and adjacent posts should be sewn up tightly. You can also make narrow bindings. The presence of narrow or wide frames and the dimensions of the windows on the veranda attached to a brick house determine the future appearance of the terrace from the outside.
In the extension, it is recommended to alternate windows with opening and fixed sashes. Single frames are sufficient, because... The veranda attached to the house is a summer and unheated room.
Window blocks are installed in the following order:
- the prepared block is inserted into the opening and fixed in the corners of the opening using wooden wedges;
- the window frame is attached with nails in several places;
- the gaps are filled with dry tow about ¾, and the remaining quarter is filled with tow soaked in a gypsum solution;
- Caulked gaps between the wall and the installed window frames are closed with wooden trim.
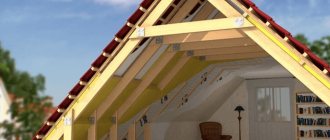
Roof
There are no special features when constructing the roof of the extension. Typically this is either a pitched or gable roof. The rafter system of both types is the simplest and the main difficulty is to ensure the tightness of the junction.
If the roof is adjacent to the facade, then the manufacturer of any roofing materials in the installation instructions describes almost all possible combinations of nodes abutting other surfaces, regardless of their materials.
If the roof of the extension continues the slope of the roof of the house, then everything depends on the height of the facade. In the simplest case, with the same slope of two sections, you will have to “build up” the rafter legs on this side. A more complex option is to change the slope angle (like a sloping roof). But even in this case, the roofing technology is standard.
This is what a broken roof slope looks like from the side of the extension. Source imo.ru.net
If the house and the extension are “covered” with one roof (as happens when reconstructing a building), then a common rafter system is installed with one contour of the mauerlat or top frame.
The working process
The process of building a brick veranda is a traumatic undertaking if you do not adhere to safety measures. Check the integrity of the tools, put on gloves. Masonry is carried out from floors or scaffolds, which are installed on a clean, flat surface. Prepare stepladders with a secure base and boards for transitions between recesses. If you have a helmet and mask, then it is better not to neglect them. Personal health is more important than mild inconvenience.
Pouring the foundation
The foundation is built on the same level as the housing
This is important, since otherwise you will need additional tightening tools. The brick veranda proposed in this instruction will be small; use a foundation made of pillars, since it is installed without reference to the foundation of the house:
- We dig holes 1 m deep, at the same level as the house.
- Crushed stone and sand are poured into the recess in layers.
- We pour the concrete base and insert brick support pillars. The top of the pillars should be equal to the height of the base of the house.
The first step is to pour the foundation.
If there is a need to build a long veranda, we build a strip foundation:
- Dig a trench.
- The formwork is installed a little higher than previously required.
- Pour the concrete. From time to time it needs to be moistened with water, otherwise cracks will appear.
This is useful: practical advice on pouring a foundation for a veranda.
Wall forcing
Before forcing out the walls, be sure to make sure that the base of the veranda is even. Waterproof the floor, after which you can begin laying out the walls:
- Stretch horizontal ropes along the base of the foundation. They are a kind of level for evenness of brick laying.
- Lay out the main brick course. There is insulation on it and then another row of bricks.
- Don't forget to measure and leave compartments for the door and windows. Install concrete lintels in them.
- When you reach the last brick row, stir the reinforced concrete belt. Install a metal mesh and fill it with concrete. The belt will prevent cracks from forming in the walls.
- Allow time for the belt to dry.
- Secure temporary roof rafters.
Correct roof
What material the roof will be built from is up to you to choose. But usually they choose the same one for the roof that was used for the house to which the veranda is attached
Please note that the process of constructing a roof can be simplified. Special coatings are sold in roll form in stores.
They are very easy to fix in any position.
Step by step process:
- Build a sheathing horizontally from wooden boards. Laying the boards depends entirely on the materials chosen. They are laid out either tightly or at intervals.
- Choose the angle of the cover. This is necessary for proper drainage of natural precipitation.
- Lay the rolls on the crate.
- Nail the rolls to the boards. To securely fix the rolls, unroll them carefully. Don't leave any uneven spots.
- At the edges, bend the roof over the sheathing by 10 cm.
- Secure the edges. If your rolled sheets are made of metal, then use nails specific for this.
- Don't forget to overlap the covering.
Window installation
Installing windows and doors is the final stage of building a brick veranda. Before you start work, remember that we fix all joints, as well as openings, tightly. The absence of drafts and drops of moisture on the veranda will depend on this.
Follow the following algorithm of actions:
- Consider what size your window frames will be. When choosing large frames, there may be problems with waterproofing and the passage of cold air flows from the street.
- To construct window sills, place the board in the window opening.
- Cover the lower space between the wooden board and the trim with clapboard or other convenient material.
- The frame is installed between the bottom board and the top of the garter.
As a decoration, you can carry out cosmetic finishing of the outer part of the gazebo. Twisted plants outside and landscaping the room inside will also have a good effect on the appearance of the extension.
Options for connecting the base of the extension to the main structure
To make the foundation of an extension, you need to know two options for connecting it to the foundation of the main structure.
The joints of the foundation of a house are designed in two ways:
- Rigid connection with reinforcement.
- Expansion joint.
How to make a foundation with a rigid connection of bases?
Rigid connections are often used on soils that are not subject to heaving.
Rigid connection is used mainly in low-rise construction, where the extension is functionally connected to the main structure, being under the same roof with it. To make the base for the extension, a hole is drilled in it with a diameter equal to the diameter of the reinforcement and a depth equal to about 35 of its diameters. Next, reinforcement is driven into it with an outlet of the same length. If the extension is carried out according to a scheme where the estimated length of the reinforcement is greater than the width of the foundation, then the holes in the foundation of the main structure are made part of the width, and the reinforcement is mounted according to the principle of an anchor, with a wedging liner at the end.
In a closed loop, the holes are drilled in a staggered pattern at two levels, and the reinforcement used has an anchor wedge at one end and a welded washer at the other end. The amount of reinforcement, its pitch and diameter are calculated based on the conditions of its least resistance to shearing and crushing of the concrete underneath it. On average, a closed contour of a new foundation will require 20 rods per square meter of foundation. They are cut using an emery machine or grinder. With an open contour, the number of reinforcement bars is calculated separately in each case and depends on the width of the future foundation.
A rigid connection is used when the recessed strip base of the house and extension is made of monolithic reinforced concrete, and with a shallow type of foundation, the base and foundation form a single monolithic structure. and plinths do not provide a reliable connection, and with a columnar foundation, a rigid connection is possible provided that the height of the monolithic grillage is sufficient for installing anchors. A slab foundation allows for a rigid connection provided that there is a protrusion from the base no less than the thickness of the slab. In this option, you can expose the reinforcement frame of the house and connect it (weld, tie) with the reinforcement frame of the extension. A house with a basement can be connected to a basement-free extension with a rigid coupling if the base of the main building and the recessed walls are monolithic. Using an expansion joint
An example of an expansion joint.
Expansion joints are more often used in multi-storey residential and industrial construction, where under a long structure in different parts of it, the soils differ significantly in deformation characteristics and, under the same loads, settlements can differ significantly. Such seams are used for different number of storeys in different parts of the structure, thus giving different loads and different settlement deformations. Another case of using expansion joints is when another structure is attached closely to an existing structure. In the above options, expansion joints should be provided at the design stage. It is often easier and cheaper to use expansion joints in heaving soil.
An expansion joint is an insulation material placed in the gap between walls and basement floors, without adhesion to structures. Often simple tow is used as such insulation. The junction is enclosed with a decorative overlay attached only to the wall of the house. In heaving soil, when using an expansion joint, the floor level of the extension is placed below the floor level of the main structure by the amount of expected deformations.
The filler is removed from the expansion joint area to a sufficient depth for laying the sealant.
What you should consider to make a foundation for an extension using an expansion joint:
- the gap between the bases of the extension and the main structure should be about 5 cm. To comply with this requirement, before making the foundation of the extension, boards covered with waterproofing are applied to the base of the house. They will play the role of an expansion joint in the future;
- for a small one-story extension, the thickness of the expansion joint can be 2 cm;
- the seam can also be filled with thermal insulation material (foam or polystyrene foam is best) and sealed with weather-resistant sealant. From the outside it is closed with a decorative overlay.
Hard connection
This method is used in the following cases:
- on non-heaving and slightly heaving soils;
- if there is a shallow strip foundation, the base part of which forms a single whole with it;
- when the shrinkage of the building is predictable;
- when building an extension of several floors under one roof with the main house.
Where to start connecting tape samples:
- A ditch is dug to the required size. A layer of sand is poured onto the bottom to ensure stability.
- Holes are drilled in the foundation. Each next row is drilled offset from the previous one.
- Metal rods with a longitudinal slot at the end are driven into the holes, into which wedging wooden inserts are inserted.
- Using protruding sections of reinforcement, the foundation for the extension is formed.
- After the frame is ready, concrete is poured.
- Further work can continue only after the structure has settled. This standard is observed for all filling options.
A slab foundation is connected in this way only if its thickness is more than 400 mm. The possibility remains the same when the slab protrudes beyond the base of the house. The protrusion must be more than 300 mm. The reinforcement is stripped and welded to the metal frame of the base of the extension. Such protrusions are often found in buildings made of foam blocks.
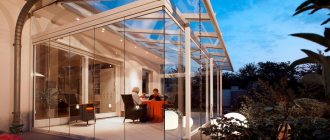
Terrace design
Among the 2021 terrace house design trends is to decorate your terrace as a living room, so you need to choose beautiful textiles. Plenty of pillows for the outdoors, rugs, a blanket for cooler evenings, and a stretched canvas over the table near the brick wall for privacy. Hanging rattan chairs on the terrace are fashionable.
Absolute chic, monochrome decor that matches perfectly with the very trendy concrete terrace highlighting the pool. Mobile lanterns are beautiful and practical, they decorate the space without getting in the way, since you can move them as you wish.
For terraces in 2021, large flower pots, standing planters, terracotta flowerpots, designer planters are used: there is something for every taste, every size and, above all, plants (palm trees, succulents, cacti in irresistible containers).
Interior arrangement of the veranda
The last final stage is the interior arrangement of the room. When creating its design, the general wishes of the owners, the size of the extension, and the general style of the house are taken into account. With the right approach, this part of the house can be made as comfortable and cozy as possible. As finishing materials, preference should be given to wear-resistant materials. If the room will be heated, you can paste wallpaper on the walls, paint them or cover them with wall panels.
Laminate, linoleum, parquet boards are laid on the floor. When arranging furniture, it is not recommended to clutter up the free space. It is better to place it near blank walls. It is practical to use folding furniture in such rooms - it will help save free space.
In conclusion, I would like to note that an attached veranda can give owners additional living space. Here you can organize a wonderful recreation area. By decorating the windows with beautiful plants, you will turn the extension into a beautiful and cozy part of your home.