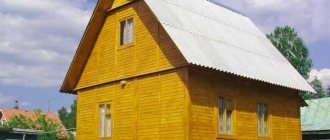
Over time, owners of private country houses and cottages with year-round use are faced with the need to increase the usable area of their home. For example, one of the reasons may be the birth of a child or simply the desire for space, since the available area is too small. In this case, a frame extension seems to be one of the best solutions. The features of the construction of such a structure and the procedure for its legalization will be discussed in this short article.
How to make a frame extension to a brick or wooden house?
To build with your own hands, you will need some set of tools. The figure below shows a typical version of such a set.
Necessary tools for building a house
It is also advisable to have at least one assistant, since some work cannot be done alone, and working with someone is always more fun.
What's next?
At the final stage, lamps are installed inside the premises, contact connections are covered with switches and sockets, making sure to check the functionality of the system.
If the extension is intended for winter living, install heating radiators and connect them to the general heating system of the house or make an individual one
Taps are attached to the supplied water supply and plumbing fixtures are installed in the right places.
If the extension includes a bathroom or other rooms with high levels of humidity, take care of their reliable waterproofing.
Don’t forget about exterior work, which does not end with finishing the façade. The final stage may include installing a canopy, concreting steps or installing a wooden staircase, pouring a blind area and finishing decor.
To ensure that the extension fits in organically, read How to plan a plot of 10 acres?
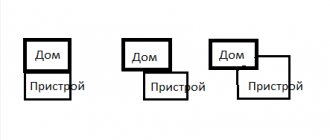
Pairing with the main house
Interfacing the frame extension with the main house
Regardless of the quality of the foundation, due to the difference in the magnitude of the load that the cottage and the extension exert on the ground, there is still a possibility that over time they will move relative to each other. For this reason, experts strongly do not recommend a rigid type of connection between an extension and an old house; it is more advisable to use a connection similar in principle to a tongue-and-groove connection. To install it, you need to fasten two beams to the wall of a permanent building, and install a vertical beam between them, which is an element of the frame wall of the extension. This type of connection will ensure leveling of mutual movements. Of course, you can use a metal frame instead of wood, then all the embedded elements will also be metal. Or you need to use a bolt-on hinge.
However, the connection of the extension is not limited to just the walls; it is also important to connect the two roofs correctly. To do this, the rafters need to be connected at one end to the top frame frame, and at the other end, they need to be fastened to the rafter system of the roof of the old house. The sheathing under the roof is mounted in such a way that the junction of the old and new roof is between the elements of the sheathing.
As a roofing material, it is necessary to use only one that has a certain degree of flexibility, for example, soft tiles or corrugated sheets with a wave height of no more than 10 mm. But slate or ceramic tiles are no longer suitable for these purposes.
Veranda or terrace?
It is these two buildings that are most often erected near the house as an extension. A terrace is usually called an open structure that has restrictions around the perimeter.
A veranda is an enclosed space. It can be used to equip any room. And therefore this option is more preferable for many cottage owners.
After all, you can even install a stove or fireplace on the veranda. And then this room will be warm even in the winter season. In addition, this room can be used as a reception room.
Step-by-step instruction
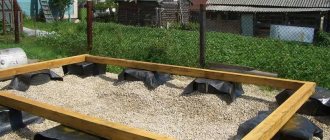
Foundation installation
Scheme of options for a columnar foundation for a frame
The first stage of construction is foundation work. Usually, a separate foundation is arranged for an extension, which must be connected to the base of the old house using special embedded reinforcement.
Strip foundation reinforcement scheme
Of course, the most preferable option is the common foundation laid at the stage of construction of the first house, however, few of our compatriots look that far, which, however, in everyday life is quite understandable and understandable. When laying a new foundation, it is necessary to ensure maximum identity not only in shape, but also in the depth of both structures.
Diagram of the floor arrangement of a frame house
If it is impossible to achieve full solidity, then a so-called expansion joint must be left between the two foundations so that when the soil moves in the spring, cracks do not form on the walls of the extension and at the very foundation.
Installation of strapping beam
Strapping is the second stage of building an extension. The thickness of the frame walls is usually 20 cm. Living rooms are rarely placed in extensions, which makes it possible to reduce the wall thickness to 10 cm. Therefore, the diameter of the timber for piping and the cross-section of the vertical posts will also be 10 cm.
Installation of strapping beam
The figure below shows a possible installation diagram for the lower trim of the extension:
Frame installation
Frame installation
When assembling the frame, the greatest attention should be paid to fastening the racks. The figure below explains its features.
It is recommended to make the step between the vertical posts 60 cm, then there will be no difficulties when laying mineral insulation slabs. Accordingly, the distance between the floor joists and the rafters should also be taken as 60 cm.
Installation of the top trim and installation of floor beams
Installation of the upper trim and installation of floor beams
The fastening of the upper trim is carried out according to the same principle as the lower one. The side view is shown in the figure below.
Ceiling cladding and insulation
The ceiling, like the walls inside, is best covered with clapboard. This is the most favorable option from a price and aesthetic point of view. Pine eurolining will last at least 30 years, and even more with proper care. To insulate the ceiling, in order to save money, you can use expanded clay, pouring it on top in a layer of 10–12 cm.
Assembling the rafter system
Assembling the rafter system
A possible installation option for the rafter system is shown in the figure below:
Roof sheathing
Sheathing the roof
The process of attaching the roofing material does not differ in any nuances, except for one thing: the upper part of the sheets should be under the roofing material of the main building. To do this, you may need to remove some of the fasteners. An approximate diagram of the roofing “pie” is shown in the figure below.
An original solution to the expansion issue - the adjustment goes under the house with stas_ssp
Almost in real time you can watch a most interesting experiment, the likes of which have never been seen on the forum before.
stas_sspForumHouse Member
There is a one-story frame-modular house with an area of 72 m². Our family has grown, and there is no longer enough space. It was decided to increase the area, but not by adding an upper floor, but rather by adding a lower floor and raising the house to the required height of this extension. Since the house stands on a pile foundation, it was decided to dismantle the base and dig a pit for the installation of a monolithic slab. And then rest the jacks on this slab to lift the house.
All discussion participants who were interested in Topicstarter’s original approach to solving the housing problem agreed that “the problem is interesting.” The main difficulty is not to destroy the house during the lifting process, since even a strong gust of wind can turn the house into a pile of firewood. But the eyes are afraid, but the hands do.
Foundation - in addition to the insulated monolithic slab, there will be an insulated blind area and an insulated base, so there will be no problems with the piles concreted into it. The load from the modular floor will be transferred to the slab by walls made of expanded clay concrete blocks.
Walls - several rows are laid out under load-bearing walls, the house is jacked up, the next few rows are laid out, the house is jacked up, and so on until the finish. At the moment, “the process has begun.”
stas_ssp
The house was raised about a meter from the level of the slab, all the piles were cut off, and the laying of the first rows began. We lay out three rows, install jacks, carefully lift the house, and lay “columns” of blocks under the floor beams. To insure against slippage from the jacks and distortion, we are thinking of installing strut stands at the corners. There is already experience when the ohm deviated from the design axes, now the verticality of the rise is the main cause for concern.
As of the 26th of this month, the construction site looks like this.
The professionals who joined the discussion estimate the lifting and construction time to be approximately fifteen days, with a normal crew of four people. So it will be possible to find out how the most important stage of this extraordinary reconstruction will end in the foreseeable future. The topic is called “Raising the house by 3 meters and building a new floor at the 0.000 mark.”
Wall “pie”: characteristics
Wall “pie”: characteristics
The ultimate goal of any construction work is the creation of a durable structure, in which living will be comfortable and cozy. The quality of the wall “pie” has the most direct and decisive influence on achieving this goal. When insulating the walls of a frame house or extension, you need to remember that properly installed vapor and wind insulation is the key to long service without loss of performance characteristics of any type of insulation. If you forget about this, the insulation will very quickly absorb moisture from the environment and become unusable.
If we consider the layers of the wall “pie” from the inside of the frame extension, then they should go in this order:
1. Internal lining,
2. Air gap (10–20 mm),
3. Vapor barrier,
4. A layer of insulation,
5. Windproofing,
6. Exterior finishing.
Traditional roofing felt or glassine can be used as wind protection.
The second option is more preferable, since it does not deform when exposed to high ambient temperatures. When installing vapor barrier membrane materials, you need to place their smooth surface towards the thermal insulation layer, and the fleecy surface towards the room. The fibers prevent condensation from forming on them, which prevents excessive wetting of the insulation.
Useful tips
Before making a high-quality frame extension to a wooden house, you need to learn more about the process itself. We will tell you some tips from professionals who have already experienced all the difficulties of construction themselves:
- It is necessary to carry out work with wooden elements in the cold season. This will reduce shrinkage time.
- Many people, when buying wooden beams in a store, assume that they have already undergone all the necessary processing. Often this is not the case, and the wood needs to be treated yourself.
- The height of the foundation of the extension must correspond to the height of the foundation of the house.
- It is important to monitor the location of the joints on the roof so that rainwater does not leak into the room through the cracks in the roof.
- When working with laminated veneer lumber, you need to allow time for the structure to settle. Only after this can you continue working.
- The foundation is installed to a depth equal to the depth of soil freezing.
- The wood must be allowed to dry before treatment (coating with paint or antiseptic agents).
It is imperative to treat with an antibacterial agent, especially if this is a frame extension made to a log house. It is also important to remember about fire-resistant treatment, which helps prevent fire.
To preserve the frame building from corrosion, it is recommended to use minimal metal fasteners. They can be replaced with galvanized elements.
Features of insulation
Features of insulation
Insulation of a building is one of the most important factors for a comfortable stay in it in the future. In fact, all the nuances concerning the insulation of a frame extension completely coincide with the insulation features of full-fledged houses built using frame technology. For insulation, you can use a variety of materials, both traditional and more modern: ecowool, sawdust, basalt mineral slabs, extruded polystyrene foam and much more. From the point of view of speed and ease of installation work, perhaps, mineral slab insulation is optimal. Such insulation must be tightly laid between the frame racks in several layers, but without kinks or pinches, which over time can lead to the formation of “cold bridges.” An important feature during the work is the need to shift the joints between the slabs relative to each other in adjacent layers. This principle must be observed not only when insulating walls, but also ceilings and floors.
Advantages of frame-type buildings
A frame-type wing attached to a house can be budget or expensive: it all depends on the chosen material for construction and insulation, the presence and number of assistants and other nuances.
A frame-type extension will cost much less than completing a house with bricks or other blocks
Their main advantages:
- The design, assembled with strict adherence to all technologies, is very reliable and has a relatively long service life .
- A properly insulated extension is in no way inferior to a brick or monolithic structure heat and sound insulation characteristics
- You can assemble such an extension knowing all the nuances of the technology.
- The design is quite simple to assemble.
- Frame construction technology is inherently very flexible and allows you to make extensions of any size and shape . The main thing is that in the end the structure harmoniously combines with the house.
- The final structure is quite light and does not shrink .
The materials from which the structure is built can be reused after its disassembly
In addition, the extension can be disassembled at any time and moved to another location, and reassembled there again if the need arises.
Possible mistakes
Completing and redesigning an existing structure is always more difficult than building from scratch, so it is worth once again paying attention to possible errors in the process of constructing a frame extension.
The first and main thing is that many inexperienced builders rely on factory processing of all lumber. However, this is incorrect; before assembly, all frame elements must be thoroughly dried and treated with fire-retardant impregnations. Window frames and doors must be installed strictly level and secured to already installed vertical posts, that is, the dimensions of all openings must be specified
Nuances regarding construction work
Once the home owner has completely resolved the legal issues, he will be able to begin organizing the process of building an extension. Of course, it is better to turn to professionals who can quickly complete the work without making any mistakes.
But if a person is interested in building an extension on his own, then this issue must be approached thoroughly.
You must first draw up a project, select building materials and decide what design the building will have.
After all, it should complement the main structure. Therefore, it is better to familiarize yourself with photo examples in advance.
How to legalize an extension to a house?
Construction of a frame house in section
When all the construction work on the construction of a frame extension is completed, many of our compatriots begin to think about the need to legitimize the resulting masterpiece of architecture. However, it is better to think about this before starting work, since the process of legalizing an unauthorized structure is a little more complicated, you will have to go to court, and besides, the result may not be in favor of the plaintiff and then you will have to demolish all the resulting beauty, and at your own expense. Of course, you can avoid going through the circles of bureaucratic hell and leave everything as it is, but this will entail the impossibility of selling, renting, bequeathing or donating the entire house, and not just an extension.
When applying to the courts, you will need a whole set of various documents, among which the most important are the following:
- Certificate of ownership of the land plot;
- Certificate of ownership of a residential building (dacha);
- Certificate from the BTI;
- Permission from the housing and communal services organization;
- An extract from the house register about the number of registered citizens in the residential building;
- Frame extension plan;
- House project;
- Control shooting of the extension on a scale of 1:500;
- Consent of neighbors if the extension borders their site;
- Epidemiological service report.
In some cases, you may need a photo of the site, residential premises and an extension to it.
The preparation of a statement of claim must be taken with full responsibility, since the process may be lost due to errors made in it. Most courts will provide you with an application form and help you fill it out.
After filing a claim, you need to wait for a response, which should be sent by mail. To make sure that the application has been accepted, you can call back after 10 working days and clarify the information. It should be borne in mind that judges have only 2 legal reasons for rejecting a claim: the presence of a court decision regarding the legalization of a given building or an incorrectly drawn up claim document. In the second option, you must submit a second application.
The municipality will become the defendant during the court hearing, and the owner of the house to which the extension has been made will, accordingly, be the plaintiff. If the court makes a decision in favor of the plaintiff, he will need to receive a payment receipt from Rosregistration for payment of the state duty and make the payment, after which the owner will be issued all the necessary documents legitimizing the unauthorized construction.
As for other financial expenses, approximately 10,000 rubles will be spent on collecting all the necessary information (consultations with lawyers, etc.), the price of the state duty is currently 500 rubles, 20,000 rubles costs an entry in the Urban Development Cadastre, about 60,000 more rubles will be required by specialists for forensic construction and technical examination. Thus, in addition to direct construction costs, about 100,000 rubles will be needed for all bureaucratic delays.
When an extension begins with documents - a story from resideent
A private house is not always the property of one owner; initially it may be a share.
resideentFORUMHOUSE Member
I would like to share my experience of building an extension to a multi-family house. There is a residential building for four families, each with its own isolated part with solid walls and exits to its own separate plot. The house was brick; each house had a screen veranda attached to it; only I had this veranda preserved in its original form; the neighbors had long since demolished them and expanded their areas with the help of new extensions.
The dilapidated load-bearing structures of the veranda, whose age was approaching the turn of forty years, became a strong argument in favor of demolition and construction of a new capital extension in its place. And the first step on this path was the settlement of all legal issues.
- By agreement of the parties, they formalized the division of the house into parts, not shares.
- I took written permission for the reconstruction from the neighbors, in order to avoid possible difficulties in the future.
- Within a year, without haste, I received permission (approval) for the reconstruction: in architecture, they asked for consent from the neighbors.
And with the approval of local authorities, with a calm soul, he began construction of the extension.
The foundation is an insulated monolithic slab (EPS, 150 mm), with a water-heated floor line. The adhesion of the slab to the main foundation (MZFL) through an expansion joint. As filling and at the same time permanent formwork - EPPS, 50 mm thick. Before pouring, they laid a drainage pipe along the outside of the house and a storm sewer pipe with storm water inlets.
The walls are the main construction material, gas blocks, 300 mm thick, with an eye to insulation and a ventilated façade. The partition and future cold balcony are a block 200 mm thick.
The roof is pitched. Flooring: wooden beams 100×200 mm supported at three points; rafters 50×200 mm; roofing, soft tiles (with a ventilation gap and membrane for further insulation).
The construction took a month, the budget was about 900 thousand rubles, with a total extension area of 50 m² (including the porch).
In winter, the extension came with a sealed circuit (windows, doors) and working heating - warm floors, plus two panel radiators.
The positive temperature in the room allowed us to begin interior decoration. The building survived the first winter without cracks or other problems, and by the second it arrived in a state of complete readiness for the first, habitable floor and with an insulated attic.
You can find out about the current state of affairs in the author's thread.
Installation of doors and windows
Considering that the areas for these structural elements were previously planned in the extension, installation will not be difficult. The windows are mounted on seats and fixed to the wall with self-tapping screws. The free space is filled with polyurethane foam.
Doors can be installed without a frame: this function will be performed by the vertical and horizontal posts that were used during marking. The door leaf is hung on hinges, the remaining gaps are closed with slats of a suitable size.
Floor arrangement
Smaller cross-section bars are installed to the bottom of the horizontal beams attached to the foundation of the extension. A rough floor made of boards is laid on top. Then the subfloor is covered with a waterproofing film and vapor barrier.
Insulation is laid on top. For these purposes, it is better to use expanded clay stone or polystyrene foam; it can be insulated with mineral wool. A second layer of vapor barrier is laid on top of the insulation. The resulting pie is covered with a layer of plywood, which will serve as the basis for laying the final floor covering of the frame extension.
Frame installation
The construction of the frame is also carried out in accordance with certain rules. At the initial stage, a horizontal beam is installed, which will serve as the basis for the entire structure. The beam is mounted directly on the foundation. To do this, holes are drilled in the concrete and dowels are driven in for the fastening element.
After this, vertical racks are installed. A beam is also used here, which is attached to the wall of the house and the horizontal base at the corners of the extension. The connection is made with self-tapping screws; the racks can be reinforced with a metal corner. The height of the horizontal pillars is selected so that the extension can be placed under a common roof with the house.
At the stage of installing the frame, the location of window and door openings is thought out. In these areas, additional bars are installed, which are fastened to the basic elements of the extension. When the frame is installed, it is better to immediately cover it with boards or moisture-resistant plywood. This will give the frame structure additional rigidity, which will significantly simplify the subsequent stages of construction.