A gazebo attached to the house is an interesting solution, from an economic and territorial point of view, that can help you create an excellent place to relax. The design of the building allows you to save on both material and square meters of area - you will not need to additionally arrange the landscape in the area.
Designer extension
An extension to a house requires less building material and less space on the site. For small cottages this is a great idea for a gazebo.
This article will look at various types of extensions from which you can get ideas for your own construction.
I will share my own experience of building such a gazebo at the dacha: my father decided to implement this solution on his site. A review with photographs will be presented towards the end of the publication.
Advantages of a gazebo attached to the house
To understand why articles on how to attach a gazebo to a house or country house are so popular, let’s consider the advantages of such structures.
Convenience of a summer canopy at the dacha
Direct communication with the main residential building is the most important advantage of the extension. To sit in a comfortable gazebo with a cup of coffee, you don’t need to go out into the rain. There is also no need to build a covered platform across the entire yard or lay a path that will remain dry even in severe bad weather.
A gazebo in the country, attached to the house, allows you to relax in the fresh air right in your slippers and pajamas without the risk of getting dirty. And you won’t need to carry snacks to a separate building.
Ease of use is also reflected in ease of cleaning. And in the event of a rainstorm, bringing furniture or food into the house will be much faster and easier.
It is better to attach the gazebo to a wall with a kitchen window or direct access from the kitchen.
Compactness
Compactness is also an advantage. For example, a gazebo with a pitched roof attached to a house takes up much less space on the site than a separate structure. To save the most space, you can calculate how and where it is best to make an extension to the house, which side to turn it on and what to combine it with.
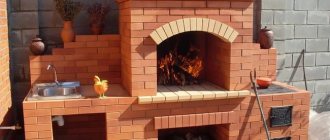
A gazebo with a barbecue attached to a house or cottage will help replace a summer kitchen and a terrace for traditional barbecues.
What designs of gazebos with barbecues and barbecues exist are indicated in this article. What a drawing of a wooden gazebo looks like is detailed in this article
What a drawing of a gazebo with dimensions looks like is detailed in this article here: https://2gazon.ru/postroiki/besedki/osobennosti-proektirovaniya-sostavlenie-chertezha-s-razmerami.html
Saving
The final price of adding a gazebo to the house is significantly less than the cost of a separate structure.
- firstly , less materials are needed for the foundation, frame, and glazing;
- secondly , construction takes less time and requires less effort.
In addition, if you figure out how to make a gazebo attached to the house, you can do all the work yourself.
Multifunctionality of terraces
Multifunctionality and variability are also among the advantages of a gazebo attached to the house. In the photos on the Internet you can see a wide variety of options for arranging such spaces - from a summer dining room with transparent windows to a workshop or even an additional guest bedroom. This continuation of the house belongs to the closed type of gazebo.
Some also manage to combine such a gazebo with a garage when a room is added to the side.
Recently, combined extensions with several rooms have become very popular . Thus, a house with an attached bathhouse and gazebo is very convenient for everyday use. For a year-round bathhouse or summer cottage, an open structure under a canopy or roof is preferable.
You will find all the information about projects for gazebos with barbecues in this material.
Varieties
There are several main types of gazebo extensions:
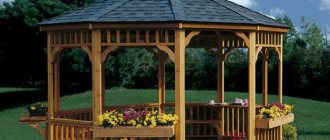
- Open. There are no walls in this structure, only supports and a roof. It is relatively inexpensive, provides a large amount of fresh air, but is not suitable for use in bad weather. The shape can be classic, that is, rectangular or oval, or non-standard, for example, going around the corner of the house.
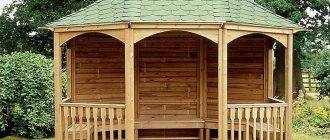
- Closed. This gazebo has walls, so you can sit in it during a rainstorm or strong wind. Windows and doors can open or slide. Insulated structures are suitable for use in winter and can be combined with a greenhouse. Such gazebos are much more expensive than open ones.
- With barbecue. The central role in this design is played by a brick grill. Such a gazebo should be spacious enough so that vacationers do not have to sit next to the stove. It is important to take care of the correct location of the pipe so that smoke does not flow towards the house.
The extension can be open.
In addition to the main ones, there are many combined and atypical types of structures.
Types of country outbuildings
All types of gazebos attached to the house differ according to several criteria:
- type of construction (open under roof, partially glazed, fully glazed, with blank walls);
- location (in front of the cottage, behind, on the side or corner, covering 2 sides of the facade);
- functionality (the presence or absence of additional elements such as a fireplace or barbecue, which require certain conditions).
What gazebos made of profile pipes and polycarbonate look like is detailed in the article.
It’s quite simple to learn how gazebos with brick barbecues are made; you just have to read this article.
What is the price of a gazebo made of laminated timber, you can find out here:
Area
Construction begins with site preparation, at this stage the following actions are performed:
- clear the area, removing vegetation and debris. If the canopy is intended to protect a resting place or barbecue, fine grass is left;
- particularly prominent mounds and depressions are cut off or filled in, respectively;
- if the area under the canopy is supposed to be concreted, covered with crushed stone or covered with paving slabs, cut off the top layer of soil to a depth of 10 - 15 cm. It contains plant seeds, they would break through the covering;
- carry out markings, noting the location of the supports. The number of supports and the pitch between them are determined by calculation at the design stage. As a result of marking, the outline of a rectangle should appear on the ground. To make sure that the figure is drawn without distortions (due to its large dimensions this is quite likely), measure the lengths of the diagonals: for a rectangle they are equal;
- in the places where the supports are installed, excavations are made with a depth exceeding the soil freezing mark by 10 - 15 cm. If the depth is less, the frozen soil will squeeze out the posts in winter (the force of frost heaving).
Materials
The most common and profitable option in all respects are wooden gazebos attached to the house. They are easy to design, light in weight, and can be of any configuration. And their cost is low.
Making such an extension with your own hands is also quite simple if you know the technology.
Caring for wood with modern impregnations is limited only to treating all structural elements with special compounds to protect against moisture and pests.
Metal or concrete piles are used for the foundation. It is better to choose a light roof - from ondulin or metal tiles.
Wooden construction will ensure a comfortable stay
We advise you to choose the most environmentally friendly, natural material for construction - wood. A wooden building will be cheaper, and purchasing wood is easy. In a wooden gazebo you will feel comfortable and cozy. But wood also has its drawbacks. Firstly, wood is highly flammable. It is necessary to protect yourself from fire. In addition, it is susceptible to fungi and mold.
This is due to the appearance of profile pipes. Installation of such a building is carried out using welding. It is impossible not to mention country houses made of stone - brick, cinder blocks. And finally, summer structures of a combined type. In their construction, combinations of different materials are used, for example, stone and metal, stone and wood. As for the roofing material, choose it according to your desire, and also based on the amount of money you planned to invest. You can choose:
- slate,
- metal tiles, flexible or ceramic tiles,
- corrugated sheets,
- roofing felt,
- polycarbonate
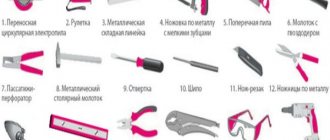
The tools you'll need most are
- different types of hammers, axe, wood saw, pliers,
- construction level,
- nails, screws, angles,
- other modern power tools, if you have them.
How to add: continuation of the wall
Saving money, the desire to do it “right” or just a love of construction - there can be many reasons to take on the manufacture and installation of an extension yourself. The main thing is to clearly understand the technology and correctly perform all stages.
Like any construction project, it all starts with a design for a gazebo attached to the house. This point is especially important if the design is supposed to be complex in shape and large in size. And financial savings will not be possible without accurate preliminary calculations of the amount of material.
Find out how to build a terrace for your house here.
Base structure
If the house is just being built, you can build a gazebo on a common foundation, but there are reasons not to do this.
So, the extension will be lighter than the main building, and it simply does not need such a powerful foundation. And load distribution also plays a role. The best option is a pile or columnar foundation. Waterproofing is required between the piles and the floor sheathing.
Frame installation
Wooden support pillars are installed on the piles, which are connected by beams using metal corners. If glazing is planned, you need to mark and install ceilings for it in advance. The optimal height of the railing is up to 1 meter.
Installation of a pitched roof
The roof is most often single-pitched and is attached to the wall of the house by a support beam. First, a rafter system made of massive beams is installed and secured, forming a solid structure.
The roofing covering (slate, ondulin) is mounted on a wooden sheathing in increments of 30 cm. For other materials (fused and clay tiles), special base preparation systems are provided.
Preparatory steps
First you need to choose what material the gazebo will be made from. Let's consider popular options:
- Stone or brick. Most often used for closed structures. Strong and durable material, but retains heat worse than wood. Resistant to moisture and fire.
- Tree. Both open and closed structures are made from it. The material holds heat well, is beautiful and environmentally friendly, but it is also flammable and susceptible to rotting. It is often used for semi-closed gazebos: the lower part of the walls is completely covered with boards, and instead of windows there is a thin sheathing on top.
- Metal. Typically used as structural supports. Such a gazebo can be minimalistic or decorated with forged elements. In closed gazebos, polycarbonate or glass is usually attached to steel profiles.
As roofing materials, you can use corrugated sheets, metal tiles, corrugated slate or polycarbonate.
It is desirable that the material of the gazebo be in harmony with that from which the house itself is made, but this is not a necessary condition.
For example, consider the construction of a closed wooden gazebo covered with corrugated sheets.
Tools you will need:
- drill;
- saw;
- chisel;
- plane;
- hammer;
- building level and tape measure;
- concrete mixture for the foundation;
- screws, nails, anchor bolts, corners.
Create a drawing
First of all, you need to create a drawing of the future structure. The dimensions of the gazebo should approximately correspond to the size of the family. It is advisable that each person have at least 4 square meters. m. Recommended height is at least 2 m.
Don't forget to make a drawing before construction
Consider the soil type: the foundation in clay or fine-grained sandy soil should be deeper than in loam or boulder-pebble soil.
Consider the shape and type of structure, determine whether it will have walls, doors and glazed windows, and how much decorative sheathing there will be.
Based on these data, calculate the required amount of material.
Glazing and finishing for closed type
The decision to glaze the gazebo may be influenced by rain regularly flooding the extension or by the leeward side not taken into account during construction, which remains open. Also, such an improvement is necessary if you want to use the space not only in summer.
Both glass itself and lighter polycarbonate are suitable as materials. To illustrate such glazing, you can find photos of polycarbonate gazebos attached to a house or country house. This option is modern, inexpensive and easy to use.
For a large glazing area (for example, if a gazebo has no railings, only support posts), a classic metal-plastic double-glazed window is often ordered. Similar ones are used for panoramic decoration of balconies and loggias.
The cheaper option is to glaze only the upper horizontal part of the wall, and cover the lower part with wooden panels. It is advisable to minimize the number of blind windows in order to make the gazebo open again at any time. Removable glazing will greatly simplify seasonal operation. This is especially true for private homes with permanent residence.
Which building style should you choose?
Choosing the most suitable style of gazebo can be difficult. When selecting a project, the following are taken into account:
- Purpose of the building.
- Allotted budget.
- Registration of other buildings on the site.
The material for the gazebo is selected taking into account how long it can last. Brick, concrete and natural stone last much longer, but wood is cheaper and, if properly processed, retains its basic properties over a long period.
Shapes of gazebos for summer cottages
The most important criterion for choosing a project is the shape of the structure. It could be as follows:
- The most common is the square or rectangular option, as they are easy to construct.
- A polygonal shape is chosen if the structure will have a large area.
- The most difficult project to implement involves the creation of a structure of a round or semicircular shape.
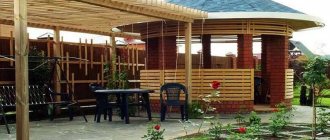
We are building a veranda
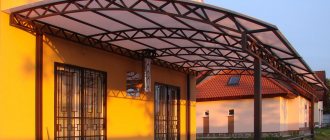
Building a veranda from polycarbonate with your own hands is much easier, cheaper and faster than from any other material. But first, you should have a clear idea of what you will use this room for. So, from a veranda you can make not only a place for rest and leisure, but also a functional dressing room. Attach it to the entrance to the house, and it will be much warmer even in the harshest winter. If you love plants, you can turn your veranda into a greenhouse or even a winter garden. Then, of course, an additional ventilation system will be required, which must be taken into account in the project.
Important: The area of the room must be more than 12 m². If you make it smaller, the veranda will be too tiny and uncomfortable; it will be difficult to clean it and accommodate the necessary furniture.
Polycarbonate is mounted on a pre-prepared frame. For its construction, you can use wooden beams with a large cross-section or rolled metal (steel or aluminum). It is very important to organize the correct roof slope - it should be at least 30°. The slope is calculated individually for each climate zone and depends on the amount of seasonal precipitation, wind load and other factors. This information is presented in more detail in the relevant SNiP.
Foundation for a greenhouse
As we said earlier, polycarbonate is lightweight, so it is not at all necessary to lay a powerful, expensive foundation to build from it. In this case, a lightweight (shallow-depth) strip, column or pile option is suitable. When choosing a foundation, consider not only the weight and dimensions of the future veranda, but also its purpose. For example, if you plan to place heavy furniture or many potted plants inside, this will put additional stress on the base.
What types of foundations are suitable for a veranda:
- Slab - for large and heavy verandas. The most expensive option, however, it provides a level base and guarantees the durability of the structure.
- Shallow tape is the most common solution. Even an inexperienced builder can make such a foundation. The only materials you will need are crushed stone, cement, sand and formwork boards.
- A columnar foundation is more suitable for open or small closed verandas.
- Pile is the most common type of foundation in recent times. Installation of piles by professional workers takes only a few hours, after which you can immediately begin installing the frame and covering it with polycarbonate. Thus, the veranda can be made in just 1-2 days.
Let's look at how to arrange a columnar foundation for a small veranda. Support posts can be made of concrete, brick, wood or pipes. The main advantage of this type is that the base is completely autonomous and does not come into contact with the foundation of the house; it can be attached to any side and expanded if necessary, just by adding the required number of pillars.
Progress:
- If you are making poles from pipes, coat them with an anti-corrosion agent before installation; if made of wood, use an antiseptic, plus coat every centimeter with liquid bitumen or mastic.
- Mark the site where the veranda will be built and dig holes around the perimeter. The depth of the pits should correspond to the depth of the main foundation, and the diameter should be slightly larger than the diameter of the pillars.
- Pour 15-20 cm of river sand into the bottom of each hole and compact it thoroughly. Such simple drainage will not allow underground and sedimentary waters to destroy the pillars.
- Install the posts in the holes strictly vertically, checking the position using a building level. If you are making concrete supports, then wooden formwork is first installed in the pits, after which concrete is poured into it. To increase strength, a thick reinforcing rod is placed in the center of each concrete column.
Screw piles are convenient because, depending on the specifics of the landscape, you can adjust their height without additional difficulties, leveling the soil, etc. If your site is on a slope or has hilly terrain, it is better to make a pile foundation than to waste time creating a level area.
Installation of polycarbonate
Glazing of the veranda with polycarbonate can be done both vertically and horizontally on wooden beams or metal profiles. If you are making an open extension, then you only need to install the roof sheathing on the support posts. If you want to cover the veranda with polycarbonate, you will need a sheathing (frame) not only for the roof, but also for the walls. Polycarbonate is a very durable material, but in order for the veranda to last for a long time, it must be properly secured. To do this, the sheathing beams should be installed in increments of 60 to 80 cm, and the support pillars should be located from each other at a distance of 1 to 3 m (depending on the thickness of the sheet and the dimensions of the veranda).
There are two ways to attach polycarbonate to the frame - dry or wet. In the first case, only self-tapping screws and other fasteners are used; in the second, silicone sealant is added to this.
Important: Before installing the polycarbonate sheet, you need to make markings for the fasteners, drill holes with a diameter slightly larger than the self-tapping screw, and only then screw them to the sheathing. Be sure to use protective spacers (thermal washers) to avoid damaging the polycarbonate surface with metal fasteners. Do not overtighten the screw, otherwise a crack will appear in the material, or it will bend and begin to collect moisture in this place. Maintain a distance between fasteners of 30-40 cm. The image below shows how to correctly screw a self-tapping screw into polycarbonate:
How to make a polycarbonate veranda:
- Start installing panels from the left edge of the wall. Leave a small gap of 3-5 mm between adjacent panels - then the sealant will fill it. If you are working with honeycomb panels, lay them vertically and do not overlap the bottom so that condensation can flow freely through the gutters inside the sheet and out. To insulate the bottom end of the panel, use a special perforated tape. It will not allow dust and debris to penetrate inside and will not retain water.
- Before installation, each panel must be glued with a special continuous tape, covering the upper end part so that water, dust or small debris does not get there. Protective strips are also used for this.
- Do not remove the protective film from the polycarbonate until installation work is completed! Position the panels so that the film is located outside the room.
- Make markings for fastening points on the frame and panels. Use self-tapping screws only made of stainless steel, otherwise they will begin to rust after the first rain. To attach monolithic slabs to the frame, use a metal profile or weather-resistant durable adhesive.
- After installing the walls and roof, fill the joints between the sheets with transparent silicone sealant or cover them with decorative strips.
As you can see, the work is not at all difficult and for a successful outcome you just need to understand the features of fastening the sheets. Finally, we invite you to watch an interesting video about assembling a polycarbonate veranda:
Modern
The style of modern gazebos is sharply different from those that we are used to seeing in summer cottages and villages. Fashion is dictated for the most part by European countries with a good climate, where you can put electrical equipment in an open room and, in general, feel quite calm.
I really like the Italian style - light, free and simple. However, in Russian climatic conditions it is almost impossible to implement it.
I won’t go into too much detail about the advantages of such architectural masterpieces, because ultimately it all comes down to whether this option can be implemented in your backyard. If this is possible, then you need to boldly take the idea and use it in construction. And if not, then continue looking for a simpler and more reliable option.
Final stage
Finally, the wooden surface is coated with varnish or paint. Careful processing of structural elements made of natural material should not be neglected, otherwise it will collapse very quickly. For the same purpose, parts adjacent to the foundation should be impregnated with special solutions that prevent the appearance of fungus and rot. It is also better to pre-coat the gazebo with an appropriate primer - this will make the paint or varnish last longer.
Finally, it is worth paying attention to the following. All construction work must be coordinated with the competent authorities
If this is neglected, then in the future there may be a fine and legal problems when selling the house.
Monolithic foundation
The corresponding substrate in its finished form is a single piece that extends under every square meter of the extension. A monolithic foundation is used to contain heavy loads and is erected as follows:
- First you need to prepare the area for the extension - clear and level the soil;
- Next, a 1.5-meter recess is dug, which should protrude 1-1.5 meters beyond the future structure;
- The next step is laying a drainage layer at the bottom of the pit and formwork (covering the soil walls with wooden boards);
- Next comes the installation of the reinforcing frame and its filling with cement mortar.
A monolithic foundation is especially relevant for stationary brick kilns. However, it is enough to erect only a small monolithic slab under the fire source.
Frame or monolith
The choice of building materials and construction technology affect the complexity of the project. In particular, we are talking about the expenditure of effort, money and time. The extension can be:
- Frame - assembled from profiled timber, profile or pipes;
- Monolithic - built from bricks, foam concrete, cinder blocks.
It is recommended to place a bet on the frame, because This technology involves the rapid assembly of a structure from ready-made building materials. Moreover, the finished extension puts less load on the foundation. On the other hand, monolithic analogs are more stable and are necessary if the house itself is brick or cinder block.
Personal experience of DIY construction
I would like to share my personal experience of building a gazebo attached to a house. The project of this building was implemented in the small dacha area of Salovka (Penza region). This is where our dacha is located