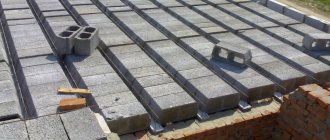
The easiest and fastest way to form a floor between the first floor of a private house and the basement is to lay reinforced concrete slabs. Despite its apparent simplicity, the process actually requires special attention and knowledge of the nuances of the construction operations being carried out. Plus, installation is considered costly because they cannot be installed without a crane. This will require three or four assistants. And you will have to pay for all services. But you can do laying floor slabs on the foundation with your own hands. We will tell you how to do this correctly below.
Rules and technology for installing floor slabs
The whole process can be divided into four stages:
- preparing the horizontal plane of the foundation on which the slab blocks will be laid;
- ceiling installation;
- fastening to the foundation, this process is called anchoring;
- sealing gaps and technological holes.
Preparatory stage
Regardless of what materials the strip foundation was built from, there is always a high probability that its upper horizontal plane has a drop and unevenness. We need to get rid of them. How to do this depends on the magnitude of the difference.
- If this value is small, up to 5 cm, then leveling is carried out with a cement-sand mortar with or without the addition of crushed stone. In this case, the crushed stone must be of a fine fraction. A reinforcing mesh must be placed in the poured layer.
- If the difference is 5-10 cm, then leveling is carried out with bricks.
- If the value is more than 10 cm, then the foundation plane is leveled with a concrete reinforcing belt, which is poured into the installed formwork.
In order not to do all this, you just need to accurately construct the foundation structure. Pay special attention to the horizontal position of the upper plane.
Have you ever laid floor slabs yourself?
Not really
Installation of slabs
Before laying floor slabs on the foundation, you need to understand their layout. There are rosary beads
standards that must be taken into account.
- If a concrete foundation was poured, or it was assembled from foundation blocks, then the size of the support of the floor slabs on the foundation should not be less than 6 cm.
- If the foundation is a brick structure, then the support should not be less than 12.5 cm.
- The first and last slabs should not be laid on walls that are located along the slab products themselves. Be sure to leave gaps up to 25 cm wide, which will later need to be filled.
Expert opinion
Oleg Grishin
Expert of our site. More than 10 years of experience in foundation work. Implemented dozens of different projects. Helps make our website content interesting and useful
Ask a Question
Important! It is recommended to choose the right crane not only in terms of lifting capacity. The reach of the arrow must be taken into account. It is optimal if the crane works from one point, reaching all parts of the foundation structure.
There are no strict rules in construction SNiPs regarding the presence or absence of a fastening mortar on which the floor is laid. But it's better to use it. Typically, a cement-sand mortar of at least M100 grade is used for this. It is kneaded with sifted sand so that there are no pebbles in it. The latter can cause distortion of the installed concrete products.
The installation rules contain several requirements that must be adhered to:
- The fastening solution is applied with a thickness of 2 cm. A reinforcement frame in the form of a lattice or individual longitudinal rods made of reinforcement with a diameter of 8-12 mm must be placed in it.
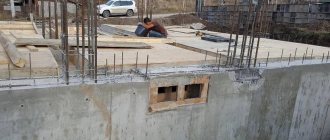
- Since the slabs used in private house construction are hollow products with holes at the ends, it is necessary to seal these holes on both sides before laying them on the foundation. Most often, a thermal insulation material is used for this, for example, mineral wool, which is wrapped in plastic film. After insulation, holes must be sealed with cement mortar.
- Slab products have two sides: one smooth, the other rough. Laying should be done with the smooth side down. It will form the ceiling in the basement. The thing is that concrete products are poured into molds. So the lower plane rests on a smooth metal surface, and the upper plane hardens in air, which is why it has roughness. It should be added that the lower smooth side always works in tension, and the upper side in compression. Therefore, a more powerful reinforcement cage is placed in the lower part than in the upper part.
- The installation sequence is determined by the house design. There are no strict requirements in this regard. But usually they begin to mount from one of the edges of the future structure, laying out the remaining elements in order. If a load-bearing wall rises inside the house, under which a foundation wall is erected, then the slabs should not cover it. That is, the supporting structure should rest on the foundation element, and not on the floor of the house.
- Don't neglect safety precautions. The main thing is to lift the load correctly. There is only one requirement here - the slings of the lifting mechanism must be positioned relative to each other at an angle of no more than 90°. Each plate is attached to the crane hook with four slings. The driver of the special equipment is aware of this, but it must be monitored.
- After installing concrete products on the mortar, you have 10 minutes to correct them. That is, move them closer to each other or align them at the ends. To do this, use crowbars.
Safety precautions
Floor laying can begin only after all builders are familiar with safety precautions.
Before starting installation, it is necessary to familiarize all builders with safety precautions.
First of all, all cranes, lifting mechanisms and other equipment necessary to install the ceiling must be in good working order. Only qualified specialists who have undergone a routine medical examination and are at least 18 years old can lay floors and perform related work.
Workers who lie down without scaffolding must wear non-slip shoes and safety harnesses. Welders and crane operators must undergo appropriate training, after which special certificates are issued. It is prohibited to lift slabs that do not have mounting hinges. Cleaning of structures from dirt is carried out before lifting to the site. It is prohibited for people to remain on equipment and structures while they are being moved. The slabs are placed in an area isolated by special portable fences, i.e. A visible barrier must be installed. Unslinging of structures during loading/loading can only be done after checking for stability, and during installation - only after securing. On scaffolding and scaffolding, you can only assemble, adjust and lay structures. It is impossible to carry out floor installation and other high-altitude work in foggy weather, icy conditions, or thunderstorms.
Installation work on the construction of subsequent tiers of the building is carried out only after the structures of the previous tier have been secured.
Installation of subsequent tiers is carried out only after the structures of the previous one have been secured.
The installation of the ceiling is carried out at height using special equipment, and this must be taken into account during work. Lifting and laying is carried out using a truck crane. The ceiling is laid on the mortar, so within 10-20 minutes the structure can be moved without problems with a crowbar until they take the required position.
It is very important to create the most comfortable conditions during installation. For example, a container with mortar can be raised onto the first installed ceiling, so as not to constantly go down after it. The same solution is used for filling rust. Such seemingly insignificant moments very often take a lot of effort and time and interfere with the productive laying of slabs.
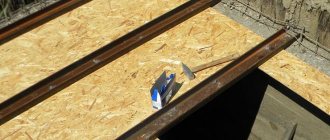
Distance between floor slabs during installation
The cross-section of a reinforced concrete slab is a trapezoid. Therefore, from the basement side there will remain a fairly wide
gap. It will need to be filled with cement mortar. But in order to reduce the consumption of cement-sand mixture, it is necessary to lay the floor slabs correctly, namely closer to each other. The maximum possible distance between them is 2 cm. There is no need to delay sealing the seam. They quickly fill with garbage, which will be difficult to remove.
How to fill the gap correctly:
- Place the board on supports on the basement side.
- You can tie it with wire to reinforcing bars laid across the gap on top of the ceiling.
- Place insulation in the gap, usually using polystyrene foam.
- Pour the prepared mixture.
The gaps between the edges of the foundation and the slab material are filled with concrete mortar, in which fine crushed stone is used. To do this, formwork must be constructed around the entire perimeter of the house. You can seal it with bricks or wall blocks made of different types of concrete. To do this, piece wall material is laid with one edge on the foundation, the other on the laid slabs.
It is the second option that is used more often today, because brickwork can be converted directly into raising the wall. This reduces the time it takes to build the walls of the house. In addition, pouring concrete into formwork, that is, the first option, is a process with drying of the solution, which can last up to a month. After which it can be loaded with wall materials. That is, this method takes longer.
Primary requirements
In the process of manufacturing floor slabs for heating mains and trays, standards must be used that detail the recommended tests for the material regarding :
- Strength, reliability, homogeneity and resistance of concrete at low temperatures.
- Waterproof and compression.
- Compliance with the declared quantity and quality of reinforcement for the manufactured frame.
- Thickness of the concrete block and dimensions according to the project.
- The formation or absence of microcracks that occur during shrinkage of the structure.
If manufactured products do not pass tests under production conditions, they are sent for production revision. The standards governing the production of floors include :
- GOST 12730.4-78;
- TU 5859-001-86780364-2008 (table of trays);
- Series 3.006.1-8 (features of channels and tunnels from tray elements), etc.
The main characteristics regulated for slabs of heating mains and trays must comply with the following indicators :
- Water resistance - more than W4.
- The compressive strength of concrete material is 22.5V and above.
- Frost resistance –
- Indicators of frame steel – class A-I, A-III, including also BP-I.
For factory-made reinforced concrete products, there are mandatory requirements for the presence of markings (letters + numbers), which are applied to each slab. Marked designations indicate the main characteristics and parameters (dimensions, weight), as well as the withstand load per 1 m2 (strength). Additionally, the date of issue, company (firm), as well as a mark on passing technical control are indicated.
Important! Special requirements are imposed on the location of reinforcement in the frame of products, which must be included in the nomenclature. The project also calculates pressure and future loads.
How to properly anchor floor slabs
Laying the slabs is not all. It is necessary to fasten them together, for which a steel round timber with a diameter of 10-12 mm is used. Reinforcement cannot be used, it is hardened, and therefore will not withstand vibration loads, especially the welding area.
- Make holes in the slabs closer to the ends, get to the reinforcement frame.
- Bend its elements located transversely towards each other. That is, from one plate to another.
- Cut rods from round timber so that their length is equal to half the distance between the holes in the two slab elements, plus 20 cm.
- On each rod, bend a 10 cm long end into a hook.
- One rod is hooked onto the reinforcement frame of one slab, the second onto the adjacent one.
- Both rods are joined to each other in the same plane so that their connection occurs with an overlap of 10 cm. Carry out the joining with an interference fit to each other.
- Weld the overlap area using electric welding.
The installation pattern of anchors can be different: crosswise, parallel to each other in the transverse direction, in pairs, individually. If a balcony is planned in the design of a private house, then it would be good to anchor the floor to the balcony. That is, it becomes possible not to connect it with round timber to the foundation.
Video: anchoring floor slabs
Anchoring to the foundation is rarely done. They don’t do this at all if the structure is made of concrete blocks. If the slabs are laid on a brick base, then anchoring will also be difficult. It is optimal if the foundation structure is a concrete strip with a reinforcing frame inside. To do this, even at the stage of pouring the solution, steel embedded parts are attached to the reinforcing mesh or grid. It could be a strip, corner, pipe or even fittings. It is to the mortgages that the anchors are attached.
If the foundation part of the house is built from individual FS concrete blocks, then it is necessary to pour a reinforcing belt over them, which is often called a seismic belt. And it is precisely this that is already anchored. That is, not to the belt itself, but to the reinforced frame that is embedded in it. Here, just as in the previous version, metal parts are laid to which the anchors will subsequently be attached.
Average prices
The cost of floor slabs for trays and heating mains depends on the region of the Russian Federation. So, in the northern regions, Moscow Region and St. Petersburg it will always be higher. The price is also affected by the type of series with the specified load. The higher it is, the more expensive the product will be, since its technical characteristics are improved in the factory.
On average, the most commonly used types of slabs at prices in the Russian Federation look like this :
| No. | Product brand | Cost (in rubles) from… |
| 1. | LK-300-90-45 | 2990 |
| 2. | PNO 160 | 2 452 |
| 3. | Fri 12-12 | 1 600 |
| 4. | P 8-8 | 2990 |
| 5. | VP 19-6 | 3 500 |
| 6. | PTO 150.240.14-6 | 2380 |
The price is also affected by the quality of the material used, place of manufacture, brand and place of production.
Product types
The installation of the ceiling must be approached responsibly. The strength of the structure depends on this.
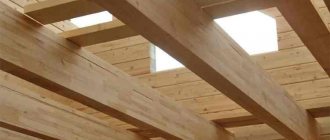
Plates can be flat or ribbed (PKZH). The large-panel reinforced concrete slab has a U-shaped cross-section. They are used in the construction of industrial and technical facilities, under conditions of increased loads and long spans. Stiffening ribs increase load-bearing capacity. In residential construction, they are used to separate the first floor from the basement, since a section of this type does not allow obtaining a flat ceiling.
Flat slabs are produced with voids or with continuous fill (PT). The technical underground slab is used in public buildings to cover channels under the floor. During the construction of private houses, it can be used as an additional element for flooring over small spans of corridors and bathrooms. In residential construction, round hollow-core products are used. They are cheaper, weigh less and are easier to install. Air voids help retain heat better and increase sound insulation. Depending on the production method, they are divided into 2 types.
Round hollow formwork
PCs have been used in private construction for more than 20 years. In production, reusable sized molds (formwork) are used. To reduce the cost of products, formwork of standard parameters is used. The price of a product made in individual sizes will be much more expensive. The thickness of the slab is 220 mm. Depending on the width and length, there are options as shown in the table:
| Parameter | Index |
| Width, m | 1,0 |
| 1,2 | |
| 1,5 | |
| 1,8 | |
| Length, m | From 2.7 to 9 in increments of 0.3 |
Continuous production
PB - manufactured using new technology on a continuous conveyor, then cut. They have a smoother surface, which greatly simplifies further finishing. Made from stronger concrete. At the customer's request, the length can be any, with an accuracy of 10 mm. It is possible to cut the end side of the product at an angle. The only drawback is the width, it is standard - 1.2 m.
How to divide monolithic reinforced concrete panels into parts
When performing installation activities, it becomes necessary to reduce the length of the standard panel. To complete the task, you can use a regular grinder with a diamond wheel designed for cutting concrete. You will also need a disc for cutting steel reinforcement, a sledgehammer and a crowbar.
Carry out work on cutting slabs according to the following algorithm:
- Mark the required panel size with chalk.
- Place a backing along the markings to protect the concrete from chipping.
- Cut the reinforced concrete slab along the chalk line.
- Apply blows with a sledgehammer to the top plane and end surfaces.
After the unnecessary piece of slab settles under its own weight, perform the following operations:
First, a cut is made with a grinder on the upper surface of the slab along the marked line
- Use a crowbar to break through the bottom of the concrete panel.
- Use a grinder to cut the reinforcement using a metal disc.
Following the given sequence of operations, it is easy to cut the panel along the longitudinal axis. In this case, using a grinder with a metal circle, you will have to cut the metal mesh used to strengthen the slabs.