Why is the project needed?
The main purpose of the project is to determine the calculated data on the load characteristics of the network.
The main purpose of a typical electrical project in a private house is to determine the calculated data on the load characteristics of the internal network. In this case, the individual characteristics of the country house or two-story cottage being built are taken into account. According to the legislation of the Russian Federation, a project for connecting electricity to a private house will not be required if the power consumption declared by its owner does not exceed 15 kW (taking into account what is already available).
When submitting an application to Energosbyt for a standard technological connection, it is enough to provide a calculation of the total power consumption and a single-line diagram of the local power supply. However, some regional representatives of energy supply companies indicate in the agreement the need to prepare an electrical design. In this case, it is assumed that it necessarily contains a wiring diagram indicating specific consumers and exact data on the metering device.
Common Design Mistakes
A common mistake is the use of aluminum wires.
The desire to save money often forces owners of private houses under construction or reconstruction to independently develop an electrical wiring project. However, behind the apparent simplicity of this work lies a sufficient number of problems, ignoring which leads to errors that can disrupt the normal operation of the home electrical network. In this case, residents may suffer electric shock, and in some cases, electrical wiring may catch fire.
When designing an electrical wiring diagram in a private home, the contractor needs to avoid repeating common mistakes:
- the use of materials and components without marking, often not certified for use in the country;
- use of cable and wire products with conductive conductors made of aluminum;
- inclusion in the project estimate of sockets not intended for connecting electric stoves, electric boilers, water heaters, etc.;
- introducing into the electrical wiring project of a wooden house the laying of wires in a closed way;
- switching power cables in one distribution box with low-power lines;
- using twisted wire connections instead of special terminals;
- location of distribution boxes at human height.
It is prohibited to ground electrical appliances on metal pipes: sewer, gas, water, etc.
Typical power supply project for a private house
Single-line power supply diagram
The power supply project for a private house includes the following mandatory documents:
- Single-line electrical diagram (including distribution panel).
- A house plan indicating the locations of equipment, as well as a diagram of the location of sockets and lighting fixtures.
- Diagram of outlets outside the house, arranged for the purpose of connecting external devices or external outbuildings.
- Calculation data for the grounding loop.
- Plan for organizing a lightning protection device.
- Specification for protective and control equipment (hardware).
- Permits confirming the legality of the work performed by the design organization selected by the contractor.
The last sample working document is required if approval of the project with the energy supply organization is required.
Electrical installation work in a cottage
After examination and approval of the project in the appropriate authorities, you can begin electrical installation work in the cottage, which it is advisable to entrust to employees of specialized companies that have an electrical laboratory at their disposal to carry out control measurements and the necessary measurements when putting the facility into operation. Our company is ready to offer you a full range of electrical installation work in a cottage, which will be much cheaper and faster when performing the entire scope of work on a turnkey basis.
Order a power supply project for your future building from us +7 (499) 390-9416
Requirements for a private home power supply project
Layout plan for a country house
Before preparing a project for a country house, for example, you will first need to obtain specifications for its development from Energosbyt. They spell out the entire list of issues related to the arrangement of electrical wiring. The following items are required to be included:
- Wiring plan for a country house.
- Type and installation location of the distribution panel.
- List of installed equipment, including electricity meter and circuit breakers.
- Breakdown of consumers into groups and other issues.
The specifications also stipulate the power allocated to this facility (no more than 15 kW).
It is necessary to prepare a statement of balance sheet ownership, in which all attention is focused on delimiting the areas of responsibility of the supplying organization and the private consumer. It is drawn up in the form of an agreement concluded between two interested parties and approved after agreement.
The presence of this document allows you to:
- distribute the responsibilities of each party for servicing “their” section of the electrical network;
- have a clear idea of who is responsible for repairs if the supply line (power cable, for example) is damaged;
- connect new facilities to existing and existing electrical networks.
If it is not possible to immediately establish the boundary of responsibility, it is chosen along the perimeter of the outer wall of a private house or land occupied by the owner. With mutual agreement of the parties, other delimitation options are allowed.
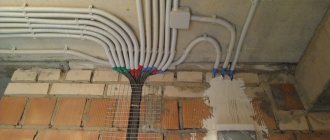
What are the features of electrical wiring in monolithic houses?
Installation or repair of electrical wiring in monolithic walls is slightly different from conventional electrical wiring. There is a lot of preparatory work involved: laying a shaft for the wires, gating surfaces, punching holes in the monolith (which, as is known, has high strength and hardness).
Grooving a monolithic surface is a rather complex and labor-intensive task, hence the usually high cost of such work in monolithic houses. It should also be noted that when drilling concrete there is always a lot of dust generated. Therefore, the work is carried out with a “grinder” or a wall cutter with an industrial vacuum cleaner, which reduces the amount of dust during gating.
The presence of reinforcement in the walls can add great complexity to builders. Often, in order to make a hole for a wire to pass from one room to another, it is necessary to drill several times, because the drill rests and hits the reinforcement.
There are quite a lot of nuances of laying wires in a monolithic wall, but for professionals familiar with this work there will be no problems.
House electrical circuit diagram
Connecting a SIP to a house
The diagram for connecting a house to a single-phase electrical network takes into account the following mandatory points:
- The cable or the SIP wire that replaces it is connected directly to the switchboard buses through an electric meter.
- After it, each power supply group must be connected through its “own” linear automatic device, pre-calculated based on the current setting.
- The working zero and protective wire of each linear group, unlike the phase conductors, should not be switched.
The neutral core “breaks” like a phase only if there is an RCD in the linear branch, which can be placed both on one group and on their combination. Next, the wires from the group circuit breaker are laid towards the distribution boxes. From them, electrical wiring is routed to end consumers (power sockets and lights with switches).
When preparing an electrical project, the structure of the building must be taken into account, on which the chosen method of laying wires depends.
In houses with a large number of rooms, when drawing up an electrical wiring diagram, the following are taken into account:
- when designing, it is convenient to divide consumers into separate groups: one for each room and for service annexes;
- in the example of a power supply project for a private house, separate branches with a circuit breaker are taken into account, designed to protect a washing machine or oven;
- When preparing design data, the requirement of uniform distribution of loads across groups is observed: due to the significant number of consumers, they often load the network unequally.
Taking into account all these recommendations, you can move on to the practical part of the project.
Electrical input and wiring installation
Protective devices are mounted in the input distribution panel, which is usually installed in a cottage in a frost-free room. Electrical wiring from all groups and an input cable from the street are also supplied there.
Inputting electricity into the house
In some cases, the electrical panel is divided into two - input and distribution. The first with a switch, meter and general RCD is installed outside, and the second with everything else inside the building. This will make it easier for inspectors to take readings. However, then the outdoor shield and the devices in it must be highly protected from moisture, which significantly increases their cost.
If the installation of electrical wiring in a cottage can be done independently, then the input cable is connected only by electricians from the network company. Moreover, they will do this only after checking the metering device and grounding system, as well as drawing up all the necessary reports.
By air
The easiest and cheapest way to install an air inlet is to install it. To do this, a self-supporting insulated wire (self-supporting insulated wire) or its usual steel analogue is thrown from the nearest power line support. However, this option of connecting the home electrical network to the village one is not always possible to implement due to regulatory restrictions on the distance from a residential building to a pole.
Requirements for electrical wires
Overhead cable:
- It's cheap and quick to install.
- It doesn't look very aesthetically pleasing.
- Can be torn off over time (for example by wind or crane).
- Limits the ability for large construction equipment to enter the site.
If the distance from the house to the pole is more than 20 meters, then you will have to install another support. Otherwise, the cable may break under its own weight. And these are additional costs.
Underground electrical wiring installation
The bushing laid in the ground is more reliable and less susceptible to precipitation. Such a cable is laid at a depth of about 0.8–1 meters in a protective pipe made of plastic or steel.
Pipes and structures for underground electrical wiring
This option involves excavating and making a hole in the foundation or wall. It is more difficult to install and time-consuming. However, the probability of a break in such an input power line is lower, and its service life is longer than that of its overhead counterpart.
Necessary calculations for underground electricity supply
Electrical network design
External wiring is laid in cable ducts.
Based on the considered diagram for a private house, when preparing a detailed design for an electrical network, you will need to calculate the required number of groups and then distribute consumers. In addition, it is important to decide on how to install the line and calculate the possible load on all devices connected to it.
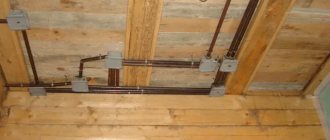
Choosing a mounting method
Preparatory procedures begin with choosing the method in which the electrical wiring is supposed to be laid. For a private house made of timber, for example, the most suitable is the external laying, in which it stretches along the surface of the walls. If desired, it can be hidden in pre-prepared plastic cable channels.
Hidden installation has to be resorted to in private houses built from brick, foam blocks and similar non-combustible materials.
Total load calculation
At the next stage of work, it is necessary to calculate the total load falling on all consumers connected to the network, which is very important for their subsequent breakdown into groups. To do this, you need to understand the number of devices and the maximum power consumed by each of them. The easiest way to find out this indicator is from the passport that is attached to any of the household products.
By summing up all the indicators and obtaining the total power consumed by all connected loads, it is possible to find out the maximum current in the circuit. To calculate it, you should use the practically derived relationship, according to which a power of 1 kW at a voltage of 220 Volts corresponds to a current of 4.5 Amperes.
Distribution of loads by groups
Distribution of electrical load in the house
The breakdown of consumers is carried out taking into account the fact that the total power of one group of lines of sockets and lighting devices should not exceed 16 Amperes. Based on this requirement, it is necessary to distribute the existing loads into separate groups.
To connect and service powerful loads like an electric furnace, you will need to install a machine with a rating of 25 Amperes in the consumer group.
Distribution into groups is made taking into account their distribution among rooms and depends on the power of a particular load. The PUE recommends separating group lighting lines from power outlets, which is important for buildings with a large number of rooms.
Wiring selection
Before independently laying electrical wiring in a private house, you must carefully calculate the cross-section of its constituent conductors. The durability and fire safety of the entire power supply system depends on the correctness of this procedure.
According to clause 7.1.34 of the PUE, since 2001, only copper cables and wires have been allowed to be used in wooden residential buildings and other buildings.
The cross-section of the conductors should be selected taking into account the load found by calculation on all types of group lines. To avoid unnecessary calculations and simplify the choice of this indicator, we usually proceed from the rated current of the group circuit breakers.
The type of wiring installation (closed or open) must also be taken into account, since for conductors laid in different ways, the conditions for heat removal will be different. In both cases, for group lighting lines the cross-section is selected to be no more than 1.5 mm square, and for power (socket) lines - no less than 2.5 square mm. mm.
Typical electrical wiring diagrams
When developing design documentation for electrical wiring for a private home, designers recommend using standard wiring diagrams for different types of premises. All these circuits have the same structure, which is based on dividing the wiring into a number of circuits, with each of them connected to a separate machine.
Kitchen wiring diagram
The peculiarity of electrical wiring in the kitchen is characterized by the presence of a large number of fairly powerful electrical appliances, for which it is advisable to allocate separate lines with their own circuit breakers. The main task of the designer in this case is the optimal location of sockets - they must be placed next to electrical appliances, providing for the possibility of free access to them for repairs or for rearranging/turning off household appliances. In this case, the diagram needs to show not only the location of electrical appliances, but also the arrangement of kitchen furniture.
Garage/basement wiring diagram
When starting to develop a wiring diagram for the garage, you need to determine the number of sockets, switches and sockets and specify their locations.
For example, it is better to install sockets at a height of 1 m, and switches at a height of 1.5 m from the floor level. Distribution boxes are usually placed under the ceiling at a distance of no more than 20 cm from it. Quite often the garage is also used by the owner as a workshop. Therefore, when routing wires, it is necessary to provide for the possibility of connecting a power tool, compressor, or even metal or woodworking machines. This is only possible if there is a three-phase power supply. Depending on what network is connected to the garage, the wiring diagram also depends. In this case, circuit breakers must be installed on the distribution board for each group of wires and an RCD.
Considering the high humidity in basements and the garage inspection pit, experts recommend using safe lamps rated for 12 V when organizing lighting in them. To connect the wiring leading to such lamps, you will need a step-down transformer.
General layout of electrical wiring in the house
In some cases, before drawing up a wiring diagram, it is recommended to develop a preliminary diagram listing all the devices expected to be installed in the house. Such a diagram will make it easier to count the total number of lines connected to the distribution board and the total number of circuit breakers and RCDs. It also indicates the type of power supply network, which allows you to select the appropriate cable, type of protection device and model of the electric meter.
The explanatory note to the plan indicates that the input device and electric meter are installed on one of the external walls of the house, and the general electrical distribution panel is located in the corridor or in a separate room, for example, in a nearby garage. In order not to create maintenance difficulties later, in houses with 2 or 3 floors, it is recommended to provide intermediate electrical distribution panels connected to a common switchboard on each of them.
An electrical plan for a small one-story house is being developed in a similar way.
Wiring diagram
Based on pre-compiled plan diagrams, you can develop a general wiring diagram, using which you can easily calculate the required number of switches and sockets and additional equipment and materials, as well as the footage of cable and wire products.
Develop an installation diagram using a copy of the house plan, which indicates:
- power line entry point;
- installation locations of the electrical panel, junction boxes, electrical appliances, sockets, switches and lighting lamps.
If the house is supposed to install high-power electrical appliances, they also need to be shown on the diagram, since the power supply for them must be supplied through separate lines.
Inputting a power line into a house
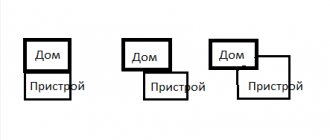
If the design of a private house includes separate outbuildings, the wiring in them also needs to be shown on the wiring diagram.
To facilitate the procedure of counting the required number of cables and wires, it is better to draw the connecting lines of each circuit in a different color.
It is also recommended to designate current-carrying conductors of the same cross-section in the same color on the plan. This will simplify the determination of the range of required cable and wire products and simplify the process of its installation.
Country electrical installation: basic electrical safety
If you assemble the electrical wiring diagram for your dacha yourself, you should take care of your personal safety yourself. Before starting installation operations you should:
- de-energize the work area, make sure that accidental power supply is excluded;
- check screwdrivers and pliers for quality of insulation of handles;
- wear shoes with rubber soles;
- make sure that there are no water spills in the work area;
- Using indicator and measuring electrical devices, make sure there is no voltage.
Having finished assembling the wiring diagram on your own, it makes sense to invite a professional electrician for additional control. It will measure the grounding and insulation resistance and help verify the correctness, quality and safety of the assembled electrical network.